

I really wish they made a 6 mm bullet dropper. I've tried using a 6.5 mm and experimenting with the little bearings. Using two or using two 6.5 bearings and then a 223 bearing. Just wasn't reliable enough to use all the time.I am not dropping bullets, I will place them on by hand.
- Thread starter padom
- Start date
You are using an out of date browser. It may not display this or other websites correctly.
You should upgrade or use an alternative browser.
You should upgrade or use an alternative browser.
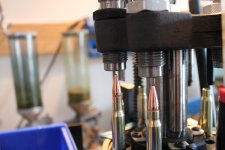
I started using the Dillon carbide.223 sizing die on my 1050. A light spray of Dillon lube and it feels like sizing 9mm. Cranked through over a 1000 rounds in a little over an hour.
The difference in fatigue factor is nice.
I size and prime on tool head number one. Then trim brass on the giraud.
Processed brass is then loaded in tool head -2.
Armonov powder funnel, Redding competition seating die and Dillon crimp die.
The difference in fatigue factor is nice.
I size and prime on tool head number one. Then trim brass on the giraud.
Processed brass is then loaded in tool head -2.
Armonov powder funnel, Redding competition seating die and Dillon crimp die.
Hello, Needing some help.
I have. Dillon 1100 for 5.56. I using a Redding seat die with the micrometer. I can load 55gn hoser ammo just fine but started to load 77gn Sierra Match Kings and the bullet is hitting the seat die after the bullet feeder station. I can’t raise the die because I have the micrometer bottomed out. I’m using Ram Shot Tac going for 23.5-24 grains of powder and using an OAL of 2.250. Is there another way to load this longer bullet on an 1100! Thanks in advance for taking the time to
read and respond to my post!
Hello, Needing some help.
I have. Dillon 1100 for 5.56. I using a Redding seat die with the micrometer. I can load 55gn hoser ammo just fine but started to load 77gn Sierra Match Kings and the bullet is hitting the seat die after the bullet feeder station. I can’t raise the die because I have the micrometer bottomed out. I’m using Ram Shot Tac going for 23.5-24 grains of powder and using an OAL of 2.250. Is there another way to load this longer bullet on an 1100! Thanks in advance for taking the time to
read and respond to my post!
I had similar issues on my Super 1050 trying to use sliding sleeve match dies.
Not enough "workspace" for .308 or 30-06. I even tried machining down the sleeve length.
Only match die of that design I can run is .223 but I think the S1050 has more "workspace" than its later iterations.
Interested if someone found a workaround.

I recall adding micrometer seating stems to my standard dies now that I think about it.
It's been so long since I reloaded .308-30/06.
Pretty sure I put a Redding seating stem on either one or both dies.
Not as nice as the sliding insert competition dies but it gave some reference for seating.
It's been so long since I reloaded .308-30/06.
Pretty sure I put a Redding seating stem on either one or both dies.
Not as nice as the sliding insert competition dies but it gave some reference for seating.
Kind of depends if you are trimming with the rapid Trim.
I do an initial size with a Dillon die to knock the primer out and have the ball unscrew any dented necks.
But I only about 80% the first sizing. What percent is a guess. They wouldn’t chamber is the thing.
I use a rapid trim to finish size. The trim die is tight though I only want it set to the point it will allow brass to chamber and even than I have to run a neck die to reopen the necks from the tight RT die.
If not trimming on the S1050 I’d think it could be a one die operation.
Kind of depends if you are trimming with the rapid Trim.
I do an initial size with a Dillon die to knock the primer out and have the ball unscrew any dented necks.
But I only about 80% the first sizing. What percent is a guess. They wouldn’t chamber is the thing.
I use a rapid trim to finish size. The trim die is tight though I only want it set to the point it will allow brass to chamber and even than I have to run a neck die to reopen the necks from the tight RT die.
If not trimming on the S1050 I’d think it could be a one die operation.
This
If not trimming, single die is all you need. If your trimming, I use a MA FL Gold sizing die but also used a Forster FL and Dillon Carbide 223 in the past. This sizes the die 90% or so to get it real close. I then have the FL trim die setup to set final bump and trim to length.... I found, because of the amount of force it took to do 100% sizing in the trim die, the trim length was not 100% consistent. It was close, and acceptable, but not 100%. Took a lot more force to do everything in the trim die.
Press runs so much smoother with the 2 die setup as mentioned above when using an RT1500 trimming on press.. I ALWAYS use a 21st century mandrel right after the trim die to set final neck tension because that trim die sets WAY too much neck tension.....
Thanks. Definitely not trimming on press. I’m experimenting with BRA sizing. So trimming is basically once in the brass lifetime. I don’t mind the separate step there. I’m just looking to save time for the day to day tasks.
When using a separate prep and load stage, does anyone run into issues NOT resizing on station 1 during the load phase? For some reason I thought it was important to have a resizer in place and I don’t have the experience to know one way or the other.
If not resizing in station 1, do you have anything in that station?
If not resizing in station 1, do you have anything in that station?
I have decap in station one. (Mighty Armory with the guide bushing) Clears any leftover tumbling media from the flash hole. It’s not necessary though. I run my size die out in station 2 in brass prep mode with the decap pin removed/retracted. I don’t deal with crimped brass so my swage is backed totally off.
I butchered my Redding comp seating die sleeve to make it work on my 1050 loading 308.I had similar issues on my Super 1050 trying to use sliding sleeve match dies.
Not enough "workspace" for .308 or 30-06. I even tried machining down the sleeve length.
Only match die of that design I can run is .223 but I think the S1050 has more "workspace" than its later iterations.
Interested if someone found a workaround.
Attachments
I butchered my Redding comp seating die sleeve to make it work on my 1050 loading 308.
What I did to get 300prc going on the 650
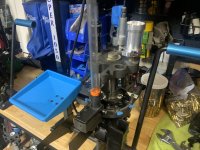
I have set up separate tool heads for two different 1050 machines for .223 / 5.56. Both have Forcht autodrives. I have been running a Mighty Armory spring loaded decapper in #2 and a Might Armory FLHS sizer in #3. The sizer die is set up to provide -.003 using the Whidden head space gauge. This machine is normally run at 1600 rds / hr for .223 and 2400 rph for 9mm. Swapping tool heads in super easy since no swager or primer.Got the linkage torn apart last night. Today i Cleaned the bearings and linkages up. Soaked the bearings in mineral spirits, blew out with air, dried and repacked with red tacky grease as per Dillon instruction.
Put the linkage back together, red tacky on all parts except oil on main shaft and case feed slide. Looks and feels like new.
Just waiting on my parts order from Dillon to arrive to put the rest back together.
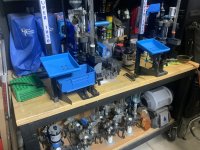
Started setting up my 2 brass prep and loading 5.56 toolheads. So far I have a Mighty Armory Gold FL sizing/decapping die in station 1. Dillon Carbide Trim Die with RT1500 trimmer in station 3 and a Lyman M Die in station 4.... I think that will do it for my brass processing toolhead.
In my loading toolhead I have a Mighty Armory Blue automated press decapping die in station 1 to knock anything out of primer pocket in case any media stuck in there, powder drop in station 3, Mr. Bulletfeeder bullet die in station 4, Forster Ultra Micrometer seating die in station 5 and a Dillon crimp die in station 6 to just close the slight flare from the M Die...
How's everyone else setting up there brass processing and loading toolheads for 5.56???
I think with this setup, I should be able to dry tumble my brass, run it through my brass processing toolhead to decap, FL size, swage, trim, flare case mouth then SS wet tumble to get it into a ready to load state without doing any processing manually ( THANK GOD)!
When I'm ready to load, brass is ready to go, just swap in loading toolhead..
From there the brass goes to steel pin, then hot air dry, and to the loading press with no additional lube. I am using a Lyman Type M die in #2, swager stays in #3, primer in #4, Mr. Bullet Feeder in #6, Dillon seater in #7, and Dillon crimp in #8. This machine runs at a nominal rate of 900 rph, BUT I am seeing at least one bullet topple going from the bullet feeder to the seater every 80 to 100 rds. That cuts the effective rate in half.
I have three questions:
1. Since I have been running 55 gr FMJ/BT, the Type M normally provides just enough case mouth flare for bullets to stay in place at #6 making the transition to the seater with only the occasional topple. Switching to 55 gr VMAX with a flat base for a test was a disaster. The flat base bullet toppled at least 50% of the time. (Using my 650 with manual bullet insertion is faster.)
What / how would you recommend to get additional case mouth flare so that the VMAX is stable from #6 to #7?
2. I am using 26.3 gr of H335 which consistently produces 3180 fps in my 18" 5.56 barrel with a TBAC can and a heavybuffers.com heavy buffer and Wolf spring. This is by far the most consistently accurate round I have produced on the 1050. The problem is that after putting on a set of KMS2 tool head lights, I can actually see the small amount of powder slosh as the case moves from the powder measure to the bullet feeder drop. Even with the "slosh" my LabRadar is showing SDs in the 12 to 15 range.
What steps would you recommend to make the transition smoother without the pronounced snap? I have a Delrin ball but am using the standard Dillon spring.
3. Both the FMJ and VMAX have cannelures which the combination of seating depth and amount of crimp produce a very consistent neck tension. When I manually load brass on my Co-Ax, I aim for a neck tension of .004. There seems to be very little measurable difference in accuracy comparing 1050 ammo to Co-Ax ammo in my gas guns. The M mandrel measures .221, and my set of pin gauges shows a .2205 gauge just barely entering suggesting a .0035 net neck tension after spring back from the mandrel.
If I use a thicker mandrel, say .225, will that be sufficient neck expansion to eliminate bullet topple when switching to VMAX?
NOTE: Would it make sense to accomplis the case mouth flare on the prep machine after the MA sizer die? What would be the best set up to accomplish this additional flare?
Mighty Armory 223 expander die works great. No falling off bullets...
In regards to spilling powder I tackled this pretty hard as I had powder all over initially. These upgrades stopped all powder spilling and jerking...
Make sure you order the right shellplate and station tabs for your desired caliber
 www.armanov.com

 www.doublealpha.biz
In regards to spilling powder I tackled this pretty hard as I had powder all over initially. These upgrades stopped all powder spilling and jerking...
Make sure you order the right shellplate and station tabs for your desired caliber
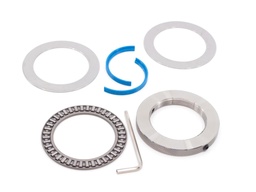
Shellplate Bearing Kit with Low Profile Lock Ring for Dillon Super 1050 / RL1100
Upgrade your Dillon 1050/1100 reloading press with Armanov Shellplate Bearing Kit. Smooth and reliable operation for precision reloading.
www.armanov.com F.W. Arms™ DILLON 1050/1100/CP2000 #3 STATION TAB SET - FW Arms
UNIVERSAL LOCATING TAB SET FOR DILLON 1050, 1100, AND CP2000 STAINLESS STEEL
fwarms.com
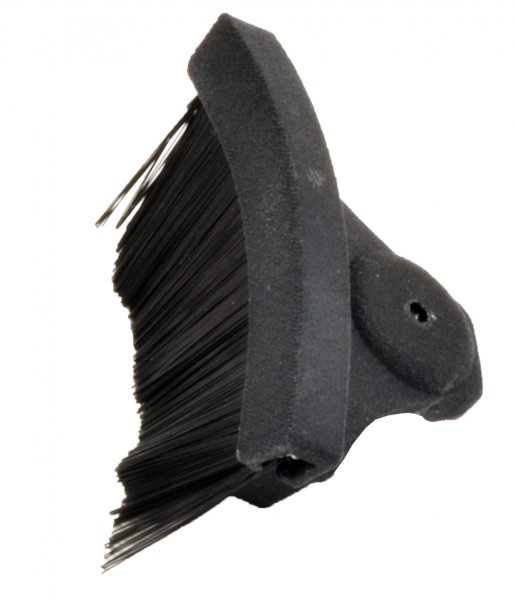
DAA PSP Brush
The DAA Powder-Spill-Prevention (PSP) Brush is a simple yet efficient reloading accessory that solves a real issue: How to prevent small amounts of powder being spilled out of the case, as the tool head of the progressive reloading press indexes?This problem is even more acute for reloade...
Thanks. Great suggestions. Do you put the Mighty Armory expander die in station #2?Mighty Armory 223 expander die works great. No falling off bullets...
What would you think about putting it in station #4 on my 1050 case prep head following MA decapper in station #2 and MA sizer in station #3? (no swager on primer on this press)
Do you use the MA hold down die in station #3 (swager) on your loading press?
Is the DAA PSP Brush still needed if you install the FW station tabs?F.W. Arms™ DILLON 1050/1100/CP2000 #3 STATION TAB SET - FW Arms
UNIVERSAL LOCATING TAB SET FOR DILLON 1050, 1100, AND CP2000 STAINLESS STEELfwarms.com
DAA PSP Brush
The DAA Powder-Spill-Prevention (PSP) Brush is a simple yet efficient reloading accessory that solves a real issue: How to prevent small amounts of powder being spilled out of the case, as the tool head of the progressive reloading press indexes?This problem is even more acute for reloade...
Is the DAA PSP Brush still needed if you install the FW station tabs?
Is it needed....I don't know as I had the brush on before the FW shellplate and tabs.. so when I installed the FW shellplate and tabs, I kept the psp brush on.
The brush helps stabilize the loaded cases during that little snap while the tabs keep the cases moving in a straight path around the stations. I can say, with this combo, I have no spilled powder, it's just super smooth...
I don't know if you watched my videos but here is one loading 9mm with the FW shellplate, tabs and psp brush. No wobble on the cases with dropped powder or spillage... smooth and stable
Is there a link?I don't know if you watched my videos but here is one loading 9mm with the FW shellplate, tabs and psp brush. No wobble on the cases with dropped powder or spillage... smooth and stable
Thanks. Great suggestions. Do you put the Mighty Armory expander die in station #2?
What would you think about putting it in station #4 on my 1050 case prep head following MA decapper in station #2 and MA sizer in station #3? (no swager on primer on this press)
Do you use the MA hold down die in station #3 (swager) on your loading press?
So I run a 2 toolhead setup. I have a 5.56 brass processing toolhead that I use with MA decapper in #2, MA gold 223 sizing die in #3, Dillon carbide FL size trim die with RT1500 trimmer in #5 and 21st Century turning mandrel in #6... I process thousands of pieces at a time with this setup then SS tumble and fill bins of ready to load brass.
I then run a dedicated 5.56 OnPoint Manufacturing CNC loading toolhead (threaded station above priming station).
I run a MA decapper in #2 to ensure clear flash holes, MA flare/expander die in #3, MA hold down die in #4 above primer station, powder drop in #5, Mr.Bulletfeeder in #6, seating die in #7 and crimp in #8
Is there a link?
Above video is essentially my above setup as my 5.56 loading toolhead setup but in 9mm. I don't have a newer video of my dedicated 5.56 1050 with all the mentioned upgrades. I'll have to make a video next time I'm running 5.56.
Here an older video processing 5.56 where I was getting spillage before the mentioned upgrades. You can see the shellplate snap and case wobble in this video before the FW shellplate, station tabs and psp brush. World.of difference.!
Last edited:
Generally thinking along the same lines, but I have some more questions.So I run a 2 toolhead setup. I have a 5.56 brass processing toolhead that I use with MA decapper in #2, MA gold 223 sizing die in #3, Dillon carbide FL size trim die with RT1500 trimmer in #5 and 21st Century turning mandrel in #6... I process thousands of pieces at a time with this setup then SS tumble and fill bins of ready to load brass.
I then run a dedicated 5.56 OnPoint Manufacturing CNC loading toolhead (threaded station above priming station).
I run a MA decapper in #2 to ensure clear flash holes, MA flare/expander die in #3, MA hold down die in #4 above primer station, powder drop in #5, Mr.Bulletfeeder in #6, seating die in #7 and crimp in #8
1. Why do you not use a hold down for the swager in #3?
2. Since you have two open slots after the 21st Century mandrel in #6 to open the neck back up after being squeezed by the trim die, why not put the MA flare/expander in #7 on your prep head? That would allow for a normal hold down die in #3 on your loading plate.
3. Did you have primer seating depth problems before using the MA hold down at #4?
Generally thinking along the same lines, but I have some more questions.
1. Why do you not use a hold down for the swager in #3?
2. Since you have two open slots after the 21st Century mandrel in #6 to open the neck back up after being squeezed by the trim die, why not put the MA flare/expander in #7 on your prep head? That would allow for a normal hold down die in #3 on your loading plate.
3. Did you have primer seating depth problems before using the MA hold down at #4?
I was going off memory. I havent run my 5.56 dedicated 1050 since last fall when I ran off 15k rounds of 5.56 for my AR's. I process brass in big batches and I make ammo in large batches and dont run again until I have a few thousand left...
I just looked, and my brass processing toolhead I run the MA Gold FL Sizing die in #2 that decaps and sizes, and I run the MA hold down die in #3.
On my loading toolhead I dont swage (lower swage pin so its just below the case) I run the MA decapper in #2, then the MA flare in #3 and MA hold down in #4..
I run the hold down in #4 because it makes a big difference for seating depth consistency. Did I have a problem before..no. But I did measure seating depth and it was all over the place. With the hold down above the seating station, seating depth is WAY more consistent. If I can make better ammo, why not. Doesnt always have to be a problem. You can see the shellplate flex/push up on the seating station without a hold down above it. You prevent that with a hold down above the seating station.
I think I understand. Since swaging is done on the brass processing machine with an MA hold down in #3, that same position is open for the MA flare/expander on the loading machine with the hold down on a custom tool head threaded at #4.I was going off memory. I havent run my 5.56 dedicated 1050 since last fall when I ran off 15k rounds of 5.56 for my AR's. I process brass in big batches and I make ammo in large batches and dont run again until I have a few thousand left...
I just looked, and my brass processing toolhead I run the MA Gold FL Sizing die in #2 that decaps and sizes, and I run the MA hold down die in #3.
On my loading toolhead I dont swage (lower swage pin so its just below the case) I run the MA decapper in #2, then the MA flare in #3 and MA hold down in #4..
I run the hold down in #4 because it makes a big difference for seating depth consistency. Did I have a problem before..no. But I did measure seating depth and it was all over the place. With the hold down above the seating station, seating depth is WAY more consistent. If I can make better ammo, why not. Doesnt always have to be a problem. You can see the shellplate flex/push up on the seating station without a hold down above it. You prevent that with a hold down above the seating station.
I'm guessing no lube on any of the brass on the loading machine. Right?
I think I understand. Since swaging is done on the brass processing machine with an MA hold down in #3, that same position is open for the MA flare/expander on the loading machine with the hold down on a custom tool head threaded at #4.
I'm guessing no lube on any of the brass on the loading machine. Right?
Yes, exactly.
No lube at all on brass when running my loading toolhead. No need. Just clean, fully processed ready to load brass into the case feeder.
SUPER 1050 PRIMER PUNCH STICKING
After ordering some parts and stripping down my dedicated 5.56 press, I spent time calibrating all the dies and calibrating the powder charge and primer seating depth. In each batch of 100 I had one or two primers that failed to seat at all.
Looking more closely at both the swager setting and the primer system, I realized I had two different and not totally independent issues. I have ordered the Fast and Friendly Brass small primer swaging rod and the Mighty Armory Hold Down die. Once installed and tuned, I expect to have much more consistent primer pockets. I will provide and update as soon as I put them on the press.
BUT, I also found something totally unexpected with the primer punch. Even after cleaning all the parts (tappet, rocker arm, bushing, spring, and punch), the primer punch would occasionally stick as it was pushed back down by the spring after seating the primer. Occasionally a lot of resistance, mostly very little, but always some. I pulled another primer punch and spring and bushing from a different press dedicated to 9mm. Smoother but still some sticking.
I then put the punch, spring, and bushing from the 5.56 press in the 9mm press. Smooth. Seems the problem must be in the bottom of the recess on the 5.56 machine that the punch drops into. I used different grades of 3M Scotch Brite ultimately getting to maroon 7447 (similar to steel wool #1) to polish the inside of the recess and eliminate the sticking. To do the polishing I cut a strip and put it on a mandrel to reach the bottom.
Does anybody have a similar experience and a better way to go about fixing this issue?
UPDATE: Sticking or binding at the bottom of the primer punch recess returned after only three test cases. My next step was to put calipers on the fat part of the base of the primer punch. 0.374 or 3/8". Since I had a set of carbide drill bits, I put the 3/8" bit into a tap wrench and carefully rotated it into the recess. Sure enough, there were still some burrs. I used the drill bit to remove all the rough spots. Then, I chucked the bit into a portable drill turning the torque setting to the lowest value and the speed setting to the lowest available. The bit extended out the bottom of the recess, Very carefully, I eased on the power trigger and let the drill spin.SUPER 1050 PRIMER PUNCH STICKING - UPDATE
When finished, the primer punch dropped straight through since the rocker arm had been removed. Next step: maroon scotch brite on a mandrel chucked into the drill. First at low speed and then high speed settings to polish out any remaining burrs. After clean up, the rocker arm was re-installed and then the tool head to check the operation of the tappet and smooth return of the primer punch. Then a batch of 5 cases all the way through the cycle, measure, adjust and run a 100. All worked. Next step several thousand.
UPDATE: Sticking or binding at the bottom of the primer punch recess returned after only three test cases. My next step was to put calipers on the fat part of the base of the primer punch. 0.374 or 3/8". Since I had a set of carbide drill bits, I put the 3/8" bit into a tap wrench and carefully rotated it into the recess. Sure enough, there were still some burrs. I used the drill bit to remove all the rough spots. Then, I chucked the bit into a portable drill turning the torque setting to the lowest value and the speed setting to the lowest available. The bit extended out the bottom of the recess, Very carefully, I eased on the power trigger and let the drill spin.
When finished, the primer punch dropped straight through since the rocker arm had been removed. Next step: maroon scotch brite on a mandrel chucked into the drill. First at low speed and then high speed settings to polish out any remaining burrs. After clean up, the rocker arm was re-installed and then the tool head to check the operation of the tappet and smooth return of the primer punch. Then a batch of 5 cases all the way through the cycle, measure, adjust and run a 100. All worked. Next step several thousand.
I would have stopped and called Dillon. They would have made good and replaced anything not in spec. I have never had them say otherwise and been nothing but helpful.
I have none of these issues on both my 1050's.
Several things kept me looking for an on the spot solution:I would have stopped and called Dillon. They would have made good and replaced anything not in spec. I have never had them say otherwise and been nothing but helpful.
I have none of these issues on both my 1050's.
1. Memorial Day weekend. Dillon is great even for self-induced screw-ups, but they are slow.
2. This is my first 1050 which has had a Fortsch AutoDrive since day one - more than 10 years ago.
3. My two sons had a loading business while they were in college. From our records, including purchases of primers and powder from BHSS, up through early 2019 that machine had over 1.1 million rounds on it before going into storage through 2023.
Pretty sure we were out of warranty.
Now that I have cleared up this issue, I have just run 1300 rounds without the primer punch sticking even once. My loading is pretty low key at 2000 to 6000 rds per month, and I am getting better at seeing, hearing, or just feeling that something is not right.
I will never have the amount of experience the kids have when they graduated.
Under other circumstances, I would have cheerfully accepted your advice. Everything you have suggested so far has been great. Thank you.
Several things kept me looking for an on the spot solution:
1. Memorial Day weekend. Dillon is great even for self-induced screw-ups, but they are slow.
2. This is my first 1050 which has had a Fortsch AutoDrive since day one - more than 10 years ago.
3. My two sons had a loading business while they were in college. From our records, including purchases of primers and powder from BHSS, up through early 2019 that machine had over 1.1 million rounds on it before going into storage through 2023.
Pretty sure we were out of warranty.
Now that I have cleared up this issue, I have just run 1300 rounds without the primer punch sticking even once. My loading is pretty low key at 2000 to 6000 rds per month, and I am getting better at seeing, hearing, or just feeling that something is not right.
I will never have the amount of experience the kids have when they graduated.
Under other circumstances, I would have cheerfully accepted your advice. Everything you have suggested so far has been great. Thank you.
Oh so it was a commercially used heavily machine. I thought we were talking about a new press.
UPDATE: Sticking or binding at the bottom of the primer punch recess returned after only three test cases. My next step was to put calipers on the fat part of the base of the primer punch. 0.374 or 3/8". Since I had a set of carbide drill bits, I put the 3/8" bit into a tap wrench and carefully rotated it into the recess. Sure enough, there were still some burrs. I used the drill bit to remove all the rough spots. Then, I chucked the bit into a portable drill turning the torque setting to the lowest value and the speed setting to the lowest available. The bit extended out the bottom of the recess, Very carefully, I eased on the power trigger and let the drill spin.
When finished, the primer punch dropped straight through since the rocker arm had been removed. Next step: maroon scotch brite on a mandrel chucked into the drill. First at low speed and then high speed settings to polish out any remaining burrs. After clean up, the rocker arm was re-installed and then the tool head to check the operation of the tappet and smooth return of the primer punch. Then a batch of 5 cases all the way through the cycle, measure, adjust and run a 100. All worked. Next step several thousand.
I had to do this a few months ago. Don’t think it was a bur in the casting in mine because it is well used, but some kind of debris got in there and it wouldn’t come out with gentle efforts. I took off the tool head and the priming arm, and did exactly what you did with a 3/8 bit. That recess isn’t a critical dimension anyway, the punch head is much more precise in the bushing than the bottom that rides on the tappet.
One of the things that I have noticed in some of my loading dies is that little tiny pieces of brass somehow get embedded in the highly polished steel walls of a die (not supposed to but it happens). Sometimes these little bumps just disappear because they get knocked off. Other times they grow enough over time that they create a visible scratch in an otherwise clean piece of brass.I had to do this a few months ago. Don’t think it was a bur in the casting in mine because it is well used, but some kind of debris got in there and it wouldn’t come out with gentle efforts. I took off the tool head and the priming arm, and did exactly what you did with a 3/8 bit. That recess isn’t a critical dimension anyway, the punch head is much more precise in the bushing than the bottom that rides on the tappet.
As a part of regular maintenance at somewhere between 10,000 and 20,000 rounds, we will run a mandrel with white scotch brite (0000 steel wool equivalent) into the die to clean out any accumulated shavings, lube, debris, whatever and start over again. Much more effective than QuickScrub.
I am guessing that the rough spots in the primer punch recess wall built up from "junk" that accumulated over time including primer pieces. Since there is quite a bit of slop between the punch and the recess wall, it would be pretty easy to end up with a really hard build up over a very large number of cycles. The 3/8" bit obviously had no problems knocking any build up off the walls. The scotch brite then polished everything else. No big deal. Just my first time with this location.
Similar threads
- Replies
- 32
- Views
- 1K
- Replies
- 7
- Views
- 612