

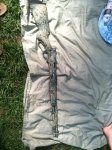
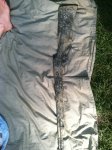
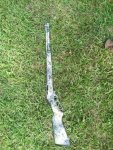
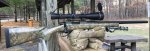
This is an old Glenfield Model 30A that was in pretty rough shape. I decided to use it as my guinea pig for the sponge camo treatment. I couldn't find any natural sponge locally so I just used some regular dish sponge that I tore into useable pieces. Turned out great I think.
- Thread starter coyotehunter223
- Start date
You are using an out of date browser. It may not display this or other websites correctly.
You should upgrade or use an alternative browser.
You should upgrade or use an alternative browser.
Cool
looks good I got natural sponge from wall-mart in the arts and craft section cheap
Looks good man. I like the multi color. I just went two color on mine and I'm happy with it but the extra work in yours shows. Looks good man. This was my first one, did it last weekend.

Looks great! I was nervous the first time I tried it out, but after doing a few of my stocks, it's a little easier.
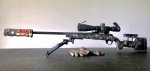
Just finished up painting my 338 RUM the other day.

Just finished up painting my 338 RUM the other day.
That looksGreat! Some of it for me was that the paint dried a different color than the calf so it was a little different and I wasn’t sure if I like the color that I dried to
Paint job turned out great! What brand of paint did you use for the base coat?Looks great! I was nervous the first time I tried it out, but after doing a few of my stocks, it's a little easier.
Just finished up painting my 338 RUM the other day. View attachment 7189375
View attachment 7189377
Paint job turned out great! What brand of paint did you use for the base coat?
Thanks! Stock was already black, so I added krylon for the tan and bronze. Finished with a few coats of matte clear coat (can't recall brand off top of my head).
Last edited:
Looks awesome!!!! Here's my first attempt on an old Mauser action rebarreled to 280AI
Wow, some great looking rifles. I am scared to death to try this, but will practice on a board first. I really want mine to look like the OP's.
The best thing is that you can always strip and repeat. Plus, the more you use the rifle the sexier it looks as the paint rubs and wears. Don’t be scared man, it’s just a tool and is a fun project that you can’t mess up.Wow, some great looking rifles. I am scared to death to try this, but will practice on a board first. I really want mine to look like the OP's.
::looks over at the unpainted rifle in the safe and then over at the paint I just purchased::
Good points about being able to strip the paint. On a Fieldcraft, what would be safe to use for this? I'm convinced I am going to do this. Just don't want to cause any problems by using the wrong stuff. I know I can Google, but while we are here I wanted to ask folks who have actual experience with this.
Good points about being able to strip the paint. On a Fieldcraft, what would be safe to use for this? I'm convinced I am going to do this. Just don't want to cause any problems by using the wrong stuff. I know I can Google, but while we are here I wanted to ask folks who have actual experience with this.
You can use a few different things to strip it, but what I’ve done is just sand it enough to make another coat stick and just re-sprayed it. I only strip stuff if I’m going to cerakote it. Just my $.02.
We took the leap on a tikka bravo build. It ended up nothing like what I was aiming for but love it nonetheless!

Rustoleum with multiple layers and a bunch of clear coats. Toward the end before the clear coat I got a little piece of a sponge with some spread out texture and used bits of black to separate the colors a bit and it really made it come to life.
Rustoleum with multiple layers and a bunch of clear coats. Toward the end before the clear coat I got a little piece of a sponge with some spread out texture and used bits of black to separate the colors a bit and it really made it come to life.
This is one I did a few years ago. The base color is black.
I'm getting ready to do another one in the same style. I'll post pictures of that one when it's done.

I'm getting ready to do another one in the same style. I'll post pictures of that one when it's done.
Man that looks good!This is one I did a few years ago. The base color is black.
I'm getting ready to do another one in the same style. I'll post pictures of that one when it's done.
View attachment 7197659
If you don’t mind me asking, what type of paint did you use and what kind of sponge?
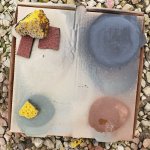
I used natural sponge from Walmart (5 pack for $3) and rustoleum camo spray paint. I sprayed the paint into paper bowls and dipped the sponge into it. One sponge per color, and make absolutely sure the paint is dry before applying another color.
Get creative, it'll look like crap when you first start out (and you will think it was a mistake), but as you add colors it starts to get way better. I used a satin clearcoat once it was all done. It has worn well after a few years.
Get creative, it'll look like crap when you first start out (and you will think it was a mistake), but as you add colors it starts to get way better. I used a satin clearcoat once it was all done. It has worn well after a few years.
With a few dry days in the 50's I also broke out the paint.
The stock was purchased here from @JfarmshooterW.
The stock was purchased here from @JfarmshooterW.
Attachments
With a few dry days in the 50's I also broke out the paint.
The stock was purchased here from @JfarmshooterW.
Looks good.
That's great! My sponge camo came out awful. My bros say they can seem me moving through the woods a mile away.
Looks really good. I want to try this now...
I want to add some info, if you are considering doing as the OP, along with others and myself I would suggest trying a Scotch Brite to add smaller areas of color and finer lines of black.
This worked really well for me and if the paint dried or color change just cut the end off to get a new edge. Also a medium pizza box makes a great Artist Palette just be sure to eat the pizza first
This worked really well for me and if the paint dried or color change just cut the end off to get a new edge. Also a medium pizza box makes a great Artist Palette just be sure to eat the pizza first
Attachments

Dang i like that ?niceThis is one I did a few years ago. The base color is black.
I'm getting ready to do another one in the same style. I'll post pictures of that one when it's done.
View attachment 7197659
My new stock is finished. Lots of work went into this one to fit the Defiance action properly. The bolt handle cut out, side bolt release, and ejection port were completely redone. This build isn't finished yet but parts are in the mail.
I'm pretty happy with this one. Same basic scheme as my other one I posted earlier.


I'm pretty happy with this one. Same basic scheme as my other one I posted earlier.
I think that pattern looks sick.
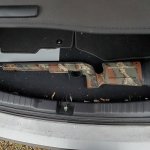
Here is my AK I just finished. It started with a FDE base then sprayed with various colors, using leaf stencils, through a laundry bag. Then I used sponges to dab and further break it up.
This Ak is a year long project. It is a Saiga chambered in 223. I pulled the barrel to thread it 1/2-28 concentric to the bore. While apart I reduced the gas port size because it was over gassed to a point it felt like a 7.62 AK. Originally the gas port was .069” but I reduced that to .050” but it would only cycle with a silencer so I opened it up to .055”. It is now PERFECT because the carrier no longer impacts the rear trunion, reducing felt recoil. With a muzzle brake installed it feels like a 22 now. I TIG welded material onto the trigger so I can rework how the trigger feels. Trigger pull is right at 2.5 pounds with less than 3/16” of movement total. And it has been 100% reliable in over 250 rounds so far. It has a PA red dot attached to a Midwest Industry rails, Zhukov stock with a Hogue grip.
I used 7-8 different colors.
Last edited:
Here is my HMR I did awhile back.
What colors did you use? I like it a lot.
It’s the rustoleum camo paint. Sand and the green. With a black baseWhat colors did you use? I like it a lot.
That looks sharpLooks great! I was nervous the first time I tried it out, but after doing a few of my stocks, it's a little easier.
Just finished up painting my 338 RUM the other day. View attachment 7189375
View attachment 7189377
Some talented individuals ... I'd like to try this on one of my MPA chassis
No sanding for me. Just degreasing they stock good.Damn there's some great looking rifles in here. How are you guys prepping the stocks? Doing any sanding first or just cleaning the oils off?
I sanded and textured my last stock. After all the work was done I had to do it that way. Then I degraded with acetone and a lint free cloth. Wear nitrile gloves so the oils on your skin don't contaminate the surface.
We took the leap on a tikka bravo build. It ended up nothing like what I was aiming for but love it nonetheless!
View attachment 7196832
Rustoleum with multiple layers and a bunch of clear coats. Toward the end before the clear coat I got a little piece of a sponge with some spread out texture and used bits of black to separate the colors a bit and it really made it come to life.
DAMN! That is a gorgeous paint job! What colors did you use for this??
Thanks. I don't remember exactly but it was a camp/light olive green, a medium grey, kind of a flat/dead orange, and black. It looks like a 6 year old is doing it when you first start but as you add layers it starts to take shape.DAMN! That is a gorgeous paint job! What colors did you use for this??
Thanks. I don't remember exactly but it was a camp/light olive green, a medium grey, kind of a flat/dead orange, and black. It looks like a 6 year old is doing it when you first start but as you add layers it starts to take shape.
Awesome thanks! What order did you do the colors in? And did you prime it first? And just to clarify, you took a small section of a sponge and used it in black paint to kinda outline and border the other colors?
Yea the stock started as black and I wasn’t really planning on using black paint. I was just going to leave some black uncovered. I started with some big random areas of each color and let them kind of bleed into each other. Really this was hard for me because I suck at random. My brain always wants to structure things and make patterns.Awesome thanks! What order did you do the colors in? And did you prime it first? And just to clarify, you took a small section of a sponge and used it in black paint to kinda outline and border the other colors?
After that there was not much black left so I started adding a little black here and there then started dabbing around the outside of the colors to separate them which made it look really good. So the black is dabbed thick on the outside edges of the colors and then is dabbed lighter and more spread out as it gets toward the center of each color.
I used small torn off pieces of natural sponge. I spent some time testing different sizes and types of torn pieces to get the effect I was looking for. I’ve said before, I practiced and had a big plan to make a completely different design that copied another member here. 5 minutes in that went out the window and it just became what it wanted to become lol. Once I realized you can’t really screw up it got to be pretty fun. If if you do screw up an area you just let it dry and go over it again.
Yea the stock started as black and I wasn’t really planning on using black paint. I was just going to leave some black uncovered. I started with some big random areas of each color and let them kind of bleed into each other. Really this was hard for me because I suck at random. My brain always wants to structure things and make patterns.
After that there was not much black left so I started adding a little black here and there then started dabbing around the outside of the colors to separate them which made it look really good. So the black is dabbed thick on the outside edges of the colors and then is dabbed lighter and more spread out as it gets toward the center of each color.
I used small torn off pieces of natural sponge. I spent some time testing different sizes and types of torn pieces to get the effect I was looking for. I’ve said before, I practiced and had a big plan to make a completely different design that copied another member here. 5 minutes in that went out the window and it just became what it wanted to become lol. Once I realized you can’t really screw up it got to be pretty fun. If if you do screw up an area you just let it dry and go over it again.
Well I'm gonna probably try to copy this and we'll see where it ends up haha
Did my Bergara a few weeks ago had to get rid of the brown!
My first attempt at sponge camo.

I liked the results so well that I did two more stocks a couple days later.
It took a little over an hour to do the pair from taping, to painting and clear coat.

Here's all three together.

I have a couple more that I want to do in the next couple of weeks.
One will be a B&C on a Savage. It will probably be a blue based pattern for fun.
The other is an old H-S Precision Fiberthane ADL that just needs refreshing.
I liked the results so well that I did two more stocks a couple days later.
It took a little over an hour to do the pair from taping, to painting and clear coat.
Here's all three together.
I have a couple more that I want to do in the next couple of weeks.
One will be a B&C on a Savage. It will probably be a blue based pattern for fun.
The other is an old H-S Precision Fiberthane ADL that just needs refreshing.
I have an old Springfield 67H that I want to do this to. most of the blue is worn off and the wood is gouged and in horrible shape. The action is tight and the barrel spotless. Was obviously beat up but rarely shot.
Any reccomendations on filling the wood? Just rgular wood filler? Maybe just paint over the gouges and not worry about it.
Any reccomendations on filling the wood? Just rgular wood filler? Maybe just paint over the gouges and not worry about it.
Depends on how far you want to go. You could completely sand the stock, removing all the old finish. For this step you can use some pretty course paper. This will remove surface scratches as well.
Then use regular wood filler to fill the gouges and deeper scratches. Let filler completely dry.
Sand again with a course paper. Rub down with a wet towel to raise the grain. Let dry. Repeat sand using finer and finer grit until smooth.
Lots of different stains and shit. You could go high gloss with a poly over coat or just stain and wax.
Id probably just stain and put a few coats of wax.
There are stock refinish kits that come with basically everything you need.
Do a decent job and give that old thing a bit of new life then post a pic")
Then use regular wood filler to fill the gouges and deeper scratches. Let filler completely dry.
Sand again with a course paper. Rub down with a wet towel to raise the grain. Let dry. Repeat sand using finer and finer grit until smooth.
Lots of different stains and shit. You could go high gloss with a poly over coat or just stain and wax.
Id probably just stain and put a few coats of wax.
There are stock refinish kits that come with basically everything you need.
Do a decent job and give that old thing a bit of new life then post a pic