BigJimFish
Written: Sept 22, 2025
Table of Contents:
– Introduction
– Unboxing,Look, and Feel
– The case prep station
– BurstFire primer crimp remover
– Annealing
– Summary and Conclusion

Introduction:
I had been considering for quite some time trying out annealing. I’ve been reloading now for more than 20 years, but, like most other reloaders, I had never given annealing a try. I had been having some issues with velocity consistency in one of my loads that I expected to do better and I thought annealing might help. I figured it was worth a try – and who doesn’t want substantially better brass life to boot? Who knows, I might even get some increased accuracy. Consistency is key to that and having your case necks get harder and harder after every firing is not consistent, resetting their hardness to baseline is. Lastly, we’re not talking about a huge reloading time commitment here. Any auto-feed annealing machine is a pretty quick step relative to many of the other reloading steps I go through on precision rifle ammo. Weighing each powder charge, for instance, is much more time consuming.
So, I started researching and shopping. I spent a good deal of time on YouTube listening to far more knowledgeable folks then myself and learning about annealing. I highly recommend Erik Cortina’s videos on the topic by the way. Erik is worlds beyond me (and most others) in knowledge base and experience, and he really breaks down what matters and what doesn’t in annealing – and how large your margin for error is. Pretty quickly, I determined I was not looking to spend a mint on an annealer as we’re not talking about precision ground toolmaking here. Furthermore, the margin for error is pretty wide when it comes to getting a good hardness reset with your anneal. I settled on the BurstFire due to a combination of the cost, auto-feed, the added case prep center on the top, and I liked the design of the torch holder. I then bought the annealer and their primer crimp remover as well. I also hit them up for an industry discount as I usually do and got 10% or so, if I remember correctly.
During the ordering and review process, I have spoken to the owner of BurstFire a number of times. He started the company in 2019 because he basically wasn’t happy with the ratio of quality to cost in annealing machines available. He had manufactured products before and knew the costs of the materials in the devices he saw looked a bit low for the retail prices being asked and opportunity existed to do better. In addition to BurstFire, he also makes the perfectly named Muffpot, a device for cooking or warming food using the heat from a snowmobile or ATV’s exhaust pipe. He is a tinker and an innovator. He has already updated his first 2019 case annealer design to the second generation I am reviewing here. Those updates included the toolless adjust torch holder I liked so much, an analog speed control knob, better screen, and improved feed chute angle. Since the release of the second-generation unit, he has also added a magnetic short case feed ramp that just slides into place. During the course of this review, he also announced a new – and very fast – induction heating based annealer model I expect to be reviewing in the future, as well as a smaller, more portable, and slightly less expensive, comp edge pro flame model. Things must be going pretty well for BurstFire, as I saw one for sale yesterday at Cabelas.
Unboxing, Look, and Feel
In the box, you get the annealer, torch, power cable, adapter line for 16oz propane cylinders, short case feed ramp, both standard and magnum feed wheels, and a single page manual that points you to BurstFire’s website that contains PDF manuals and YouTube video tutorials. The annealer is manufactured in Taiwan.
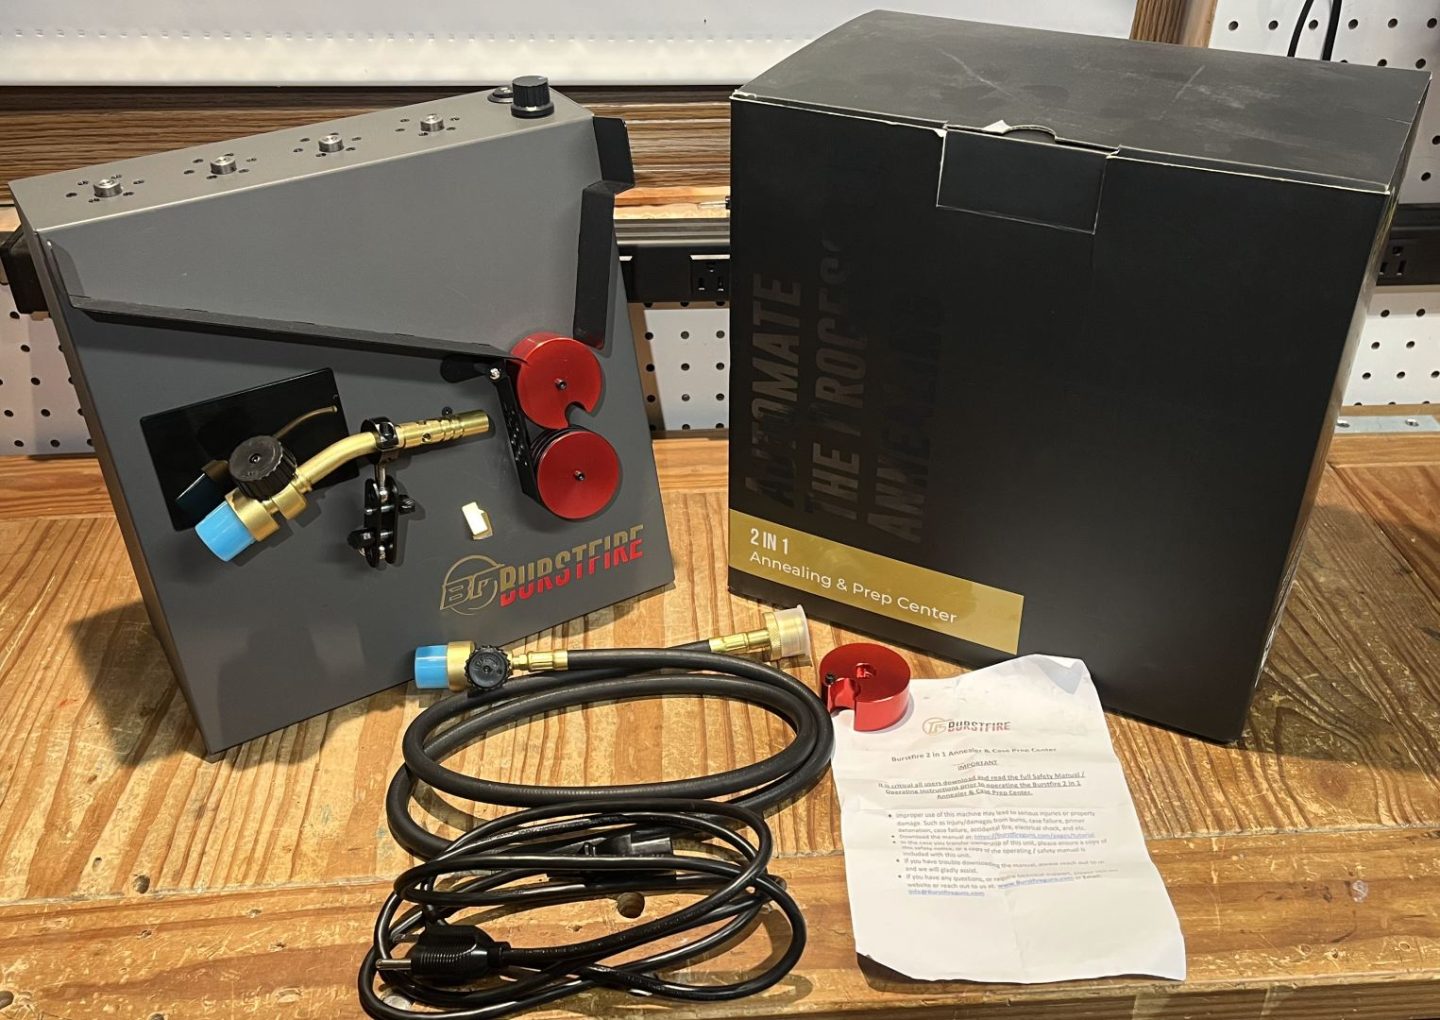
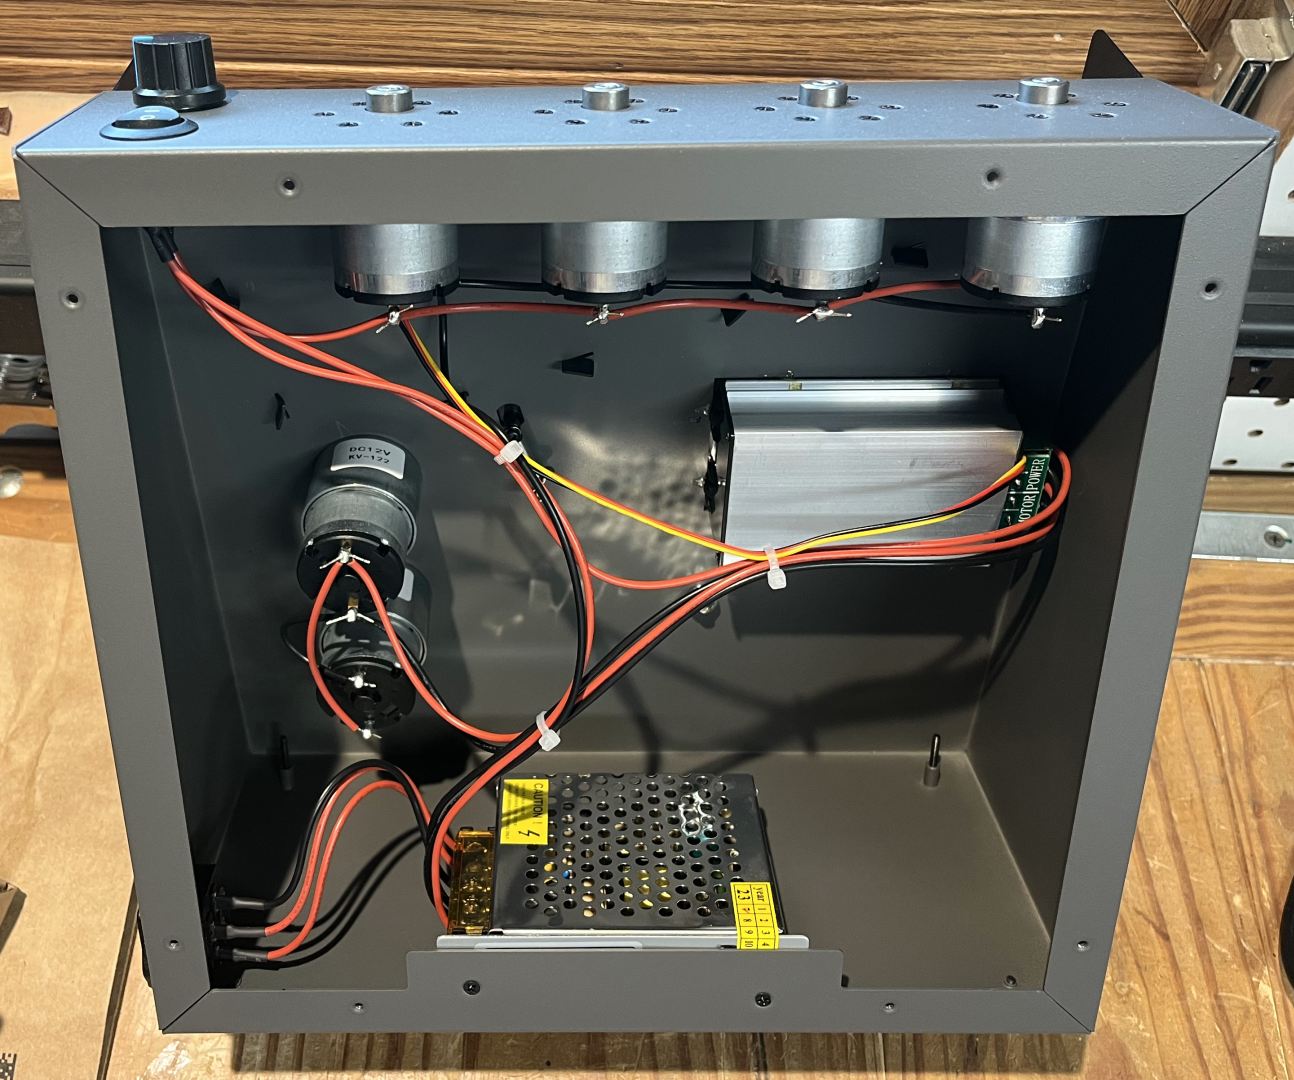
The fit and finish of the BurstFire annealer are quite nice. There were no defects in the paint or assembly. The machined feed wheels look nice and are evenly anodized. The silicone looking bands on the feed wheel are superbly grippy and, I expect, will wear well. I unscrewed the back panel on the annealer and it looks quite repairable with a screwdriver and soldering iron, and I understand it is easy to get replacement parts from BurstFire if you have a case prep center motor wear out or something. Overall, the unit looks well designed and manufactured as well as quite serviceable. It also comes with a limited lifetime warranty.
The Case Prep Station
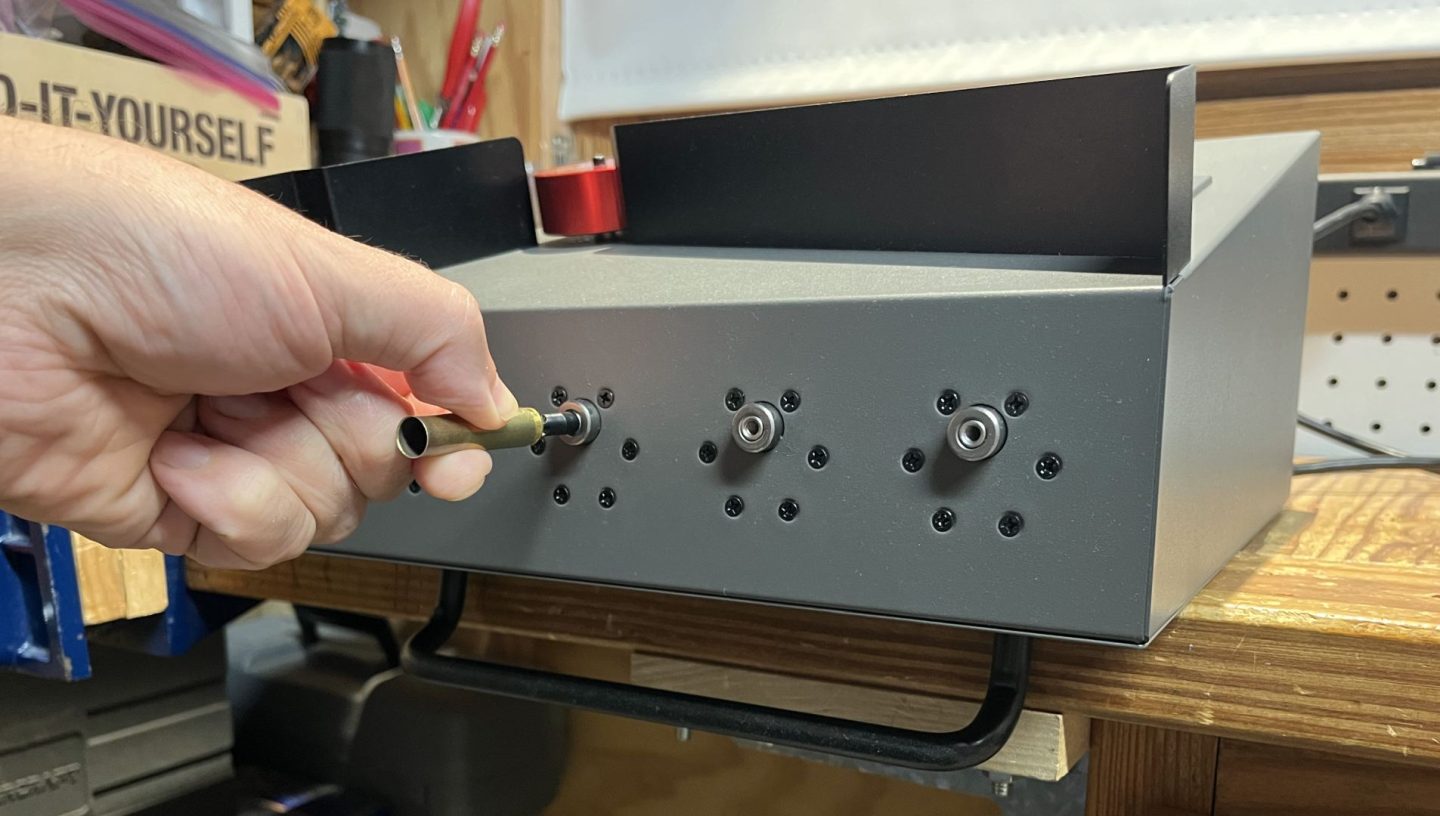
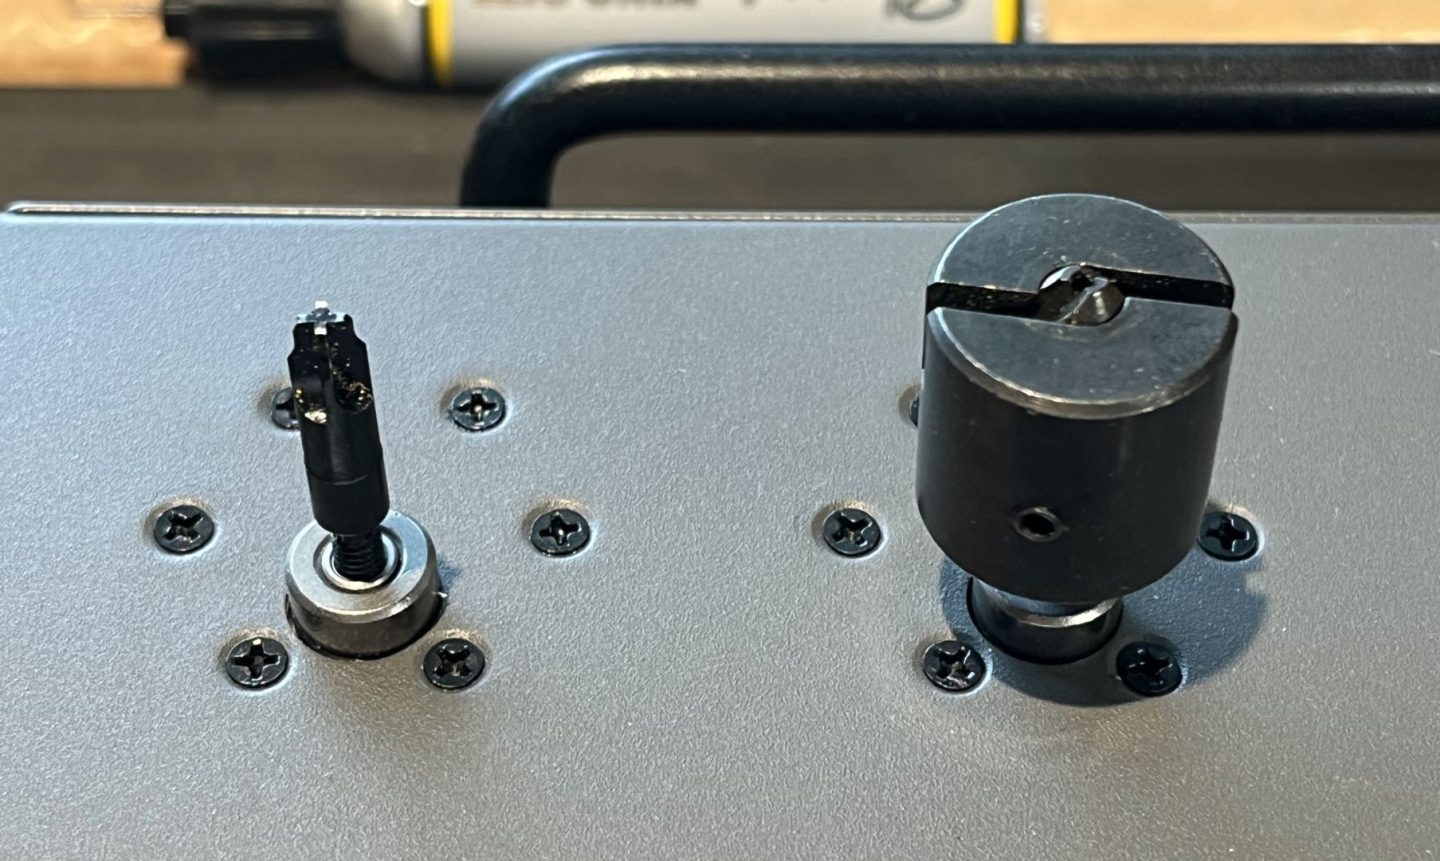
The first feature I used on thegen 2 BurstFire 2-in-1 flame annealer was actually the case prep station so I will start here with that. I have wanted a nice case prep center for a while now. This is mostly because I cut a lot of crimps out of primer pockets and I thought a solid platform might really help keep things steady relative to trying to hold down a case with one hand and line up a drill with the crimp remover in it in the other. It turns out the BurstFire is particularly well designed for this. The carry handle on the back of the unit is intended to act as a stop, to keep the unit from sliding around when it is oriented horizontally on a tabletop. This makes for a solid platform and has just enough overhang from the table to allow whatever shavings your producing or gunk you are cleaning out of casings to fall into a trashcan below. This worked quite well. Another nice design feature is that the rotation speed of the far left motor is about half that of the other three in case you want a higher torque / lower rpm option for one of the tools you’re using. My only complaint with the case prep center is that there is no place for a wrench where the tools thread in the motor, so if they work themselves tight, you sort of have to jerk them loose by torquing them super fast. Overall, I was really pleased with the case prep center and consider it a big added value in the unit.
BurstFire Primer Crimp Remover
In addition to making annealers, BurstFire has a small, but very interesting, line of tools and gauges. These include neck tension gauges, primer pocket gauges, chamfer and deburr tools, primer pocket uniformers and cleaners, and the “ultimate primer pocket reamer / military crimp remover set”. A lot of these look useful and well designed, but having never been totally satisfied with any primer crimp remover, that is what I picked up. Man do I hate crimped primer pockets! All of them are a pain to deal with but they can’t even agree on how much of a pain to be. Some of the little staked crimps are easy to remove with just a couple twists of a chamfer tool. Some of the roll crimps though, especially the super tight Hornady ones, require essentially re-cutting or substantially swaging the primer pocket. The BurstFire primer crimp remover is a reamer type crimp remover essentially designed to re-cut these crimped primer pockets. BurstFire’s claims are that theirs will stay sharp longer as it uses better steel, that it is a bit more aggressive in its cut radius at depth than most others, and that it does not open the pocket up as much toward the back end: Essentially, that it is producing a cone shaped cut that is less tapered than most others.
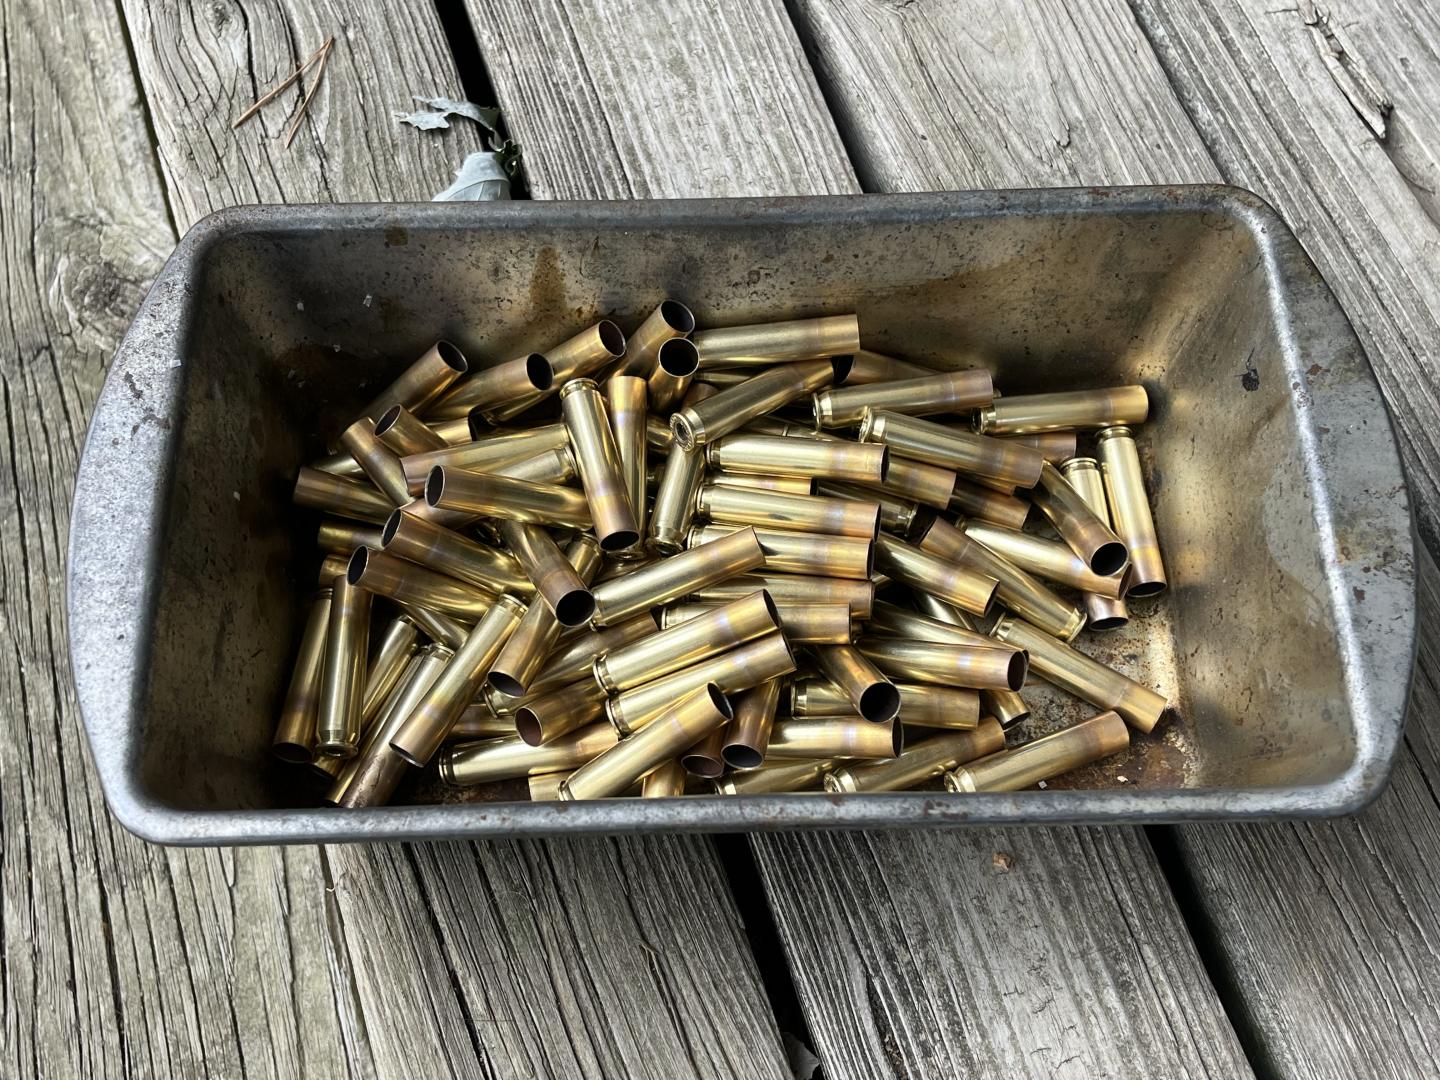
With the pile of Hornady 350L crimped cases I needed to process I was giving the BurstFire crimp remover a substantial challenge. These are very tight. Just opening up the back end a little with something like a chamfer tool or my old RCBS crimp remover won’t get you anywhere. The primer would just crush if you tried to put it in (quite a dangerous thing BTW) as the whole length of the primer pocket is just too narrow. My first set of cases with the BurstFire crimp remover was a bit of a mixed bag. I followed the instructions and did not insert the reamer all the way in but just until I felt it cutting. I also didn’t use any lube. This resulted in some cases that weren’t reamed enough to get a primer started and had to be re-reamed. I also had some cases that ended up over-reamed. This was possibly from the case torquing in my hand during cutting as the cutter grabbed while biting in, as this was an issue. It may also have possibly been that the cases that needed to be re-reamed ended up with the angle being slightly different the second time than the first time, opening them up. Overall, there were a number of lost cases in this lot from over-reaming, case-to-case feel when seating primers was highly variable, and getting the primer started in the case was sometimes tricky as it had to be lined up just perfectly to get started straight.
With a second lot of Hornady 350L cases later on, I decided to deviate my technique from the instructions based on my experiences and some ideas I had to improve the results. I decided to lube the cutter every few cases with motor oil (be sure you tumble afterward if you do this as oil kills primers). The oil made for a smooth easy cut with no grabbing and none of the cases torqued in my hand during cutting. I also made sure to fully insert the reamer on every case so that I would not need to redo any and so the altered dimensions of the primer pocket would be much more uniform. This lot of brass came out much better. The primers have seated with an even primer seating force that is also the correct amount of force and I haven’t had any lost cases. The opening at the case head is still a little hard to get the primer started in, though. I occasionally need to rotate the case in the holder as I start the primer in to make sure an edge of it doesn’t catch the flat where the crimp was. This may be unavoidable as I’m not sure how much variation exists in primer pocket depth and the positioning of the flare at the back of the cutting head that aids in the primer alignment is highly effected by that dimension. It may be that some shallow pocketed brass is always just going to need to be hit with a little bit of chamfering tool after using any primer crimp removing tool. Still, my pockets didn’t end up perfect so I am not convinced that the BurstFire crimp remover is “the” solution, or at least not a universal solution, to the pain in the ass that is crimped primers. I have not tried all, or even the majority, of options on the market. The BurstFire cutter is working now on these cases with the specific techniques I mentioned though, and it easily has at least has my old RCBS beat on that front. I plan to continue to use the BurstFire crimp remover, it is the best I have tried, but I also plan to continue trying others, in case there is a better solution.
Annealing
Boy, I’ll tell you, flame annealing is a visceral experience. I’ve done plenty of brazing copper pipes with the same propane torch, but there is something different about the flame not being directly in your hand and instead being attached to a machine in front of you. Do not EVER leave your flame annealer running without your supervision. It may be automatically feeding and running just fine, but we’re talking about a lot of heat fire potential here. You wouldn’t want to house to go up like in the “wildfires” so prevalent in any area wealthy developers become interested in. Also, I shouldn’t have to tell you, but don’t have your powder or primers out anywhere near your annealer and don’t try to anneal primed cases. You know somebody has done it, because if it is a reloading mistake, someone has done it. It’s like the rule 34 of reloading.
Probably the most unique feature of the BurstFire annealer is its torch holding and positioning mechanism. This mechanism uses two thumb screws and two ball joints to allow for a truly highly articulated positioning of the torch. I very much like degree of freedom this allows in the torch’s positioning. For instance, you can angle the flame slightly away from the machine so that the case rotation wheel is subject to less heat from the torch. This mechanism also allows for quick adjustments between different calibers, though I would have liked for the adjustment thumbscrews to be all metal, larger, and more finely threaded for greater mechanical advantage. It takes an amount of force to tighten them enough to hold the torch in position that is a little uncomfortable to apply and which the plastic thumbscrews may have difficulty within a few years as plastic ages quickly. I may try lubing the threads to increase the amount of force applied to the ball joints relative the amount of torque on the thumbscrews.

Just as with the torch positioning, the adjustment for case dwell time is very simple and effective. It is an analog style knob on the top with a segmented led display of the relative speed on the front. The temperature the brass reaches will be determined by a combination of torch position, exactly how open the torch gas valve is, and the dwell time setting. As such, most users will probably not have the same number on the LED readout correspond to the same brass temperature when annealing the same brass on different days as torch position will likely be changed as well as the torch valve setting. This will certainly be the case for users annealing multiple calibers. In this case you will be readjusting the factors for each run of brass to achieve the desired temperature as measured by Tempilaq, brass glow with the lights dim, flame color, or some other method. I would suggest, when making such adjustments, to start with your dwell time low (wheel speed fast) and slow it down until you hit your desired temp so that none of the cases get too much heat. Again, I am not an annealing expert, see Cortina’s videos for greater depth and far more knowledgeable explanations on the science and logistics of annealing. In my novice experience, it typically takes ten or so cases to get all factors in line with each other. After everything is set and you’re happy, you can put those 10 cases back on the stack (being careful not to burn yourself) to run though a second time. Just be sure they are on top of the stack so they have time to fully cool before they run though again. It may be possible to reuse your annealing settings if you turn on and off the torch at the secondary gas valve so as not to change the torch setting, only anneal one caliber, are careful that nothing on the rig ever gets bumped, and always operate the machine with the gas cylinder at the same temp. I didn’t run experiments on the repeatability of this and my experience with subsequent lots run though with significant intervening time and all the variables readjusted was that the speed number ended up very different each run. Essentially, expect to calibrate for 10 or so cases at the start of each run.
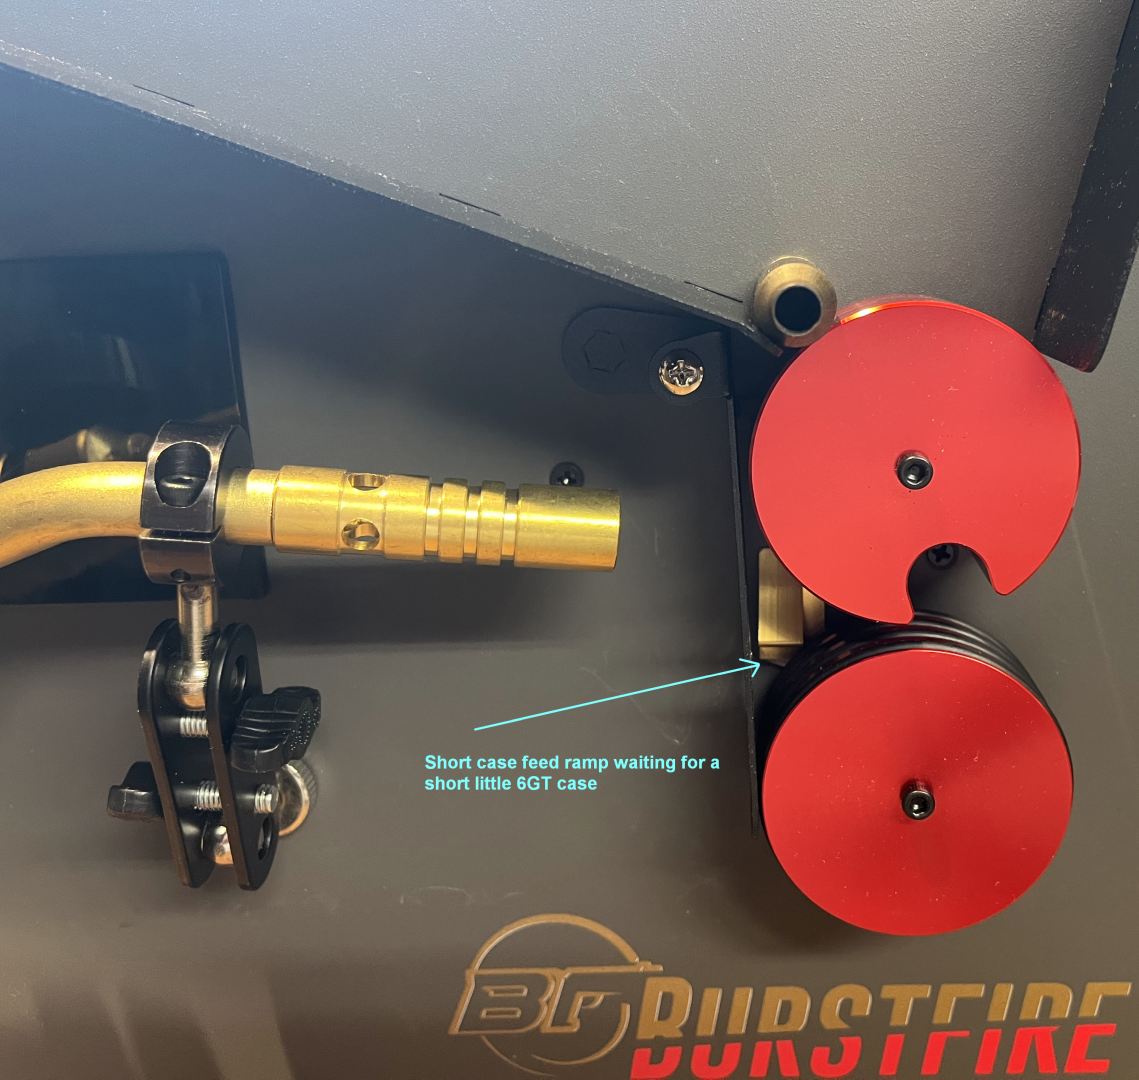
During the past two years I annealed more 350L than anything else but did a test run with just about everything I have lying about. Notably, this didn’t include any long belted magnum stuff. I don’t have any rifles that big and neither did anybody else on the number of range trips where I picked up anything I could find left behind to try out. I have run though 30-06, .308, 6.5cm, .223, 350L, 300 blackout, 6ARC, .357, 38sp, 6GT, 30-30, and probably some others I have forgotten. Everything fed great except for a couple combinations involving the short case feed ramp and cartridges that don’t really need to use it. The short case feed ramp is a little brass wedge with a neodymium magnet taped to the back of it designed to make short cases stick out from the wheels further so you can hit them with the flame. A word to the wise on that taped on magnet: Don’t try pulling the feed ramp on and off the machine a bunch. It will come loose from its magnet and need to be re-taped. Just slide it into and out of position while leaving it on the machine’s surface. Another word to the wise on that ramp positioning – it is a little finicky. Make sure to run a substantial number of cartridges though before you mess with turning on the torch to make sure you have it just right. Just because the first 3 rounds went though okay is really not enough. Run 20. The feed ramp works really well with the short 6mm BR, 6ARC, 300 blackout, 38sp, and .357 mag. That is probably 90% of what people plan to run it on as these are some pretty popular cartridges and difficult to anneal without scorching the feed ramp if you’re not using the ramp. The ramp does not work so well with the long skinny .223 rem and 350L. These are long and skinny enough they are pretty loose in the feed wheel. They don’t like to slide into position over the feed ramp reliably. These calibers are long enough they work without the ramp, though, and are best run that way.
I will add that there are certainly cartridge limitations to this machine as well as likely cartridge limitations to flame annealing in any machine. I think running a cartridge shorter than a 38sp in the BurstFire would be a challenge when it comes to positioning the flame to do its job and not get the wheels as well. There is also some theoretical absolute limit to how short a cartridge can get and you still be able to heat its neck and mouth hot enough with a torch without heating up the case head, which would result in a case head that is too soft to be safely used. Brass is quite conductive and the shorter the distance between the area you are trying to get hot and the area you and trying not to get hot, the more challenging the equation. Lastly, BurstFire sells aftermarket feed wheels for extra small (think 17 hornet and FN 5.7×28) and extra large (Cheytack / 50BMG). No doubt you would want those if running said cartridges, as brass is super expensive. FN 5.7×28 is also well known for blowing out brass shoulders worse than anything else I know of and the lifespan boost you would get from annealing would likely be particularly excellent on that cartridge with annealing.
Summary and Conclusion
At a time when people are paying close to $2k for fancy induction annealing machines and close to $200 for simple plastic case prep stations, Burstfire certainly seems to have met their value goal with the 2 in 1 brass case torch annealer & case prep center priced just shy of $300 at the time of this writing. I find myself quite satisfied with the purchase. The quality of construction is very good and it is well designed as evidenced by its reliable feeding of a wide variety of different cartridges and the ease with which it can be adjusted and tuned to properly anneal those cartridges. If all I can come up with is that I would like a little more impressive thumbscrews and maybe some flats to put a wrench on the tool holders, that is pretty darn good. The case prep center in particular struck me as a huge added value and was its biggest selling point to me. I especially liked the clever table stop / carry handle that does a great job of holding the prep center in just the right position slightly extended over a table surface to drop brass shavings conveniently into a waste basket. The BurstFire designer has chosen an excellent rpm settings for the prep center tool heads as well and I found this very convenient to use. Having a case prep center is a big win over doing it all by hand or with a power drill.
In addition to the line of annealers, BurstFire has a nice looking line of reloading fiddly bits and gauges. Of these, I tried just the “ultimate” primer pocked crimp remover. This was an improvement over the couple crimp removers I have used before and allowed me to utilize brass previously shelved for lack of a good enough crimp removal solution as well as the difficult, tight-pocketed, and crimped Hornady 350L I am using for my ongoing 350L project. While I still occasionally had a little difficulty with getting the primer perfectly aligned with the case after crimp removal as it did not cut much of a flare at the entrance to the primer pocket, I did get primer seating force that was consistent and correct once I adapted my technique to using oil lubrication on the cutter and fully inserting it in each case. Overall, I got better results with the BurstFire primer pocket crimp remover than with other crimp removers, though I have not tried very many and plan to continue trying available options.
How about my brass though? The bullet seating force after annealing with the BurstFire feels both noticeably reduced and more uniform. As for consistency of velocity and improved accuracy, I don’t have a good answer. If there is difference, you need a lot bigger data sets than I have produced to see it. I did solve, though not fix, that velocity problem I was having though. It just boiled down to a powder simply not being as good a fit as I expected it would be with that cartridge. Having a radar chrono the last two years and therefore firing a ton more shots over the chrono than I ever did before has been an eye opening experience. Of course, the biggest benefit to annealing is case life and I expect my case life will be much improved. We will have to wait and see on that front though, as I don’t think I am near the end on any of the lots I have been annealing.