Introduction:
Levels have got to be one of the most controversial, misunderstood, and poorly advised topics in precision rifle. So, naturally, I will offer you some more advice of dubious provenance to go with the rest on the heap. I will, however, throw in some numbers as well. That should make it seem scientific and conclusive. Whether it be or not, it’s my opinion on the topic and I’m self-confident enough to think it will be of help to somebody. At least, it will keep you from trying to hang a plumb line from a tree in your backyard or from buying some expensive and ultimately useless tool kit to level your scope. As I am well aware and all the suggestion analytics stuff in Word Press keeps screaming at me, this article is too long. As such, I have divided it into three main parts. The first one contains numbers and general information on level use. You will find this interesting and informative and it was fun to write. The second part is an instructional for mounting a scope in conjunction with a level. This was terribly boring to write but, judging by questions I get as well as the bizarre and difficult contortions people seem to go though when mounting scopes, I think it will be helpful. The final section is on general classes of levels for precision rifle use and my thoughts on specific products in those classes. This is sort of like a collection of mini-reviews for precision rifle level products.
Index:
Part one: Precision rifle the why, the how, and the numbers:
- Why your scope must be level when you make a long shot:
- Level, by the numbers:
- Just how level are you? :
- Does Parallax Matter and how level do I need my level to be? :
Part 2: How to mount your scope in conjunction with a level
- What needs to be level on my rifle? :
- Mounting your scope and level:
- Step 1, a visible vertical line:
- Step 2 for fixed levels, leveling the level to the vertical line:
- Step 3 for fixed levels, adding the scope:
- Step 4 for fixed levels, beginning to tighten the scope down:
- Step 5 for fixed levels, tightening without rotating:
- Step 2 for levels that have adjustable alignment, positioning the scope:
- Step 3 for levels that have adjustable alignment, leveling by eye or with feeler:
- Step 4 for levels that have adjustable alignment, torque the scope down:
- Step 5 for levels that have adjustable alignment, setting the level:
Part 3: Types of levels and thoughts on specific products I have used:
- What types of level exist and which is best for you:
- Considerations when selecting a level:
- Levels built into the Scope:
- Sig Tango 6 and BDX series
- Scope tube mounted stand-alone levels:
- Arken Bubble Level
- Mk Machining Ultra Low-Profile Billet Scope Level
- Ring mounted levels:
- Zeiss Precision Rings
- Hawkins Precision Ultra Light Tactical Scope Rings
- Wheeler Pic Rail Scope Rings
- Rail Mounted Levels:
- U.S. Optics BBL 300
- MDT / LRA MV3 Electronic Level, the SEND iT Level:
- Levels Integrated into Stocks:
- Grayboe
- McRees
Part one: Precision rifle the why, the how, and the numbers:
Why your scope must be level when you make a long shot:
You probably already know this, but bullets aren’t airplanes and they don’t fly, they fall. They do so from the moment they leave the barrel until the moment they hit the target. If the target is a long way off, even though your bullets are moving very quickly towards it while they are falling, they still have a good bit of time to fall, and so, fall far. As such, if you want the bullet to hit the target, you have to fire it a bit up so that when it falls a bit down it ends up on target. The further the target is, the more substantial that ‘bit’ up is. On a 1,000-yard shot, you might have 10 yards of falling for the bullet to do, for instance, and so you will need to adjust the scope 10 yards high to hit the target. That is a lot. Now, imagine you start to tip that rifle sideways. If you go the whole way sideways so that the rifle is laying on its side, that 10 yards up will become 10 yards to the right or left instead. In that case, your bullet would strike 10 yards to the side of the target and also 10 yards below it. This is because you just converted all of the elevation necessary to correct for gravity into windage throwing your shot both sideways and low.
This is, of course, a worst-case scenario involving a huge amount of drop and a dog with an inner ear infection amount of tilt. You get the concept though. When you are dealing with a lot of adjustment to compensate for drop, it doesn’t take much tilt to end up way off target. Next, we will see how much.
Level, by the numbers:
To a great extent, precision rifle is numbers: distance, velocity, DOPE, wind, and ballistic models are all numbers; and we work hard to quantify or model these things not just to the point of getting a bead on individual quantities, but to the point of even quantifying the degree of unknown that we are dealing with. We want to know not just what our solution is and where to aim, but also about how much error we might have in both the horizontal and vertical components of that solution. This defines our target window.
When it comes to level use, one of these key numbers is degrees of cant. In this case, this refers to how many degrees from vertical you are holding your reticle (if the scope is properly made, this will be aligned with the adjustments). Below, you will see a table I have calculated for factory Berger 140gr Hybrid ammo from my PurePrecison 6.5CM. Values in this table are calculated using a trigonometric simplification that makes the assumption that your degree of cant is relatively small.
In this table, I have given you the error at five different degrees of canting the scope. This error is presented in both mils of angular error at the shooter and feet of linear area at the target for a set of 4 distances that correspond to nice round numbers of elevation correction. For example, with this cartridge, 5 mils of elevation correction is necessary for a 730 yd shot. If you accidentally tilt your rifle by 3 degrees on this shot, you will be adding ~.26 mils of windage to it which will move your shot about .57 feet from where you thought you were sending it. This is a pretty big amount of error to add. It is about two and a half clicks of windage with the 1/10th mil turrets you probably have and, given that it is more than half a foot of linear distance, you will most likely miss that shot on most common size targets.
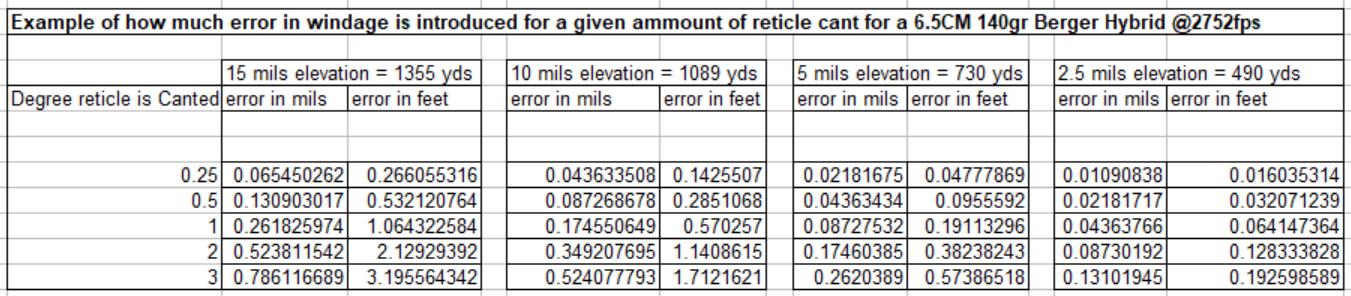
On the other hand, if you only introduce .25 degrees of cant on the same shot, you’re only .02 mils of angle from where you thought you were. This is only .04 feet, which is less than an inch. I’m going to guess you’re fine with that.
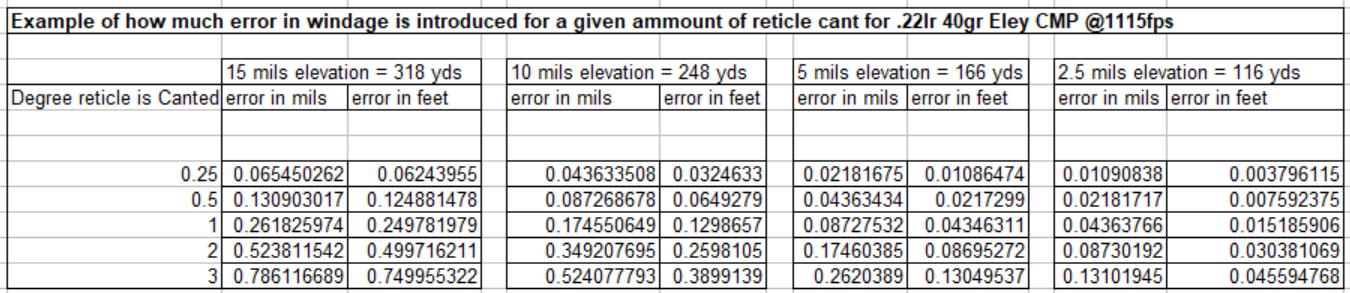
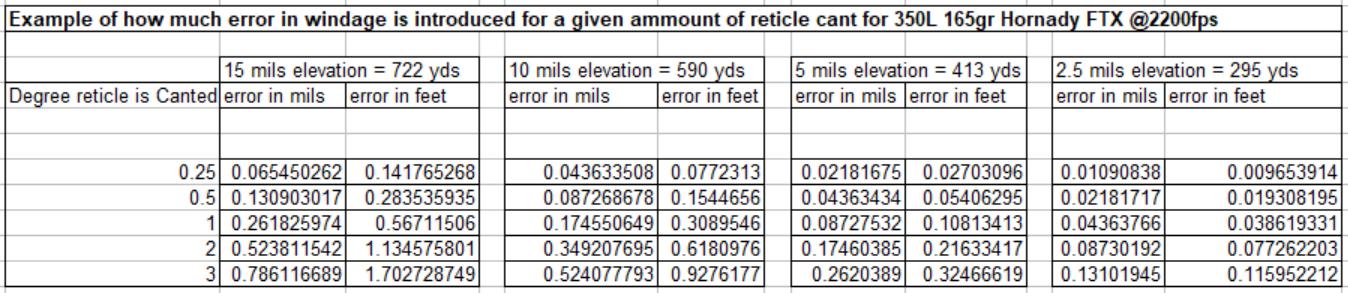
While I’m at it, I’ll give you a couple more tables. The 6.5CM isn’t a bad proxy for high-velocity slippery cartridges in general, so I’ll make our other examples cartridges that are quite different. I’ll do a .22lr table because we all love rimfire and it drops like the lead balloon it is. I’ll also do a table for the fat, mid-velocity, straight-walled hunting cartridge I’m doing an article on later this year, the 350 Legend.
Just how level are you? :
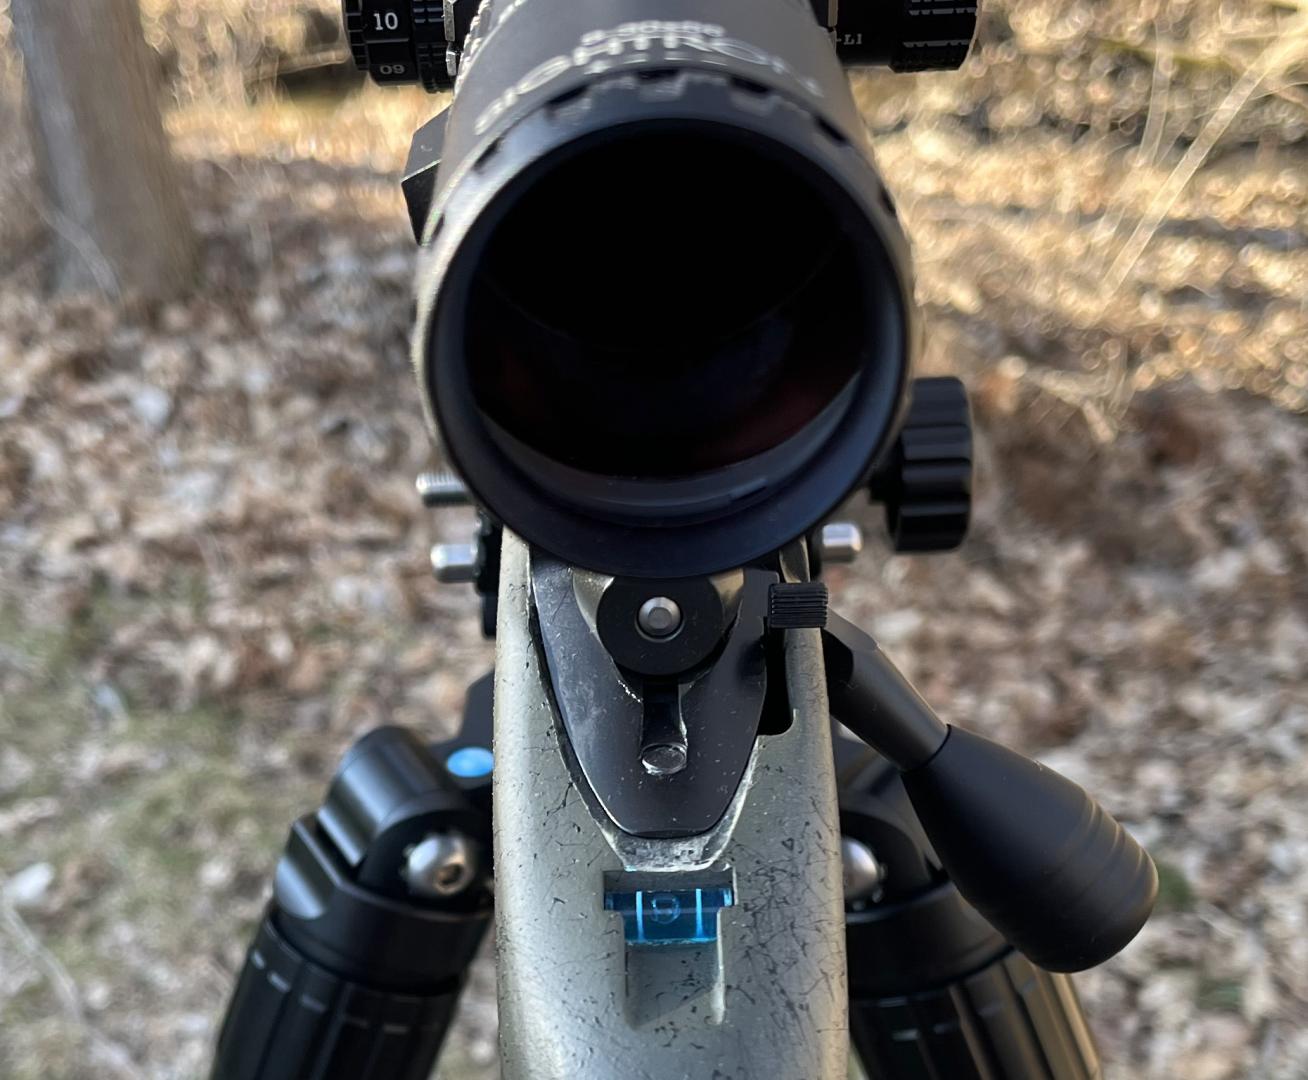
The good news is, you’re not a dog with an inner ear infection. Your brain is a fair bit more complicated than that. Sure, you have the inner ear otoliths other mammals have that give you a true gravimetric sense of vertical orientation. Your brain takes into account a lot more variables than that, though. These include the orientation of objects you expect to be vertical like trees and flagpoles, as well as those you expect to be horizontal like the horizon. The takeway from this is that you’re not about to tilt your head when you get a cold that swells up your inner ear and makes you dizzy if you close your eyes and try to walk. However, you can also be fooled if that flagpole you thought was vertical isn’t. Fun fact, I have a flagpole behind my house that is not vertical by more than a full degree. It looked perfectly vertical to me, however. I was quite surprised when I viewed it through the Sig Tango6 5-30×56 with its built-in level and the two didn’t agree. In fact, I thought at first that the Sig’s internal level must be wrong. That was how sure I was that the pole appeared to be vertical. It was not. The Sig internal level was right and the pole actually canted a little more than a degree from vertical. Here is a teaser for you. What is vertical in this picture (answer at the end of the section)?
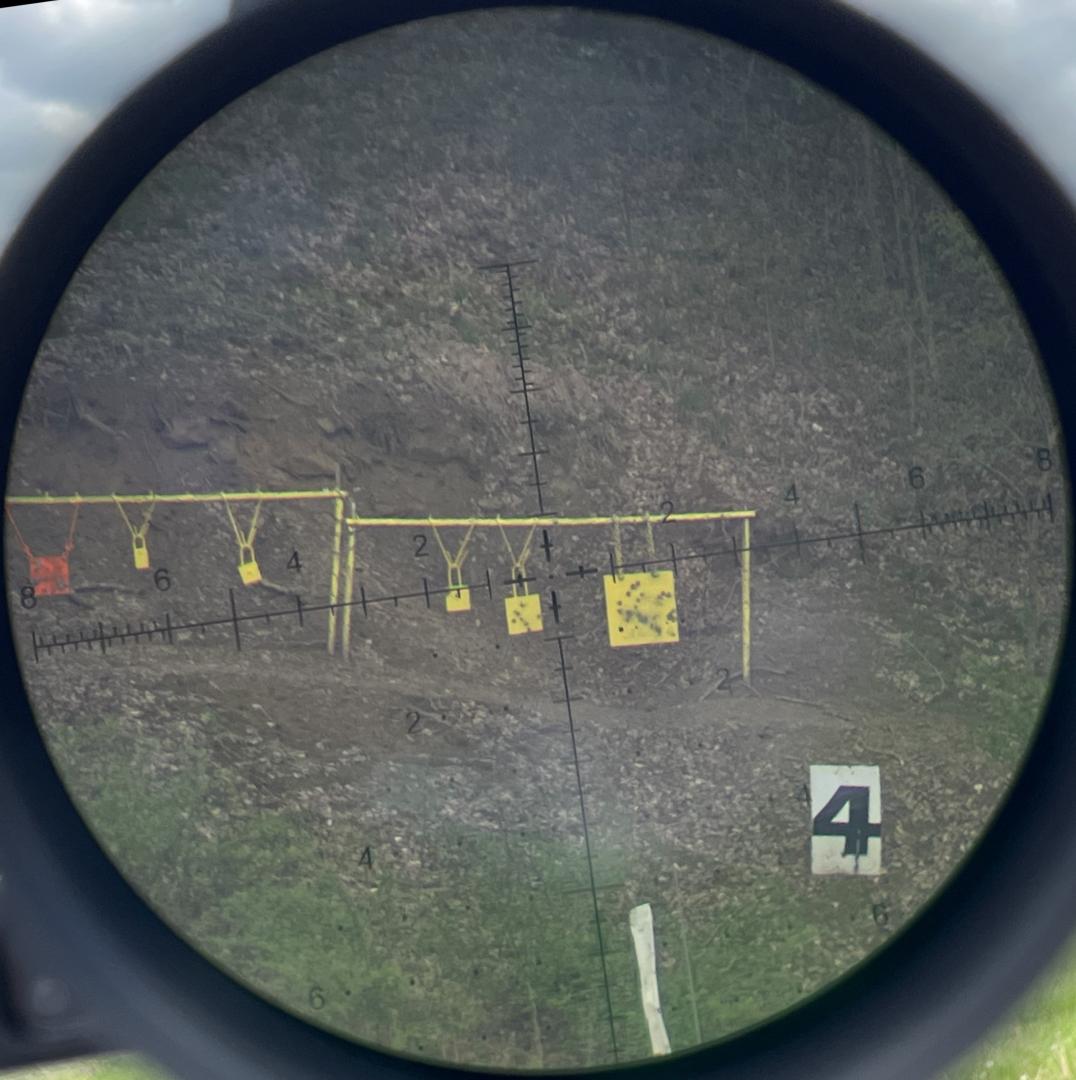
It’s a little hard to tell isn’t it? There are lots of the types of straight lines your brain wants to index off of, but none of them agree with each other. It is easy to think that you are very good at telling if your reticle is properly aligned when you are shooting off a concrete bench on a square range with nice, vertically-oriented, square paper targets. However, if you’re bent over at a weird angle on a barricade that is not level on a hillside that is also not level shooting at a different unlevel hillside with a crooked plate rack on it, things can get a lot more complicated.
So, just how good are you at holding your scope vertical? I have no idea. What I do know is if I am shooting in a situation where there is some complexity such as an un-level target, more than half the time when I think I have the reticle level and then glance at the bubble level to check, I find it is fully pegged to one side. This means that I am greater than about 2 degrees off, as most levels peg in the 1.5-2 degree range. Given that fact, and the data on how far a shot is thrown per degree of cant in the above table, I can see that I need a level to shoot my best. You probably do, too. By the way, the reticle is perfectly level in the above image. You can verify this by paying attention to the orientation of the single point hung plates. The hillside, plate rack, stage number, and photo itself are all way out of level. Did I throw you off?
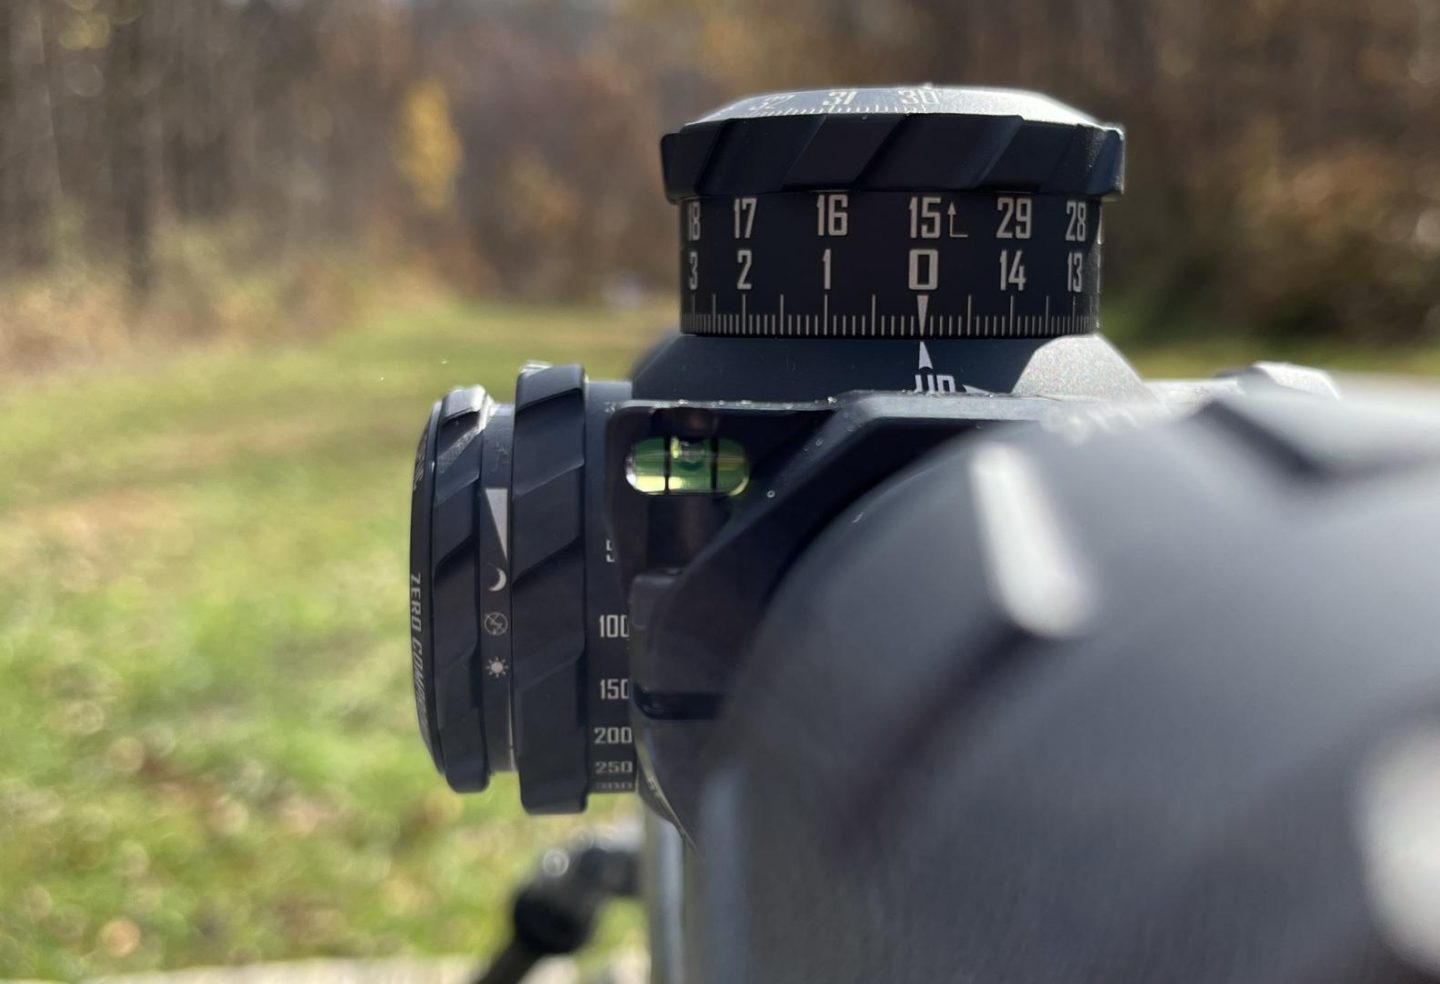
Does Parallax Matter and how level do I need my level to be? :
One of the things I wanted to examine when doing this article was how sensitive the average bubble level is. There is some variance in this because there can be some variance in the actual shape of the vial. I wanted to test this because I needed to know exactly how much error I am letting into the equation if I don’t exactly center the bubble, but rather have it touching one of the hash lines in a two-line level, for instance. I also needed to know how much error I add if I am looking at the level a little from the side instead of exactly straight on and so introduce some parallax. After all, a bubble level is a roundish bubble inside of a tube whose markings are on the outside. If you look at it from 15 or 20 degrees to the side, the bubble appears to move closer to one line and further from the other.

I will address sensitivity first as this pretty much answers the parallax question. I looked at a number of bubble levels for precision shooting from a number of popular makers. There is some variance in exactly how widely spaced the central guide lines are around the bubble and also some variance in how much tube you are given on either side of those lines. In my sample, this variance was not large, however.
What I found is that with the bubble touching one of the guide olines, you are between about .25 degrees of cant and .5 degrees of cant on every level I looked at. That is pretty sensitive. Sensitive enough that I would take any shot with the bubble between the hash marks happily. On every level I tested 1 degree of cant had a hash line landing somewhere mid-bubble, and on every level tested, the bubble was pegged to one side of the vial by 2 degrees.
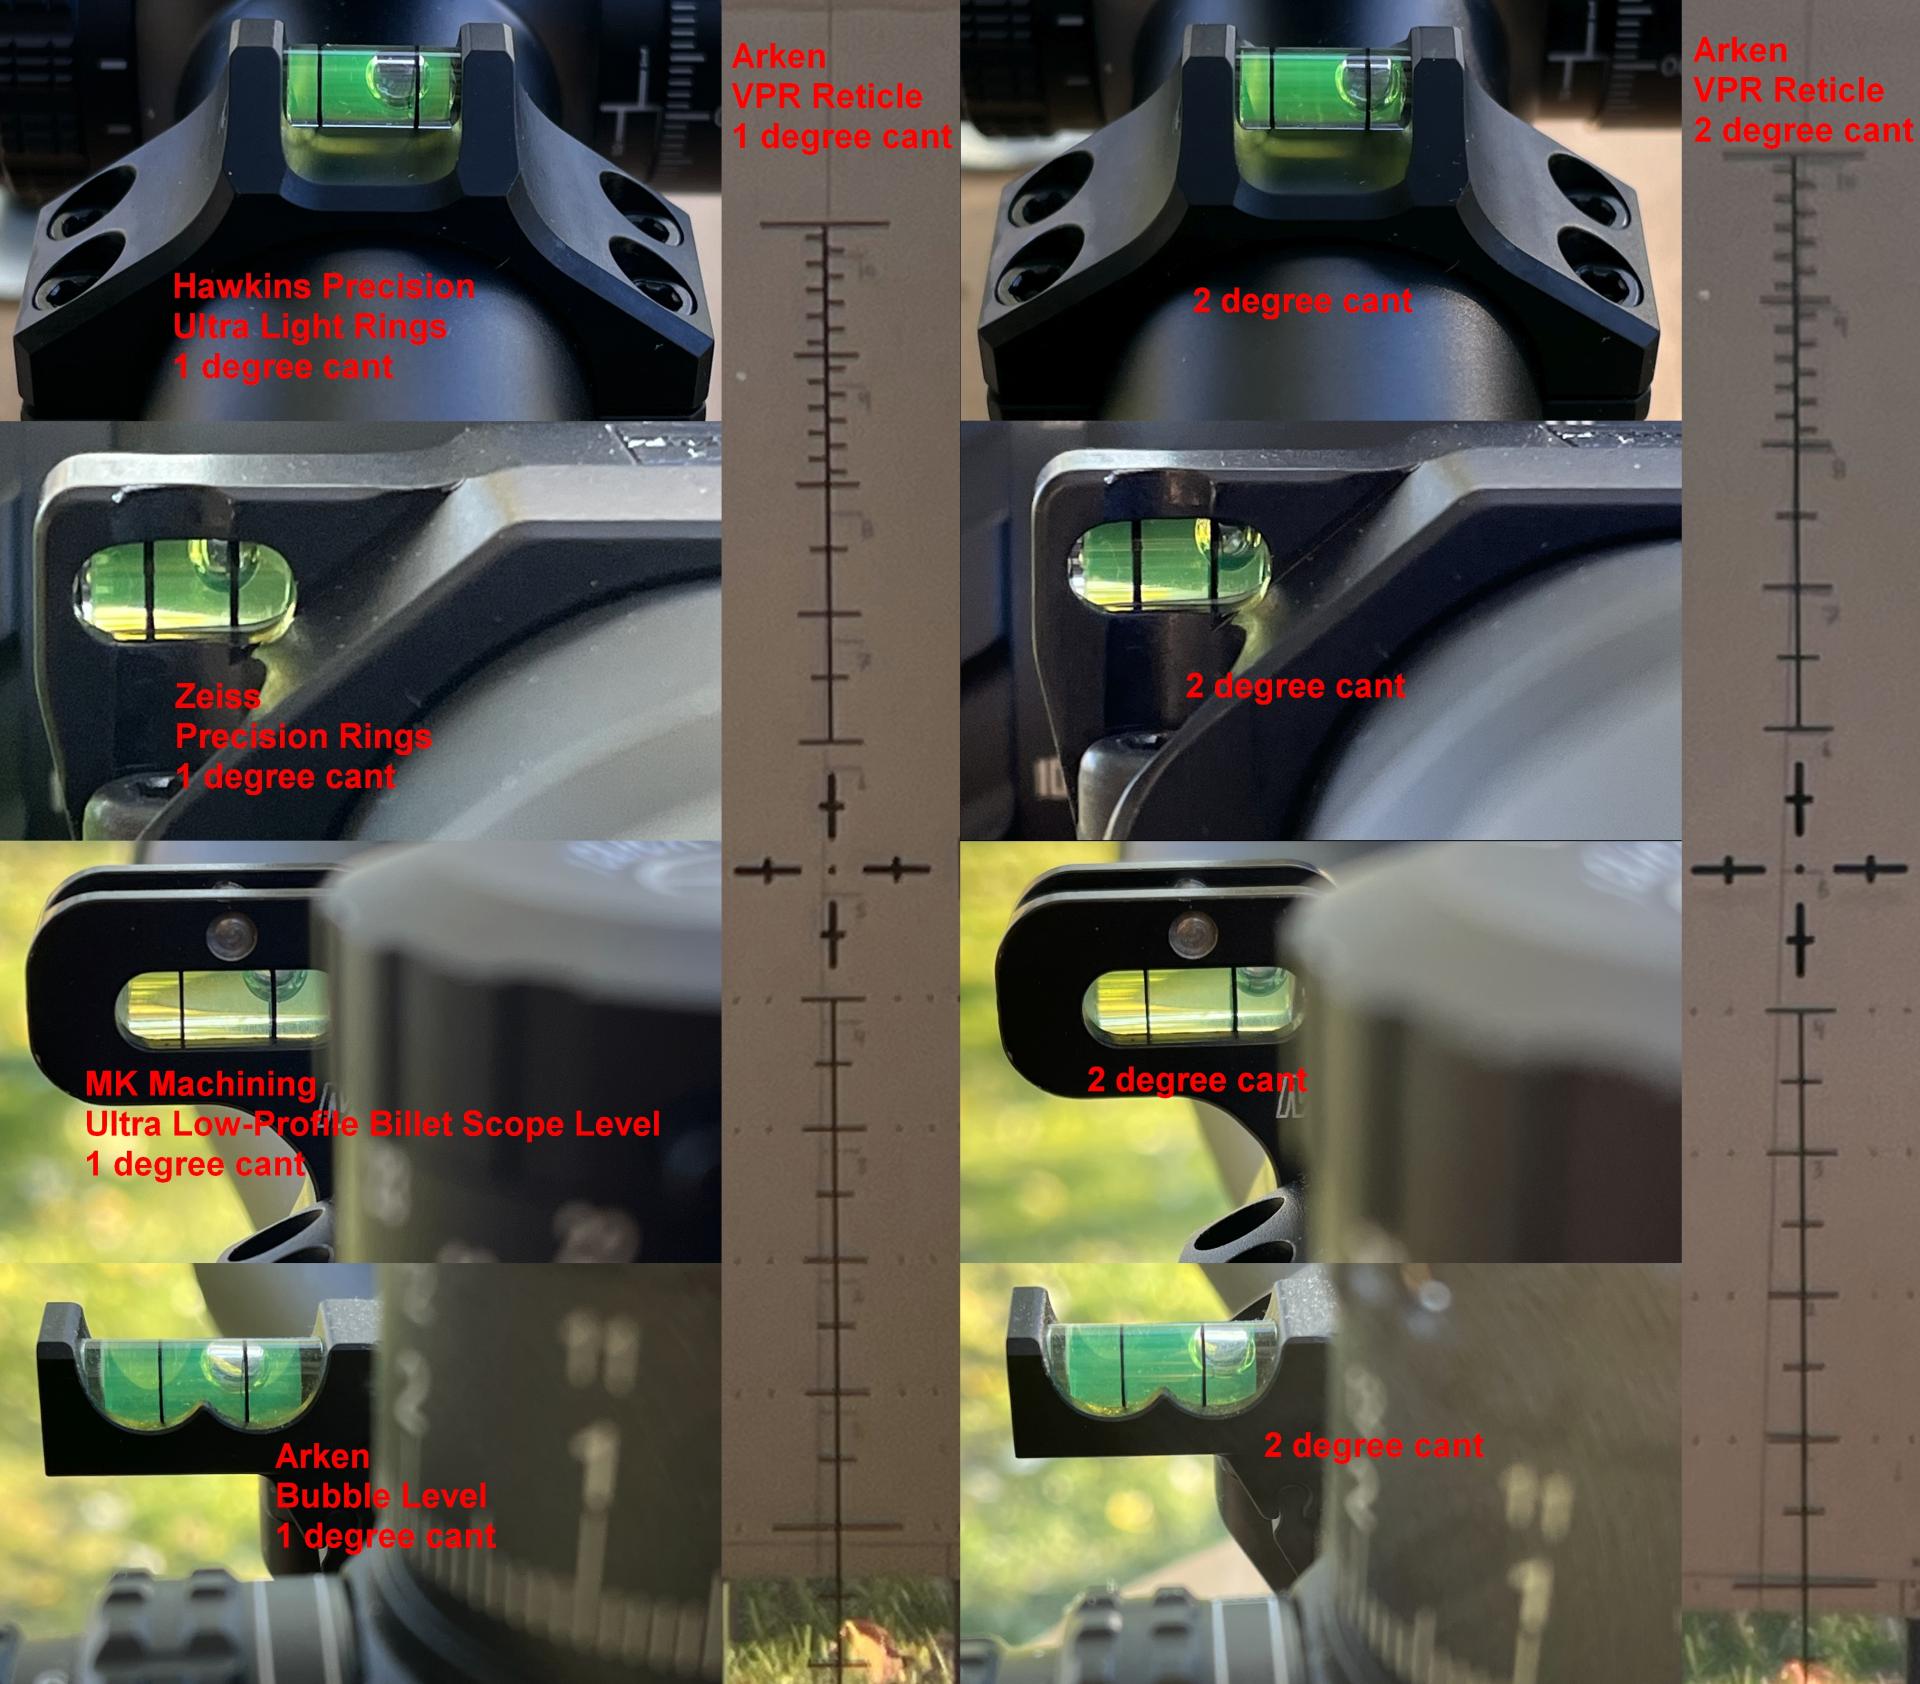
What we learn from this testing in combination with the tables on amount of error per degree of cant from the earlier section is that if your bubble is between the hash marks you are level enough to send the shot in almost all situations. Similarly, you learn that parallax is not a big concern as the level is so sensitive that you won’t be thrown off much by being a little wrong about exactly how centered the bubble is between the hash marks.
Part 2: How to mount your scope in conjunction with a level
What needs to be level on my rifle:
Lots of people are going to hate this, but here goes. Your rifle scope’s reticle does not actually need to be perfectly level with the vertical axis of your rifle stock or with the top of your pic rail. Don’t get me wrong, I’m not advocating a 45-degree angle here. If you do that, you will encounter some issues as you shoot at different distances. I’m also not telling you if you have the gear, such as a rail-mount level, not to use it. However, if were talking about +_ 5 degrees here, it just doesn’t matter. You can eyeball it. You don’t need a fancy scope mounting kit and caboodle. Bottom line, if the reticle looks and feels level to the stock you, it is level enough.
The reason for this is again… numbers. If you are a full 5% off between the axis of your scopes reticle and the axis of your rifle (you would notice this BTW – it is a crazy amount to be canted) and you are using a scope that is mounted 1.25 inches above the bore line, your bore will only be offset in the horizontal from your scope by .109”. You will theoretically correct this in your 100yd zero leading to shots at other distances having some theoretical horizontal error due to the misalignment of bore and scope in that axis (in reality you don’t have clicks this fine). At 1,000 yds this error would only be a whopping ~1”. So yea, it really doesn’t matter if your scope reticle is just a little bit canted to the axis of your scope tube, the rifle bore, and your stock. You can stop obsessing about it and buying a bunch of products to try to make it perfect – your eyeballing is fine.
As for the alignment between your reticle (scope adjustments), bubble level, and the pull of gravity, that has to be pretty darn good though. This is for the reason we discussed in the section “level by the numbers.” Now it is time to discuss mounting a scope and getting that right.
Mounting your scope and level:
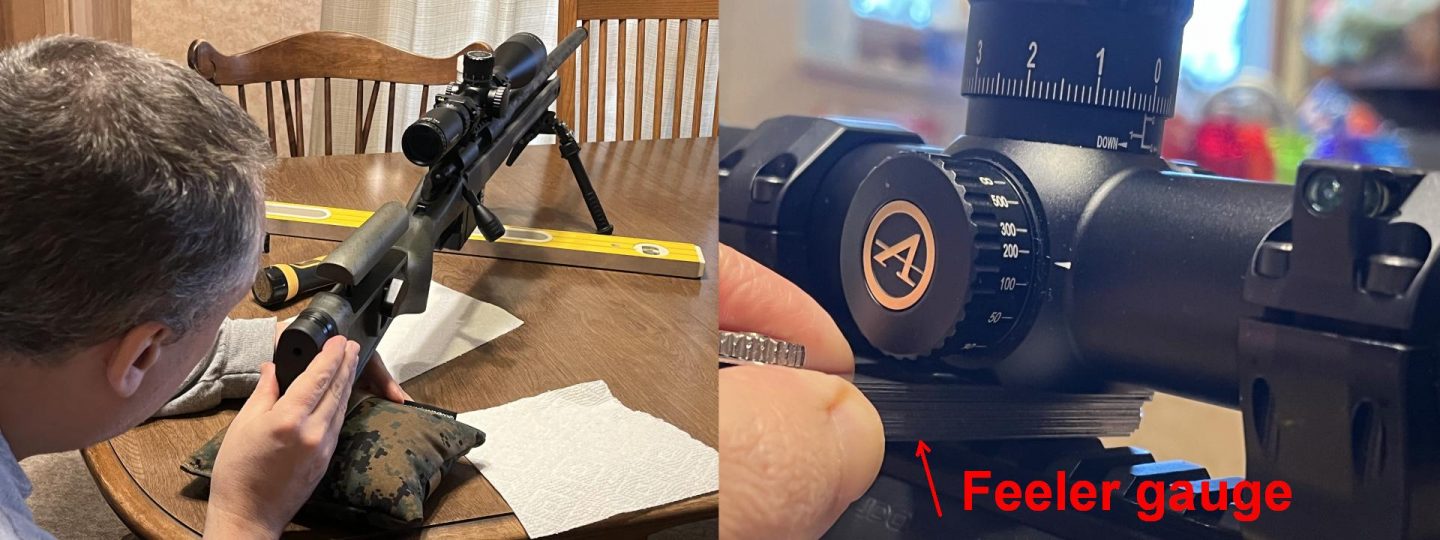
I get more questions about this than probably anything else. People obsess about it endlessly and many even buy a lot of fancy tools to do this simple job. You do not need much to get the job done right, though. You first need a level vertical line at a distance you can see clearly through your scope. Then, you need a way to hold your rifle still. I get the vertical line by using a target with a vertical line on it and a carpenter’s level to set that target up straight. I do not do this with a plumb bob because I don’t have a big enough house to set one up far enough from me to see it though a scope and they are super affected by the wind outside. Ditch the plumb bob thinking. A carpenter level and a target is just easier. Next, you need a way to adjust your rifle’s angle and to lock it down once you get it vertical. I use a nice bipod with a Terry Cross Pod-Loc for this. You could use some sort of rifle vice for this, a nice shooting tripod, or even some fancy scope mounting tool that costs as much as the bipod but you should really have a good bipod already anyway so we will just use that. Those are enough tools for scope mounting though a torque screwdriver and feeler gauges (if you’re mounting without a fixed level) are nice as well.
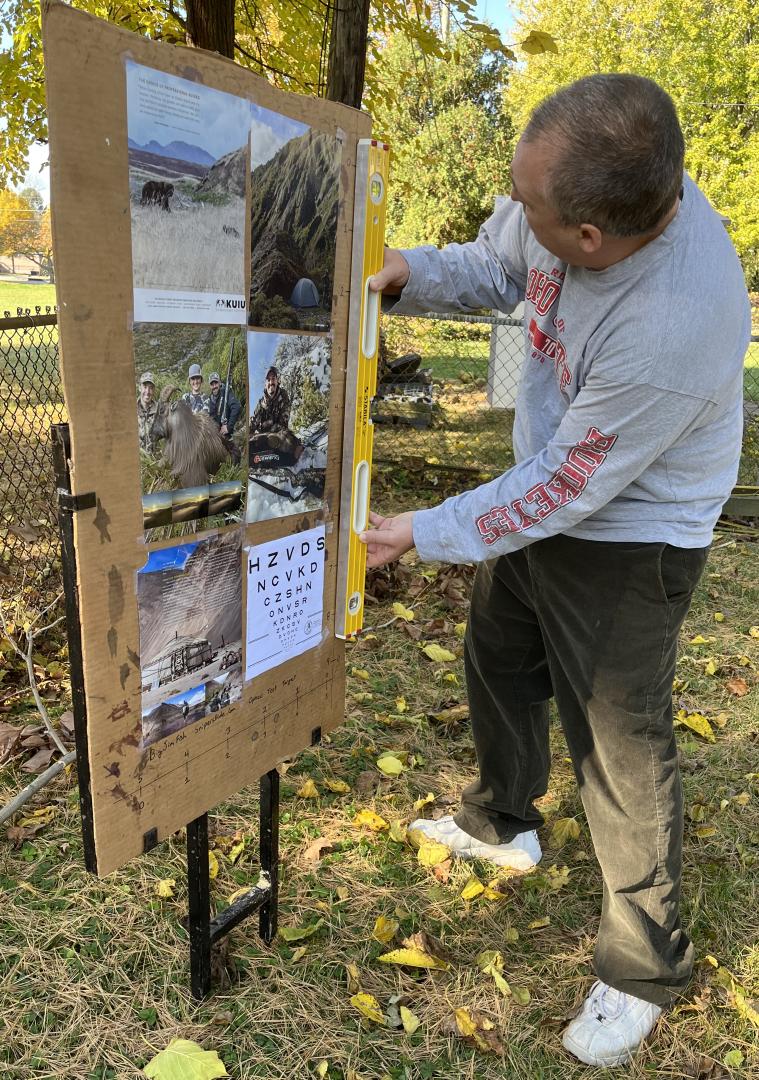
Step 1:
Set up the target a sufficient distance from the table or shooting bench you will be leveling the scope on so that you can see it clearly though the scope. Use the carpenter level to make sure that line is vertical. Be picky about this. Get that line just right as any error in its orientation will be forever part of your system.
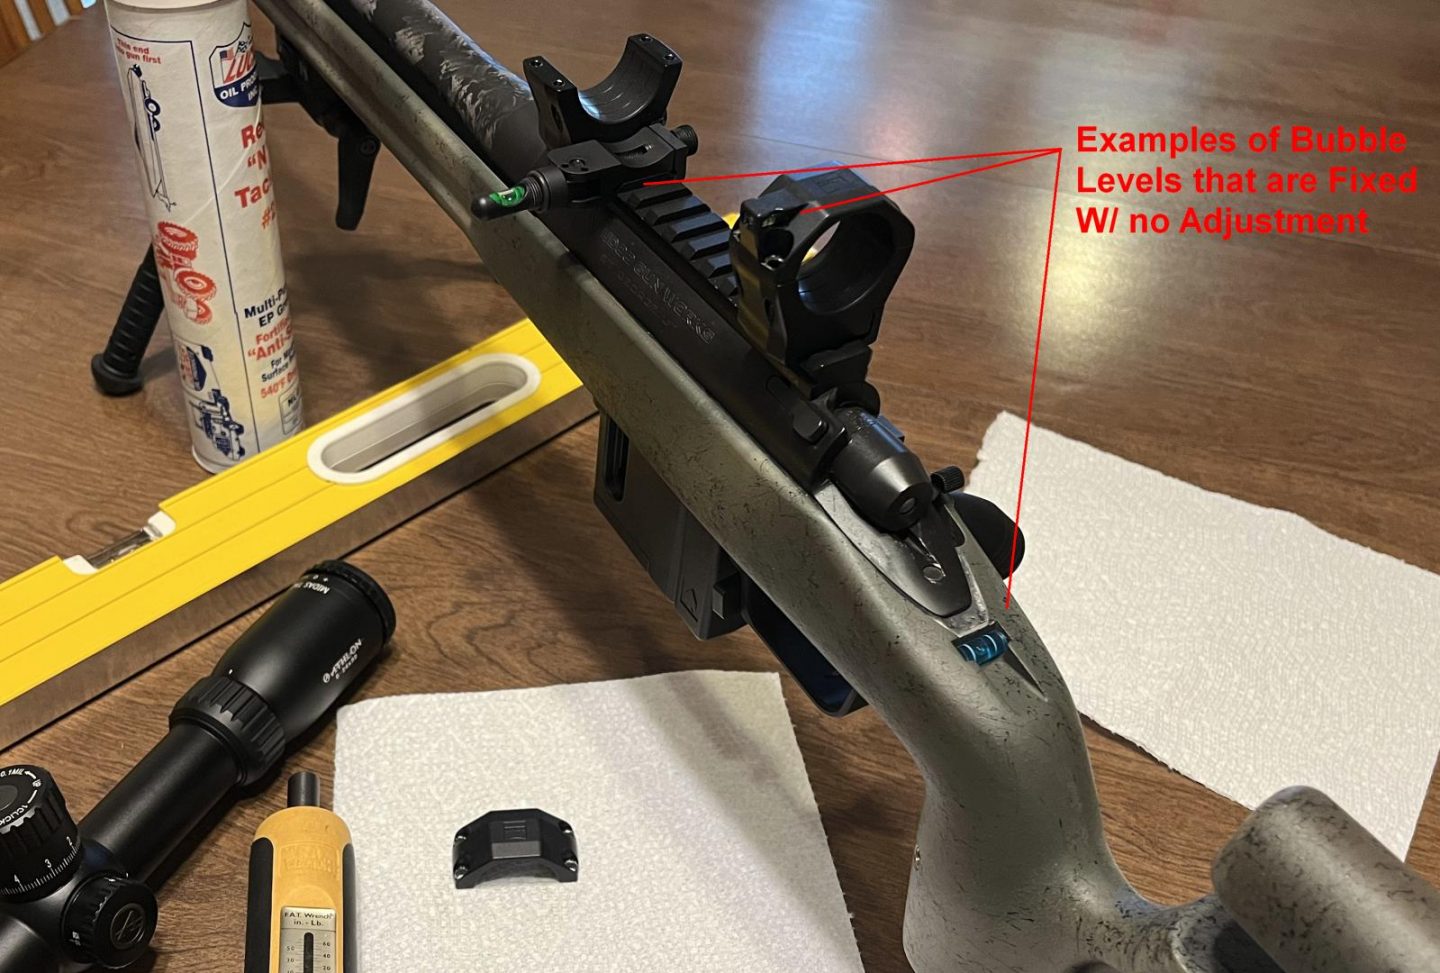
Now we will bifurcate the scope mounting process into two classes. The first set of steps will be for mounting scopes in conjunction with levels that are fixed and cannot be adjusted relative to the scope after mounting, such as those integrated into the stock, those mounted to the pic rail, and those integrated into the rings. The second set of instructions are for mounting scopes when the level is to be added on and adjusted later, such as with a scope tube mounted level.
Step 2 for fixed levels:
In this step we level our level. At the start of this step, you should have your ring bases attached to the rail and torqued to spec with as wide as possible a spacing between them that still allows for the scope to be at proper eye relief. Any fixed level that you will be leveling the scope to should also be attached, such as one that straps to the pic rail. In this step, you point the rifle with the level attached at your test target, rotating it until it is level, and locking it down with the Pod-Loc. If you are using rings that have the level on the top cap, simply sit the top cap on the bottom cap for this step. You now have the rifle pointed to the target, level, and relatively securely locked in place.
Step 3 for fixed levels:
It’s time to add the scope now. You will be trying not to move the rifle around much in this step but don’t fret too much about it. Place the scope in the rings and check proper eye relief by sitting behind the rifle and shouldering it as if shooting. Place the ring caps on the rings with the same gap between cap and base on both sides of the cap. Put the fasteners in and screw them in until they are just barely not touching the top cap so that the scope can still freely rotate. At this point, your rifle is level and the scope is the correct distance from your eye. Carefully rotate the scope until its reticle is in perfect alignment with the target you set up in Step 1.
Step 4 for fixed levels:
At this point you should have a rifle that is properly level to the target and a scope that is set up for the correct eye relief and also level with the target. If that is not the case you may need to finely adjust the rifle or scope a little so that the bubble shows level and the reticle also shows level against the target you set up. That is fine, expect to do a little fine tuning. Once the level and reticle both show level, you are going to start to tighten the cap screws on the rings. Speaking of those screws, they should be lightly lubed with grease. Do not run them dry as your torque will end up uneven and your scope will likely eventually come loose. I also do not recommend Loctite, as it is unnecessary as well as a PITA if you ever want to move anything in the future. You will first hold the bit in just your finger to start tightening and you will tighten just until you feel the cap screws start to snug the ring cap. You will do this in a cross pattern, as with lug nuts, and just a little on each screw at a time. We want to be slow and even here so that the scope does not rotate during the tightening process. If you do it slowly and evenly, nothing will rotate at all, I promise. If you are using a set of rings with the bubble level in the cap, start the tightening with just the cap that does not have the level. Proceed tightening until the cap screws are finger tight.
Step 5 for fixed levels:
At this point, the cap screws should be finger-tight on all the ring cap screws that do not have a level in them; the gaps between ring caps and the ring bases should be even all around; your bubble level should be level; and your scope reticle should be perfectly aligned with your level target from Step 1. If any one of these things is off, go back and fix it. If not, time to put your torque screwdriver on the ring cap screws and start to tighten them to the ring or scope manufacturer’s recommendation, typically somewhere between 8-18 in/lbs. If you are mounting using rings with the bubble level in the cap, I would put just a little torque on the non-bubble cap here, but not the full amount, before moving on to the second cap that has the bubble and starting to tighten it as well. You need to do this because the scope must not rotate while you’re torquing the cap that has the level. You’re going to keep the non-bubble cap screws just a little tighter than the bubble cap until the end of your torque down process when they will both be at the recommended torque so that the scopes alignment doesn’t get messed up if you need to re-start and re-adjust the bubble level cap. This is likely. You will torque all of the fasteners a little at a time in that crossways pattern until they are all to the manufacturer’s spec. At this point, you will check to make sure the bubble level and scope reticle are still level and put any witness marks you might want on the cap screws. All done.
Step 2 for levels that have adjustable alignment:
If your level has adjustable alignment, you are essentially just going to mount the scope so that it feels level enough and then adjust the level to be in agreement with the scope later. So, go ahead and put your scope rings on with as much space between them as you can have and still get proper eye relief on the scope and then torque their bases down. Next, get behind the rifle like you’re shooting and slide the scope forwards or backward in the rings until your eye relief is correct. When you have finished that, put the cap ring caps on so that there is an even gap between the ring cap and ring base on each side and put the lubed cap screws in such that they are just barely not touching the caps and you can freely rotate the scope.
Step 3 for levels that have adjustable alignment:
Your scope is now on the rifle at the proper eye relief with ring caps on but not tight. You need to get the scope reticle to the point of ‘good enough’ level. This is done either by eyeballing or using a feeler gauge. To eyeball you adjust the scope to its lowest magnification and stand behind it so that you can just see the reticle in the scope. You will rotate the scope until it looks like the reticle is pointing twords the center of the bolt. To use feeler gauges, you will slide the correct number between the flat bottom of the scope’s center saddle section and the flat top of your rail. You’re going for as small a gap between the feeler gauges and your scope as possible so you can tell if the scope is turned in the rings or not. With either method, you are doing your best to get your alignment within a degree or two of correct. Make sure to sit behind the rifle with it shouldered and look at your leveled target though the scope. Does it feel level? You are basically just going for it feeling level here.
Step 4 for levels that have adjustable alignment:
Your scope is now at the proper eye relief and feels level enough. Time to tighten down cap screws. Do this with just the bit in your fingers first and do it little by little in a crossing pattern as with lug nuts. If you do this little by little, the scope will not rotate and your ring caps will stay evenly gapped. Also, make sure you do not have the feeler gauge in while tightening screws, as you can bend the scope this way. You will tighten the screws little by little first by hand and then with your torque screwdriver until they are at the ring or scope maker’s recommended torque. This is typically between 8-18 in lbs.
Step 5 for levels that have adjustable alignment:
Here is where we add the level and align it. The key to this is to have your riflescope aligned to your target while you strap the level on and tighten it down. It will take some trial and error to adjust to level and tighten down most of the levels that can be adjusted. Most of them have some sort of strap or hinge mechanism where you are tightening them on just one side. They will rotate while you tighten them. Because of that you end up having to start them a little off of level and sort of tighten them into level with some guess and check as to how far off to start them. The key is to make sure to check the level of the scope on your target after you get your bubble level tightened down to make sure it is still correct. Also be careful not to over tighten those tiny little screws that most scope tube levels have. I have never seen a torque spec on any of them, but it sure feels like less than even ring cap screws.
Part 3: Types of levels and thoughts on specific products I have used:
What types of level exist and which is best for you:
There are a truly massive number of levels marketed for precision rifle. There are bubble levels, electronic levels, and even a ceramic ball level from Accuracy 1st. Some of these products are stand-alone and attach to the rifle scope. Some attach to the scope mounting picitinny rail. Some even attach to the rifle stock. A number of companies also integrate a bubble or electronic level into other products that are already necessary pieces of precision rifle equipment, such as the stock / chassis, scope, or scope rings. I will not attempt to find and catalogue all the possibilities for you. Rather, I will give you a list of considerations when thinking about how to add a level to your rifle and then talk about a few common products and how they stack up.
My list of considerations for levels derives from the experience of trying a number of these products and encountering both weaknesses and strengths in particular classes of products as well as individual products.
Considerations when selecting a level:
1) Do I have to break head position to see the level and if so, by how much? Level lean is real, it is very easy tilt your rifle over in the direction of the level when looking over at it.
2) Even if I can maintain head position, do I have to change my primary attention focus from the reticle and target. This might mean focusing an eye on a little bubble level vial at an uncomfortable focal distance.
3) Does the level interfere with my ability to see another control such as a windage adjustment, or does another control obstruct my view of the level?
4) Does the level stick out in such a way that it may snag, become damaged, or damage something else?
5) Is the level easy to see even when lighting is low?
6) Is there play in the mounting of the level such that it can give inconsistent readings?
7) What is the added cost of this level? Is it basically a free add-on to a component I must buy or a stand-alone product or option with some associated cost?
8) Do I have a place to mount this level in my current configuration or will making this choice of level necessitate more changes?
9) Will the level still be visible if I have to shoot from my weak hand?
Levels built into the Scope:
There is only one place you can put a level to have it deliver its information to you without you having to take any attention off of your target at that crucial time when you are checking your level right before the shot – and that place is inside your scope. Integrated levels are right up there with toolless adjustment knobs in my pantheon of features I would like in all my scopes but few manufacturers provide. Off the top of my head, the only companies I know of that provide a level indicator inside of the scope for precision rifle use are Sig and U.S. Optics. In the case of Sig, it is an electronic level integrated into the reticle of some models, and in U.S. Optics case, it is a bubble level inside the eye piece that can be purchased as an option.
Sig scopes with LevelPlex
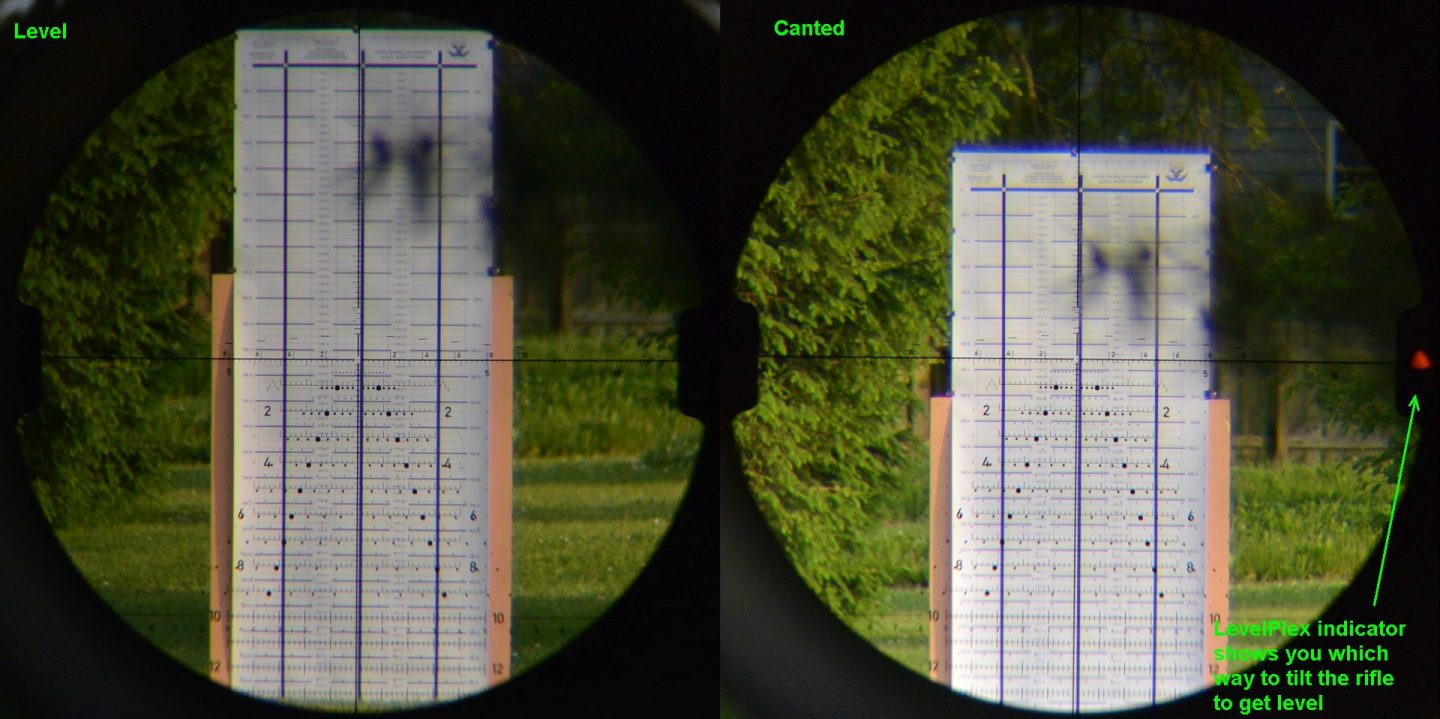
A few years ago, I did a review of the Sig Tango6 5-30x56mm rifle scope with the LevelPlex reticle. I later did an examination of the Sig BDX 2.0 system and the Sierra6BDX scope. Both of these scopes featured Sig’s integrated electronic level system they call LevelPlex. In both cases this system performed perfectly. The LevelPlex system features arrows that light up in your reticle when it is un-level telling you which way you need to tilt. The sensitivity of this read out is adjustable and the possible settings are well chosen. Feedback was instant with this system and the levels were calibrated to be properly level with the reticle in both scopes I tested. I find the LevelPlex system a big selling point for Sig scopes, and I think more makers should incorporate levels into their long-range scope offerings.
Scope tube mounted stand-alone levels:
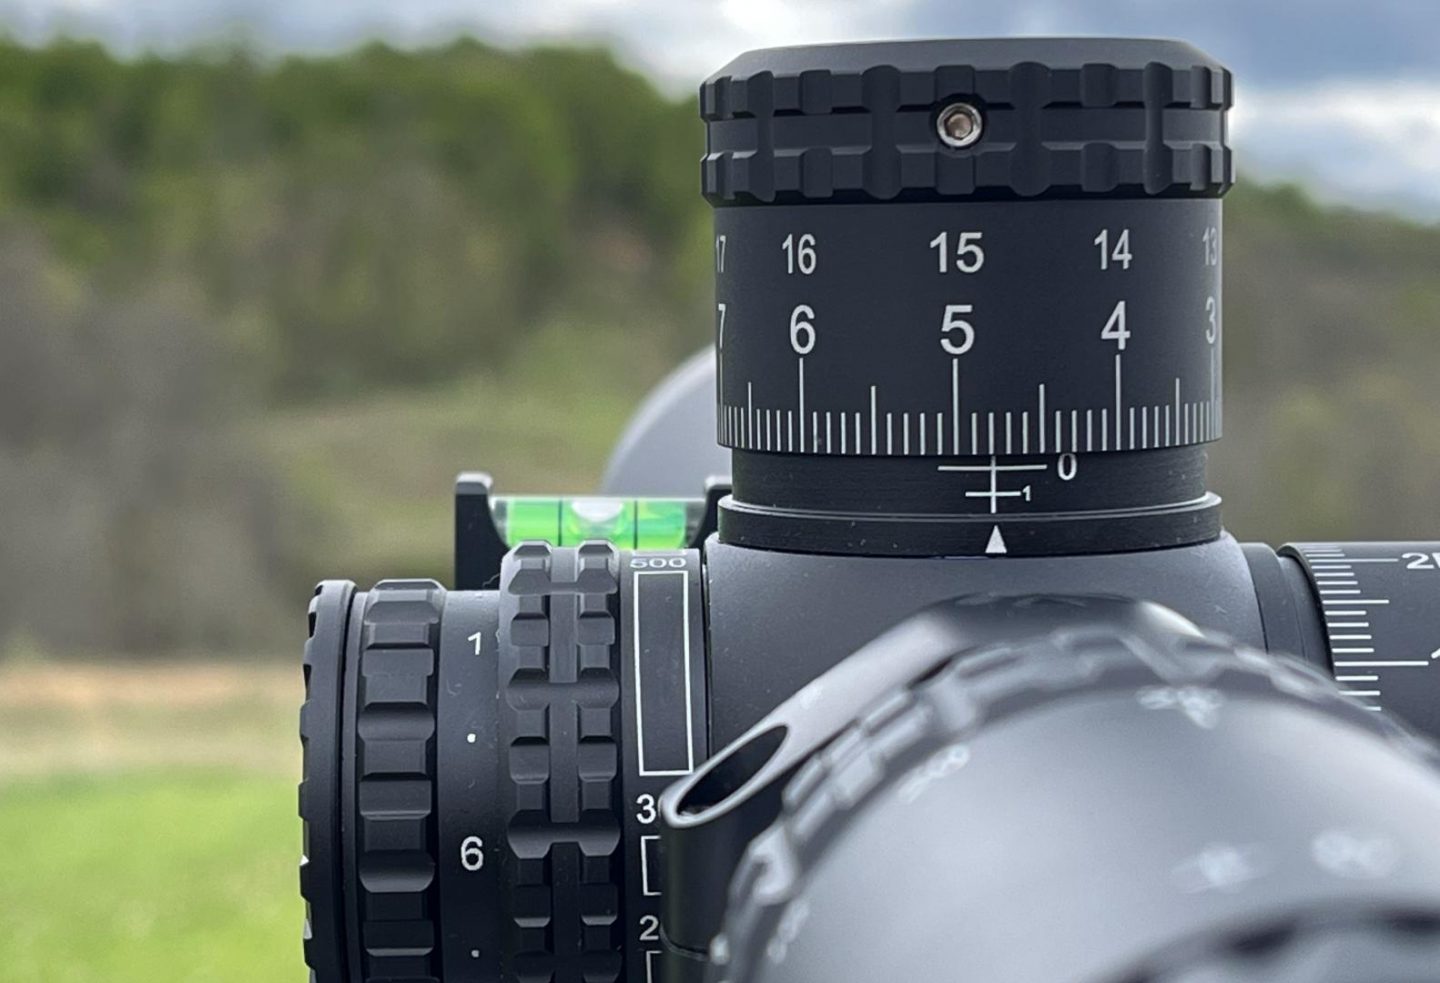
The most common choice of level for precision rifle shooters is probably a stand-alone ring-mounted level, such as those from MK Machining or the one from Arken Optics. These are mounted on the scope main tube, typically on a right-handed shooter’s left in the 10:30 position to be visible with the off eye between the parallax control and the elevation turret. This is a comfortable position that requires no break in head position, and little shift in attention focus to use. These particular examples let ample light in to be well illuminated even in low light. The downside of these options is that they are stand-alone products, so they do add some cost, even though that is typically not much. Some scope / mount combinations will also not have room on the main tube to add a strap-on level in the desired mounting position. These levels also stick out and are pretty easy to snag. I worry that the wrong impact might even damage the scope tube since they attach directly to it, though this seems less likely with the plastic version of the MK than the various aluminum products. Shooting weak hand will also necessitate a head position break to read these levels.
Arken Bubble Level
Much as is the case with Arken’s Halo scope rings, their bubble level is of surprising quality for the price. It utilizes a thin, flexible aluminum strap to hold it to the scope main tube that has a pivot on one end and a single fastener on the other. Like most tube-based levels, it is a little tricky to get positioned perfectly when you tighten it down, but at least you only have to do that once. The Arken level provides good area for light to get to the level and so has good visibility. It also is positioned well to get a good view with your off eye between the elevation knob and the parallax. All in all, it’s good quality for the price.
Mk Machining Ultra Low-Profile Billet Scope Level
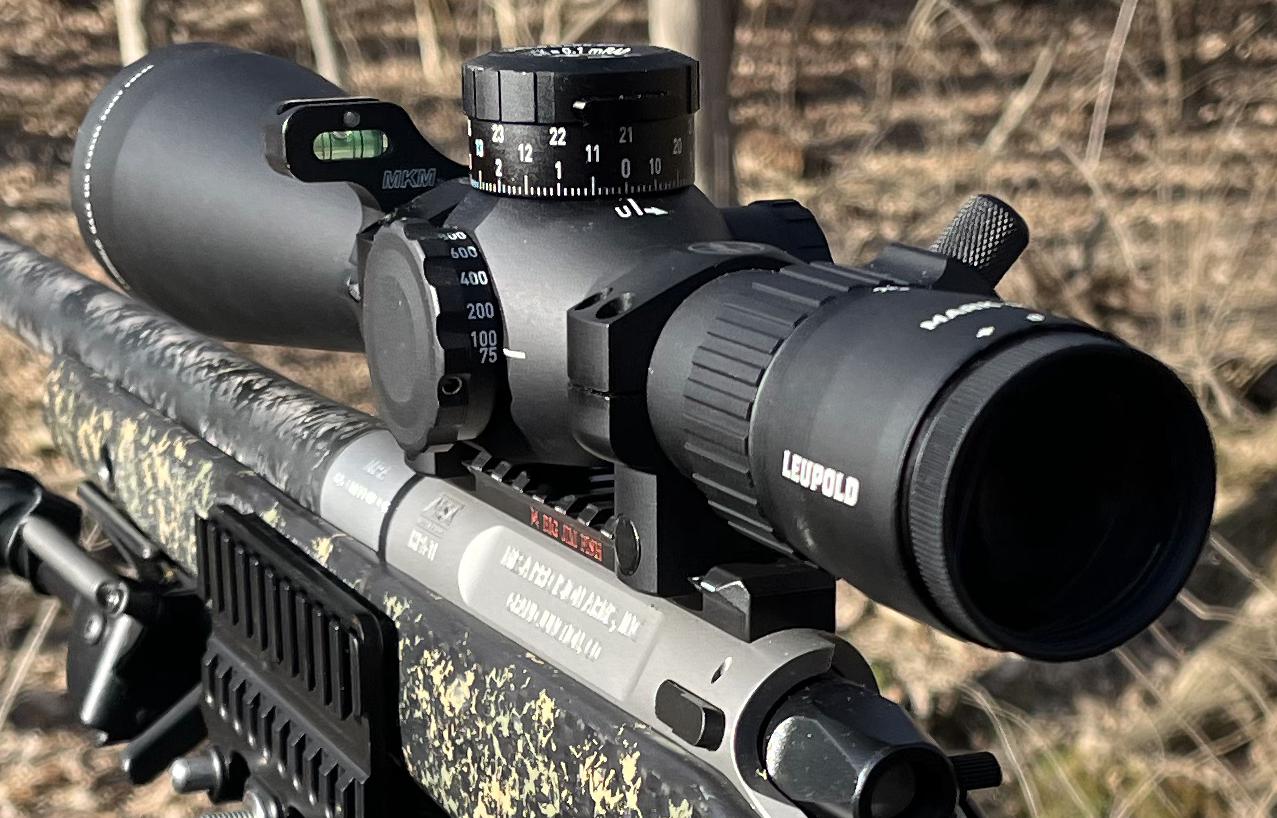
This might be the most common level used in precision shooting today. Its best selling points are how perfectly they have the height and orientation set to fit right in that notch between the elevation turret and the parallax turret in your visual plane and how well the level picks up the light to be easy to read. It is a pleasure to use and is about as good when it comes to position and attention breaking as a bubble level not inside your scope could be. They have also done a good job radiusing the edges so it is less likely to cut up your rifle case sliding around in it. The level’s design has a pivot on one side and single screw on the other. Like most tube-based levels, it is a bit tricky to get perfectly level when you’re installing it. Lastly, the joint on the pivot side is just a two-part hinge and likes to stretch and torque a bit. I wish they had gone with a different, more robust hinge design
Ring-mounted levels:
A number of makers of rings and one-piece mounts have begun to offer levels either integrated into the rings or as add-ons that attach to the rings. In many cases, these levels come at effectively no cost as they are integrated into a ring or mount that is cost-competitive with otherwise similar rings or mounts from other makers. The location of the bubble level on the rings or mount varies a great deal from maker to maker, with some offering an offset ring cap location usually oriented at 10:30, similar to most scope-mounted stand-alone levels, while others mount the level below the scope on the base, and still others mount it centered in the top cap of the rear ring. In my experience, locations below the scope are difficult to see, often requiring a break in head position. They also do not catch much light and so are difficult to see for that reason as well. The centered top cap location also requires a small break in head position to see, but is a bit more comfortable and better lit. The offset location has all the benefits discussed with the stand-alone levels above but with the added benefits of essentially being a free add-on to a mounting solution you will purchase anyway and having little chance of damaging your scope main tube if you snag the level since the cap screws should prevent it from torquing the tube if impacted.
Zeiss Precision Rings
I have a couple sets of Zeiss Precision rings that I bought a year or two ago as semi-used demo list products. The Zeiss rings have an offset level in the top cap that is very low profile and essentially no-snag. They are very nice looking and well-machined rings that come in an absurdly nice plastic box that you’re definitely paying for. To be frank, I expected to love the rings, but I don’t. They do not have as snug a fit to the tube as I would expect high-end rings to have. Though I have not had any issues with my scopes shifting in them yet, I have heard rumblings of this and I find it plausible. The bubble level on the Zeiss rings is also mounted in a location where it will often not be visible without breaking head position if it is mounted on the front ring because the parallax turret will block your view of it, depending on the size of your particular scope’s parallax adjustment. I have to mount it on the rear cap of my ZCO for this reason and the eye relief for it is not great there. There is no opening above the bubble vial on the Zeiss rings for light to reach the level, so they are also very poorly lit. Lastly, the Zeiss website lists the rings as Type III hard anodized, but the finish on mine has come off under the cap screws in flakes and has become easily scratched in a few other areas. These are used demos rings that I bought, so perhaps they were an early painted variant. I’m not sure, but the finish is not impressive. All in all, they are okay rings, but I don’t love them.
Hawkins Precision Ultra Light Tactical Scope Rings
On the other end of the spectrum, the Hawkins Precision Ultra Light Tactical Scope Rings are the nicest lightweight scope rings I have encountered from any maker to date. The fit is snug and perfect on the scope tube, and the machining is excellent throughout with very well-done skeletonizing of the base section to save weight. Hawkins uses substantial size torx fasteners on the top cap and a solid steel press fit crossbolt arrangement for the base that should be more than robust enough for the torque required. Hawkins sells their rings with both a center cap location for the level and a high offset cap location. The center location, which I have, is low-profile and no-snag, and should be a great arrangement for a hunting scope whereas the offset cap location looks to be an excellent placement for precision rifle and competition use. It should sit right in that 10:30 position where most aftermarket tube mounted levels go. In either arrangement Hawkins provides plenty of area for the levels to pick up light. I expect I will buy more of these rings in the future.
Wheeler Pic Rail Scope Rings
Picking these up probably owes a lot to how good the Arken rings were that come in the “combo pack” you can buy from Arken when you order their scopes. That got me thinking I should look at the quality of other low-cost rings to see if they have improved. The short answer is, no, Arken rings are just unusually good for low-cost rings. These Wheeler rings are made of much softer aluminum that visibly and tacitly stretches a good deal even as you tighten them carefully. Fortunately, the clamp for the rail at the bottom has a steel crossbolt so at least that it is not threaded into the soft aluminum. The level mount location on the Wheeler rings is low enough on the ring that you will need to mount it on the rear ring, as it will otherwise be blocked by the parallax turret. This makes it a little cramped when you try to focus on the level. The level flips out for use and in for transport, and rests on a pivot such that it can be adjusted with 4 cap screws to level it relative to the reticle. There is some slight variance in where the level comes to rest when you flip it out, but this isn’t too bad, maybe around 1/8th of a degree. All in all, these Wheeler rings are no substitute for a quality-machined ring. However, if you’re careful and gentle with the cap screws and don’t take them on and off a lot, they may work well enough. They are $50, and the quality is fair enough for that.
Rail-Mounted Levels:
The first level I ever saw for precision rifle use was a U.S. Optics rail-mounted level that simply bolted on to the pic scope mount rail on top the receiver. The explosion of alternate level products and mounting locations over time has not dampened the popularity of the bolt on pic level. In fact, there are many more makers of rail-mounted levels today than there were back then, including variants that are electronic and some that are jointed to flip to the side out of the way. Much of the time, rail mounted levels can fit at the 7:30 position in the field of view of your non-dominant eye, right underneath your parallax adjustment. Here they offer excellent eye relief from the shooter such that they can be viewed with little break in concentration and no break in head position. In addition to being an extra cost for shooters, the most common complaint with rail-mounted levels is that they tend to stick out a good bit and snag easily. This can sometimes be mitigated by the flip-to-the-side features some models have, though that often requires extra mounting room to utilize. Even when not utilizing flip-to-the-side varieties, issues with some scope / mounting solutions not offering a free place on the rail to mount the level where you most want it is still a common problem.
U.S. Optics BBL 300
As mentioned above, the first level for precision rifle I ever encountered was one of the U.S. Optics rail-mounted levels. These levels were way ahead of the game when it came to level use then, and even now, by offering the option of an internal level in their scopes for an additional $85. That is a very under-appreciated feature that I would absolutely pay for in many of my scopes. As for the BBL 300, it is an excellent rail-mounted level with a few winning added features. First off, it is flip-to-the-side for no-snag transport and storage. For added storage protection, it even comes with a little screw on knurled cap to protect the vial. Lastly, the BBL 300 contains some bright, translucent whitening agent in suspension in the bubble vial. This highlights the contrast between the bubble and the vial substantially making it easier to see. With the possible exception of price, it’s all wins for the BBL 300. Great product.
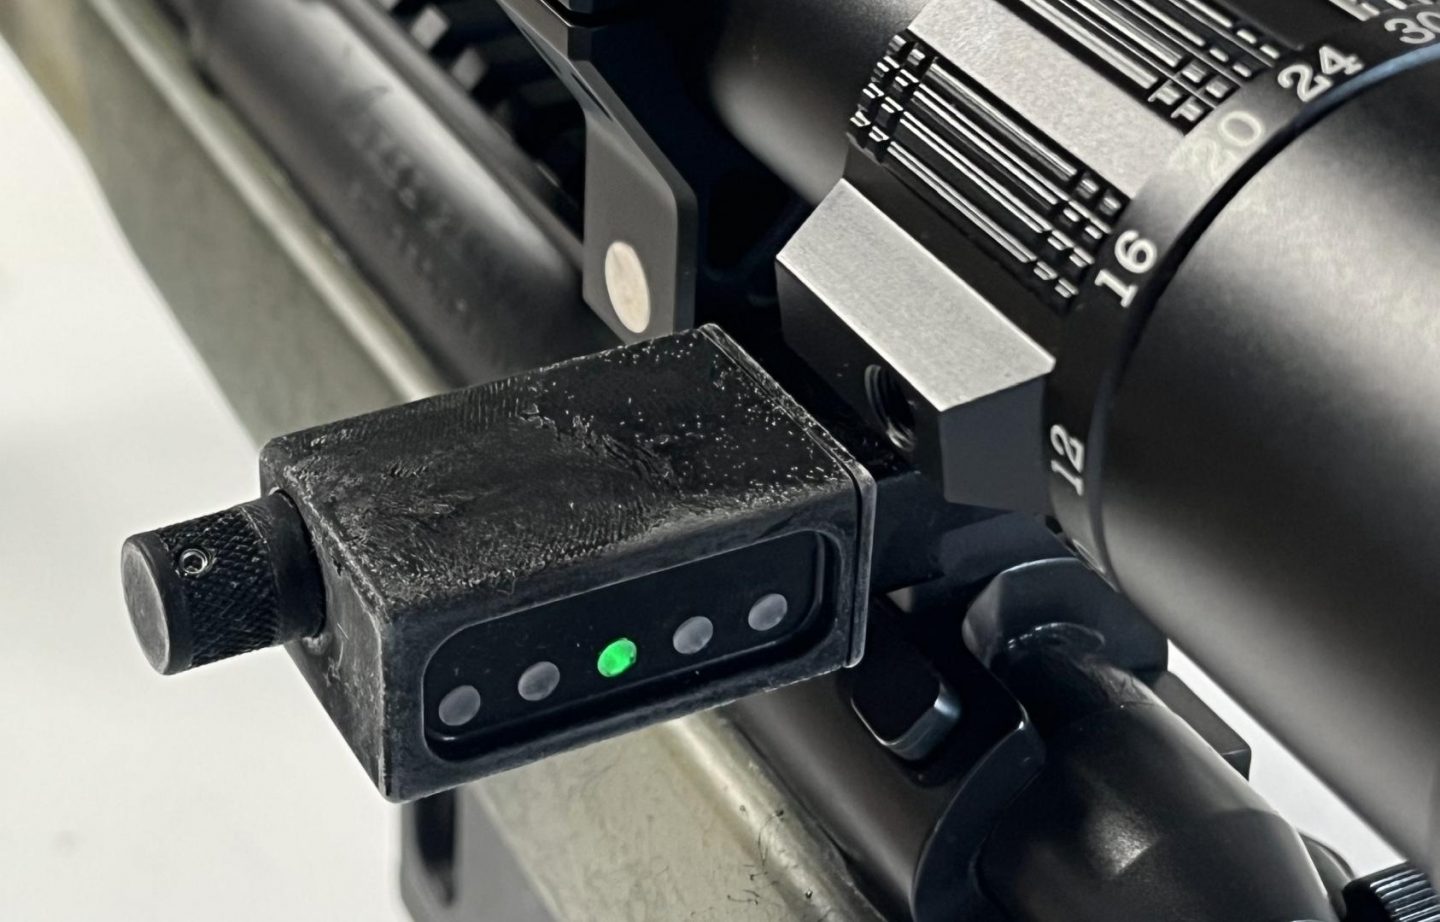
MDT / LRA MV3 Electronic Level, the SEND iT Level:
The MV3 is an electronic level originally designed by Long Range Arms and now produced in conjunction with MDT. Its electronic nature allows it some flexibility in function that analog products to not have. For instance, it can be mounted in 4 different orientations. This amounts to left or right side horizontal and left or right side vertical. A number of mounts from a number of different makers can be purchased aftermarket to aid with this, such as a SPUHR adapter, scope tube adapter, and 90degree mount. The level comes with a simple horizontal pic mount that can be reversed for right side placement. In addition to mounting flexibility, you also have choices in how much sensitivity and LED brightness the level has. You can set the sensitivity to 0.2, 0.4, 0.6, 0.8, or 1.0 degrees, and the brightness is continually adjustable from ‘you can’t see it’ to ‘it’s hard to look at’. The level provides feedback to the shooter on amount of cant using 5 color-coded LEDs, with the center green light indicating when you are in the range of sensitivity you have set the level for. This color-coding eliminates the need to actually focus your eye on the level and helps you keep attention on target. An MV3 mounted in the visual range of your off eye is therefore the best you can do as far as keeping your attention on target while using a level not built into your scope. The final advantage the MV3 level has is that, within 5 degrees each way, you can reset what it considers level. This is the big win, as this reset only takes about 10 seconds and allows you to use one MV3 with all your rifles, which is how I use mine. Each of my rifles has some sort of bubble level on it with the scope properly calibrated to that level. Some of these bubble levels are great to use, but some, like the Zeiss rings or level on the Grayboe Phoenix stock, are not ideal. When I am using those products, I put my MDT MV3 on the rifle and zero it to that existing hard-to-read level. This way, I always have an excellent level system while I am shooting that I just take off before I pack the rifle up and throw it in my bag. This also works out well as the MV3 is huge, sticks out, and would knock into everything if I left it on all the time. That, the fact it needs a battery, and its $230 pricetag are its biggest down sides.
For those wondering, I have tested the MV3’s ability to hold a saved zero over time and though inclement weather conditions. It remembers its zero fine after being juggled around all day and it continues to hold that zero even in freezing conditions.
Levels Integrated into Stocks:
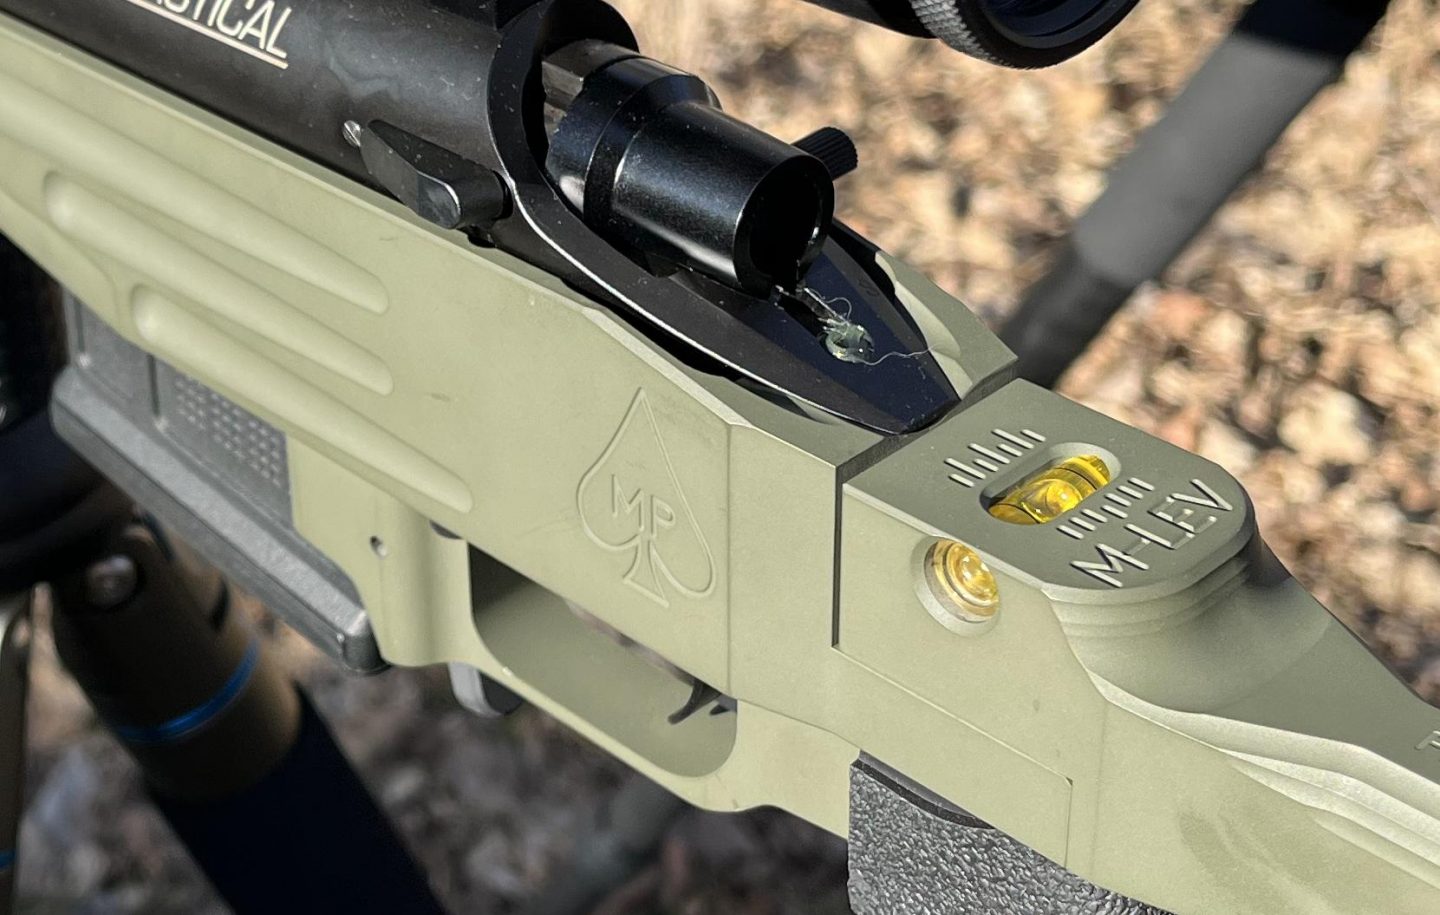
It is probable that the first precision rifle guy to ever put a level on his rifle put it on or in the stock. Wood, being the easily-worked material that it is, certainly invites the modification. Unsurprisingly, a number of makers of stocks and chassis systems today include such a feature. Off the top of my head, I can think of McCrees, Grayboe, MPA, and XLR. All of these makers position a bubble level directly behind the tang where it can be viewed with the dominant eye without breaking head position, though you do have to move your little eyeball a good bit and strain a little to focus so close. I also remember somebody doing a slide-out bubble vial on the left side of a chassis at some point, but who it was has skipped my mind. As it is of negligible cost, there is really no downside to a stock or chassis maker adding a level in the tang, and it is certainly a selling point for the end user. While these are in no way the most comfortable or fastest levels to use, they have their place.
Grayboe stock integrated bubble levels:
In the past I have done reviews on both the Grayboe Ridgeback and Phoenix stocks. At the time, both included integrated bubble levels in the tang, though it appears that the later Phoenix 2 does not. On both stocks these levels were properly level to the action. The level in the Ridgeback has a lighter green tube and is significantly preferable to the dark blue tube on the Phoenix, which is hard to see. As with all tang-mounted levels, it takes a good deal of eye movement and some eyestrain to see the level, though you do not have to break head position. These are not the easiest levels to use, but they are basically free and properly calibrated, so who can complain?
Note: Apparently a number of people did complain. Since the time of my Grayboe stock reviews they have stopped integrating bubble levels into their stocks. They got too many complaints about levels being “not level” or “not matching the level on the customers rings” from people who just didn’t understand how to properly mount a rifle scope with a level. I guess I should have written this article a couple years ago.
McCrees chassis:
McCrees is the only company I remember really pushing a level in the chassis as a major selling point. This ended up being a double-edged sword, as they patented the concept and there was a kerfuffle about intellectual property. Their level is nice, big, and bright, though, and certainly one of the best integrations into a stock or chassis. Like all tang-mounted products however, you will still strain your eye a good bit when using it.