
Many that have a CZ 452 / 455 bring up that they do not like the factory trigger, myself being one of them. There are several replacement triggers available, however many folks are budget minded and simply do not have the funds for a Timney or other "top shelf" triggers, or for that matter even a Rifle Basix which is on the lower priced side of the spectrum, but still around the $80.00 to $100.00 mark depending on source of supply.
The nicest thing about the above type of triggers is that they are adjustable to find that sweet spot both in creep and poundage. But again for the budget conscience, may not be able to or willing to expend funds for them.
With my recent acquiring of a CZ 455 Varmint, I was very unsatisfied with the trigger, and believe that CZ should have implemented the set trigger on the 453 for their new 455 flagship, but that's neither here nor there.
So at the time of this writing, for $18.00 I inquired about the YO Dave trigger kit http://www.yodaveproducts.com/, seen many favorable reviews about the kit and figured it was worth a try at that price. If not satisfied, no big loss.
The only tools suggested for the install is a 3/32nd punch to be used as a drift for the trigger pins holding the trigger group to the receiver. I had simply used an old allen wrench instead, but is up to you to spend the extra money on a punch. You may already have a punch, drift, or can borrow one from a friend. You will also need a small grinder or a drill and bit to remove the front trigger pin - the metal on the pin is rolled over for retention, you have to remove this "lip".
The kit comes with 4 springs of varying tension to help with poundage ranges and 4 cylinders (shims) to adjust for creep. There are instructions included, and are also available on the YO Dave website. The kit also included a replacement front trigger pin.
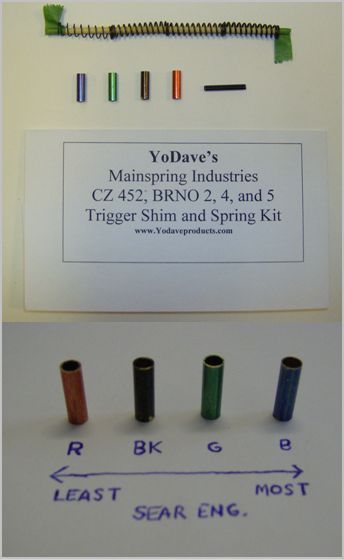
The shims come in different sizes, pictured above is the amount of sear engagement to experience with each.
Installation is very simple, and pretty straight forward. First, make ABSOLUTELY SURE YOUR FIREARM IS UNLOADED. When you've cleared the firearm, check again. Remove the action from the stock and back off the poundage adjustment nut until there is no tension placed on the spring. The instructions say to leave the bolt in the receiver.
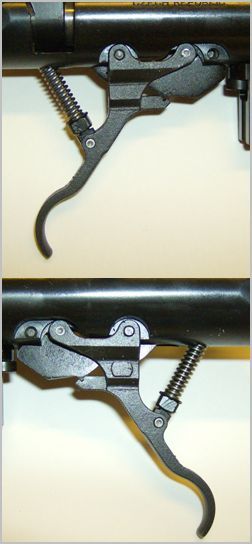
Below is a before look of the CZ trigger group. Note the "dimpled" front trigger pin, again you have to remove the metal "lips" to remove the pin. I used a large drill bit to remove the lips, though a small grinding tool is recommended.
Once the "lips" are removed, it's a simple task of tapping out the front pin. NOTE: put a small piece of duct tape on the pins in your magazine well and the sear retaining pin - they have a tendancy to vibrate out when tapping the trigger pins out.
I left the enough of the front pin in to keep some alignment of the yoke for the removal of the rear pin (Do the same on reassembly).
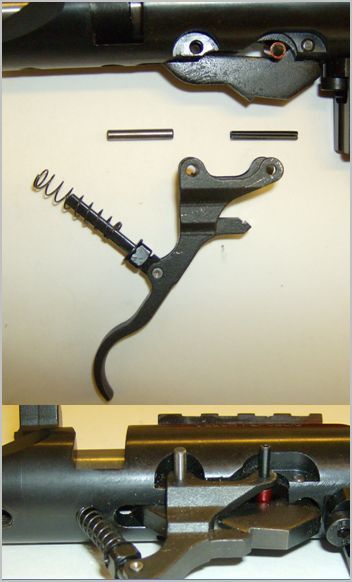
Then remove the rear pin by tapping it out. There are no "lips" here to contend with. While being cautious not to lose the factory spring or rear pin, remove the trigger group. Also be aware not to lose the washer that fits onto the bar that holds the spring in place. You should have the below at disassembly.

Note that the bar that holds the poundage spring has a flat spot on it, if the washer is removed make sure that the flat spot of the washer fits onto the bar correctly during reassembly, do not force it. Also on the washer, there is a ridge running on the bottom side, make sure that ridge is pointing down to engage the depression on the adjusting nut.
You can tell the difference in the poundage springs by the thickness of the coils. As my 455 is mostly going to be a bench queen, I prefer the lightest weight and least amount of sear engagement. I had started with the lightest spring and the red shim, but the sear engagement for me was pretty scary, constant slam fires. I moved up the line of shims, eventually using the blue one. Results will vary with the choice of poundage springs as the heavier springs tend to keep the trigger engaged more with the sear.
This is a trial and error thing, and takes a little time to figure out depending on your firearm and spring / shim combo. Even the blue shim and lightest spring combo I chose produced a firing when all was reassembled and give the rubber mallet test to the butt of the stock after a very hard and sharp strike, but no slam fires when cycling the bolt aggressively. Remember my intent is a bench queen, not a critter getter or I would choose a heavier spring for safety for a hunting application.
To install the shim and reassemble, simpley drop the chosen shim into the gap between the sear (above the front trigger pin area), seat the spring and spring bar in the recess in the receiver, start installing the rear trigger pin. Align the shim between the ears of the trigger yolk for the installation of the replacement front trigger pin. Tap in both pins, always checking the alignments of the pins, holes in the trigger yoke, holes in the receiver and the alignment of the shim along the way.
Once the I had the pins and shims installed, I turned the poundage nut 4 complete turns to the the heavier side just engage the spring. I later turned it 3 more full turns to the heavier side (7 in all) to give me a poundage setting I felt comfortable enough with without being "too hairy".
The end result was a factory trigger that went from the lowest setting of just over 3 lbs and a mile of creep to a 13 oz trigger that broke very crispy. I have to admit there was a very very light amount of creep, but is one of those things where you had to close your eyes and concentrate to find that creep. Concentrating / focusing on the target I did not notice this minuscule amount of creep at all, and was actually a nice buffer from setting the firing pin free unintentionally while address the trigger.
Bottom line is that it's a darn nice trigger job for $18.00. When you think of it, it's actually 4 trigger jobs for $18.00, or $4.50 a piece without the hassle of finding a spring at the hardware store or making your own shims as making a "DIY" kit. No need to hone or polish anything, although I did pay attention to the mating surfaces on the sear and trigger so as not to deform them in anyway during disassembly or reassembly. You can hold back the trigger slightly to make sure the surfaces don't touch.
Installation took maybe 15 minutes, though the finding of the "just right" spring / shim combo to fit the desire will take a bit longer.
I was very surprised on how well the kit functioned, so much that I will probably leave the YO Dave in my present set up. All in all a very well $18.00 spent, the YO Dave gets a BIG thumbs up for functionality, ease of install, and price.
The nicest thing about the above type of triggers is that they are adjustable to find that sweet spot both in creep and poundage. But again for the budget conscience, may not be able to or willing to expend funds for them.
With my recent acquiring of a CZ 455 Varmint, I was very unsatisfied with the trigger, and believe that CZ should have implemented the set trigger on the 453 for their new 455 flagship, but that's neither here nor there.
So at the time of this writing, for $18.00 I inquired about the YO Dave trigger kit http://www.yodaveproducts.com/, seen many favorable reviews about the kit and figured it was worth a try at that price. If not satisfied, no big loss.
The only tools suggested for the install is a 3/32nd punch to be used as a drift for the trigger pins holding the trigger group to the receiver. I had simply used an old allen wrench instead, but is up to you to spend the extra money on a punch. You may already have a punch, drift, or can borrow one from a friend. You will also need a small grinder or a drill and bit to remove the front trigger pin - the metal on the pin is rolled over for retention, you have to remove this "lip".
The kit comes with 4 springs of varying tension to help with poundage ranges and 4 cylinders (shims) to adjust for creep. There are instructions included, and are also available on the YO Dave website. The kit also included a replacement front trigger pin.
The shims come in different sizes, pictured above is the amount of sear engagement to experience with each.
Installation is very simple, and pretty straight forward. First, make ABSOLUTELY SURE YOUR FIREARM IS UNLOADED. When you've cleared the firearm, check again. Remove the action from the stock and back off the poundage adjustment nut until there is no tension placed on the spring. The instructions say to leave the bolt in the receiver.
Below is a before look of the CZ trigger group. Note the "dimpled" front trigger pin, again you have to remove the metal "lips" to remove the pin. I used a large drill bit to remove the lips, though a small grinding tool is recommended.
Once the "lips" are removed, it's a simple task of tapping out the front pin. NOTE: put a small piece of duct tape on the pins in your magazine well and the sear retaining pin - they have a tendancy to vibrate out when tapping the trigger pins out.
I left the enough of the front pin in to keep some alignment of the yoke for the removal of the rear pin (Do the same on reassembly).
Then remove the rear pin by tapping it out. There are no "lips" here to contend with. While being cautious not to lose the factory spring or rear pin, remove the trigger group. Also be aware not to lose the washer that fits onto the bar that holds the spring in place. You should have the below at disassembly.
Note that the bar that holds the poundage spring has a flat spot on it, if the washer is removed make sure that the flat spot of the washer fits onto the bar correctly during reassembly, do not force it. Also on the washer, there is a ridge running on the bottom side, make sure that ridge is pointing down to engage the depression on the adjusting nut.
You can tell the difference in the poundage springs by the thickness of the coils. As my 455 is mostly going to be a bench queen, I prefer the lightest weight and least amount of sear engagement. I had started with the lightest spring and the red shim, but the sear engagement for me was pretty scary, constant slam fires. I moved up the line of shims, eventually using the blue one. Results will vary with the choice of poundage springs as the heavier springs tend to keep the trigger engaged more with the sear.
This is a trial and error thing, and takes a little time to figure out depending on your firearm and spring / shim combo. Even the blue shim and lightest spring combo I chose produced a firing when all was reassembled and give the rubber mallet test to the butt of the stock after a very hard and sharp strike, but no slam fires when cycling the bolt aggressively. Remember my intent is a bench queen, not a critter getter or I would choose a heavier spring for safety for a hunting application.
To install the shim and reassemble, simpley drop the chosen shim into the gap between the sear (above the front trigger pin area), seat the spring and spring bar in the recess in the receiver, start installing the rear trigger pin. Align the shim between the ears of the trigger yolk for the installation of the replacement front trigger pin. Tap in both pins, always checking the alignments of the pins, holes in the trigger yoke, holes in the receiver and the alignment of the shim along the way.
Once the I had the pins and shims installed, I turned the poundage nut 4 complete turns to the the heavier side just engage the spring. I later turned it 3 more full turns to the heavier side (7 in all) to give me a poundage setting I felt comfortable enough with without being "too hairy".
The end result was a factory trigger that went from the lowest setting of just over 3 lbs and a mile of creep to a 13 oz trigger that broke very crispy. I have to admit there was a very very light amount of creep, but is one of those things where you had to close your eyes and concentrate to find that creep. Concentrating / focusing on the target I did not notice this minuscule amount of creep at all, and was actually a nice buffer from setting the firing pin free unintentionally while address the trigger.
Bottom line is that it's a darn nice trigger job for $18.00. When you think of it, it's actually 4 trigger jobs for $18.00, or $4.50 a piece without the hassle of finding a spring at the hardware store or making your own shims as making a "DIY" kit. No need to hone or polish anything, although I did pay attention to the mating surfaces on the sear and trigger so as not to deform them in anyway during disassembly or reassembly. You can hold back the trigger slightly to make sure the surfaces don't touch.
Installation took maybe 15 minutes, though the finding of the "just right" spring / shim combo to fit the desire will take a bit longer.
I was very surprised on how well the kit functioned, so much that I will probably leave the YO Dave in my present set up. All in all a very well $18.00 spent, the YO Dave gets a BIG thumbs up for functionality, ease of install, and price.
