• Watch Out for Scammers!

    We've now added a color code for all accounts. Orange accounts are new members, Blue are full members, and Green are Supporters. If you get a message about a sale from an orange account, make sure you pay attention before sending any money!

CZ 455 Ultimate Tacticool build has begun!! (Pic Heavy!)

djdilliodon

Sergeant
Full Member
Minuteman
Dec 17, 2013
563
42
West Babylon, NY
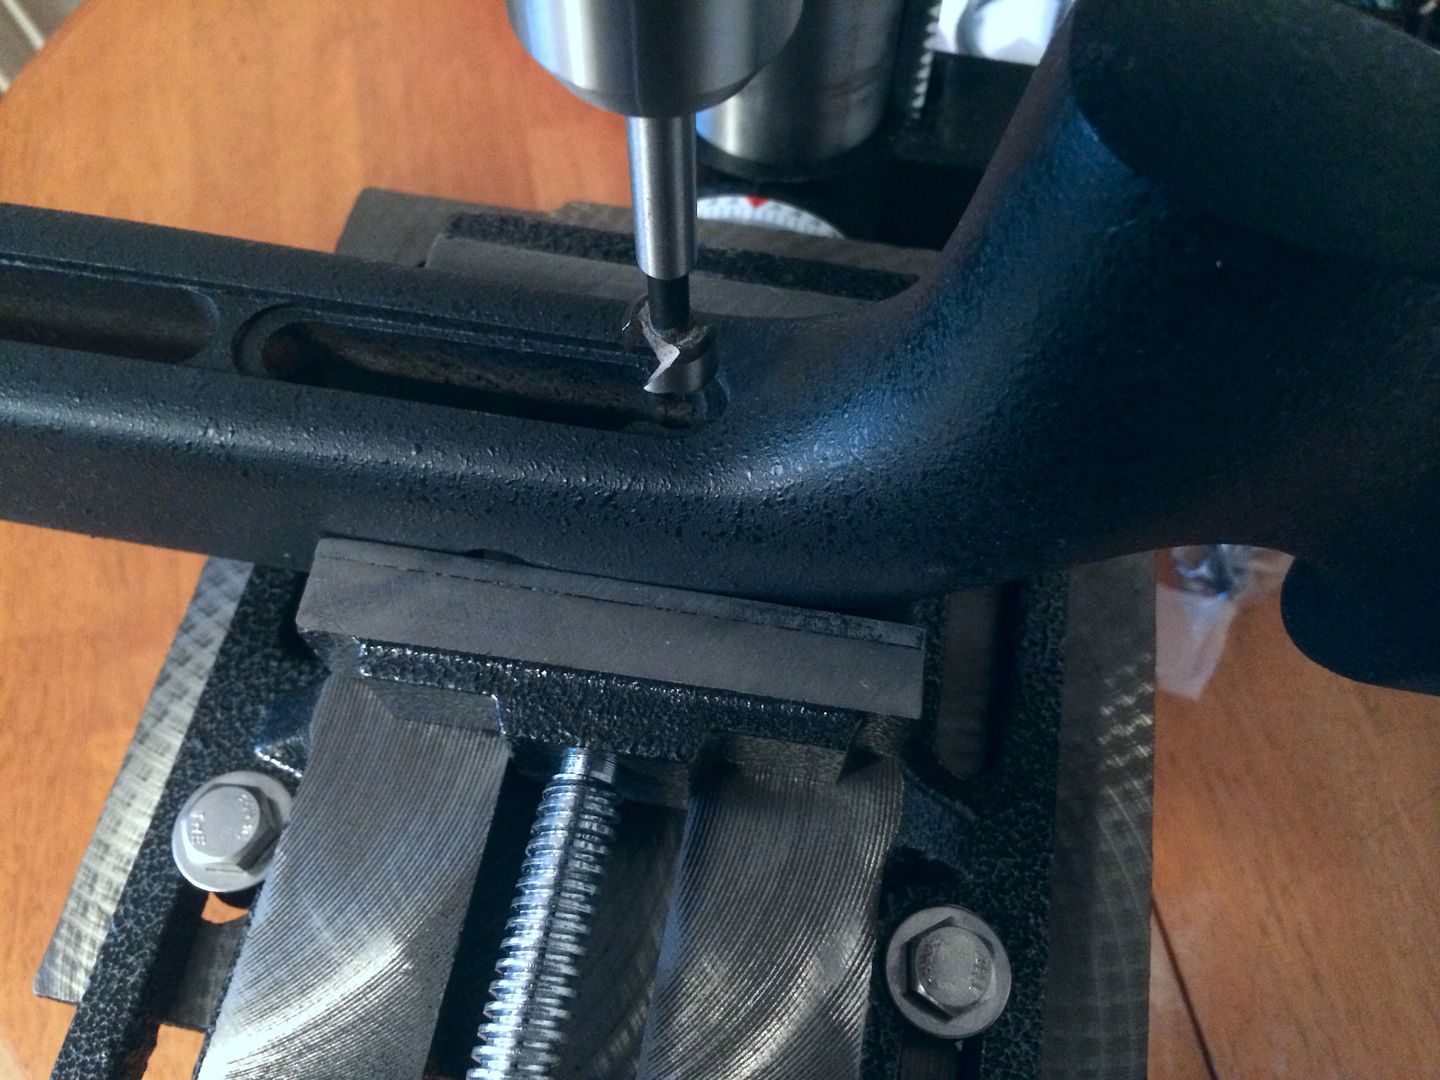
Enough parts have showed up to start this build. Still waiting on custom springs and M5 trigger guards. I will update this post everytime I progress on it so if your interested keep on checking in. This is how I build a 455 with a lilja barrel. First thing is to pillar bed the stock. I use a drill press with a forstner bit and vise that I bolt to the presses table. Here is a pic of the bit all lined up ready to drill out the stock. Always drill from the trigger guard area and NOT from the inlet side! Seen many guys get pissed off seeing the bit come through and chip the stock! On a boyds tacticool you have to be careful and drill the stock straight! There is a screw in the stock you can hit if you come in at a small angle! Highly recommend if its your first time to use a press and piloted counterbore!!


After both holes are drilled, I use a file to clean up the small lips in front of the holes that are drilled (didn't take pics of this). Now its time to cut the pillars to length. What I do is use stainless threaded rod, small washers, and nuts to hold the pillars to the action at full length. Here is a pic of it all in the stock.


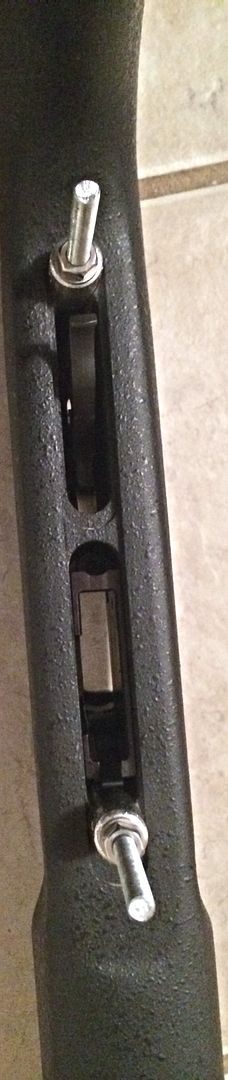
The reason for doing this is to mark where the pillars need to be cut. Here you can see from the side them protruding out from the stock.


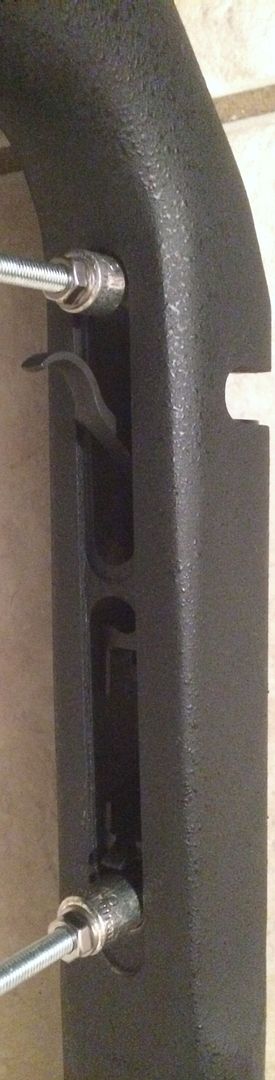
After they are marked I cut them to size square and bevel the inside edge. These pillars are the largest diameter that can be used in a 455 stock. They are 9/16" outside diameter with a 1/8" thick wall, yes they are very strong! Here is a pic after they are cut.


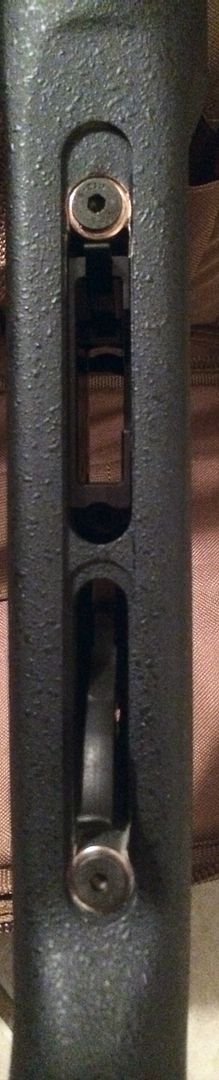
Here are the pillars on the action making sure everything fits well.


Here is a test fit with it in the stock. Pillars sit perfectly flush with the wood!


Before I epoxy them in I drill a line of dimples in the sides that will be epoxied to the stock. This doesn't have to be done but I go overboard and do it anyway for a better bond.


That's it for now. Later tonite I'll epoxy them in and will have more pics tomorrow late day of the finished product. Will also get the glass bedding ready as well!
 
This is a very timely build. I just bought the same gun. Picked it up today in fact. I have the same set of pillars and plan to start there. I'm also going to shoot mine before and after each modification to show how much group size can be shrunk. I plan to pillar bed, free float the barrel and then work with some shims to see if it makes a difference. Then I plan to bed the entire action. I also have a DIP adjustable sear and spring kit that I'm going to put in. I may eventually go the Lilja route if I get involved in some competitions.

I need to give the gun a good cleaning first and lube the bolt. It is a little rough.

Thanks for posting your progress.
 
Looking forward to seeing the final product. I just may send mine off to ya. ;)


Sent from my iPad using Tapatalk
 
Will be following this thread. Can't wait to see the finished product and how it shoots.
 
Pillars are all done.


Now that the pillar bedding part is done its time to prepare the stock for glass bedding. The pillars will retain the proper height of where the action should be in the stock so removing material in the inlet area won't change a thing. I use a 1/4" gouge to remove about 1/8" of material from the entire area I'm bedding. This allows for a solid amount of bedding (no skim bedding from this guy lol). Most stocks using a straight .900" lilja will need minor sanding to allow the barrel to free float. I had to do it with this one and I removed 1/8" of material from the first 3" of the barrel channel where I'm going to bed as well.


After all the inletting and taping she is now ready to get clay stuffed where I don't want bedding to go. Same goes for the action as well.


Last edited:
9 hours later she popped out nicely and I cleaned her all up. Bedding is officially done! Next step will be the bolt work. I'm waiting for the custom striker springs to be made so I will show the polishing part first so stay tuned :).
 
The bolt work will consist of polishing key points of the striker, installing a custom made striker spring which is tuned specifically for the 455, and re lubing the key areas of the bolt with moly grease. Here is a pic showing the areas that will be getting polished.
The area between the red lines will be getting polished

The sides circled in red will also be getting polished
 
Bravo DJD, this is an excellent thread for much more than just a putting a tacticool on.

(i have to get back to you on the mounting bolts torque failure in your other thread, i didn't get to the hardware store this week)
 
It is looking very nice so far. You may also want to clean up the cocking ramp on the bolt handle. I have found that there was a large raised area at the beginning and end of the cocking ramp. If you smooth them out it will help a lot with the effort required to open and close the bolt.

These were took after I cleaned it up:


After I do the trigger I'll be taking a look at the handle. After polishing did the handle tend to jump after firing or feel loose?
 
Sear and trigger have been polished. Just gotta wait for the custom trigger springs and striker springs to show up and I can finish off the bolt and trigger. The custom M5 trigger guards should be here in 3-4 weeks. It should look totally awesome on this rifle! Pics below.


After I do the trigger I'll be taking a look at the handle. After polishing did the handle tend to jump after firing or feel loose?

I don't honestly remember. It is BM11's rifle, you could PM him and have him check.
 
Man DJD, just saw this. Awesome, ironically enough I just bought a tacticool last week, to house the lilja you got for me months ago. Also got the DIP parts, so I truly appreciate all the detail and pics your putting into this. I'll be using this as my instruction manual!!!
 
Man DJD, just saw this. Awesome, ironically enough I just bought a tacticool last week, to house the lilja you got for me months ago. Also got the DIP parts, so I truly appreciate all the detail and pics your putting into this. I'll be using this as my instruction manual!!!

If you need any help with any part of your build just let me know and I'll walk you through it! This build will slow down a bit as I'm waiting for the custom springs to be made and the trigger guards. Here is a little teaser pic of what the guards will look like :).
 
Today I put the aluminum magazine well on and put the trigger/sear back on the action. Action had some clay stuck on it in spots but my handy 32 oz spray bottle with hoppes #9 got it all off :). That's about all I could do today since I'm now at the mercy of waiting on the rest of the parts to show up :(. In the mean time I pillar bedded a 455 American stock :).


Here is after the polishing in the key areas. They are perfectly smooth and slick now!


DJ what are you using to polish with
details please i'am a little slow LOL
an do you do both sides of flats at back of pin
also what spl striker pin spring
thanks YOTE
 
DJ what are you using to polish with
details please i'am a little slow LOL
an do you do both sides of flats at back of pin
also what spl striker pin spring
thanks YOTE

The compound I use is made by porter cable and is the green colored one. I polish both sides of the flats. Before adding the compound to the wheel run the wheel at high speed with no compound and hit the metal for a few seconds with it. This will heat it up so when you touch the wheel to the compound it will go right on and even. The springs I'm having custom made as the aftermarket ones available now are a one size fits all kind of deal. They tend to be long and the ends aren't perfectly closed and ground which leads to uneven wear on the striker.
 
Who is making your springs and what poundage are they? Thanks for the great post.
 
Who is making your springs and what poundage are they? Thanks for the great post.

I have a US manufacture making them for me in a large quanity. The power of the springs is increased but I won't say by how much due to the trial, error, and money that went into it (no ones ripping off my idea lol). I had test springs made from 5% to as high as 20% more than the factory springs and tried them all!
 
Cool build and great info....I've got a 455 22lr that I'd like to make into a 22 WMR
 
That is a good looking shifter. Do you think it will have any problems clearing a low mounted scope?
 
That is a good looking shifter. Do you think it will have any problems clearing a low mounted scope?

Not sure yet as I haven't put it on since I'm still waiting for the custom striker springs to come in. Once I get them in, I'll install it ASAP and will post pics to show the clearance.
 
That is a good looking shifter. Do you think it will have any problems clearing a low mounted scope?

You got me wondering if I would have problems so I took one of my rifles that is completed and put the handle on that ones bolt. This handle is not only sweet looking it makes the rifle just feel much better. It also has plenty of clearance with my warne 7.2 rings and mueller 8.5-25x40 tactical scope. This stock isn't mine, it's one I just finished up pillar bedding for someone and was curious what a lilja would look like in an evo stock. These stocks ain't easy to pillar bed let me tell ya!


Last edited:
That does look nice! I think with a 40mm objective and low rings it is close, but it depends on where the knob is actually attached I suppose.
 
please turn me on to the guy that makes these sweet cz 455 bolt handle, thanks joebob
 
The custom firing pin and trigger springs should be here this week so I'll be able to complete the bolt! Just waiting for the custom trigger guards to be done so I can finish this thing and shoot it already! They should get anodized sometime this week so shouldn't be much longer!
 
The custom firing pin and trigger springs should be here this week so I'll be able to complete the bolt! Just waiting for the custom trigger guards to be done so I can finish this thing and shoot it already! They should get anodized sometime this week so shouldn't be much longer!

Can't wait to get those upgrades on my CZ 455 .... Tuesday can't come quick enough...!
 
Springs finally came!!!! Bolt work is completed! Only thing left to wait for is the custom M5 Trigger guards to get here and its 100% done! For now a factory guard is on it and this weekend it will get some range time for testing. Here are some pics for your viewing pleasure :).

Custom firing pin spring and trigger spring


Bolt fully assembled after spring install and moly lubrication. Notice the 2 springs at the top, top spring is another aftermarket spring which is longer. Not a good way to obtain the extra power!


And the rifle all together :).


Looking good! Looking forward in seeing the bottom metal :)

Guards should be on the way to me by the end of next week (4/4/14 that's a lot of 4 no? Lol) so I should have I'd say by 4/11 or sooner. I put the Ultimate tacticool 17 HMR with its brother the Ultimate thumbhole 22 LR for a family pic :)


As much as I love the thumbhole stock I may sell it so I can get another tacticool but in forest camo like the thumbhole!
 
Very nice! I have a Savage 93r17 that I pillar bedded into a Boyds rimfire hunter stock. It was a bitch, but going slow paid off and now it has a real stock instead of those crappy tupperware ones the Savages come with.