• Watch Out for Scammers!

    We've now added a color code for all accounts. Orange accounts are new members, Blue are full members, and Green are Supporters. If you get a message about a sale from an orange account, make sure you pay attention before sending any money!

First bedding job

FTW_RPR_6.5prc

Private
Minuteman
Jul 30, 2020
37
22
Hey guys.

I’m building my first bolt action and need some help/insight on my thought processes based on what I’ve read and looked up on YouTube on the bedding of the barreled action. I understand that there’s more than one way to skin a cat and achieve the same results.

I’ve been gathering parts as funds allow, and expect my AG Composites stock to ship this week (I’ve confirmed with them since I know their CNC machine was down for a month).

  • AG Composites Stock
  • Impact 787 action
  • Proof Research pre-fit barrel
  • Hawkins M5 DBM
  • Triggertech Diamond Trigger

So in a lot of research and hours spent on YouTube, here’s my thought process for bedding this thing my first time. I’m pretty confident in my mechanical abilities in which a previous job, I performed the remove and replace of upgraded components on the F-35 ejection seat. I’m open to any/all advice.


  • Receive stock, perform initial fit of components.
  • Disassemble and apply dry erase marker on bottom of action then re-assemble to look where the high spots/rubbing is (Even though I know the inletting is done based on my specs when I ordered the stock.
    • Also apply electrical tape to barrel to ensure that it’s centered on the fore-end.
  • Use dremal and carbide bit to slowly and carefully remove material where action will rest, including some of the rear tang.
  • Use modeling clay (I’ve read that the modeling clay from Brownells is best as it does not dry out and can be re-used multiple times to fill action, bolt and safety recess, trigger mount recess, then use fishing line or dental floss to draw over the modeling clay for a round/smooth finish.
    • Apply some modeling clay “worms” in the fore-end (front and back) to support the barrel while it’s waiting on the bedding to cure.
    • Apply a clay dam in front of recoil lug to make sure bedding doesn’t leak ahead of the lug.
  • Use green frog tape to tape off in front of the recoil lug, and 3M vinyls tape to sides and bottom of recoil lug.
    • Mask off stock also (I know some say not necessary).
  • Wrap electrical tape around studs to ensure action is being inserted in the center of the pillars and that no bedding can seep down into the pillars.
  • Insert studs in action and perform dry run of applying the bedding and the process.
  • Clean action with accetone.
  • Apply two coats of Brownell’s Acra release agent on the action studs, and action.
    • I was gonna use the SC Johnson’s Paste Wax, but they don’t make it anymore, and I’ve read that first timers shouldn’t use it till they’ve done multiple bedding.
  • Mix up the white Marine Tex (more than what is estimated)
    • Once mixed thoroughly with the hardener, add orange mica powder to dye bedding orange (The stock finish is the Bengal Rogue color).
  • Use popsicle sticks to apply bedding to the stock, then prior to bedding, apply a skim layer of bedding to bottom of barreled action prior to inserting into stock.
  • Once inserted, use Q-tips, and popsicle sticks cut flat to remove squeeze out.
  • Wrap surgical tubing around barreled action and remove any further squeeze out.
  • Wait 24 hours (I’ve read that some wait 48 hours and one guy waits 6 days) for bedding to cure.
  • Use vice grips to remove studs from action
  • Pop out barreled action and hand sand or gently drum dremal out bedding from stock as needed.

I’ve seen the youtube videos by Gradous Rifles, but was disappointed that the rifle bedding series wasn’t finished before he passed away. I’ve also seen gavintoobe with ultimate reloader’s video. There’s one video by Long Range Only that seems to be pretty darn good. Out of these main ones I’ve seen, what isn’t explained is how do you pop the barreled action out? Do you rasp on the bottom of the stock with a rubber mallet to creat vibration to pop it out? This part is the main part that I’m not real clear on and want to find out and research it to death before I do this on my own.
 
  • Like
Reactions: Auryx356
I personally use kiwi neutral shoe polish as a release agent. Apply and rub the release agent in everywhere you could possibly think of the bedding bonding to. I even coat the barrel, the top of the action, and the action threads. I also relieve the whole area where the action is going to sit in the stock to give room for the bedding compound. If the stock has pillars I leave them alone. They should sit proud of the area you removed.

Crayola modeling clay works really well too and doesn't dry out. I tape everywhere on the outside of the stock where I don't want compound to go.

Get everything prepped before you start mixing, and take your time. The bedding takes a bit to start setting up.

If you have good release agent coverage it should pop right out without too much drama.
 
Since you're Egress, I'd recommend crossing the hall and asking a sheetmetal guy for some Marine Tex.

Then, skip everything you've posted above and head out to the flight line (don't forget your line badge) to the Fuel Cell shop.
Find the gun guy there and let him do the bedding while you change an O2 bottle or a Retraction Thruster.
Before you return to pick up your barreled action, swing by the Shoppette and grab a 12pk and a dozen doughnuts.
Head back out to the flight line (again, don't forget your badge)
Make the trade for a job well done, and go shooting while he's still at work.
😂😂😂🤣🤣🤣😁😁
LMAO!!!

Well I worked for MB directly, no previous military experience (got the job over beers), now I work for BAE Systems.

But what you said above sounds about right…except if in the air force, don’t forget the reflective belt.
 
I like plumbers putty Instead of modeling clay. I haven’t purchased any in awhile. But it’s cheap and easy to work with.
 
  • Like
Reactions: Dawhit
LMAO!!!

Well I worked for MB directly, no previous military experience (got the job over beers), now I work for BAE Systems.

But what you said above sounds about right…except if in the air force, don’t forget the reflective belt.

Martin Baker on the F-35?
The Navy must have had some input in that design.

The Aces 2 is so much simpler and more reliable.

Hell, a non-egress guy like me understands them. They gotta be easy.

Since you work on MB seats, you must have some skills.

Carry on with that bedding job. 🙂
 
  • Like
Reactions: FTW_RPR_6.5prc
Martin Baker on the F-35?
The Navy must have had some input in that design.

The Aces 2 is so much simpler and more reliable.

Hell, a non-egress guy like me understands them. They gotta be easy.

Since you work on MB seats, you must have some skills.

Carry on with that bedding job. 🙂
I’m not familiar with the Aces 2 other than seeing it in person. To me the Mk16 MB seat is simpler…sequencer and wiring harness are easy to remove.

But I do say, Thank you for your service.
 
One tip I found that cut down on having little voids in the bedding surface

- when applying the bedding in the stock prior to setting the action into it,
leave a ridge of bedding down the middle of the stock just a little higher
than the rest of the bedding. When you set the action down in the stock it
will allow the bedding compound to flow from the center outward and lessen
the chance of having air bubbles trapped

I don't apply bedding to the action unless I'm bedding pillars, that are secured to the action, at the same time

Nice detailed write up !
 
  • Like
Reactions: FTW_RPR_6.5prc
One tip I found that cut down on having little voids in the bedding surface

- when applying the bedding in the stock prior to setting the action into it,
leave a ridge of bedding down the middle of the stock just a little higher
than the rest of the bedding. When you set the action down in the stock it
will allow the bedding compound to flow from the center outward and lessen
the chance of having air bubbles trapped

I don't apply bedding to the action unless I'm bedding pillars, that are secured to the action, at the same time

Nice detailed write up !
I’ll avoid skim bedding the action, but I never thought to make the ridge in the center. Makes perfect sense.

How do you go about removing the barreled action once the bedding is cured? That’s the main part I’m not 100% sure on.
 
Mix up the white Marine Tex
Use the Gray- white is too soft.

Once inserted, use Q-tips, and popsicle sticks cut flat to remove squeeze out.
I use denatured alcohol on the swabs. One pain-in-the-ass is when the tape masking the top edge of the stock lifts- and allows epoxy to ooze underneath. I've found that if, for whatever reason (sometimes, the surface of the stock is too rough) I can't get the tape to bond well here I just leave it off. JMO...
I performed the remove and replace of upgraded components on the F-35 ejection seat.
AHA!
So you're the guy that was installing the faulty CAD cartridges!! (J/K)
My son's completing T-38 UPT- same Martin-Baker ejection seats, they were down some aircraft for a few weeks.
 
I’ll avoid skim bedding the action, but I never thought to make the ridge in the center. Makes perfect sense.

How do you go about removing the barreled action once the bedding is cured? That’s the main part I’m not 100% sure on.
I hold the barrel right in front of the stock and give the cheek rest area a good, sharp smack and if you did your job and didn't bond the action to the stock it will give and you can remove it from there.
 
I’ll avoid skim bedding the action, but I never thought to make the ridge in the center. Makes perfect sense.

How do you go about removing the barreled action once the bedding is cured? That’s the main part I’m not 100% sure on.
I've used this method to remove the barreled action.

- Clamp the barrel in a padded vice just in front of the stock with the stock flat so the stock is hanging in the air.
Turn the guide inletting screws a 1/4 turn to break loose
I have rubber insulation blocks that are 2 x 2" square 3" long. It's firm and has a square edge.
I place it against the stock, right next to the barrel, just in front of the recoil lug and tap it with a hammer.
That's usually all that is needed to break the stock loose.
Grab the stock at the wrist and the forearm and gently rotate while pulling away from the action
You can either remove the guide screws before removing the stock, just make sure you keep everything aligned as
you pull the stock away from the action
 
The best looking bedding jobs i've seen were done by longriflesinc. I would look for their videos and copy their method the best you can.

They also sell a tool to separate the action and stock.
 
Use the Gray- white is too soft.
Will do….I’ll disregard trying to dye the gray unless I did black to make it more consistent.
I use denatured alcohol on the swabs. One pain-in-the-ass is when the tape masking the top edge of the stock lifts- and allows epoxy to ooze underneath. I've found that if, for whatever reason (sometimes, the surface of the stock is too rough) I can't get the tape to bond well here I just leave it off. JMO...
I was thinking that with the swabs. I see that they have Orange Frog tape that is supposed to be a better adhesion than the green and blue.

AHA!
So you're the guy that was installing the faulty CAD cartridges!! (J/K)
My son's completing T-38 UPT- same Martin-Baker ejection seats, they were down some aircraft for a few weeks.
Haha! That’s is on MB and Indian Head! I work in the Fleet Planning team with BAE for the JSF program.
 
Guys,

Thanks again for the replies and banter on the MB seats.

I’ll be sure to edit my process above once I complete the bedding and will post pics.
 
I use studs and put heat shrink over them until it's snug in the holes. Keeps them centered and keeps bedding out of the holes. I used kiwi shoe polish as well but I'd look into the release agent that Longrifles, inc sells. They also have a tool that is used to pull the action straight up. I will be buying one when I bed the next action.
 
  • Like
Reactions: otnot
+1 for the "smack the gun" to pop it loose after bedding. I usually hold the forend in one hand and give the underside of the barrel a good whack with my bare hand, you're hear the crack that is the gun coming loose. I don't have to worry about it flying out because I just tape the front of the recoil lug instead of damming it, so it's a snug fit in the recoil lug recess until the tape comes off. If you were worried about it flying out, @JMGlasgow's method is perfect.

It absolutely doesn't need to cure for 6 days haha, just read what the directions say on the MarineTex. If you don't trust the directions, hang onto one of the scrapers you use to remove excess, and check its hardness after 12 hours and thereafter until you're satisfied.
 
I use studs and put heat shrink over them until it's snug in the holes. Keeps them centered and keeps bedding out of the holes. I used kiwi shoe polish as well but I'd look into the release agent that Longrifles, inc sells. They also have a tool that is used to pull the action straight up. I will be buying one when I bed the next action.
I never thought of heat shrink over the studs…def more consistent than tape.
 
I just did 2 last night with JB weld and Hornady one shot case lube.

Have used marine Tex before and it is much easier to use than JB weld. (Runny). But I was in a hurry and didn’t have any on hand.

Over release agent everything!!! Your first time is terrifying..

Don’t forget chamber and bolt holes and bolts.

I Didn’t tape a thing. It easy enough to clean up with a knife and a dremel.

Stocks were already pillar bedded.

They came out with no issues after about 4-5 hours.

I do not tape recoil lugs either.

Both stocks hold barreled actions upside down with no bolts.

Prep work is key. Overflow is paramount

I paint the barrel channel and the greyJB weld with black paint afterward hence the wet paint on the stock in back.
 

Attachments

  • E7D6EED5-77FD-4705-89F8-ED1A154FC17F.jpeg
    E7D6EED5-77FD-4705-89F8-ED1A154FC17F.jpeg
    388.6 KB · Views: 247
  • A20D8E81-B21C-4FE7-AAF6-C409C015DA8D.jpeg
    A20D8E81-B21C-4FE7-AAF6-C409C015DA8D.jpeg
    504 KB · Views: 255
Well, we’ll see in 24 hrs.

I probably over did it with the clay, but I’m a bit ocd.

It looked way messy and a lot, but from what I’ve read and seen on YouTube university, if it looks messy and looks like too much, you used the right amount.
3DBEAD9B-191E-454F-AAC9-566CD8BDF4AE.jpeg
C5F8C042-0A66-44F0-B88A-7908D832902D.jpeg
97658D8E-0DE1-45DC-A114-43A584C7F161.jpeg

C8BF32AD-6A3E-4DA2-BC7F-89AF99BD22E0.jpeg
D0CE1D7B-F420-4DDB-AE53-7F80DD352D13.jpeg
 
Last edited:
Quick tip - if you wipe away all the excess with alcohol and Q-tips you wont have anything to sand or grind away along the top edge of the stock. Also id you use this method, you do not need to mask the stock at all.

Gift wrap scotch tap is good to put along the action right to the stock line. If the action above the stock is not covered, wiping with Q-tip and alcohol will polish a line along the action (especially if using devcon as it has metal particles in it.

You may have wiled excess before it started curing, but I didnt know when the pic was taken.

It took me about 10 times to figure out my method.
 
  • Like
Reactions: supercorndogs
I just did 2 last night with JB weld and Hornady one shot case lube.

Have used marine Tex before and it is much easier to use than JB weld. (Runny). But I was in a hurry and didn’t have any on hand.

Over release agent everything!!! Your first time is terrifying..

Don’t forget chamber and bolt holes and bolts.

I Didn’t tape a thing. It easy enough to clean up with a knife and a dremel.

Stocks were already pillar bedded.

They came out with no issues after about 4-5 hours.

I do not tape recoil lugs either.

Both stocks hold barreled actions upside down with no bolts.

Prep work is key. Overflow is paramount

I paint the barrel channel and the greyJB weld with black paint afterward hence the wet paint on the stock in back.
The only action I ever stuck was with Hornady case lube. Never again for me!

I hear lots of people use it. I guess it buffs away. Just spraying it leaves waves and streaks from what I saw, but I may be doing it wrong. Kiwi shoe polish for the win. Ive done about 60.
 
  • Like
Reactions: Aftermath
I probably won’t bed another stock.

First, Travis Stevens (TS Customs) has such an amazing stock in the KS1 for Impacts that it really is the “easy button”. It is like getting your favorite AG Composites stock with a better paint job and a perfect bedding job for basically free.

Second, for a non Impact action, or a stock other than his models, his bedding work is well worth the $375 price. It took me probably 2-3 hours to bed my last Manners LRH (all-in—taping, putty, mold release, bedding, cleanup), not to mention the $30 or so for the best bedding compound on the market (Score Hi Pro Bed 2000). I’d rather tinker with something else than do another bedding job for this kind of money.
 
I noticed that you ground the tops of the pillars, and they don't look to be proud of the rest of the stock around it.
Keep in mind, the pillars are what locates the receiver in the stock.
When I dry-fit a receiver into a stock that has already had pillars installed, I want contact only on the pillars and nowhere else. I'll take a round body receiver and "spin" it on the pillars, to confirm I'm not making contact anywhere else; and the pillars need to sit at a height that allows clearance for minimum epoxy depth everywhere.

When I pull the receiver, I expect to see the center of the pillars exposed, that shows me the receiver was making contact at those two points only.

JMO, YMMV.
Actually I didn’t touch the pillars. That was the way they were installed by AG composites.
 
In my opinion, having pillars installed in the stock before bedding, is of little benefit. Are they the right height or are they spaced correctly? I'd rather install pillars attached to the action as I bed the action.
But it may be good for marketing.
 
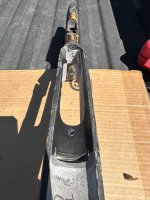
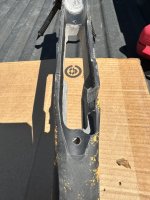
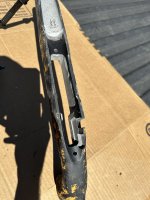
Ok, so I honestly couldn’t wait the 24 hours, but when I pulled it apart it was at 15 hrs.

I should have used more McLube 1700 and cleanup using more q tips than I did and also use toothpicks. Instead of alcohol, I used acetone for cleanup. My dam ahead of the recoil lug had epoxy on it from squeeze out.

I had to use some needle files and gently sanding with the drum sander on the dremel to clean up squeeze out.

Overall, I think it turned out well….we’ll see how she shoots once I get my hands on that new Zeiss glass.

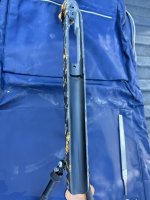
It does pass the “dollar” test on free floating and the electrical tape wrapped around the barrel kept it nice and centered, plus didn’t allow barrel droop.

Edit: masked it off and painted the barrel channel flat black.
 

Attachments

  • 205F2E62-400F-4CAD-BA01-1EE06E4713FC.jpeg
    205F2E62-400F-4CAD-BA01-1EE06E4713FC.jpeg
    549.4 KB · Views: 281
  • F3D7FCB8-F39D-4644-AEBD-DB9AE924F8F6.jpeg
    F3D7FCB8-F39D-4644-AEBD-DB9AE924F8F6.jpeg
    554.2 KB · Views: 277
  • AF52EADF-8AD7-4766-BFCB-1506D0172777.jpeg
    AF52EADF-8AD7-4766-BFCB-1506D0172777.jpeg
    413.5 KB · Views: 274
  • 6726B237-3527-498F-B122-97A171A8C838.jpeg
    6726B237-3527-498F-B122-97A171A8C838.jpeg
    407.7 KB · Views: 269
Last edited:
Ok, so I honestly couldn’t wait the 24 hours, but when I pulled it apart it was at 15 hrs.

I should have used more McLube 1700 and cleanup using more q tips than I did and also use toothpicks. Instead of alcohol, I used acetone for cleanup. My dam ahead of the recoil lug had epoxy on it from squeeze out.

I had to use some needle files and gently sanding with the drum sander on the dremel to clean up squeeze out.

Overall, I think it turned out well….we’ll see how she shoots once I get my hands on that new Zeiss glass.

It does pass the “dollar” test on free floating and the electrical tape wrapped around the barrel kept it nice and centered, plus didn’t allow barrel droop.

Edit: masked it off and painted the barrel channel flat black.
That’ll do just fine, good work
 
Looks good, you passed the audition first try . Congrats !
 
  • Like
Reactions: FTW_RPR_6.5prc
Get a dial indicator with magnetic base. Put the stock in a vise. Put the magnetic base on the barrel near the stock. Put the plunger on the end of the stock near the studs. Have the stock screws snug and zero the indicator. Slowly unscrew the front action screw and watch the dial. If it moves more than .002 the job was sub par. Do the same on the rear, if it moves at all it’s no good. I did a Bergara HMR Pro I bought last week. It moved .220 at first and after bedding .0015. Had a custom a few years ago do about the same. Your on the right track, just don’t let looks make you think it’s good Measure it.
 
Get a dial indicator with magnetic base. Put the stock in a vise. Put the magnetic base on the barrel near the stock. Put the plunger on the end of the stock near the studs. Have the stock screws snug and zero the indicator. Slowly unscrew the front action screw and watch the dial. If it moves more than .002 the job was sub par. Do the same on the rear, if it moves at all it’s no good. I did a Bergara HMR Pro I bought last week. It moved .220 at first and after bedding .0015. Had a custom a few years ago do about the same. Your on the right track, just don’t let looks make you think it’s good Measure it.
That’s next on my list to get and check
 
Torque those screws and shoot it .
 
Should work fine. Post results, good or bad, it helps us all. If bad, we’ll help.
Thanks again for the link with pics of the dial indicator.

Here’s my results for all to see.

Again, many thanks to everyone for their input, help, and critiques!

I’ll have to edit my process in my first post about what I learned.
B2209FE8-9B2D-47DA-8DCA-2CF18319EC6B.jpeg
CF1DAA25-9DFD-4978-AB1F-0ACF896C7204.jpeg
520B6E6F-2882-47BC-90A6-A0AF419416F3.jpeg
7B433467-F488-4279-AB07-FE81D48E0A9B.jpeg
 
Get a dial indicator with magnetic base. Put the stock in a vise. Put the magnetic base on the barrel near the stock. Put the plunger on the end of the stock near the studs. Have the stock screws snug and zero the indicator. Slowly unscrew the front action screw and watch the dial. If it moves more than .002 the job was sub par. Do the same on the rear, if it moves at all it’s no good. I did a Bergara HMR Pro I bought last week. It moved .220 at first and after bedding .0015. Had a custom a few years ago do about the same. Your on the right track, just don’t let looks make you think it’s good Measure it.
Thanks again for the link with pics of the dial indicator.

Here’s my results for all to see.

Again, many thanks to everyone for their input, help, and critiques!

I’ll have to edit my process in my first post about what I learned.
View attachment 7960430View attachment 7960432View attachment 7960433View attachment 7960434

Other way..
Stock in the vise. Rifle right side up.

Bedding job could look much more rough for a first.

Long as you learned from it. If you do it again you'll do better.
 
I just did 2 last night with JB weld and Hornady one shot case lube.

Have used marine Tex before and it is much easier to use than JB weld. (Runny). But I was in a hurry and didn’t have any on hand.

Over release agent everything!!! Your first time is terrifying..

Don’t forget chamber and bolt holes and bolts.

I Didn’t tape a thing. It easy enough to clean up with a knife and a dremel.

Stocks were already pillar bedded.

They came out with no issues after about 4-5 hours.

I do not tape recoil lugs either.

Both stocks hold barreled actions upside down with no bolts.

Prep work is key. Overflow is paramount

I paint the barrel channel and the greyJB weld with black paint afterward hence the wet paint on the stock in back.
What kind of black paint do you use? I have a sanded barrel channel I need to paint……thanks
 
Cerakote C-Series, Duracoat or the Duracoat self spray is what I would recommend. The self spray Duracoat should be as easy as Krylon and be more resilient to solvents and chemicals.
 
Well, more updates since installing the S3 from Christmas. Found the load that works with Berger 205 elite hunter, retumbo, and lapua brass and cci primers.

Zeroed at 100 yds, 2739 fps at muzzle. Used Balistics AE to get the dope to try. This past Monday, took the gun out to 800yds from 250yds. Dopes mostly checked out except a few that were off a mil or two.

Now I need to find a range in the DFW area that is 1,000 plus.
E6B63A40-4F9A-4FB0-9F01-8DBA81ED0034.jpeg