• Watch Out for Scammers!

    We've now added a color code for all accounts. Orange accounts are new members, Blue are full members, and Green are Supporters. If you get a message about a sale from an orange account, make sure you pay attention before sending any money!

Gunsmithing A few bedding tips (Pic Hvy) Sav,Rem,Howa NU PICS

Scimitar

Sergeant
Supporter
Full Member
Minuteman
Nov 21, 2005
1,252
144
Pine Hall,North Carolina
Had a few more rifles to bed so I figured that I'd take the time to get a few pics and share.
There were a few things different about each job and hopefully this may help a few DIY guys.
Enjoy.

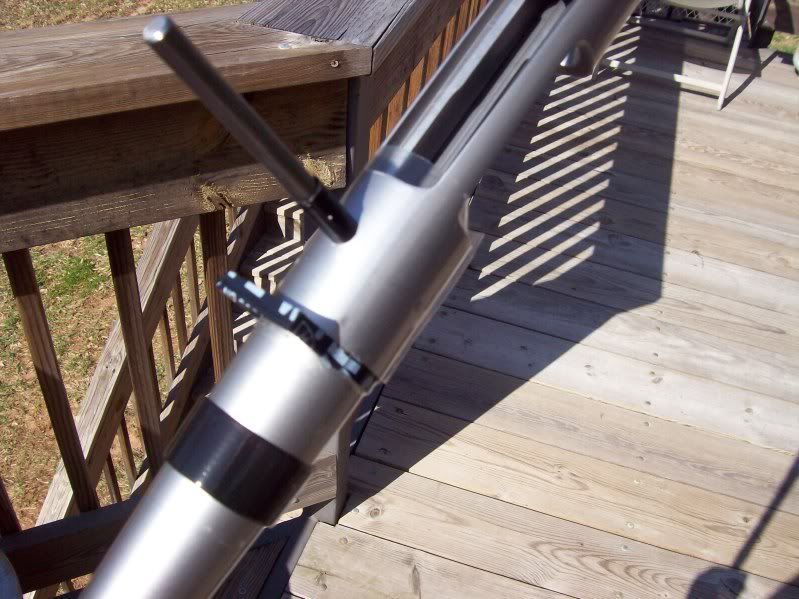
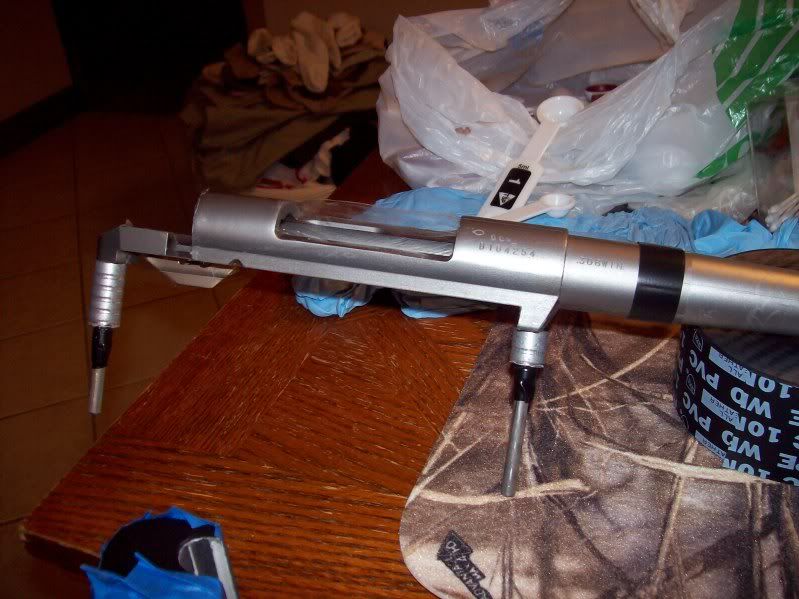
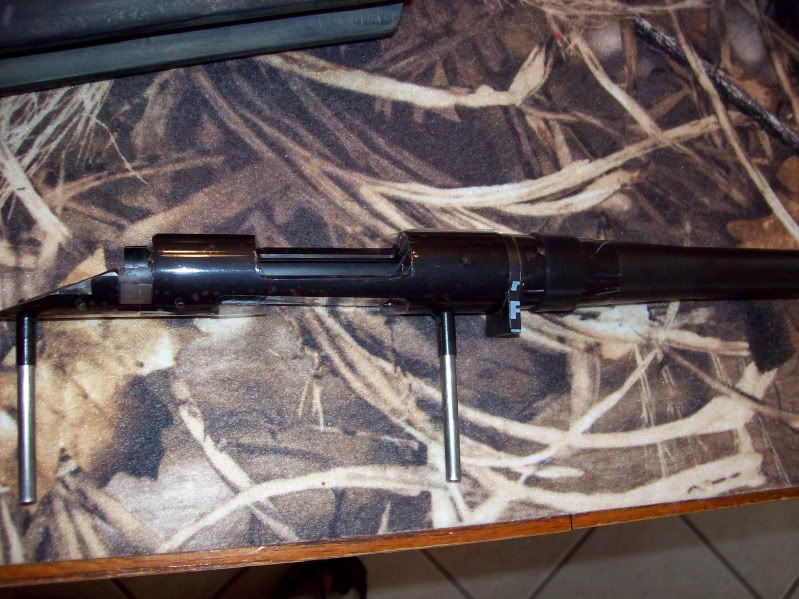
First one was a Savage FTR single shot. It has a 30 inch heavy barrel so we wanted a pad in
front of locknut to help support barrel. Also, one thing that I am sure several others have
done before, and will again, is to forget the lugs in the barrel nut when you bed. I have.
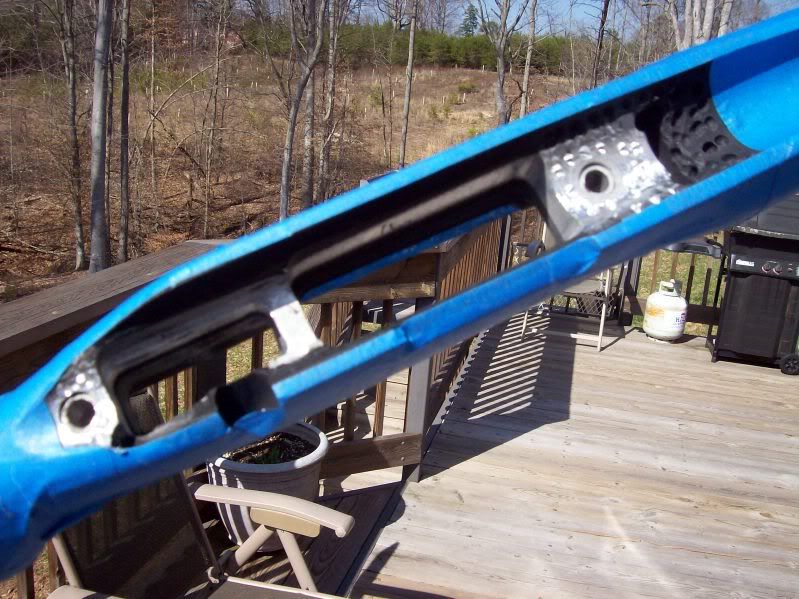
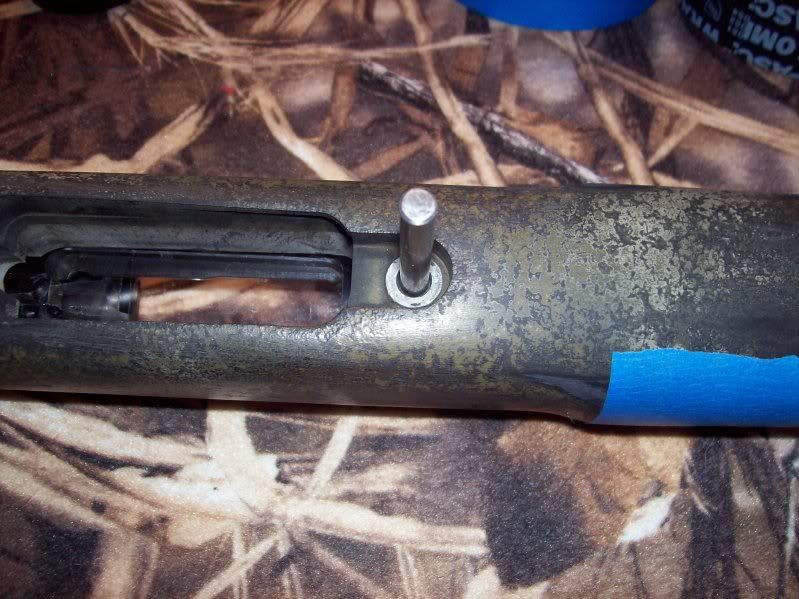
Had to beat the action out with a hammer on the inletting screws and break up the mechanical
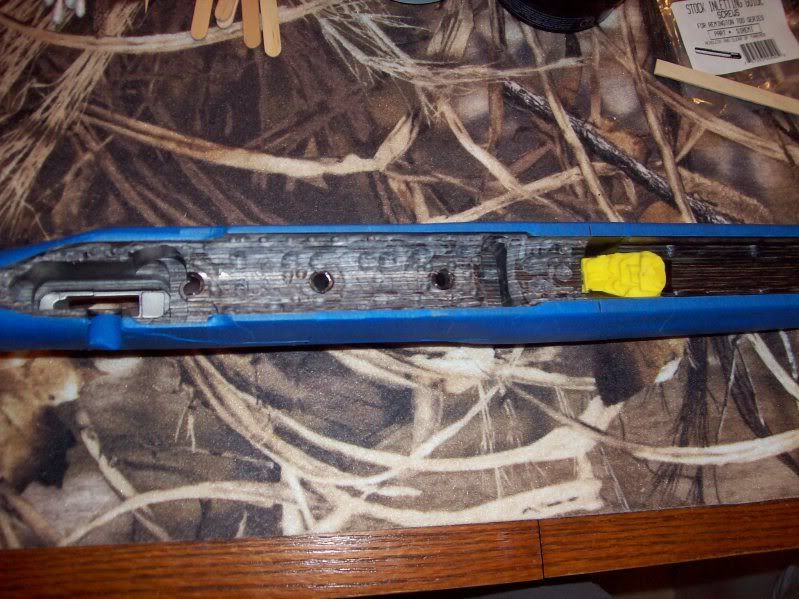
lock I had just created
smile.gif
The tip is to fill those with modeling clay like any other crevice
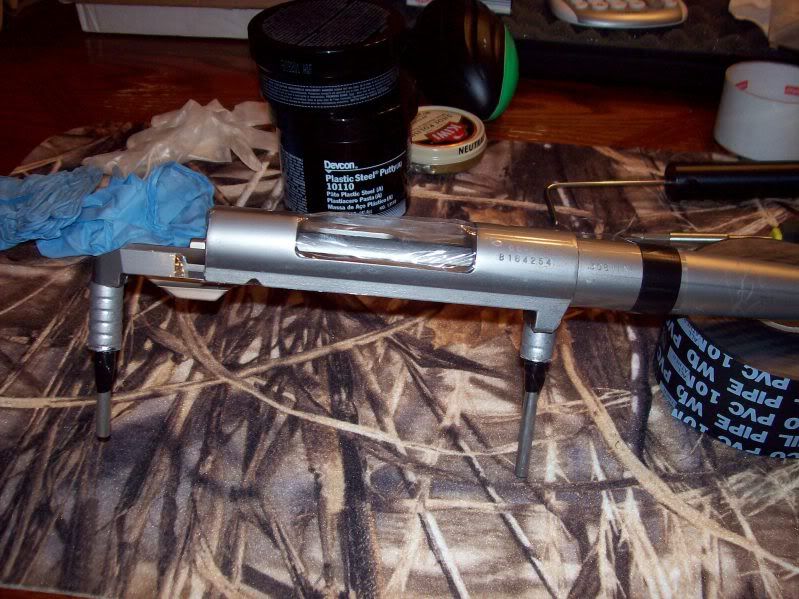
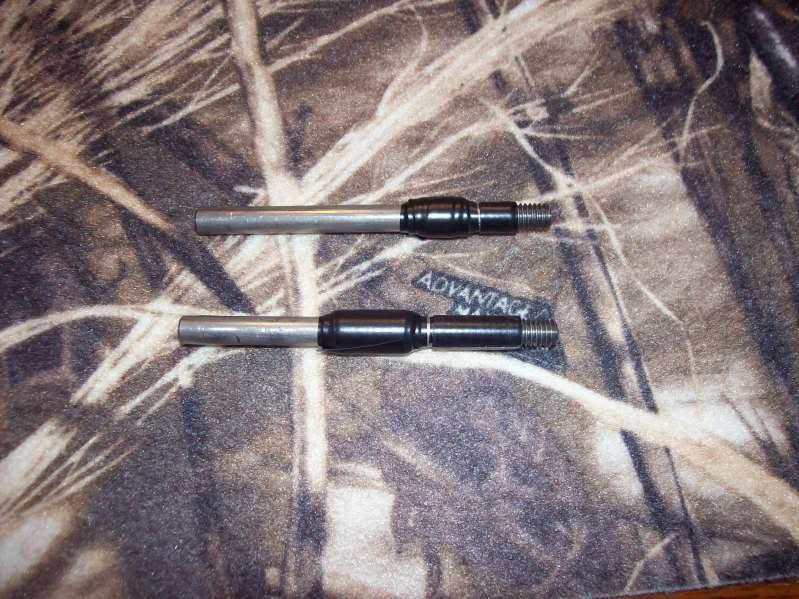
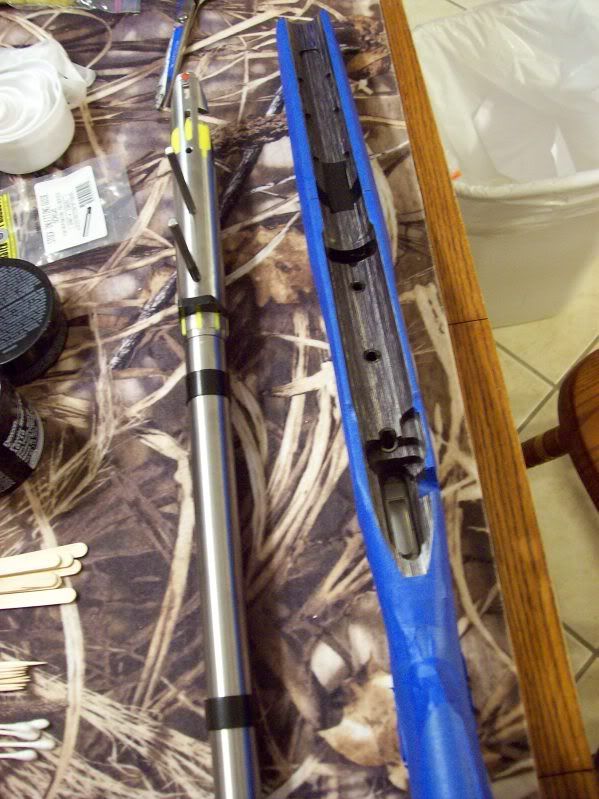
you don't want epoxy in. Then I wrap tape around my inletting screw to center it in the
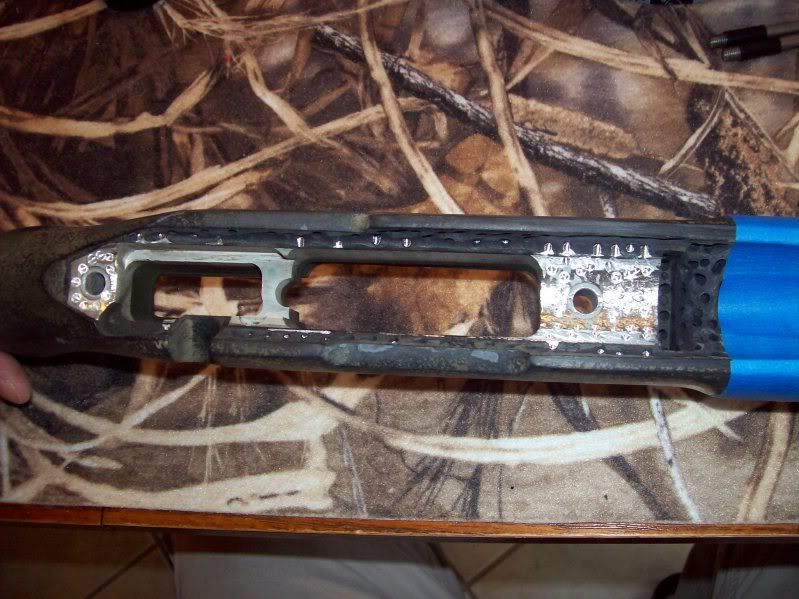
pillar hole. Also tape the front/bottom/sides of the recoil lug. Then I dug out recesses all
along the bedding area for compound to lock into. I taped the barrel in two places to center
action/barrel in the stock. Also ran tape across stock under where barrel should be for where
I want bedding to end. Finish it off with some more modeling clay and that's about it. Coated
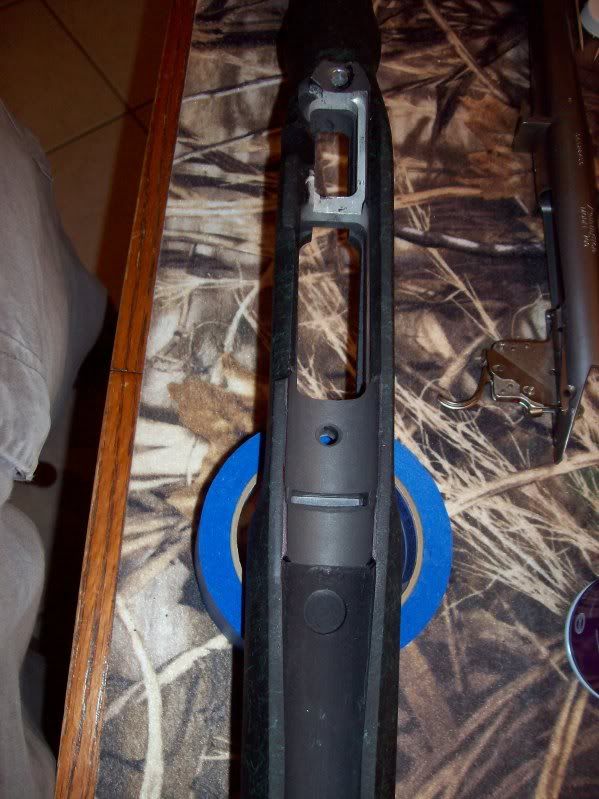
with acra release agent and bed. Some use the srews to pull action into stock/pillars. I don't
anymore. Some factory actions have a littel warp from heat treating. You can put quite a bit
of tension on an action with the screws. I prefer to bed it in the with the action "relaxed"
if that's the way to put it. I hold it in place with black tape or surgical tubing.
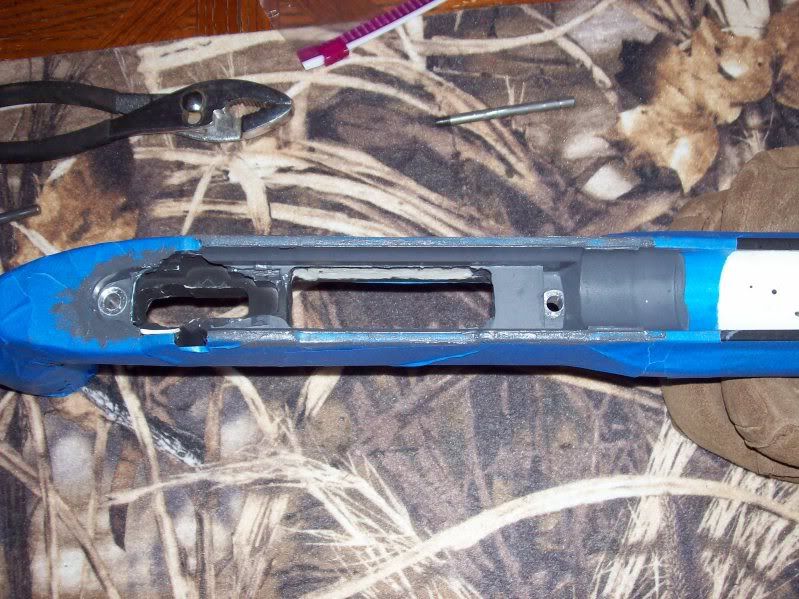
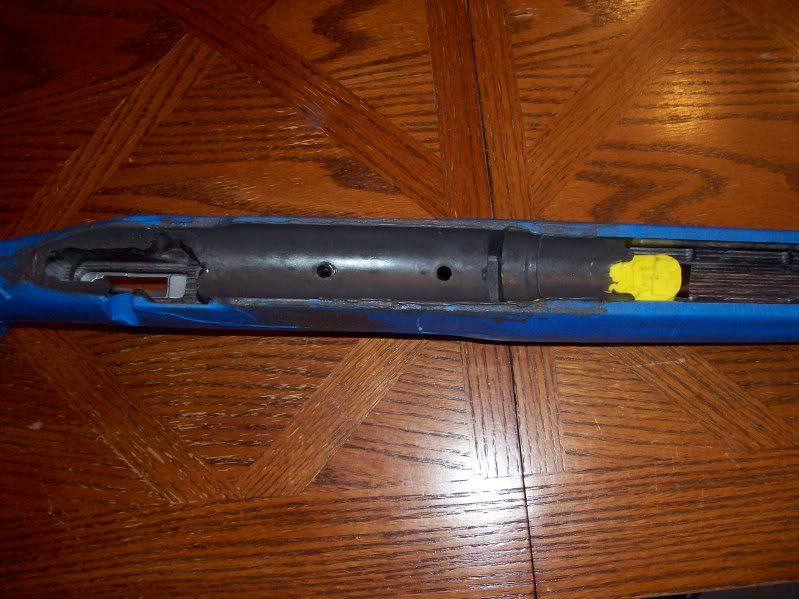
I used Devcon steel putty in these applications.

SavageFTRbedding1.jpg


SavageFTRbedding2.jpg


SavageFTRbedding3.jpg


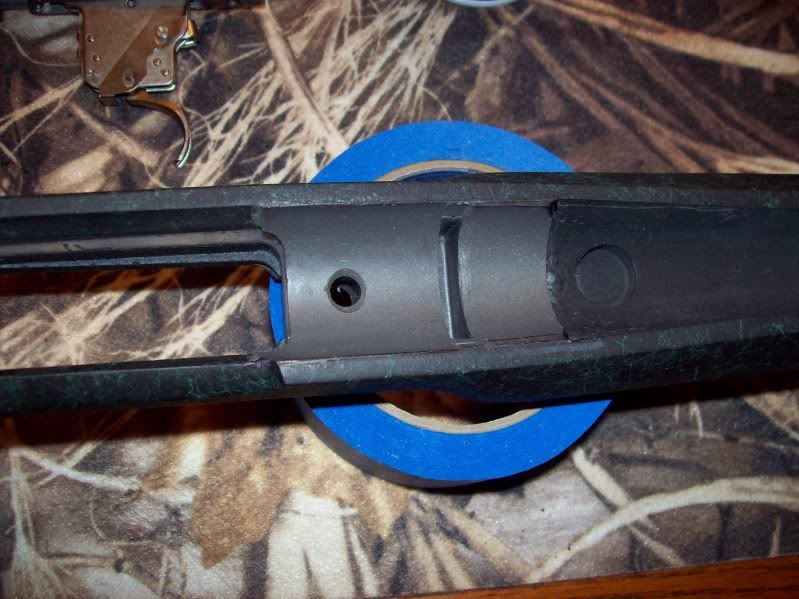
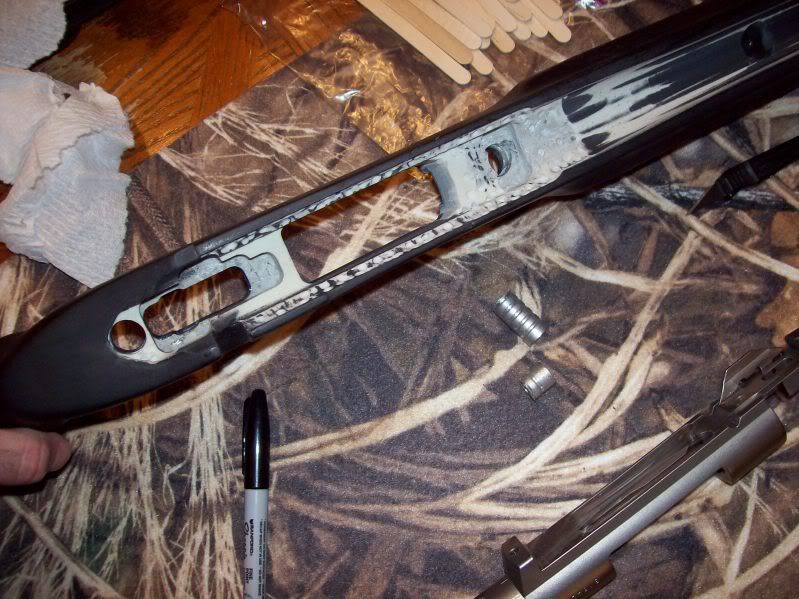
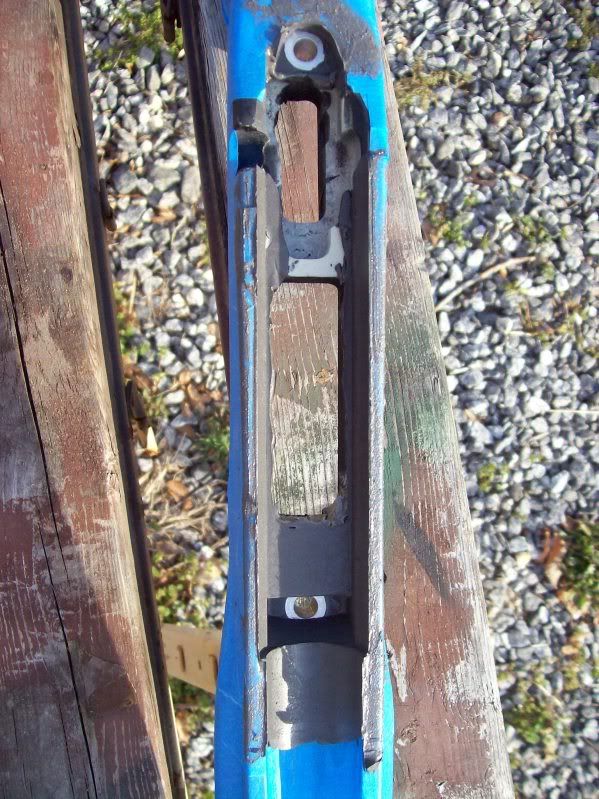
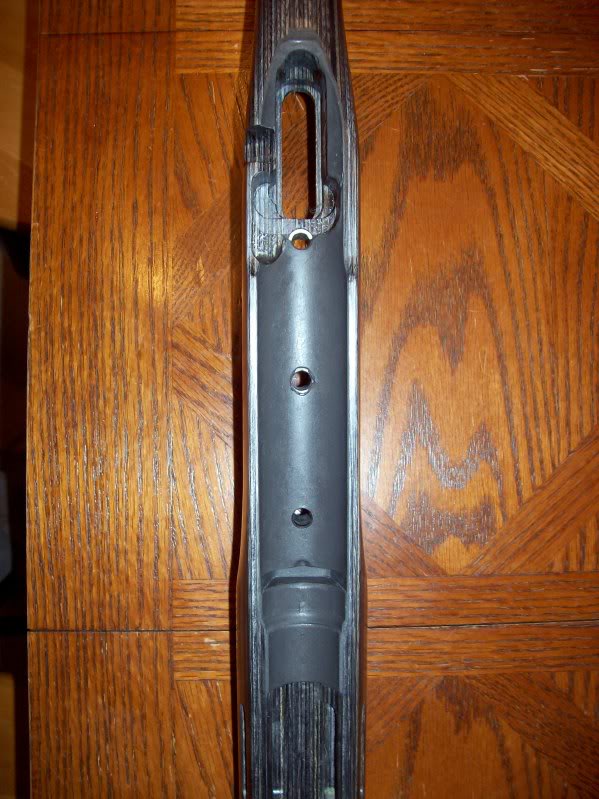
Came out looking OK. Just need to trim up a bit.
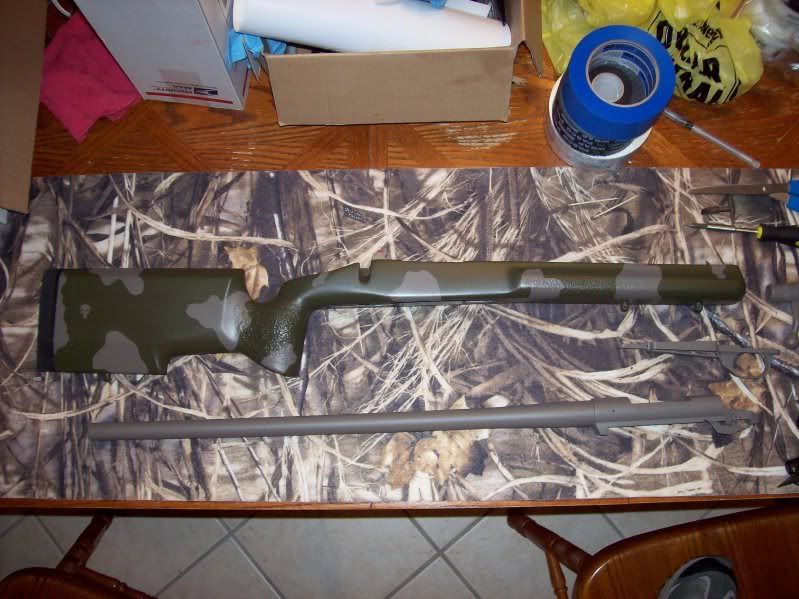
SavageFTRbedding4.jpg


After trimming

SavageFTRbedding5.jpg


SavageFTRbedding.jpg


  • Like
Reactions: jdemp1
Re: A few more bedding tips (Pic Heavy)

Next was a Remington 5R. This is a rifle that may be getting a
full paint job later so I wanted to leave a little extra room
in the bedding job so I would not have to sand or rebed later.
I used the same tape as I normally do on the bottom, front, and
sides of recoil lug. I also added one layer of thin packing tape
around action. This stuff is thin but should give more than
enough room for action to slide in without binding later on after
painting. Also makes that excess bedding come off the action
easier! I also tape up entire stock with blue painters tape. Not
so important on a stock that's gonna get some color but nice to
keep from spreading the mess on one that's finished.


Rem5R1.jpg


Rem5R.jpg


Finished product

Rem5RBedding.jpg


Rem5RBedding1.jpg
 
Re: A few more bedding tips (Pic Heavy)

Finally I came to the one I had been putting off till last. This
is a Howa going in a Manners T4. Inletting was a little off on
this one so I needed to free float the barrel and hog out a
little of magazine box area. This had holes cut for the pillars
but none were installed. I cut them roughly oversize in a band
saw. I'll finish the bottoms later with a piloted pillar reamer.
The action sat a little low in the stock so I used the twin
tape doughnuts on the barrel to get it to ride at the right
height. I hate bedding twice so I wanted to set pillars and bed
action at the same time. I put some tape around the top of the
inletting screws to center them in the pillar. Then I made a
cone shape with tape that would not pull through the hole in the
pillar. I put this screw through the pillar and tightened into
action. The cone of tape held the pillars tight to the action
so I would retain the correct pillar height after bedding.This
action is probably getting camoed later so I wanted to give it
a little room also. But it was not a good fit so I taped all of
the action with the packing tape. Howa's have the front action
screw into the recoil lug so I don't tape the bottom. Just the
sides. The front of the lug is tapered and helps locate the action
in the bedding. I just taped all of it with the same packing tape
as the action. Howas are a little different. This is just how I do
mine.

HowaBedding2.jpg


HowaBedding3.jpg


HowaBedding1.jpg


It's still curing so you have to wait for the finished product
smile.gif
 
Re: A few more bedding tips (Pic Heavy) New pics

Picture of the bedding screws. Forgot to snap a pic beforehand.

HowaBedding2-1.jpg


Before trimming. Not too shabby.

HowaBedding21.jpg


After trimming and cutting a small chamfer in front of recoil lug
to facilitate easier removal/reassembly. Did have one small air
void under there. Not big enough or in the right spot to cause
harm. Just there to annoy me! Anyway, hope hope theres a few
ideas to help someone.

HowaBedding23.jpg


Re: A few more bedding tips (Pic Heavy)

Thanks. I should have taken pics of applying epoxy, just to show guys aprox. how much to use. It's just when I start that part
of the job I lose focus on outside crap. Like my wife "Dinner's ready, are you going to eat now or let it get cold?" Of course
I say "Honey, I really didn't hear you!"

I have done several that I wasn't happy with at all, and cut it all out with a dremel and started over. Turned out fine.

As a side note, one of the biggest problems I use to have was
not mixing enough compound. Hard to go back after you have
stuck the action in and put in a little more.
 
Re: A few more bedding tips (Pic Heavy)

I've done bedding jobs on several rifles and they all came out quite well. The hardest part that I find to get right is the trimming. What do you use to get the nice clean edges on the bedding just like when GAP or LSR do it? I usually end up chipping it, especially at the end closest to the forend. I know this is strictly cosmetic, but it sucks when you put the work into it and blemish it at the very end.
 
Re: A few more bedding tips (Pic Heavy)

A small flat file and file out, not in towards the bedding. Fine cut file, not coarse and finish up with sandpaper. If I get to it
while it is still soft, I trim it with a razor carefully when action is still in. That leaves me a lot less work.
 
Re: A few more bedding tips (Pic Heavy)

When I bed an action, I put the tape on the stock like Scimitar does. I let the bedding compound cure until it is beginning to set, but still soft. I take a plastic knife that I rub on a piece of sandpaper that is supported by a flat piece of steel. I rub it until the teeth of the knife are gone and put a slight bevel on it. When the compound gets to the point where it will cut smoothly, I put the knife against the metal and run it around the stock where the compound has oozed out. It makes a nice smooth cut and does not mar the stock- provided you tape the stock.

It works for me.

David
 
Re: A few more bedding tips (Pic Heavy)

As a side note, if you buy the aircraft counterbore to do the pillars get a few pilots. Easy to snap one so get an extra.

The Brownells part number on the counterbore is # 549-884-365AA
and was 39.99 last time I checked.

The barrel tape I like is the PASCO .010 pipe wrap tape
# 100-001-354AA think its around 6 bucks for a 100 ft roll.

 
Re: A few more bedding tips (Pic Heavy)

Nice jobs. On the Savage, how did you get the clean edge at the front under the barrel?

Also, do you use the small rounded carbide burr with a mill or a Dremel? If the latter, you must have a very steady hand!
 
Re: A few more bedding tips (Pic Heavy)

Look at the tape around barrel and in barrel channel in stock in second picture. The are at the same place when put together. The tape around the barrel is over a 1/16 thick so that gives you
a nice clean edge and the tape and modeling clay in the stock
keeps it clean on the wood.

Dremel. I don't have a mill yet. Know how to run one, just don't have the funds yet.
 
Re: A few more bedding tips (Pic Heavy)

Good post!

A guy can save money learning to do things himself as a pillar bedding job by one of the shops can be expensive. Not to mention the satisfaction of learning a new skill.

Always curious about putting the pillar on the bottom of the lug on those actions with an integral lug like the Howa and others. Seems to work but when we bed those that are build like the Rem or Savage, we tape off the bottom of the lug for no contact.

Anyone ever wonder about that?
 
Re: A few more bedding tips (Pic Heavy)

Great write up.iwas thinking about bedding a savage in a b&c medalist stock.With this info i am now going to go for it.(first time bedding wish me luck)
 
Re: A few more bedding tips (Pic Heavy)

<div class="ubbcode-block"><div class="ubbcode-header">Originally Posted By: Scimitar</div><div class="ubbcode-body">Look at the tape around barrel and in barrel channel in stock in second picture. The are at the same place when put together. The tape around the barrel is over a 1/16 thick so that gives you
a nice clean edge and the tape and modeling clay in the stock
keeps it clean on the wood.

Dremel. I don't have a mill yet. Know how to run one, just don't have the funds yet. </div></div>

Great post man!

I'm still a bit unclear however on this detail (above) in front of the recoil lug. I'm going to try and repeat what you've explained. Please fill in the details for me;

1. Wrap tape around the barrel in front of the lug where you want the bedding to stop.

<span style="color: #3333FF">(do you wrap enough so it actually touches the stock?)</span>


2. Add tape and modeling clay to the stock in the area where you want the bedding to end.

<span style="color: #3333FF">(how do you keep the bedding from chipping and peeling when you lift off this tape on the stock?

Why did you run tape both left to right, and front to back?

Is this tape and modeling clay supposed to interfere and compress against the tape on the barrel?

There isn't any chance of lifting the action out of the stock with all this interference, is there? )</span>
 
Re: A few more bedding tips (Pic Heavy)

Glock,
If your lucky the bedding where the tape from the barrel and stock meet will leave a super thin layer of epoxy. A nice clean cut with a razor blade and it will look great.

I know on my first couple bedding jobs the rest would look great then then there was that hunk of crap in the forearm....yeah its hidden but you still know its there and you cant post bitchin pictures on the hide
smile.gif


Re: A few more bedding tips (Pic Heavy)

1. Yes. I wrap it until it touches the stock but does not push action up out of postition. I start the tape and end it on the top of the barrel. If I put on too much tape, which I normally do to start with, I unwind and cut one ring off at a time until
I get as close to perfect fit as I can.
2. The tape and goes across stock at the same length from lug as
tape on the barrel. You can see the pen ink marks on the tape
in picture three. I tape the barrel, put it in the stock, mark the stock at that point so I know where to tape it. As Norcal said, I should be left with a very thin layer of epoxy that I can cut with a razor.
 
Re: A few more bedding tips (Pic Heavy)

<div class="ubbcode-block"><div class="ubbcode-header">Originally Posted By: mdesign</div><div class="ubbcode-body">Good post!

A guy can save money learning to do things himself as a pillar bedding job by one of the shops can be expensive. Not to mention the satisfaction of learning a new skill.

Always curious about putting the pillar on the bottom of the lug on those actions with an integral lug like the Howa and others. Seems to work but when we bed those that are build like the Rem or Savage, we tape off the bottom of the lug for no contact.

Anyone ever wonder about that? </div></div>


The recoil lug on a Remington 700/clones and Savages are not a part of the action. They are attached by threading barrel through them. The Mauser, granddaddy of controlled round,
Winchester model 70, Weather Vangard, Howa anf others have the lug as part of the action. It is not a separate part that can affect harmonics in the barrel. If you don't bed it,
there's no use to bed at all.
 
Re: A few more bedding tips (Pic Heavy)

Got another few pics of a Rem 700 and some pics of the guide screws taped to hold pillars in for another Howa in a Manners T4

Beddingpics5.jpg


Remington PSS take off. Yeah, it's nasty. You can see in the pic how the tape keeps the guide screw centered.

Beddingpics6.jpg


Beddingpics2.jpg


Beddingpics3.jpg


Re: A few more bedding tips (Pic Heavy)

Another tip for the bedding. I just got an email back from Devcon tech services about the use of their product. I have
been using Acra release and it does a great job and is 20 bucks plus a can. I asked Devcon if Silicone Spray would alter the strength of the steel putty. Their reply was that if you let the petroleum aerosol flash off there wouldn't be a problem. At 1.50
a can, it's looking like a nice alternative.
 
Re: A few more bedding tips (Pic Heavy)

Great Post!

Question on the Savage. It looks like you bedded the tang, is this a matter of personal preference? I've heard discussion on it both ways.

Question on actions with integral recoil lugs like Howa, Mauser an M70. It looks like the Howa has an angle on the front of the lug so it does not stick in the bedding while a Mauser is straight. I would think you would tape the front of a lug like the Mauser so it would not stick in the bedding but bed the rest of the lug solid?
 
Re: A few more bedding tips (Pic Heavy)

I have been using Turtle wax for auto's. The one container has worked great for the last 5 years or so.
 
Re: A few more bedding tips (Pic Heavy)

That Savage was an F/TR three action bolt design. I just bedded
all of it.
MDesign, you are correct. Tape the front of the lug on a
Mauser or Winchester.
 
Re: A few more bedding tips (Pic Heavy)

why do you tape the bottom, side and front of the recoil lug. don't you want the lug to fit in the stock
 
Re: A few more bedding tips (Pic Heavy)

So you can get it out. If it is an action that has a separate
lug such as a 700, tape everything put the back. It is not part
of the receiver and can possibly cause harmonic, vibrations if
anything but back is touching. Plus, half of the factory ones are not flat, so you can actually lock it up if you don't.
I don't tape the bottom of winchesters, howas, actions that
have the recoil lug as part of the action, unless I am painting
the rifle later. Then if it is a tight bedding job and I later
add paint, it just ain't gonna fit.
 
Re: A few more bedding tips (Pic Heavy)

This should be stickied. A bedding tutorial stickied would be nice.
(Maybe it exists but I haven't found it).
 
Re: A few more bedding tips (Pic Heavy)

Great post Scimitar. Once again, how much to bed my FN SPR? PM me if you want.
 
Re: A few more bedding tips (Pic Heavy)

I got some of the bedding screws from Boyds and some from Brownells.

The 5R was a customer rifle. He said it was a hammer when I was done.
 
Re: A few more bedding tips (Pic Heavy)

Nice post!

I might get a Manners for my 10FP.

I took was curious about the tang. I was told to float them on the Sav. Anyone know for sure?

Re: guide screws. I presume you tape the heads of them like that to keep expoxy off them and out of the pillar holes? And put release agent on them right?

If I order the Manners he will MarineTex in Badger pillars. Should I just go ahead and have that done?

How'd you learn to to do all this? Looks like ya know your stuff.

Thanks!

 
Re: A few more bedding tips (Pic Heavy)

<div class="ubbcode-block"><div class="ubbcode-header">Originally Posted By: wpdrebel</div><div class="ubbcode-body">how much did bedding the 5-r help? i have one and am considering having mine done. thanks </div></div>

I just bedded a 5r for a guy and it went from a +2" gun at 100 yds to 3/4" at the same distance with no other changes. He had the same stock as in the earlier pictures and I was surprised how poorly the alum block fit the receiver. Only touching in 3 places and the action squirmed all over when the screws were tightened.
 
Re: A few more bedding tips (Pic Heavy)

<div class="ubbcode-block"><div class="ubbcode-header">Originally Posted By: JLM</div><div class="ubbcode-body">

I took was curious about the tang. I was told to float them on the Sav. Anyone know for sure?

</div></div>

Float it.
 
Re: A few more bedding tips (Pic Heavy)

just thought i would chime in on the devcon release agent,we use kwikee clear shoe polish.and plumbers putty.and devcon 110.just apply the shoe polish generously to all the action areas that will contact the devcon,let it dry and then buff it off with a rag,on the barrel just before the end of the forearm we wrap with electrical tape and do a couple of dry fits until we get the desired free float.when we apply the devcon and get every thing in its proper position we then use elctrical tape as a clamp to hold the action down tight in the stock.then ofcourse star removing all the excess devcon squeezing out every where.this is a tech. that we found on 6mmbr so we are not trying to take credit for it,but it was dummy proof wich helped me out alot.lol.