• Watch Out for Scammers!

    We've now added a color code for all accounts. Orange accounts are new members, Blue are full members, and Green are Supporters. If you get a message about a sale from an orange account, make sure you pay attention before sending any money!

Gunsmithing Bedding recoil lug vs. entire action

WT1

Sergeant
Full Member
Minuteman
Jan 7, 2014
909
86
Wisconsin, USA
Watched several Youtube videos on bedding actions and recoil lugs. After watching all of those videos one could conclude that bedding the recoil lug seems to be sufficient if your stock is pillar bedded.

Wondering what others think on that.
 
Might just be monkey see monkey do but I have allways bedded the full length of the action.
My reasoning mainly is if it is full length bedded and stress free that leaves less to the imagination to go back and fiddle with after it is all done.

I have a new stock waiting on me when I get home that has factory pillars installed, during the process of inletting the small portion for the trigger hanger and releaving some of the other areas I found out that there are two tight spots on both sides of the action just forward of the tang.
 
  • Like
Reactions: WT1
Might just be monkey see monkey do but I have allways bedded the full length of the action.
My reasoning mainly is if it is full length bedded and stress free that leaves less to the imagination to go back and fiddle with after it is all done.

I have a new stock waiting on me when I get home that has factory pillars installed, during the process of inletting the small portion for the trigger hanger and releaving some of the other areas I found out that there are two tight spots on both sides of the action just forward of the tang.

There is something to be said about full length, I agree. Kind of wondering what the best compound would be to use if I just bed the recoil lug? Or the recoil lug and tang, which some say is all you need.
 
All I have used in the past was Devcon 10110 but after opening the 1 lb tub of it I currently have that I have only used once to find out the hardener has gone bad I'm done with it. I really liked the results I got from it but the shelf life sucks.

I have a new batch of marine tex waiting on me, I plan on doing some texturing as well and it seems many prefer it so that's what I will be using from now on if I like the results.

Maybe some of the guys that do bedding and stock work for a living will chime in soon to give you a better sample size than me.

If you are simply going to bed the recoil lug and perhaps the tang all you need is a small dab of the stuff. Maybe that's the ticket. See who offers the smallest amount, tube, tub, whatever.
 
I asked one of the guys at Red hawk Rifles where I bought the stock what they used and recomended.

If my memory is correct I believe it was Pro Bed 2000 is what they said.
 
  • Like
Reactions: WT1
Here is Marinetex's page for the compounds in different sizes. Looks like there are smaller tubes available: http://marinetex.com/products/

Yes you can definitely get it in smaller quantities I just ordered a 14oz kit since I plan on doing a couple of stocks and some texturing. Even that may be a bit of overkill but i figured better to have and not need than need and not have it.

The grey epoxy putty is the one you would want if you do go that route.
 
I have allways used kiwi neutral shoe polish, but there are some higher end aerosol mold release agents that are purpose made for the task.

The only issue I've ever had with using the shoe polish was self induced, I forgot to put a coat of it on the tape I used to mask the outer edges of a recoil lug. Oops
 
  • Like
Reactions: Halfnutz
I have allways used kiwi neutral shoe polish, but there are some higher end aerosol mold release agents that are purpose made for the task.

The only issue I've ever had with using the shoe polish was self induced, I forgot to put a coat of it on the tape I used to mask the outer edges of a recoil lug. Oops

So you taped the recoil lug and then set it in the bedding compound, you didn't just put the shoe polish on the recoil lug and then set the lug into the compound? Or you just taped the outer edges of the recoil lug. The reason I ask is that I had the impression that you needed to get the closest tolerance to get the most from the process and wouldn't the tape add a couple thou to it all. or did you just do the very outer edges of the recoil lug and use shoe polish on the front and back surfaces of the recoil lug? Thanks for the input.
 
I wouldn't recommend using any of the fast set epoxies, you would most likely have issues with them being brittle and excessive shrinkage.
 
  • Like
Reactions: WT1
So you taped the recoil lug and then set it in the bedding compound, you didn't just put the shoe polish on the recoil lug and then set the lug into the compound? Or you just taped the outer edges of the recoil lug. The reason I ask is that I had the impression that you needed to get the closest tolerance to get the most from the process and wouldn't the tape add a couple thou to it all. or did you just do the very outer edges of the recoil lug and use shoe polish on the front and back surfaces of the recoil lug? Thanks for the input.

I have allways masked the front and outer edges (sides and bottom) of the lug. The back of the lug is your contact point and surface that takes any load and is what's important to have a precise fit.
Depending on the shape of the lug I suppose the bottom and sides could be done that way but a parallel sided lug might be problematic.
That's just the way I have allways done mine and haven't had any issues with that procedure.
So don't put any tape on the back of the lug, then.
 
I have only bedded recoil lugs and only when there is no contact with the stock. The one time I did bed the action the stock was wood with no pillars. Recoil lug area is small enough for JB weld.
 
  • Like
Reactions: WT1
Also, make sure you understand which side is the back side.
 
Last edited by a moderator:
  • Like
Reactions: RTH1800 and WT1
I have only bedded recoil lugs and only when there is no contact with the stock. The one time I did bed the action the stock was wood with no pillars. Recoil lug area is small enough for JB weld.

I have been curious more than once about how many people on the hide use JB weld for bedding, the specs on it seem like it would be very good the only real negative I've been able to find are in regards to its viscosity being a little low for some uses.
 
  • Like
Reactions: WT1
I don't know but it will run a little. Need qtips with WD40 to wipe up while it oozes out for a few minutes. It is good for small easy to handle jobs like lugs and scope bases if needed. I would not do a full bed job with it. It does take a full 24 hours to cure.
 
  • Like
Reactions: WT1 and XLR308
I don't know but it will run a little. Need qtips with WD40 to wipe up while it oozes out for a few minutes. It is good for small easy to handle jobs like lugs and scope bases if needed. I would not do a full bed job with it. It does take a full 24 hours to cure.
That's interesting. I just went to the local big box hardware store and JB Weld was the smallest set of tubes with the highest tensile strength they had at 3960 psi. All the others were around 3000 psi or lower. The JB Weld takes the longest to cure but also appeared to have the highest temperature rating and can withstand something like 550 degrees. What, may I ask, did you use as a release agent when doing just the recoil lugs? WD40? Youtube has guys saying petroleum jelly, shoe polish, all kinds of stuff.

And when you did a job on just the recoil lug, did you put tape on any part of it? Thanks.
 
I am trying to see if some of the stuff I have laying around will work as a release agent. Package says will bond to just about anything. Trick is, what will it release from. Mixed some together and trying that out.

I will have access to some Marinetex on Monday and will try that as well.
 
Last edited:
Wax (like in shoe polish) is the best release for JB weld but I also use grease in tight areas like bolt holes, threads and so forth. WD40 is just for cleaning up JB weld right after everything is clinched down. Spray it on a Qtip or cloth. There are a lot of ways to bed. I just use what is readily available. And I have only done small jobs on my own stuff. Playdoh is also useful to block areas you don't want bedding to get into. All these things are shown by others on YT.

There are several opinions on taping the lug. I use two layers of yellow masking on all sides except for the side that makes contact with the stock. And I add a layer of release Agent on the tape. Tape the pertinent areas of the stock. Use acetone on all surfaces that you want the JB Weld to stick. Also, to see how your lug sits in the stock use playdoh as a mold. Put light amount of oil on the lug and bottom of action. Put it together with the action screws then take it apart. I just get a pint of regular acetone in the nail polish section. There are a lot of methods and materials. Just depends on your preference. But it is not rocket science. Taking your time getting everything in one spot is the key. And patience will make it a fun project.
 
Last edited by a moderator:
  • Like
Reactions: Praeger and WT1
The JB Weld Steel Epoxy (which is what I am experimenting with in a pie tin) doesn't seem to be curing the way I think it should. It wants to crumple in to crumbs and flake off. Perhaps I didn't mix it well enough or maybe the steel epoxy isn't the right stuff. I chose it because it had the highest tensile strength and heat resistance but the "steel" component may not serve the purposes of bedding a recoil lug well.

I'm going to try some Marinetex tomorrow. That is the most commonly used bedding compound to my knowledge. They just don't have it at any of the local stores.

Try ace hardware if they are in your area for marine tex, as far as mixing epoxies the best method I have found is using something that is flat like a spatula blade and flexible so the two parts can be easily folded together more constently.
The Devcon kits I have bought actually include one but you should be able to improvise something or buy one anywhere that sells auto body supplies or look in the paint section of your hardware store.
Ace doesn't carry it.
 
Most boat dealers carry marine tex.
I would buy the small kit x 2.
1 will probably do for behind the lug and tang.

The real trick to using it is , MIX THE ENTIRE CONTENTS.!
Do not try and weigh or measure, just get over that.
We have a 30 year old boat that I marine tex repaired, patch still holds.
The boat dealer I bought it from told me the mt was finicky about ratio and to mix all at once.

The jb "scotch" weld is easy to mix and slightly forgiving, just draw 2 equal lines and mix.
 
Look at what needs to happen. The stock needs to hold the action in place and not shift under recoil, while not placing any undue stress on the receiver.

Functionally, you need support in three places. Around the front and rear action screws, and behind the lug. If it's making contact in all of those places with or without bedding, you will have no problems. If it is not (with or without bedding) you will.

I bed all of my rifles with 3 dabs of JB weld, and aluminum pillars if the action screw holes are through wood, or light fill on a composite stock. I also do it on V-block chassis where the bottom of the action does not touch the bottom of the V block before torquing the screws. Bedding around the action screw holes isolates the clamping force that the action screws provide. If you have one supported, and one not, you will bend/bind the action or tang.

Untitled.jpg


Cosmetically, or for warm and fuzzies, you can do a full inlet and pillar bed job with directional stainless steel pillars with degassed epoxy of uniform thickness.... etc. etc... Functionally, negligible differences.
 
  • Like
Reactions: Average guy
Look at what needs to happen. The stock needs to hold the action in place and not shift under recoil, while not placing any undue stress on the receiver.

Functionally, you need support in three places. Around the front and rear action screws, and behind the lug. If it's making contact in all of those places with or without bedding, you will have no problems. If it is not (with or without bedding) you will.

I bed all of my rifles with 3 dabs of JB weld, and aluminum pillars if the action screw holes are through wood, or light fill on a composite stock. I also do it on V-block chassis where the bottom of the action does not touch the bottom of the V block before torquing the screws. Bedding around the action screw holes isolates the clamping force that the action screws provide. If you have one supported, and one not, you will bend/bind the action or tang.

View attachment 6972578

Cosmetically, or for warm and fuzzies, you can do a full inlet and pillar bed job with directional stainless steel pillars with degassed epoxy of uniform thickness.... etc. etc... Functionally, negligible differences.

Thanks. That's a pretty thorough explanation. Makes a lot of sense. What do you use as a releasing agent in and around the action screws on the underside of the receiver at the tang? Shoe polish? Petroleum jelly?

So you are basically just bedding the action screws at the tang and the front action screw and lug. Makes a lot of sense.

By "dab," how much do you mean like the size of a small bead or something? Does it squeeze up out of the underside of the action. It'd make a great YT video.
 
The JB Weld whereas before didn't seem to be curing very well is doing much better now that I went to the store and purchased one of those clamp on work lamps and put an incandescent flood light in it and pointed it at the JB Weld experimental dab size piece as if it was under a heat lamp. It is hardening much more thoroughly and quickly. I think this stuff might work fine. It just needed some heat. The room temp is about 57 degrees but under the lamp it is 85 degrees. Most of this stuff has a requirement of 70 degrees to cure properly.
 
You can cure marine tex in an hour if you heat it with a hair dryer for 10 minutes.
Hot but not untouchable say 170 degrees, let cool to room temp.
Then rock and roll.

My hull patch was done like that, was back on the water in 2 hrs total.
It was 30 years ago, still holds.

We always let jb and scotch types go overnight.

I wont be heating my stocks, they can sit for 24.

Bring the rifle in the house and warm it, the smell of the adhesives disapate quick.
 
  • Like
Reactions: WT1
About the volume of 2 stacked quarters around the action screws and fill the lug pocket about 2/3 full. It depends on how much gap exists between the stock and action.

I just use imperial sizing wax on the action and screws, and only screw them snug, not torqued. Painters tape on the front and sides of the lug. Use q tips to clean up what squishes out. Doing it this way usually doesn't make a mess at all, which is why I do it like this.
 
Joining into this thread, after bedding my first rifle and learned something, feeling me now able to discuss it though.

There seem to be 3 versions of "the right way" to bed a rifle.
1. Only the recoil lug.
2. Area around the recoil lug and the tag.
3. Full bedding of the system

And then there seems to be another option for being added or not to this three versions, which is bedding the chamber or the area where the barrel meets the system too.

Some say it is different if you have a wooden stock or a plastic one, if there is enough space in the middle (where sometimes big magazine shafts are sitting and there are only tiny flanks on each side).

I´m pretty confused.

Everybody seems to praize the way he is doing it, without having experiences with one of the other versions.

In my opinion only a guy who has bedded a big number of different rifles in different ways and then proofed their accuracy before and after is able to give a reliable statement.

But is there such a guy anywhere?
 
If I were going to the trouble, I would bed the whole thing. Marine Tex gets my vote, have been using it for years with great results. Have used Devcon as well I just like the MT better. Watch the videos I linked below and you will know what you are getting into.


Making a stock to the design dimensions of a M700 action and having a drop in stock is a great idea - too bad Remington heat treats their pipe-based actions AFTER machining....

Bed the action too.
 
If I may:

1. Bedding the lug serves a very different purpose from bedding the action. The lug has two functions. It distributes a force to the stock created by recoil and it serves to transmit the torsional force created by the bullet acclerating from zero to 200,000+rpm in a distance of almost nothing. The contact patch to the rear of the lug does the recoil work and the sides are for torsion.

Digging into this there's likely some "stiction" stuff going on where the back side plays into the torsion thing to some degree as well.

2. Bedding the action. All it is doing is providing a tension free register for the reciever. It's a casting, nothing more. Whether you have pillars or not means nothing for that purpose. The pillars are so that the stock does not compress when snugged up. In the old days where wood was the primary stock material, this became a bigger deal due to weather fluctuations and the natural tendency for the wood fibers to compress over time. With a composite that is by and large no longer the issue. We do it cause it's "monkey see..." and it hurts nothing. Protects the stock I guess from guard screws chewing on stuff, but that's about it.

As for the front/rear of the action debate:

There is no blanket answer. Repeaters are different from single shots. In a repeater you have a gaping hole down the center. This forces the recoil energy to be sent along the sides of the rifle stock. The stock is softer than the action. When the bang happens the reciever will do some wierd stuff, but the bulk of it happens in the rifle stock. The sides along the magazine box bulge slightly. This effectively makes the stock shorter for a split second, then they straighten back out again.

During this time, make no mistake, the rear of the receiver and the bedding are sliding against one another just like your car does on icy pavement. So, all the bedding in the world won't stop that.

Bedding the tang area serves a very different purpose. It's to ensure tangent contact over the broadest footprint possible so that the receiver does not distort when the screw is snugged up. Just like it wants to do on many chassis stocks using the conventional V setup. The tang narrows and it stops making contact before the screw centerline. In that condition you have a lever. The front of the action tries to levitate off the rifle stock.

Bedding along the sides along the magazine box really isn't doing a whole lot I'm afraid. This is proven where guns are inletted poorly. Guys do the front/rear and they shoot just fine. From a fit and finish perspective, it's not something I would ever want to see, but I'm not the sherrif so my opinion doesn't mean much.

If you have the tools to do so and the means, bed from one end to the other, it'll look a whole lot better.

3. Epoxy choice. All you want is a resin of low shrinkage and good tolerance to compression. It should have a high solids content and have a good tolerance to chemical exposure. Petroleum and ammonia being the two biggest concerns. I personally don't care for stuff that has a ferrous based filler material. I'm always worried about salts and humidity breaking it down and starting a cascading effect. Just my paranoia, I have no data to support that.

It should have at least a 45m open clamp time. That means you don't have to rush it. That is poison for a good bedding job.

Epoxy goofs, one is mixing. FEW people take the time to mix the resin and catalyst properly. I like a big flat plate of glass. I can see it as its spread thin and that also mitigates heat buildup. -Extending my work time. It also avoids the introduction of air bubbles.

4. Release Agents. I've used every type listed here. They all work. Crisco or a tube of Chapstick would work. The absolute best that I have found is a product I also sell on our site. McLube 1700L. It's aerosol and goes on whisper thin. It flashes dry slick. It does not contaminate the resin in any capacity. It does not require buffing. A can lasts us about 2 months. It doesn't take much. Not the cheapest stuff, but I can say with certainty that it is better than every other product listed in this page. If it wasn't, I'd still be doing it the "old way."

Hope this helps.

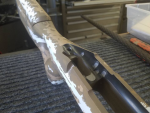
For those who've never seen LRI's bedding:

1543948088629.png


1543948202417.png
 

Attachments

  • 1543948100307.png
    1543948100307.png
    842.7 KB · Views: 202
  • 1543948113009.png
    1543948113009.png
    2.6 MB · Views: 477
  • 1543948124063.png
    1543948124063.png
    513.9 KB · Views: 217
Also, to see how your lug sits in the stock use playdoh as a mold. Put light amount of oil on the lug and bottom of action. Put it together with the action screws then take it apart.

I do this as well. Then I remove the excess playdoh where it is not wanted, and I take what is remaining and roll it up into a ball. Since I usually use the putty type epoxy it gives me an idea of how much bedding material I need and minimizes the excess.
 
Thanks guys,
amazing infos, videos and pics.

LRI, that bedding surface looks really slick, nice cuted edges, oh my, my stock looks a bit "different".
:cool:

What´s about "supporting" the barrels end / the chamber?
Some do it, other´s don´t.

I know custom rifles, where the barrels flies freely above the stock, just threaded into the system, no contact, nothing to the barrel.

Others say, with heavy barrels you have to support the chamber, because the system might bend otherwise.

What´s the "truth" in this subject?
 
The strength of the receiver and the rigidity of a 1-1/16" or 1-1/8" screw torqued to 30-100 lb-ft made of hardened CM or stainless steel is going to vastly outweigh what little bit of upward support bedding would provide on the first 1-2" of the wrong side of a fulcrum.

Bedding under the chamber potentially makes for a smaller amplitude (I doubt by very much) of vibration in the barrel. I don't look at this as "making it better" so much as I do "making it different". Modifying the natural frequency of the system.

On the down side it requires a re-bed when you spin on a new barrel.

End of the day it doesn't really matter one way or the other. You see it done both ways because both ways work. That's a universal-- If you see a bunch of people saying "their" way is the best and multiple ways of doing it are prominent... Odds are they all work. That's not to say one way might be theoretically better in some ways or the other, or geared toward a different end goal, but on the whole... mostly a wash.
 
The only (ONLY) time I have seen a difference is on the 22's I used to build for International 3 position. I bedded out 2.5" from the front guard screw on the Anschutz 54 action. This was cause that is how I was taught. Neal Johnson built guns going back to the 60's and his stuff enjoyed a whole lot of success.

The 2 gold medals that Matt Emmonds won with the rifle(s) I built for him were both done this way. (2004 and again in 2008)

Rimfire stuff is different. You have a shitty little bullet made of cast lead that is loitering around the barrel roughly 3x longer than any high performance center fire. (1050fps vs 2800+) As a result, theres more time for things to eff with it. One reason why they make such a good trainer. It forces you to hold and follow through better.
 
On the Devcon 10110 steel putty - they used to package the hardener in a shallower, smaller container. Then a few years ago, they started sending the 1lb kits out with the hardener in a container with at least double the volume of the old one, and I started having trouble with the hardener going to crap a short time after the seal was broken. I have no way of knowing whether they've changed the formula of the hardener, or whether someone got a screamin' deal on larger containers...but where before I could count on the hardener lasting for a year or more - even in a shop where the temp varied from too cold to be comfortable to too hot to be comfortable. Again, it all went to shit after they started sending out kits with the oversized container for the hardener - and I called them on that several times to question why. I'm just a dinky little one-man shop doing a dozen or two rifles per year, and used to buy 10110 from Brownells, so they probably didn't see the need to listen to someone who won't buy a ton of Devcon each year.

I stopped worrying about it and just use Marine Tex 14oz kits now. My guess is that a whole lot of guys had the same problem with Devcon's hardener - Brownells was back-ordered on Marine Tex for quite some time after the problem with Devcon reared its ugly head.
 
Chad - 15 or more years ago, I traded a CMP H&R M12 to Mac Tilton for a pretty nice Anschutz 1611 that had been bedded by someone who knew what he was about. Definitely the most professional bedding job I'd seen at the time, and it was done much like you describe how you do 54s. I sold that 1611 to a friend who needed a good prone trainer so I could afford to buy a 2011 off GunBroker - I think I stole that rifle, as I was the only bidder, and it appeared as NIB, and came with a set of Anschutz's top-of-the-line sights. However, I think I'd have been better off if I'd kept my good old 1611, and let someone else 'steal' the 2011. It's OK, but I don't really think it shoots much - if any - better than that nicely bedded old rifle did.
 
Chad - 15 or more years ago, I traded a CMP H&R M12 to Mac Tilton for a pretty nice Anschutz 1611 that had been bedded by someone who knew what he was about. Definitely the most professional bedding job I'd seen at the time, and it was done much like you describe how you do 54s. I sold that 1611 to a friend who needed a good prone trainer so I could afford to buy a 2011 off GunBroker - I think I stole that rifle, as I was the only bidder, and it appeared as NIB, and came with a set of Anschutz's top-of-the-line sights. However, I think I'd have been better off if I'd kept my good old 1611, and let someone else 'steal' the 2011. It's OK, but I don't really think it shoots much - if any - better than that nicely bedded old rifle did.

At one time I used to do quite a bit of work with Ol Mack. Hell of a guy. For those into cars, Mack is the founder of Tilton Racing Clutches.

Sharp ol cat.
 
So you taped the recoil lug and then set it in the bedding compound, you didn't just put the shoe polish on the recoil lug and then set the lug into the compound? Or you just taped the outer edges of the recoil lug. The reason I ask is that I had the impression that you needed to get the closest tolerance to get the most from the process and wouldn't the tape add a couple thou to it all. or did you just do the very outer edges of the recoil lug and use shoe polish on the front and back surfaces of the recoil lug? Thanks for the input.
Your question is valid. To answer it, understand the proper procedure is to tape the front and three sides of the lug...BUT NOT TAPE THE REAR WHERE THE LUG WILL BE PRESSED AGAINST THE LUG STOCK HOLE...the hole purpose of the job. This way the lug will rest hard against the stock. But you should tape the rest of the lug to make sure you will have just a little "play" in order to be able to lift the action from the stock in the future.