• Watch Out for Scammers!

    We've now added a color code for all accounts. Orange accounts are new members, Blue are full members, and Green are Supporters. If you get a message about a sale from an orange account, make sure you pay attention before sending any money!

BOG DeathGrip Modification? FIXED IT!!!

LRShooter101

Sergeant
Supporter
Full Member
Minuteman
Nov 6, 2013
598
435
Southern, IN
Was wondering if anyone has tried to modify their BOG DeathGrip head to prevent the clamp from moving up & down with an unbalanced load on it?

I really like the tripod and head, and for the money, it is extremely hard to beat.

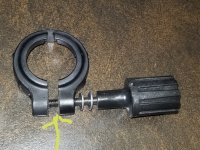
The one big downside is that you don't have a rifle that balances well in the clamp, the head can drift up or down once the breakover point is reached.

I have looked at the portion of the clamp, and tried to disassemble it to see if I could improve something, but I have not been able to figure out how to disassemble it?

I would think that by adding something on the surfaces that creates more of a "bite", or adding some additional washers, that it may be possible to get it to lockup better.

Has anyone tried to modify theirs and had any luck doing it?

Thanks!
 
  • Like
Reactions: m239
Just my luck, made this post, and 30 minutes later, I figured it out and fixed it!!!

Step 1 - There is a grey rubber cover on the knob that you use to tighten the tilt mechanism. Pull it out, and there is a nut behind it that you take off to get the knob off.
BDG Knob Cover.jpg

Step 2 - Pull the bolt out, and the head will come off of the tripod.
Inside of that assembly will be 2 black plastic washers
BDG Black Washers.jpg

Step 3 - put it all back together, however replace the 2 black plastic washers with actual metal washers that are just a little bit thicker than the plastic ones. When I say thicker, you are probably talking no more than 1mm. If the metal washers get to thick, it will not go back together. The metal washers must also be the same diameter as the plastic ones. Also add a lock washer between the black metal spacer that is between the knob and the side of the head.
BDG Washers.jpg

*NOTE - when you put it back together, make sure the head of the bolt is fully seated against the side of the head. Just below the head of the bolt is a square shoulder. When I looked at mine, that square shoulder was keeping the head of the bolt from resting fully against the tripod head. I hit it with a hammer, and it seated fully.
BDG Bolt.jpg

By making these changes, I can actually get the bolt to tighten fully and keep the head from moving!
BDG Rifle.jpg

That is a HEAVY Large Frame AR, that is NOT balanced well when it is in the clamp. With the modification, it will sit without moving, even with a negative rearward angle!!!

From what I can tell, even when you turned the knob as tight as you could get it, it was still not tightening the bolt against the head and tripod to keep it from moving. I am also sure that the plastic washers allowed it to slip easier.

I really liked this setup, especially for the price, but the slipping tilt was really pissing me off. PROBLEM SOLVED, for now!

If anyone has any questions on what I did just let me know.
 
Last edited:
Thanks very much for this tip.

I recently got a BogPod and was also disappointed with the head not remaining in position.

I knew SH would have the answer, and this fix worked well, I also added washers either side of the spacer (this still left enough thread to get the nylok nut back on).

IMG-1176.jpg


Then it was out for a quick field test with the 22

IMG-1173.jpg
 
Just my luck, made this post, and 30 minutes later, I figured it out and fixed it!!!

Step 1 - There is a grey rubber cover on the knob that you use to tighten the tilt mechanism. Pull it out, and there is a nut behind it that you take off to get the knob off.
View attachment 7547868
Step 2 - Pull the bolt out, and the head will come off of the tripod.
Inside of that assembly will be 2 black plastic washers
View attachment 7547869
Step 3 - put it all back together, however replace the 2 black plastic washers with actual metal washers that are just a little bit thicker than the plastic ones. When I say thicker, you are probably talking no more than 1mm. If the metal washers get to thick, it will not go back together. The metal washers must also be the same diameter as the plastic ones. Also add a lock washer between the black metal spacer that is between the knob and the side of the head.
View attachment 7547872
*NOTE - when you put it back together, make sure the head of the bolt is fully seated against the side of the head. Just below the head of the bolt is a square shoulder. When I looked at mine, that square shoulder was keeping the head of the bolt from resting fully against the tripod head. I hit it with a hammer, and it seated fully.
View attachment 7547874
By making these changes, I can actually get the bolt to tighten fully and keep the head from moving!
View attachment 7547875
That is a HEAVY Large Frame AR, that is NOT balanced well when it is in the clamp. With the modification, it will sit without moving, even with a negative rearward angle!!!

From what I can tell, even when you turned the knob as tight as you could get it, it was still not tightening the bolt against the head and tripod to keep it from moving. I am also sure that the plastic washers allowed it to slip easier.

I really liked this setup, especially for the price, but the slipping tilt was really pissing me off. PROBLEM SOLVED, for now!

If anyone has any questions on what I did just let me know.
Are you having a problem with the 360 rotation? My head spins no matter how tight
 
Are you having a problem with the 360 rotation? My head spins no matter how tight
The collar is not designed to lock into position, and must not be over tightened. But here is what I did to make it hold tighter:

Disassemble the saddle post by first removing the 5mm allen bolt from the bottom. It's covered with a rubber plug. The parts are similiar to a bicycle fork stem, with upper & lower ball-bearing rings, and cups. Then unscrew/remove the 360° Pan Knob, and pull the plastic collar off. Pull the saddle assembly up out of the tripod head, and the parts will fall into your hand. Remember the order they are assembled.

Blast the ball bearing rings with brake cleaner to disolve any assembly grease. Clean all the bearing cups/raceways as well. You want to remove all lubrication. I used dry graphite powder on the contact surfaces, but thats not really necessary since they are minimal moving parts. BOG over engineered this assembly, and it's actually very smooth to pan left/right in small "clicks" (there are 18 detent ribs inside the collar).

Now here is the secret sauce: You need to open up the gap of the plastic collar where it closes. This allows the collar to grab a tighter fit when tightening the 360° Pan Knob. (see attached pic with yellow arrow where material needs to be removed). I used a thin flat file to remove plastic from the mating surfaces. Cant recall how much I removed, so trial & error until it suits your preferance. You will need to add 2 flat washers on the lock screw, SAE Size #8. These are a perfect fit, and I can mail you a few if you need them, lmk.
 

Attachments

  • 20240309_175443.jpg
    20240309_175443.jpg
    883.3 KB · Views: 26
Last edited:
Neither the Elevation Tilt, or the 360° Pan Adjustment are meant to be locked into place on the BOG Deathgrip. This is described in the operator manual.
 

Attachments

  • 20240309_182034.jpg
    20240309_182034.jpg
    429.4 KB · Views: 24
The pricepoint of BOG tripods is very affordable. Dont expect Manfrotto or HOG Saddle specs. If I could afford a $1500 tripod, I would have bought one
 
Last edited: