• Watch Out for Scammers!

    We've now added a color code for all accounts. Orange accounts are new members, Blue are full members, and Green are Supporters. If you get a message about a sale from an orange account, make sure you pay attention before sending any money!

Brass Annealing Guide

Steelhead43XGunny Sergeant
Rating: 3.4/5 this site
668 posts this site
Re: Brass Annealing Guide
12/14/2014

Helpful vid. Thanks.

I got a buttload of 260 brass that I need to anneal and hope to start this week.

Rate now:
shotdown
shotdown.gif

XGunny Sergeant
Rating: 3.1/5 this site
511 posts this site
Re: Brass Annealing Guide
12/14/2014

Very useful video. I'm using the same setup and caliber brass. However, my time is at 3.8 sec compared to their 3 sec. I do use a slower flame speed so I believe that is the reason why.

Rate now:
gixxerk8XSergeant
Rating: 3.0/5 this site
290 posts this site
Re: Brass Annealing Guide
12/14/2014
(2 votes)

Got my bench source yesterday and ran my first batch of 308 lapua brass today. Looks like I need to lower my flame just a tad to get lower on the brass. Loaded round is new brass. 650 and 400 tempilaq looked ok. Any input appreciated

20141213_165434_zps6d93bd8c.jpg


Rate now:
Steelhead43XGunny Sergeant
Rating: 3.4/5 this site
668 posts this site
Re: Brass Annealing Guide
12/14/2014

Orkan, do you use tempilaq or go strictly by what your sacrificial cases tell you?

Rate now:
orkan
orkan.gif

XFirst Sergeant
Rating: 2.8/5 this site
4139 posts this site
Re: Brass Annealing Guide
12/14/2014
(13 votes)

Stricly what my cases tell me. Each case has slightly different alloys in it. Temp paint does not tell the whole story.

As for flame height, yeah, I'd go a little lower on those. You want to get about 1/4 way down the case from the shoulder. Keep the torches level, (not angled) and the flames crashing into each other at the mid-point where the brass sits.

Rate now:
Steelhead43XGunny Sergeant
Rating: 3.4/5 this site
668 posts this site
Re: Brass Annealing Guide
12/14/2014

orkan wrote:
Stricly what my cases tell me. Each case has slightly different alloys in it. Temp paint does not tell the whole story.

Thanks.

Rate now:
shoot4fun
shoot4fun.jpg

XFirst Sergeant
Rating: 3.3/5 this site
4603 posts this site
Re: Brass Annealing Guide
12/15/2014

I use temp paint on the head to keep me from overheating. The neck gets what the case tells me. I use a couple of throw away cases for testing. My R-P 260 brass is about 3.8 seconds also. There is no uniform answer for how long you need to anneal because of differences in brass and flame temo. I clean all my brass in SS media before annealing. After I resize I use corn cob for final finish and removal of any lube left from the sizing process.
Rate now:
ValhallXSergeant
Rating: 3.2/5 this site
480 posts this site
Re: Brass Annealing Guide
12/15/2014

THe video is quite decent and you give some good pointers.

For anyone that is starting out annealing, the first thing i'd advice to do is simply read up on some good information, so you atually have a grasp of what your actually doing and want to achieve.

here is a few decent ones.

accurateshooter.com/technical-articles/annealing

bisonballistics.com/articles/the-science-of-cartridge-brass-annealing


As for adviing people not to use Tempilaq, because cases does not have the exat same metallurgy is really not a sound advice.

First off you should ensure that your case neck get to a high enough temperature, for the brass grain structure to change sufficiently, witch is what you want to achieve in the first place, and that certainly wont happen below 600 F, regardless of metallurgy.

Secondly using too high a temp will permanently ruin your brass even if it is just for a few seconds.

The Tempilaq will give you some very good indicators as to what is actually happening with the brass.


Using both your eyes and Tempilaq is highly adviced, if you want to do it correctly.


Rate now:
orkan
orkan.gif

XFirst Sergeant
Rating: 2.8/5 this site
4139 posts this site
Re: Brass Annealing Guide
12/15/2014
(11 votes)

Valhall wrote:
As for adviing people not to use Tempilaq, because cases does not have the exat same metallurgy is really not a sound advice.

First off you should ensure that your case neck get to a high enough temperature, for the brass grain structure to change sufficiently, witch is what you want to achieve in the first place, and that certainly wont happen below 600 F, regardless of metallurgy.​
That's your opinion, and you are happy to voice it. Though it is just like every other bit of annealing advice given in most places: Overly complicated.

Each brand of brass and each lot number from those manufacturers will react slightly differently. The point at which they start burning off metals from the alloy will vary in time, but the point just before that is correctly annealed. Period. You say "regardless of metallurgy," but that's the entire topic at hand. I had my process vetted by a professional metallurgist that works for one of the worlds largest oil companies and makes ridiculous money. He knows more about brass alloy than anyone I've ever talked with in my life. If you want to use your paint sticks, go right ahead. People following my method will experience a faster setup time and a certainty of process that they would not experience otherwise... and it's easy to do.

You quote specific temperatures, yet say that every brass is different. That doesn't track does it? My process allows you to identify what each type of brass specifically behaves like. Finding exactly where you start ruining the brass, and allowing you to back off from it to ensure a perfect annealing temperature every time regardless of brass type. There IS no better method. I've spent several years looking for one, and no one has written anything or produced any evidence of it. I've been advocating this type of setup for the last several years, and those that heed the advice report back with excellent results every time.

Rate now:
Steelhead43XGunny Sergeant
Rating: 3.4/5 this site
668 posts this site
Re: Brass Annealing Guide
12/15/2014
(1 vote)

Thanks orkan, Just annealed 50 of my oldest cases.
12 firings on them, sure made a difference when I sized them and bullet seating feel was a lot more consistent.
Went outside and shot 2 groups of 5, didn't hurt anything but that brass was showing vertical issues at distance.
Looking forward to trying them past 1000.

5 seconds with single torch, Win 243 brass sized to 260.
Rate now:
orkan
orkan.gif

XFirst Sergeant
Rating: 2.8/5 this site
4139 posts this site
Re: Brass Annealing Guide
12/15/2014
(9 votes)

Excellent! Anneal about every 3 firings or so at least, and you'll have more consistent release. I have a machine, so I anneal every firing... because it's easy. ;)

Rate now:
goodgorillaXSergeant
Rating: 3.1/5 this site
488 posts this site
Re: Brass Annealing Guide
12/16/2014 Last edited 12/16/2014 by goodgorilla

Do you anneal before or after resizing? I would guess before.

Rate now:
orkan
orkan.gif

XFirst Sergeant
Rating: 2.8/5 this site
4139 posts this site
Re: Brass Annealing Guide
12/16/2014
(10 votes)

Anneal before resizing. The heat will tend to move the metal around a bit as it's being stress releived, so sizing will get them all uniform again before trimming.

Rate now:
BigMahi2
BigMahi2.png

XFirst Sergeant
Rating: 2.1/5 this site
1206 posts this site
Re: Brass Annealing Guide
12/16/2014
(1 vote)

Awesome video Orkan, I wish I saw this when I first started out. A few years ago (even now) there's a bunch of misconceptions and I learned the hard way (standing cases in water, heating till red, drying in the oven, and what not...).

Rate now:
tho98027XSergeant
Rating: 3.1/5 this site
328 posts this site
Re: Brass Annealing Guide
12/16/2014

Orkan, what's your opinion of dropping the cases in water after annealing. Seems like some do it and some don't. Does it matter? Great vid by the way.

Rate now:
orkan
orkan.gif

XFirst Sergeant
Rating: 2.8/5 this site
4139 posts this site
Re: Brass Annealing Guide
12/16/2014
(9 votes)

Doesn't matter at all. I don't quench.

Rate now:
PenguininXPrivate
Rating: 3.3/5 this site
43 posts this site
Re: Brass Annealing Guide
12/17/2014 Last edited 12/17/2014 by Penguinin

And the reason not to quench is simply that the brass is thin enough and the batches are large enough that the brass is cool by the time you are ready to begin the rest of the process?

Now I have also heard some shinanigans about you shouldn't quench brass becuase it would work harden it, but from what i understand about brass is that you will not recieve really any hardening in the brass since brass work hardens only when being cold worked yea?

Rate now:
 
  • Like
Reactions: LOF and Skwerl
Just thought you guys might be interested in my homemade annealing machine.


<iframe width="500" height="281" src="https://www.youtube.com/embed/Jv75-9p9yFA" frameborder="0" allowfullscreen></iframe>

 
  • Like
Reactions: N21911s
Very good information. I am trying to decide on what the best annealing machine or method to start with. May start out with tempilaq, cordless drill and propane torch as I have everything. Any opinions on best annealing machines for weekend warrior and cost?
 
  • Like
Reactions: Boatninja
IRT: "I'm using the same setup and caliber brass. However, my time is at 3.8 sec compared to their 3 sec. I do use a slower flame speed so I believe that is the reason why."

Isn't the real question: what temperature for how many seconds? I'm looking for numbers on different calibers and even different manufactures to know how long and at what temperature to run my .223 Lapua brass through the home made annealer. Does anyone know of sources for this info? Thanks!
 
If you listen to what is said during that video, you will see that you are not asking the right question. Each type of brass is different, and each flame type and conditions are different. So, if you use the method I describe in the video, it will account for all of those variables and ensure proper annealing. Time and temp vary. The moment a specific piece of brass is correctly annealed, is shown by the flame color change which comes after it. Simple, and effective. If you read this thread and watch that video, all of the answers are right there in front of you.
 
  • Like
Reactions: dbliz
How about salt bath annealing?
I saw once, but seems to be more consistent than propane annealing. You need to mess with hot liquid, gloves etc. If this is not a problem for you, than try. I think induction is similar as a result, but much more expensive.
 
I've been salt bath annealing and love it. One day ill get the AMP but til then salt bath is fast and very consistent
 
Having spent hundreds on Lapua Brass I've decided to go a little further down the rabbit hole on my reloading process. Take a look at the Annealing Made Perfect product. A little pricey, but I wont destroy my investment in the Lapua Brass.


https://www.ampannealing.com/index/

I went the same way for the same reason. The Annealing Made Perfect machine is SO easy to use! I also can't imagine a more precise way to setup and anneal brass. They evaluate each lot of brass in each caliber and examine the stuff under a microscope to determine the perfect settings to achieve the optimal hardness. The machine is expensive but if it can double the life of just the 500rds of Lapua 338LM brass I bought this year it will pay for itself and I'll use it on a lot of other calibers too.

I'm really looking forward to seeing if consistent annealing can lower my SD's and help increase accuracy.
 
Hi guys. Tangental question. I had an empty shell fall into the wood furnace before i started reloading, or knew anything about brass. It spent some time in there before it was fished out. It has since been tumbled and prepped with the rest of my brass and i cant tell which it is by looking at it. So I have 2 questions.
First is there a way to tell which it is? Any test?
And second if it does get loaded and fired, it it going to turn my gun into a bomb? Be harmless and just blow gasses out the vent hole? Or something in between?
Basically just trying want to know if i should load them all super light and try to find it, or if its not worth the risk... i appreciate any help. Also sorry if this should get its own thread. Wanted to try here first.


Personally I wouldn't take the risk. I'd toss the brass and be more careful next time. Risking a Kaboom from a totally annealed soft case wouldn't be worth it to me..........
 
  • Like
Reactions: Skwerl
I went the same way for the same reason. The Annealing Made Perfect machine is SO easy to use! I also can't imagine a more precise way to setup and anneal brass. They evaluate each lot of brass in each caliber and examine the stuff under a microscope to determine the perfect settings to achieve the optimal hardness. The machine is expensive but if it can double the life of just the 500rds of Lapua 338LM brass I bought this year it will pay for itself and I'll use it on a lot of other calibers too.

I'm really looking forward to seeing if consistent annealing can lower my SD's and help increase accuracy.


At what point in your reloading journey did you decided to starting annealing and how much more life can you get out of your brass? I am just starting out with reloading rifle ammo for my new .308 and have saved my Federal brass I have shot so far (100 cases).

BTW just from the outside looking in that AMP machine that was posted is really cool...

Cheers

M113A3, I've been reloading for longer than I care to admit (a few decades) and am just now seriously getting into annealing. You should never be to old to learn new tricks! I had another annealing machine but never used it due to some open flame restrictions where I currently live. When I saw the AMP machine I was immediately interested. The economics of it are that it's darned expensive and with 100rds of brass you really can't justify the economics of buying the AMP machine. I bought over 500rds of Lapua Brass last year. I justified to myself that at almost $3 each if I could double the life of just those cases the AMP machine would pay for itself. Of course I reload for other calibers and that would just be icing on the cake as far as justifications go. ;-)

As far as increased accuracy and lowered SD's, I'm still looking forward to some good range time with a chronograph. I loaded 50rds of the same load, same components annealed and unannealed so maybe I'll see some difference or not. Lot's of testing ahead for me. I do know of some very serious competitive shooters that anneal after each reload and I put a lot of credence into their recommendations, hopefully their advice will help my accuracy too.

Good luck with your reloading! :)
 
  • Like
Reactions: M113A3
At what point in your reloading journey did you decided to starting annealing and how much more life can you get out of your brass? I am just starting out with reloading rifle ammo for my new .308 and have saved my Federal brass I have shot so far (100 cases).

BTW just from the outside looking in that AMP machine that was posted is really cool...

Cheers


I began annealing when I noticed the neck tension diminish after about 5-6 firings. I annealed with a propane torch and a socket and neck tension was restored. It was very early on I discovered the advantage of annealing. I do it now every 3 firings usually.
 
  • Like
Reactions: M113A3
I first began annealing 10 years ago with a home made adapter on the end of a cordless screw driver, a small bottle propane torch and a bucket of water. I was shooting Winchester .308 brass for bench rest competition, a little on the hot side but under max loads. I was neck sizing only until the bolt lift started to get a stiff. Decided I needed to anneal before doing the .003 shoulder bump. I managed to get more than twenty firings out of the brass with no signs of needing to be replaced. Since it now gets used exclusively for deer hunting, I only shoot two shots a year. One to verify the scope and one to put down a deer. The 188 loaded rounds I have should last me. I will be changing over to the salt bath method this winter for my Ruger Precision .243 project. I've noticed that the 500 pieces of Starline brass I'm prepping have a lot of variation in neck tension I hope to cure by annealing. I'm switching to the salt bath because; 1) I can process more than one case at a time; 2) it won't reduce the oxygen level with the house closed up tight in the dead of winter; 3) no carbon monoxide; 4) my four legged fury heathen have no manners and thus might tip over my torch after which my wife will grab the fire extinguisher and have to decide if she should use it to assault me first or put out the fire. The wide base melting pot is much more stable and I have a place safely away from pets to use it.
 
Thanks Ken.... I just bought a kit from Ballistic Recreations and a Lee melting pot from Amazon.... This sight has cost me more money......
 
Thanks Ken.... I just bought a kit from Ballistic Recreations and a Lee melting pot from Amazon.... This sight has cost me more money......
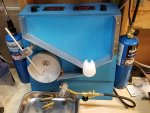
18Echo, You won't regret it! Be aware, if you purchased the 20# capacity lead pot, you'll need to come up with an adapter plate. I fabricated mine from the bottom of a cheap Chinese stainless dog dish. I also invested in an inexpensive $9.00 metronome to count and signal every six seconds. One more thing, I'm going to build a wire rack that holds my cases in two rows at the same width as the holes in the hot bath holder. My idea is to tip it to feed two cases to the front, ready for me to pick up in the groves I ground on the front of a metal spatula. The spatula will assist to remove the brass from the hot bath holder and drop them into the tubes feeding into the nested bucket water quench. That little bit of hot salt on the cases makes a heck of a splatter when it hits the water. I'll be doing my best to confine and control it.
 
I like to tinker, so last winter I ordered a few parts and used others I already had around the house to build an annealer based off the Skips DIY plans floating around on the web. Total cost was around $80.
After some minor tweaking it runs perfect and annealing is so easy, it has become a regular part of the reloading process.
Have noticed more consistent groups since adding annealing to the steps.
Here is a picture of the completed project...
 

Attachments

  • 20181223_155514.jpg
    20181223_155514.jpg
    442.3 KB · Views: 494
Last edited:
Wow these annealing machines are getting expensive. Might have to keep using the cordless drill and propane torch technique for a while longer.
 
I stepped up to salt bath annealing and won't go back! Molten salt heat treating has been around a long time. It's less hazardous than casting lead. Ballistic Recreations in Canada sells a well put together kit with shell holder, instructions, annealing salt and temperature meter with sensor. It's way faster than the torch and drill method. I purchased a digital metronome for $9.99 to count my six second intervals. I also got the 20# Lee lead pot to cut down on having to take breaks to let the salt bath come back up to temperature. I had to make an adapter for the shell holder and 20# pot.
 
Last edited:
I had never heard of that method before but after watching the Ballistic Recreations video it looks very interesting. Might have to give that a try!
 
Broc, several other Hide members have used this system and reported on it. If you search the Hide for 'Salt Bath Annealing' you'll come up with several more threads that have talked about it.
 
Yes sir, I did some searching after I posted and come across quite a few discussions. Can't believe I missed those threads. Right now I'm trying to decide how much my time is worth. Buy the BR kit or build my own...
 
Last edited:
  • Like
Reactions: twinpilot
Yes sir, I did some searching after I posted and come across quite a few discussions. Can't believe I missed those threads. Right now I'm trying to decide how much my time is worth. Buy the BR kit or build my own...
Broc, I went through the same decision process and went for the kit since the welded stainless steel shell holder was going to be a bit beyond my skill and resources. The second thing was that the BR kit came as a single shipment. If I had to find and order the salts, meter and sensor separately, I'd have as much or more into the shipping. The instruction booklet that came with the kit was well done and contained additional information I was glad to have.
 
  • Like
Reactions: tonytoshiba
Is annealing that important for prs? I am just getting into reloading and am on the fence for buying an annealer. and suggestions or help?
 
Is annealing that important for prs? I am just getting into reloading and am on the fence for buying an annealer. and suggestions or help?
Annealing is important in getting consistency. But if you are just getting into reloading work on the basics first, and get your processes as consistent as possible. Then add annealing to refine. I run an Annealeez which makes annealing very easy and fast so I anneal every reloading.
You should be able to get your SD's into the single digits with a good consistent process, then annealing will drive the SD into the low single digits.
 
Annealing really does make a huge difference. A friend loaned me his induction annealer, and I did some LC-66 match cases that had previously had primer pockets uniformed, and de-burred. I used Nosler 175 grain RDF bullets, CCI-BR2 primers, Varget powder with every charge trickled on a balance beam scale. Out of a factory stock TRG-22, I got a standard deviation of 3 fps, and an extreme spread of 11 fps.

Before annealing cases with the induction annealer, I had never achieved such consistency, so I was really happy.

My friend built his own induction annealer, complete with a water circulation system for the coil so that the coil starts out at the same temperature for every case.
 
I'm having the same success with annealing. I broke down and bought the Bench Source when Brownell's had a coupon.

For test brass, I use ones damaged by the gas gun, trimmed to short, loose primer pockets, etc. The Tempilaq works great. It's tempting to go by brass color, but I just trust what the Tempilaq tells me. Occasional tumbling cleans them back up enough to keep reusing.

Case sizing and bullet seating have gotten much more consistent which has lead to lower SD's. It's been good money spent.

I appreciate all the great info everyone on this site provides.
 
Is there an induction annealer out there for under $1000?

7089426


Torches and dogs and carpet just seem like a bad idea. The carpet is probably full of powder anyway.
I did a quick check on amazon for kicks and was horrified at their suggestion. I'm still laughing.
 
Last edited:
I'm having the same success with annealing. I broke down and bought the Bench Source when Brownell's had a coupon.

For test brass, I use ones damaged by the gas gun, trimmed to short, loose primer pockets, etc. The Tempilaq works great. It's tempting to go by brass color, but I just trust what the Tempilaq tells me. Occasional tumbling cleans them back up enough to keep reusing.

Case sizing and bullet seating have gotten much more consistent which has lead to lower SD's. It's been good money spent.

I appreciate all the great info everyone on this site provides.
I ran the original Annealeez for a couple of years and it did nice job. Now run an AMP and it is quicker and so far seems to provide a more consistent result.
The $1000 plus price differential means the AMP will not attract only the truly addicted.
 
Yes you can buy new brass. I anneal for accuracy and by annealing I reduce how often I have to buy new brass.
The initial cost may be high, but over the years the increased performance and saving on brass will pay off.
For me my SDs went from low teen to low single digits
 
Is it worth buying if i toss brass after 3-5 firings due to primer pockets? Im going to guess no?
 
My worry with annealing is how do you determine when your brass is properly annealed? The proper way is by using a Rockwell hardness tester. Most of us do not have access to one so we have to resort to experimentation and using what works best. I believe it is helpful in getting uniform neck tension but at what cost? I usually separate my cases based on the effort to resize them for now...
 
My worry with annealing is how do you determine when your brass is properly annealed? The proper way is by using a Rockwell hardness tester. Most of us do not have access to one so we have to resort to experimentation and using what works best. I believe it is helpful in getting uniform neck tension but at what cost? I usually separate my cases based on the effort to resize them for now...


Do you neck size or full length size? Most people that sort that way go off seating pressure
 
One way to tell how hard your brass is... is by tracking how much spring back you get. You can do this if you have bushing dies for sizing the neck.

A case that has been work hardened will have more spring back than one that has not.

If you happen to neck turn this makes this more predictable as all cases from the lot will do the same thing. If you don't neck turn, then do it with a single case.

OK, size the neck on a case with a bushing that is larger than will hold a bullet. Change to the next bushing 0.001" smaller and check to see if a bullet will fit or fall out... repeat until you have the size that just barely holds the bullet with finger pressure only..

Now anneal the neck, run an expander mandrel into the neck and try again.... starting with too large a bushing. Now that the neck is soft, you will need to go to a larger bushing size than before the neck was annealed because there is less spring back.

At this point you have bracketed the upper and lower hardness range via bushing size. You don't exactly know the hardness value but you have determined the spring back for the hardness values.

Again... I will re-iterate that you need to do this by reducing one bushing 0.001" at a time. If you go straight to the final bushing size, you will create a significant taper in the case neck and that will contaminate your ability to determine the right bushing. Reducing by 0.001 does not cause that tapering effect, so you get parallel walls and more consistent neck tension.

If some annealed batch needs a larger bushing than determined above, then you have over shot your annealing target.

I always write the bushing size used on my handloads. That way I can track where in the range the hardness has become.
 
Last edited:
Thank you. I will read a few times and add to my files to help me become an excellent reloader and shooter.

Too much information is almost enough.
Yeah, I used to be a programmer and an engineer.
 
One way to tell how hard your brass is... is by tracking how much spring back you get. You can do this if you have bushing dies for sizing the neck.

A case that has been work hardened will have more spring back than one that has not.

If you happen to neck turn this makes this more predictable as all cases from the lot will do the same thing. If you don't neck turn, then do it with a single case.

OK, size the neck on a case with a bushing that is larger than will hold a bullet. Change to the next bushing 0.001" smaller and check to see if a bullet will fit or fall out... repeat until you have the size that just barely holds the bullet with finger pressure only..

Now anneal the neck, run an expander mandrel into the neck and try again.... starting with too large a bushing. Now that the neck is soft, you will need to go to a smaller bushing size than before the neck was annealed.

At this point you have bracketed the upper and lower hardness range via bushing size. You don't exactly know the hardness value but you have determined the spring back for the hardness values.

Again... I will re-iterate that you need to do this by reducing one bushing 0.001" at a time. If you go straight to the final bushing size, you will create a significant taper in the case neck and that will contaminate your ability to determine the right bushing. Reducing by 0.001 does not cause that tapering effect, so you get parallel walls and more consistent neck tension.

If some annealed batch needs a smaller bushing than determined above, then you have over shot your annealing target.

I always write the bushing size used on my handloads. That way I can track where in the range the hardness has become.
Thanks for the reply. This is very useful information. I'm still learning about neck tension and how it affects accuracy. I have struggled with annealing since there is an exact temperature that you need to reach or temperature range and it can vary with the casing manufacturer (composition and thermal history) and potentially have batch variations. I need to find an affordable way to get Rockwell hardness data. Don't discount the fact that I'm overthinking it! I'm good at that! :)
 
Last edited:
FWIW I've been using the salt bath annealing method because it's inexpensive and fault tolerant. You keep it around 500 C and since it's just barely hot enough a second here or there is not supposed to make much difference. Seems good so far using a metronome.

A flame is much more time sensitive and flame temperature sensitive, so I have learned the hard way to avoid the associated grief. If you guys like to use a flame, that's great, but too fine a needle to thread for me.

The best one "They say" is the amp anealer but that is way expensive.
 
Last edited:
  • Like
Reactions: 338dude
Lol

I was the second poster in the original thread.

It was a very helpful piece of info for me and made annealing a no brainer for me.

I’m still using OP’s method and in fact I just annealed 200 260 cases.
 
  • Like
Reactions: Bradu
Lol

I was the second poster in the original thread.

It was a very helpful piece of info for me and made annealing a no brainer for me.

I’m still using OP’s method and in fact I just annealed 200 260 cases.
I’ve just gotten into the annealing game...saved my pennies and went with the AMP annealer. It’s an incredible machine and seems to spit out perfectly annealed brass each time.
 
Steelhead43XGunny Sergeant
Rating: 3.4/5 this site
668 posts this site
Re: Brass Annealing Guide
12/14/2014

Helpful vid. Thanks.

I got a buttload of 260 brass that I need to anneal and hope to start this week.

Rate now:
shotdown
shotdown.gif

XGunny Sergeant
Rating: 3.1/5 this site
511 posts this site
Re: Brass Annealing Guide
12/14/2014

Very useful video. I'm using the same setup and caliber brass. However, my time is at 3.8 sec compared to their 3 sec. I do use a slower flame speed so I believe that is the reason why.

Rate now:
gixxerk8XSergeant
Rating: 3.0/5 this site
290 posts this site
Re: Brass Annealing Guide
12/14/2014
(2 votes)

Got my bench source yesterday and ran my first batch of 308 lapua brass today. Looks like I need to lower my flame just a tad to get lower on the brass. Loaded round is new brass. 650 and 400 tempilaq looked ok. Any input appreciated

20141213_165434_zps6d93bd8c.jpg


Rate now:
Steelhead43XGunny Sergeant
Rating: 3.4/5 this site
668 posts this site
Re: Brass Annealing Guide
12/14/2014

Orkan, do you use tempilaq or go strictly by what your sacrificial cases tell you?

Rate now:
orkan
orkan.gif

XFirst Sergeant
Rating: 2.8/5 this site
4139 posts this site
Re: Brass Annealing Guide
12/14/2014
(13 votes)

Stricly what my cases tell me. Each case has slightly different alloys in it. Temp paint does not tell the whole story.

As for flame height, yeah, I'd go a little lower on those. You want to get about 1/4 way down the case from the shoulder. Keep the torches level, (not angled) and the flames crashing into each other at the mid-point where the brass sits.

Rate now:
Steelhead43XGunny Sergeant
Rating: 3.4/5 this site
668 posts this site
Re: Brass Annealing Guide
12/14/2014

orkan wrote:
Stricly what my cases tell me. Each case has slightly different alloys in it. Temp paint does not tell the whole story.​
Thanks.

Rate now:
shoot4fun
shoot4fun.jpg

XFirst Sergeant
Rating: 3.3/5 this site
4603 posts this site
Re: Brass Annealing Guide
12/15/2014

I use temp paint on the head to keep me from overheating. The neck gets what the case tells me. I use a couple of throw away cases for testing. My R-P 260 brass is about 3.8 seconds also. There is no uniform answer for how long you need to anneal because of differences in brass and flame temo. I clean all my brass in SS media before annealing. After I resize I use corn cob for final finish and removal of any lube left from the sizing process.
Rate now:
ValhallXSergeant
Rating: 3.2/5 this site
480 posts this site
Re: Brass Annealing Guide
12/15/2014

THe video is quite decent and you give some good pointers.

For anyone that is starting out annealing, the first thing i'd advice to do is simply read up on some good information, so you atually have a grasp of what your actually doing and want to achieve.

here is a few decent ones.

accurateshooter.com/technical-articles/annealing

bisonballistics.com/articles/the-science-of-cartridge-brass-annealing


As for adviing people not to use Tempilaq, because cases does not have the exat same metallurgy is really not a sound advice.

First off you should ensure that your case neck get to a high enough temperature, for the brass grain structure to change sufficiently, witch is what you want to achieve in the first place, and that certainly wont happen below 600 F, regardless of metallurgy.

Secondly using too high a temp will permanently ruin your brass even if it is just for a few seconds.

The Tempilaq will give you some very good indicators as to what is actually happening with the brass.


Using both your eyes and Tempilaq is highly adviced, if you want to do it correctly.


Rate now:
orkan
orkan.gif

XFirst Sergeant
Rating: 2.8/5 this site
4139 posts this site
Re: Brass Annealing Guide
12/15/2014
(11 votes)

Valhall wrote:
As for adviing people not to use Tempilaq, because cases does not have the exat same metallurgy is really not a sound advice.​
First off you should ensure that your case neck get to a high enough temperature, for the brass grain structure to change sufficiently, witch is what you want to achieve in the first place, and that certainly wont happen below 600 F, regardless of metallurgy.​
That's your opinion, and you are happy to voice it. Though it is just like every other bit of annealing advice given in most places: Overly complicated.

Each brand of brass and each lot number from those manufacturers will react slightly differently. The point at which they start burning off metals from the alloy will vary in time, but the point just before that is correctly annealed. Period. You say "regardless of metallurgy," but that's the entire topic at hand. I had my process vetted by a professional metallurgist that works for one of the worlds largest oil companies and makes ridiculous money. He knows more about brass alloy than anyone I've ever talked with in my life. If you want to use your paint sticks, go right ahead. People following my method will experience a faster setup time and a certainty of process that they would not experience otherwise... and it's easy to do.

You quote specific temperatures, yet say that every brass is different. That doesn't track does it? My process allows you to identify what each type of brass specifically behaves like. Finding exactly where you start ruining the brass, and allowing you to back off from it to ensure a perfect annealing temperature every time regardless of brass type. There IS no better method. I've spent several years looking for one, and no one has written anything or produced any evidence of it. I've been advocating this type of setup for the last several years, and those that heed the advice report back with excellent results every time.

Rate now:
Steelhead43XGunny Sergeant
Rating: 3.4/5 this site
668 posts this site
Re: Brass Annealing Guide
12/15/2014
(1 vote)

Thanks orkan, Just annealed 50 of my oldest cases.
12 firings on them, sure made a difference when I sized them and bullet seating feel was a lot more consistent.
Went outside and shot 2 groups of 5, didn't hurt anything but that brass was showing vertical issues at distance.
Looking forward to trying them past 1000.

5 seconds with single torch, Win 243 brass sized to 260.
Rate now:
orkan
orkan.gif

XFirst Sergeant
Rating: 2.8/5 this site
4139 posts this site
Re: Brass Annealing Guide
12/15/2014
(9 votes)

Excellent! Anneal about every 3 firings or so at least, and you'll have more consistent release. I have a machine, so I anneal every firing... because it's easy. ;)

Rate now:
goodgorillaXSergeant
Rating: 3.1/5 this site
488 posts this site
Re: Brass Annealing Guide
12/16/2014 Last edited 12/16/2014 by goodgorilla

Do you anneal before or after resizing? I would guess before.

Rate now:
orkan
orkan.gif

XFirst Sergeant
Rating: 2.8/5 this site
4139 posts this site
Re: Brass Annealing Guide
12/16/2014
(10 votes)

Anneal before resizing. The heat will tend to move the metal around a bit as it's being stress releived, so sizing will get them all uniform again before trimming.

Rate now:
BigMahi2
BigMahi2.png

XFirst Sergeant
Rating: 2.1/5 this site
1206 posts this site
Re: Brass Annealing Guide
12/16/2014
(1 vote)

Awesome video Orkan, I wish I saw this when I first started out. A few years ago (even now) there's a bunch of misconceptions and I learned the hard way (standing cases in water, heating till red, drying in the oven, and what not...).

Rate now:
tho98027XSergeant
Rating: 3.1/5 this site
328 posts this site
Re: Brass Annealing Guide
12/16/2014

Orkan, what's your opinion of dropping the cases in water after annealing. Seems like some do it and some don't. Does it matter? Great vid by the way.

Rate now:
orkan
orkan.gif

XFirst Sergeant
Rating: 2.8/5 this site
4139 posts this site
Re: Brass Annealing Guide
12/16/2014
(9 votes)

Doesn't matter at all. I don't quench.

Rate now:
PenguininXPrivate
Rating: 3.3/5 this site
43 posts this site
Re: Brass Annealing Guide
12/17/2014 Last edited 12/17/2014 by Penguinin

And the reason not to quench is simply that the brass is thin enough and the batches are large enough that the brass is cool by the time you are ready to begin the rest of the process?

Now I have also heard some shinanigans about you shouldn't quench brass becuase it would work harden it, but from what i understand about brass is that you will not recieve really any hardening in the brass since brass work hardens only when being cold worked yea?

Rate now: