

Hey guys I know this forum is geared towards rifles but I am in the process of building my first 1911. I am in gunsmithing school but this class is an NRA course at my school. Bob Marvel is the instructor for those of you that know of him. So far I have only fitted the slide to frame, tuned the extractor, fitted the firing pin stop and started fitting the barrel hood. Haven't taken many pictures but have a couple of slide and frame and when it first slid on. Will post pics of the process if anyone is interested once the gun is finished. All parts used are nighthawk and a Kart barrel.
Gunsmithing Building 1911
- Thread starter Parsons
- Start date
You are using an out of date browser. It may not display this or other websites correctly.
You should upgrade or use an alternative browser.
You should upgrade or use an alternative browser.
What he said. Pic of the process would be great.
First post here and this is of interest to me.
I have a VBOB and a SL threaded barrel that needs fit in a couple areas and Im not sure how to go about it.
Pics would be great!
I have a VBOB and a SL threaded barrel that needs fit in a couple areas and Im not sure how to go about it.
Pics would be great!
Alright guys I took more pictures today. Today we finished fitting the barrel and cut the barrel legs and got the machine marks out of the slide and frame. Had a great experience running a buffing wheel on a dremel tool across my knuckles today at full speed.
SRM I dont have pics of the barrel through the process since you only really take off thousandths of an inch to make it fit and wouldn't be able to pick up the difference in a picture. Do you plan on fitting the barrel yourself?
SRM I dont have pics of the barrel through the process since you only really take off thousandths of an inch to make it fit and wouldn't be able to pick up the difference in a picture. Do you plan on fitting the barrel yourself?
Sounds like you are enjoying it. I started to have a great 1911 smith help me with my 1911 but he got busy and I haven't touched it in several months. I learned how to fit a beavertail, fit the slide and do some other small stuff. Mainly waiting to fit the barrel and it will be pretty much ready to test fire before refinishing.
I am enjoying the class. We will start on the beavertails monday I believe. Fitting the barrel isn't to bad as long as you have accurate tools, a mill and patience. Gun should be pretty accurate once all is done. I think we will be ready to shoot next thursday.
Good luck with build. I jus finished my nighthawk compact with kart barrel recently. Cant wait to see pics.

PSE EVO 60 Lbs.
Blacked out
I will have to figure out my photobucket name and password and get them uploaded
Parsons, the hood is ten thou long and wide and the ss pin wont pivot with the link in place.
any advice? I do have acces to machines.
any advice? I do have acces to machines.
SRM feel free to PM me and I will go into detail about the link and hood. I just typed out a long post and for whatever reason i accidentally erased it.
Deer hunter I live right beside you probably
Deer hunter I live right beside you probably
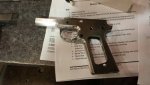
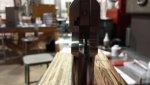
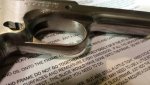
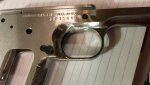
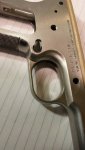
First two pictures are just frame and slide as we got them. Third picture is when they finally fit together. Fourth is while fitting the barrel hood and the fifth is just a random picture I took for whatever reason I think. Will post more in another post. Phone will only let me post 5 at a time.
Sent from my SAMSUNG-SGH-I337 using Tapatalk 2
Sent from my SAMSUNG-SGH-I337 using Tapatalk 2
Attachments
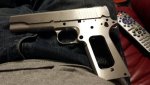
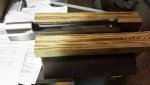
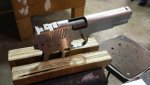
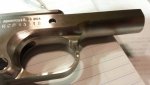
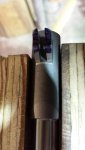
First picture is more barrel fitting. 2nd and 3rd are just showing the machine marks. 4th and 5th are while getting machine marks out and shapung the finger reliefs to be comfortable.
Sent from my SAMSUNG-SGH-I337 using Tapatalk 2
Sent from my SAMSUNG-SGH-I337 using Tapatalk 2
Attachments
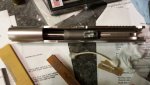
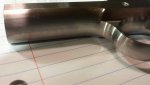
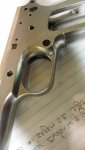
First 2 are finger grooves/reliefs after bead blasting to see if any marks would show when final finishing is done. Had to go back and redo some of the frame lines to make it look a bit more defined. Last pic is while fitting the barrel legs and link. Barrel legs and link sre by far my least favorite part of the build
Attachments
It is a very rewarding process and you have a great instructor. I'm building my first complete from stripped frame up one. The only thing I farmed out was having frame milled for a nowlin ramp. Long slide in 38 super on a single stack frame. Caspian frame, fusion slide, nowlin barrel, Wilson thumb and grip safety, fusion guts And long flat trigger. Will use a springfield armory Novak cut adjustable rear and Dawson fiber front. Not trying to hijack your thread and will start my own when it's done. Good luck!
Would love to see pictures of your process too. Hopefully you can take better pics than I do. My next build will be a 2011 in 9 or 38. Will be building it in about a year.
Have you shot that bad boy yet?
I've yet to touch my barrel.
I've yet to touch my barrel.
Similar threads
- Replies
- 0
- Views
- 950
- Replies
- 2
- Views
- 2K
- Replies
- 4
- Views
- 426