Searched the forum here and couldn't come up with much info on bedding a CZ with the manners stock, so I just jumped right in.
Disclaimer, I'm no expert, in fact this is my first glass bedding job, I'm typically more of a chassis guy, if you've bedded before just pass this one up, it has no new info for someone that's done this before. This is more intended for someone like me who wants to try bedding but not sure if they're ready to jump in or not on their CZ.
Before starting any work, I took a pencil and scribed a line down the action and barrel even with the top of the stock so I would know where it should sit when done. I then removed the barreled action and wrapped blue tape very tightly around the barrel (as close to the end of the fore end as you can) until I could dry fit it back in the stock without the the barrel or action moving when bumped around, and with the pencil line even with where it was when the barreled action was bolted in the stock. This lets the action and barrel sit at rest in the proper place without being bolted down.
Now to the stock prep, I started with clamping the stock in the vise and milling two relief grooves for bedding to bond/be thicker in, this could also be done with a dremel, nothing exact about it.
Next I bored out the rear screw hole slightly over 1/2", the front I did the same, the factory pillar drilled out for maybe 1/8" then is just pressed its way out while I drilled. I wouldn't hand drill these, definitely use a drill press or mill, hand drilling the front screw hole will result in the bit walking rearward since the hole is open on one side and make a mess of the magwell I suspect.

The pillars I used came from pete's pillars, typically I'm a make and do everything myself kind of guy, but as affordable as the pillars are, pre made, with studs and grade 10.9 bolts included as well it just made sense not to waste my time making them.
I dry fit the pillars and trimmed the bottoms to fit where the bottom metal rides, I also sanded the pillar holes in the stock a little more to make them slide in nice and easy and leave room for epoxy.

I used hard wood floor wax for release agent, can't remember the name off hand, big yellow tin. Get a big handful of Q tips from your wife, all my wax was applied with q tips, I also stole some playdough from the kids to block off all the holes and crevices. Apply wax thoroughly and to everything!
I taped off everything I thought may get epoxy on it, looking back, I won't ever tape anything moving forward I don't think, clean up is a breeze and we'll get to that in a minute.
Next I mixed up some devcon and took the leap of spreading it in the stock, not too much, just a nice even coat that will ensure some squishing out but not too much (wish I had taken more pictures), put some on the pillars themselves too, I didn't put quite enough. I was very nervous about this part, but don't be.
On this first attempt I was worried about epoxy getting in the crevices and magwell near the front screw/pillar so I didn't spread epoxy there to start with, now I wish I had, I ended up coming back afterward and bedding that area once I was no longer overly worried about the situation.
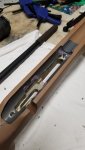
I squished my freshly waxed action in the stock, grabbed some tape and wrapped a few very tight wraps around the stock over the scope rail near the rear.
I went ahead and put another wrap on the front and proceeded to start some clean up. This taping method is what the internets call stress free bedding, the goal is not to bolt the action down therefore inducing torque and bending to the action potentially, so it sits perfectly stress free when bolted down later as well.
This is the part I wish more people made clear, clean up is ok, and not as hard as you think it will be. I took a pocket straight blade screw driver and scraped off the majority of what squished out top and bottom, next, take those q tips and some rubbing alcohol (pour a half ounce in a little bowl) and start removing the excess epoxy from the stock and action. The alcohol will almost melt the epoxy and really make it lay down and workable/removeable, use plenty of q tips and alcohol.
Once cleaned up I wrapped a few more layers of tape around the action and stock, ensured my pencil line with still even with the stock, and waited.
This tip is one I found elsewhere on the internets, and it worked beautifully for me. I checked on the excess epoxy I still had sitting on my cardboard box mixing tray every 30 minutes or so, and at 2.5 hours it was pretty firm (this is in a 70 degree garage, moderate Kentucky humidity). I chose to follow what I read and I cut my tape, flipped the gun over, and gave the action a couple easy whacks with a hammer and punch to knock the action out of the stock.
I flipped the stock over and to my delight the epoxy was pretty set but not 100%, then I tried what the internets said and used an x-acto knife to trim the excess epoxy that squished out around the trigger inlet and mag well, this worked much easier than dremeling or milling and came off fairly easy since it wasn't 100% cured yet.
Then I placed the barreled action back in the stock and resecured with tape just like I had previously done, again ensuring all my pencil lines lined up like they did previously.


The next morning I popped it out again, with little to no effort, and cleaned up all my playdough and cleaned off all the wax. Adding epoxy in front and adding more around the pillars are two things I wish I had done more. I ended up taking super thin ca glue and filling in any small gaps around the pillars and stock, it seemed to also soak into the foam/fiberglass/whatever is around the pillars so I feel it may have also stiffened up the area around the epoxy and pillars as well.
Over the next couple days I found myself wishing I had just bedded the front area that I was previously scared to do, so I decided to go on and do it. This time without any tape and with much less worry, it bedded just fine and cleaned off the stock just fine with the alcohol and q tips. In the pictures it still needs a little trimming, I also bed the first couple inches of the barrel based on internets guru's advice, we'll see if it stays or get milled back out.
Now I know how the guys on youtube bed guns so worry free, once you do it once and realize it's not that big of a deal you really calm down about the whole process.


Disclaimer, I'm no expert, in fact this is my first glass bedding job, I'm typically more of a chassis guy, if you've bedded before just pass this one up, it has no new info for someone that's done this before. This is more intended for someone like me who wants to try bedding but not sure if they're ready to jump in or not on their CZ.
Before starting any work, I took a pencil and scribed a line down the action and barrel even with the top of the stock so I would know where it should sit when done. I then removed the barreled action and wrapped blue tape very tightly around the barrel (as close to the end of the fore end as you can) until I could dry fit it back in the stock without the the barrel or action moving when bumped around, and with the pencil line even with where it was when the barreled action was bolted in the stock. This lets the action and barrel sit at rest in the proper place without being bolted down.
Now to the stock prep, I started with clamping the stock in the vise and milling two relief grooves for bedding to bond/be thicker in, this could also be done with a dremel, nothing exact about it.
Next I bored out the rear screw hole slightly over 1/2", the front I did the same, the factory pillar drilled out for maybe 1/8" then is just pressed its way out while I drilled. I wouldn't hand drill these, definitely use a drill press or mill, hand drilling the front screw hole will result in the bit walking rearward since the hole is open on one side and make a mess of the magwell I suspect.
The pillars I used came from pete's pillars, typically I'm a make and do everything myself kind of guy, but as affordable as the pillars are, pre made, with studs and grade 10.9 bolts included as well it just made sense not to waste my time making them.
I dry fit the pillars and trimmed the bottoms to fit where the bottom metal rides, I also sanded the pillar holes in the stock a little more to make them slide in nice and easy and leave room for epoxy.
I used hard wood floor wax for release agent, can't remember the name off hand, big yellow tin. Get a big handful of Q tips from your wife, all my wax was applied with q tips, I also stole some playdough from the kids to block off all the holes and crevices. Apply wax thoroughly and to everything!
I taped off everything I thought may get epoxy on it, looking back, I won't ever tape anything moving forward I don't think, clean up is a breeze and we'll get to that in a minute.
Next I mixed up some devcon and took the leap of spreading it in the stock, not too much, just a nice even coat that will ensure some squishing out but not too much (wish I had taken more pictures), put some on the pillars themselves too, I didn't put quite enough. I was very nervous about this part, but don't be.
On this first attempt I was worried about epoxy getting in the crevices and magwell near the front screw/pillar so I didn't spread epoxy there to start with, now I wish I had, I ended up coming back afterward and bedding that area once I was no longer overly worried about the situation.
I squished my freshly waxed action in the stock, grabbed some tape and wrapped a few very tight wraps around the stock over the scope rail near the rear.
I went ahead and put another wrap on the front and proceeded to start some clean up. This taping method is what the internets call stress free bedding, the goal is not to bolt the action down therefore inducing torque and bending to the action potentially, so it sits perfectly stress free when bolted down later as well.
This is the part I wish more people made clear, clean up is ok, and not as hard as you think it will be. I took a pocket straight blade screw driver and scraped off the majority of what squished out top and bottom, next, take those q tips and some rubbing alcohol (pour a half ounce in a little bowl) and start removing the excess epoxy from the stock and action. The alcohol will almost melt the epoxy and really make it lay down and workable/removeable, use plenty of q tips and alcohol.
Once cleaned up I wrapped a few more layers of tape around the action and stock, ensured my pencil line with still even with the stock, and waited.
This tip is one I found elsewhere on the internets, and it worked beautifully for me. I checked on the excess epoxy I still had sitting on my cardboard box mixing tray every 30 minutes or so, and at 2.5 hours it was pretty firm (this is in a 70 degree garage, moderate Kentucky humidity). I chose to follow what I read and I cut my tape, flipped the gun over, and gave the action a couple easy whacks with a hammer and punch to knock the action out of the stock.
I flipped the stock over and to my delight the epoxy was pretty set but not 100%, then I tried what the internets said and used an x-acto knife to trim the excess epoxy that squished out around the trigger inlet and mag well, this worked much easier than dremeling or milling and came off fairly easy since it wasn't 100% cured yet.
Then I placed the barreled action back in the stock and resecured with tape just like I had previously done, again ensuring all my pencil lines lined up like they did previously.
The next morning I popped it out again, with little to no effort, and cleaned up all my playdough and cleaned off all the wax. Adding epoxy in front and adding more around the pillars are two things I wish I had done more. I ended up taking super thin ca glue and filling in any small gaps around the pillars and stock, it seemed to also soak into the foam/fiberglass/whatever is around the pillars so I feel it may have also stiffened up the area around the epoxy and pillars as well.
Over the next couple days I found myself wishing I had just bedded the front area that I was previously scared to do, so I decided to go on and do it. This time without any tape and with much less worry, it bedded just fine and cleaned off the stock just fine with the alcohol and q tips. In the pictures it still needs a little trimming, I also bed the first couple inches of the barrel based on internets guru's advice, we'll see if it stays or get milled back out.
Now I know how the guys on youtube bed guns so worry free, once you do it once and realize it's not that big of a deal you really calm down about the whole process.