

With the onset of purchasing my CZ 455 varmint, I wanted to do everything "right" and not skimp on quality and have a certain "Gucciness" about it. When it came to a bolt knob / handle, I wanted a Badger Ordinance bell shaped knob or similiar type of knob.
But then I thought I would revert to to a DIY knob I did on a budget built Savage MKII project and make my own using Fast Steel putty or in this case, JB weld Stik epoxy putty. From the MKII project, I formed the putty to a bolt handle shape onto an expendable screwdriver to use as a torture test, ran the putty through freezing overnight, baking in an oven, and even dropped it from 3 feet to a concrete floor, the knob stayed intact with no damage. After nearly 3 years of use, no problems with it at all. LOW BUDGET .22 TRAINER - tactical/o.sized bolt knob
So I figured I would again go that route again. Just as with teh MKII project, the knob / handle can be formed to whatever length, shape, and angle you want within reason as I assume that too long or heavy of a knob will cause too much leverage and possibly snap it off.
Before doing anything, make absolutely sure that THE RIFLE IS UNLOADED. When you are sure it is a cold rifle, check it again.
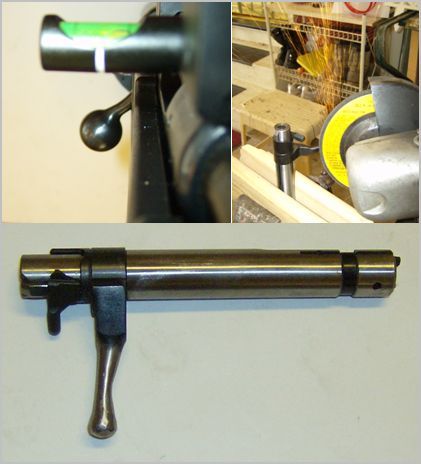
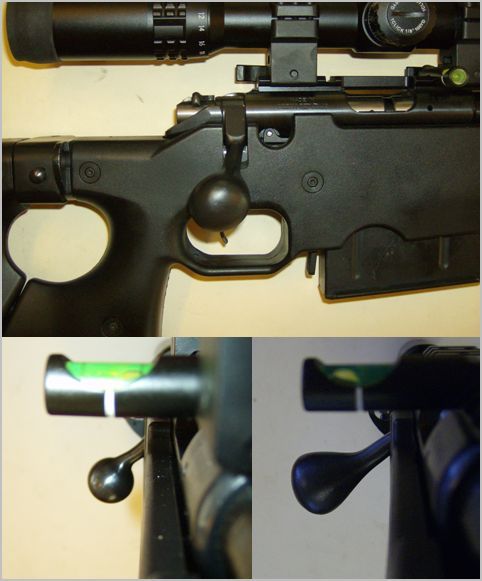
Below you can see that the CZ knob is tilted inward to the stock, step 1 is to remove "excess" metal from the existing knob, leaving a nub to have the putty have something to cling to. A little thought has to be put into it so that a useful angle is redirected away from the stock, and that the addition of the putty doesn't interfere with closing of the bolt against the stock, and keep in mind clearance with the optic.
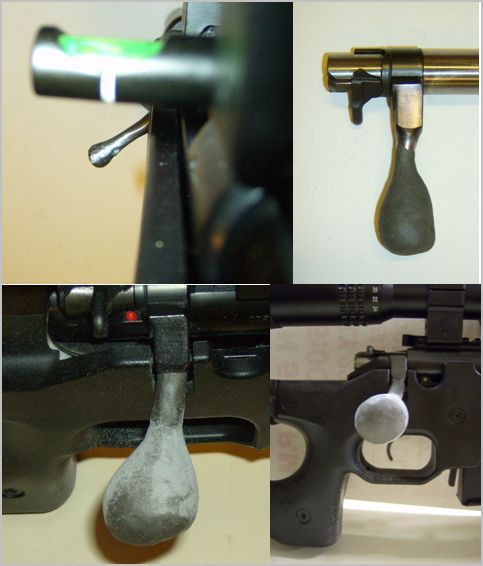
In the below picture, you can see the "new" direction of the handle putting it away from the stock to make the angle easier to "find". Using the directions of the putty, kneed together until there is a uniform color. You have only about 5 minutes to accomplish your basic shape before the putty starts setting up. You can actually practice this with modeling clay or even Playdooh before attempting with the real stuff to avoid excessive sanding to remove the "oops". A small dab of water will help to smooth out the edges and prevent the putty from sticking to your fingers. I can only guess that the "nub" should be embedded in the putty a minimum of .5 to .75 inches to give some spine strength and enough gripping surface for the putty to adhere to. During my first go at this with the MKII, the nub wasn't embedded enough (about a .25 inch in) and the knob was muscled off after a few dozen cycles. After reworking it with a .5" depth, there were no issues.
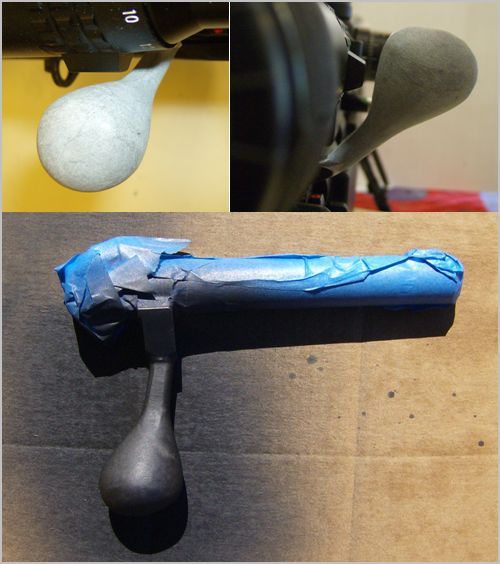
Some light sanding and shaping with a file produced a better shaped knob, and I also had to add a little more putty here and there to fill a few voids and to get the type of shape that felt perfect to my hand. Make sure that if adding more putty and before sanding you give at least an hour wait time, overnight is even better. I applied the putty a bit further up the handle to give it a little more beefy appearance, and added a flat accent to the top to help match the lines of the upper part of the handle, stock, and other accessories and to also give the handle a machined appearance.
After the final sanding touches, check for clearances around the optic and other areas of the unloaded rifle. Take a second to make sure anything used for adjusting the magnification ring, scope caps, etc. is directly in line with the path of cycling the bolt.
Once clearances were confirmed, it was time for paint. I actually used Ace hardware high temp BBQ grill paint, not because of a temperature concern, but that the matte finish matched well when dried and leaves a durable hard to wear finish. On the MKII I use Krylon indoor / outdoor paint which is still surprisingly holding up very well against wear, but the BBQ paint has a nicer matte finish to it.
Obviously mask off areas you don't want paint to be on, and like painting anything, don't try to cover in 1 coat, I applied 7 light coats. While the paint is still wet, take a close look at the knob - the sheen from the wet paint will reveal any areas you still may have to sand.
A few more views, I went with a walking stick / manual stick shift knob kind of shape, although not symetrical (on purpose)it is very nice to grip. The angle, size, and shape was "just right" for me.
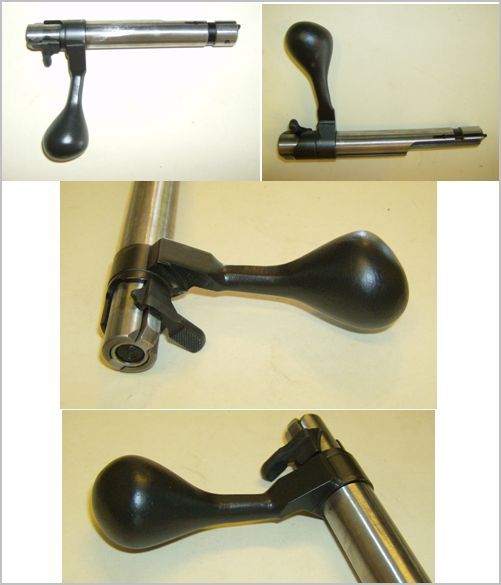
The finished product with a before and after view of the knob angle.
For a second, I thought I'd sculpt a skull shaped knob, but then thought better of it - a bit too "mall ninjaish" for me. Then I entertained the notion of scuplting the knob to a rosebud, as I dubbed the rifle's knickname as "Rosebud" (Citizen Kane), but then figured in the end a plain shape would be more tasteful.
Serrations, knurls, flutes, rings, dimples, even initials or other textures could also be added with a rotary tool, drill, or other means, the sky is the limit.
Allthough not the "right way" to do a knob, the total cost of the knob including paint was under $10.00. But the knob does meet fit, form, and function without a cheap appearance. My previous experience in doing this has proved that the epoxy putty is durable enough to remain intact and adheres solidly for most uses in the field or at the range, even though it may not be considered "Gucci" enough by many.
But then I thought I would revert to to a DIY knob I did on a budget built Savage MKII project and make my own using Fast Steel putty or in this case, JB weld Stik epoxy putty. From the MKII project, I formed the putty to a bolt handle shape onto an expendable screwdriver to use as a torture test, ran the putty through freezing overnight, baking in an oven, and even dropped it from 3 feet to a concrete floor, the knob stayed intact with no damage. After nearly 3 years of use, no problems with it at all. LOW BUDGET .22 TRAINER - tactical/o.sized bolt knob
So I figured I would again go that route again. Just as with teh MKII project, the knob / handle can be formed to whatever length, shape, and angle you want within reason as I assume that too long or heavy of a knob will cause too much leverage and possibly snap it off.
Before doing anything, make absolutely sure that THE RIFLE IS UNLOADED. When you are sure it is a cold rifle, check it again.
Below you can see that the CZ knob is tilted inward to the stock, step 1 is to remove "excess" metal from the existing knob, leaving a nub to have the putty have something to cling to. A little thought has to be put into it so that a useful angle is redirected away from the stock, and that the addition of the putty doesn't interfere with closing of the bolt against the stock, and keep in mind clearance with the optic.
In the below picture, you can see the "new" direction of the handle putting it away from the stock to make the angle easier to "find". Using the directions of the putty, kneed together until there is a uniform color. You have only about 5 minutes to accomplish your basic shape before the putty starts setting up. You can actually practice this with modeling clay or even Playdooh before attempting with the real stuff to avoid excessive sanding to remove the "oops". A small dab of water will help to smooth out the edges and prevent the putty from sticking to your fingers. I can only guess that the "nub" should be embedded in the putty a minimum of .5 to .75 inches to give some spine strength and enough gripping surface for the putty to adhere to. During my first go at this with the MKII, the nub wasn't embedded enough (about a .25 inch in) and the knob was muscled off after a few dozen cycles. After reworking it with a .5" depth, there were no issues.
Some light sanding and shaping with a file produced a better shaped knob, and I also had to add a little more putty here and there to fill a few voids and to get the type of shape that felt perfect to my hand. Make sure that if adding more putty and before sanding you give at least an hour wait time, overnight is even better. I applied the putty a bit further up the handle to give it a little more beefy appearance, and added a flat accent to the top to help match the lines of the upper part of the handle, stock, and other accessories and to also give the handle a machined appearance.
After the final sanding touches, check for clearances around the optic and other areas of the unloaded rifle. Take a second to make sure anything used for adjusting the magnification ring, scope caps, etc. is directly in line with the path of cycling the bolt.
Once clearances were confirmed, it was time for paint. I actually used Ace hardware high temp BBQ grill paint, not because of a temperature concern, but that the matte finish matched well when dried and leaves a durable hard to wear finish. On the MKII I use Krylon indoor / outdoor paint which is still surprisingly holding up very well against wear, but the BBQ paint has a nicer matte finish to it.
Obviously mask off areas you don't want paint to be on, and like painting anything, don't try to cover in 1 coat, I applied 7 light coats. While the paint is still wet, take a close look at the knob - the sheen from the wet paint will reveal any areas you still may have to sand.
A few more views, I went with a walking stick / manual stick shift knob kind of shape, although not symetrical (on purpose)it is very nice to grip. The angle, size, and shape was "just right" for me.
The finished product with a before and after view of the knob angle.
For a second, I thought I'd sculpt a skull shaped knob, but then thought better of it - a bit too "mall ninjaish" for me. Then I entertained the notion of scuplting the knob to a rosebud, as I dubbed the rifle's knickname as "Rosebud" (Citizen Kane), but then figured in the end a plain shape would be more tasteful.
Serrations, knurls, flutes, rings, dimples, even initials or other textures could also be added with a rotary tool, drill, or other means, the sky is the limit.
Allthough not the "right way" to do a knob, the total cost of the knob including paint was under $10.00. But the knob does meet fit, form, and function without a cheap appearance. My previous experience in doing this has proved that the epoxy putty is durable enough to remain intact and adheres solidly for most uses in the field or at the range, even though it may not be considered "Gucci" enough by many.
