• Watch Out for Scammers!

    We've now added a color code for all accounts. Orange accounts are new members, Blue are full members, and Green are Supporters. If you get a message about a sale from an orange account, make sure you pay attention before sending any money!

Detailed magnified pictures of brass prep

NamibHunter

Desert hunter
Full Member
Minuteman
Dec 26, 2018
1,146
569
Found another good use for my $30 bore scope, and thought some of you would enjoy a “slide show”. Not meaning to ask a question or make a major statement, just a series of macro photos inside Lapua brass, showing some (maybe) interesting phenomena, and i guess a suggestion to repurpose your bore scope into a case and die inspection tool.

Removed the 45 degree mirror from the bore scope (it easily unscrews, try not to lose it!). Not exactly sure how much magnification the lens on the Teslong produces, but probably 20x or so. To give an idea of the “zoom”, here are some sample pics

F4BAACA1-1B8B-472F-8624-27F3AE8ADE59.jpeg


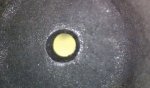
Above is my VLD seating stem photographed inside the Wilson seating die. I accidentally dropped it once on a hard surface and you can see it is slightly bent at 6 to 7 o’clock. Might need to replace it

324E9FD3-8405-4610-8A27-F8F5763F30AD.jpeg


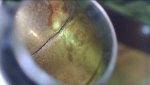
What happens if you don’t wear gloves while neck turning.
 
Last edited:
Not so well crafted flash hole. Note the burr showing on the top of the flash hole, between 10 and 1’o clock, Lapua brass, from factory Berger ammo:

D7A20044-E3B6-43F2-803C-4185EAE7A4E0.jpeg


Annoying corn cob fragment lurking in the flash hole....
 
Last edited:
Case head showing bolt swipe:

511D5810-0365-4199-80B7-007B1FBC2B62.jpeg


Corn cob fragment in the shadows...
 
Last edited:
  • Like
Reactions: 338dude
Case neck chamfering and deburring via Lyman case prep center:

57BD31B3-FB7C-4DFC-BE24-AE311E1057EB.jpeg


69BDE5F2-7BE0-4B92-8B73-16808D02EC4A.jpeg


Below pic was taken inside the case neck, VLD chamfering tool was used:

FCC32870-9143-4599-A0E9-58462CFB542F.jpeg


Note the scratches. Where does that come from??
 
Last edited:
  • Like
Reactions: 338dude
Donut removal: Used the K&M tool to neck turn the brass, and the cutting mandrel also removes any donuts inside the neck in the process, whether large or microscopic: Note the two shiny sections where the cutter polished the brass into a shine. One at the neck shoulder junction (more pronounced, just beyond the grey band), and a tiny one where the Redding Type S bushing die forms a false shoulder the previous time it was reloaded. [Brass was FL sized, then opened up via the K&M mandrel to enable neck turning.]

C0F8EBDC-0A9E-4C25-8DF4-4174BD3BA9CB.jpeg


Second time this brass was neck turned (from 12.6 to 12.1 thou). Note the “negative donut” at the neck shoulder junction (grey color), which was caused by the first neck turning adventure around 5 reloads earlier, where the cutter cuts a tiny amount into the shoulder, and after firing that amount of removed material moves to the inside of the neck to form a hollow section. Theory is that it is much harder for a new donut to form if that part of the neck is thinner than the rest of the neck or shoulder.

Seems to mostly work for 10 or so reloads, then you might need to repeat the procedure.
 
Last edited:
After effects of neck turning on the outside of the neck before firing forming:

0694C398-6B18-42ED-9177-6D5CF0FCCAD1.jpeg


Highly magnified, and with the perfect angle of the lighting, the cutting marks show up, but barely visible with the naked eye.

Note the amount of brass removed from the shoulder below:

F018891C-22C0-4D33-92A9-C132FA04BA19.jpeg


That sharp ridge will move to the inside of the neck shoulder junction after fire forming, to form the negative donut on the inside, the grey band in the prior pictures.
 
Last edited:
  • Like
Reactions: jd138 and 338dude
Pretty cool pics.
Love the media stuck in the flash hole
That explains at least one WTF
 
  • Like
Reactions: NamibHunter
Gave me a great idea to inspect my brass with a bore scope, thanks!!!
 
You the Man !!

I had not considered doing this with my borescopes !

I wonder if you could see a stretched / incipient case failure.
 
You the Man !!

I had not considered doing this with my borescopes !

I wonder if you could see a stretched / incipient case failure.

Good idea! Have some range pickup with incipient case head separation.... so will give it a go.

With the 45 deg mirror, the bore scope picture does not go deep enough into the case, will have to try it without the mirror.
 
  • Like
Reactions: bfoosh006
21st century with profiled cutter to clean up the neck to shoulder junction.

Yeah i have to agree, the cut was less than perfect and I did not go deep enough this time, probably will have to redo it.

The K&M has an angled cutter which is supposed to blend into the shoulder, but in my experience it still leaves a minor ridge.

Heard good reports about the 21’st Century neck turning tool. Might look for it second hand.
 
Good idea! Have some range pickup with incipient case head separation.... so will give it a go.

With the 45 deg mirror, the bore scope picture does not go deep enough into the case, will have to try it without the mirror.

Example of head separation, 308 range pickup:

BF0505E9-F347-485F-91FF-604C6CE9932D.jpeg


Above: Photo taken from the outside of the case, iPhone camera.

Detail of head separation taken with bore scope, 45 degree mirror installed, outside the case:

FD985ACE-540C-4276-A94D-791663D4231A.png


Below: Photo taken with the bore scope pushed all the way down inside the case, held at the maximum angle to look further down into the case, 45 mirror installed:

42212E50-C0FA-4DB3-B2F6-75AD281C229D.jpeg


Case head separation is barely visible on the inside of the case, and this is a pretty extreme example, might not be that clear if only case thinning has occurred. This case had an split.

You guys might have better examples of case thinning and incipient head separation. Please post!
 

Attachments

  • 4218F24E-FD2A-4135-8DCF-D61D5A4C3ADE.png
    4218F24E-FD2A-4135-8DCF-D61D5A4C3ADE.png
    3.2 MB · Views: 45
Last edited:
Example of head separation, 308 range pickup:

View attachment 7356922

Above: Photo taken from the outside of the case, iPhone camera.

Detail of head separation taken with bore scope, 45 degree mirror installed:

View attachment 7356923

Below: Photo taken with the bore scope pushed all the way down the case, held at the maximum angle to look further down into the case, 45 mirror installed:

View attachment 7356908

Case head separation is visible, but this is a pretty extreme example, might not be that clear if only case thinning has occurred. This one split.

You guys might have better examples of case thinning and incipient head separation.

you know. I shoved my camera down my bore with a spent case in the chamber and the bolt closed so I can see the relationship between the case mouth and the throat. Primarily I was checking to see how exactly the carbon ring was firing., I put the camera in the case and noticed that delineation line inside the case like yours but the outside look perfect.

is my brass life nearing its end? I put a pick in there and can't feel a ridge or lip where that line is. just looked like a jagged water line all the way around. not sure what to make of it

I have some 1x factory brass I will look at to compare just for giggles.

That’s pretty clever, will give it a try.

You will never know if your cases are thinning until you cut 2 or 3 of them lengthwise with a Dremel (or even a hacksaw if you must!). Make sure you chamfer the rough edges so you can see any thinning ridge properly. A nail file of the fine sandpaper type works pretty well for the chamfering.

I have done this a few times, and could confirm zero thinning, at least for the Lapua cases. It is a destructive test, so probably something to do sparingly. I wait for reload 20 on SRP brass before i sacrifice two randomly selected cases. [For LRP brass it might have to be earlier, around 8-10.]

328BC693-D94C-4904-8065-73FD2C04E5C9.jpeg


The Lapua SRP cases at the top of the pic have been cut open with a Dremel, and show zero thinning. This often has more to do with how the case is sized relative to the chamber (head space) before the first firing, eg factory ammo fired in a ‘roomy’ chamber can significantly stretch the case close to the web on the very first firing. For initial fire forming of hand loads you could use very high neck tension and seat a soft bullet deep into the lands (with a reduced powder load to keep pressures safe, but adequate) to force the case head to sit against the bolt face, so all the stretching occurs in the neck shoulder area where the brass is softer. [Some folks even remove their ejector.]

Note the negative donut, from neck turning into the shoulder area. This approach is a viable donut prevention technique.

The case at the bottom of the pic is from a batch of Nosler LRP brass after about 12 reloads, and (maybe!) displays a tiny amount of thinning.... but not enough to worry about.
 
Last edited:
That’s pretty clever, will give it a try.

You will never know if your case is thinning until you cut 2 or 3 of them lengthwise with a Dremel or even a hacksaw. Make sure you chamfer the rough edges so you see any thinning ridge properly. A finger nail file of the fine sandpaper type works well for the chamfering.

ill give that a shot. thanks!
 
Better example of neck turning with the cut blended into the shoulder section:
 
81BE9DD6-16EE-4657-8E3F-80C5912A8477.png


Not exactly the same angle as the shoulder, but better than nothing. Still there is a small square angle ridge remaining, to form the negative donut inside.

7A25088F-371C-41D4-97F6-6FC7E09F63F4.jpeg


Note that the blade has an angle to it, to blend into the shoulder.

Add: K&M sells specialized cutters with blade angles suitable for specific shoulder angles. Only available from K&M. I did not realize that before, ordered a 38 degree cutter for the 300 WSM last week. Will try it soon. Should blend in with the shoulder much better.
 
Last edited:
Jun 3, 2020


I have noticed different levels of effort in seating bullets ever since I started loading over 40 years ago, but over the last year or so I started lubing the bottom half of my bullets with Imperial graphite. That helped with evening out the felt seating force, but I still had more instances of harder than normal effort to seat bullets. So just for grins and giggles I stuck my bore scope into the necks of some new cases after a little twist or two with the chamfer tool, and that was an eye opener. What I thought was enough chamfer with a VLD type chamfer tool, was NOT enough. There were still edges rolled inward and rough inside. The roughness inside the case necks was quite surprising when viewed under magnification. So now I run a fine ball hone with a battery drill, through the necks of NEW cases, which definitely helps knock down the high spots some. I clean the inside necks with q tips and denatured alcohol after a few strokes with the hone, then lube the inside of the necks with Neo-Lube #2 on a Q tip. Then they go through the sizing die with a .100 spacer to partial neck size and round the neck and then get chamferd (sp?) Makes a big difference in seating effort consistency, I don't have a gauge. Still experimenting with this, hoping to bring S.D.'s down. Yeah it's extra work.

Point being that various degrees of roughness in the neck, (possibly causing some degree of galling) and an incomplete chamfer job can't be helping consistent bullet pull.


I posted this back around the first of the month, I have been using the bore scope for a while now to inspect cases. You might be amazed at how rough some manufacturer's case necks are on the inside. I am speaking of new cases and I can't help but think that it can affect bullet pull.
 
  • Like
Reactions: NamibHunter
Jun 3, 2020


I have noticed different levels of effort in seating bullets ever since I started loading over 40 years ago, but over the last year or so I started lubing the bottom half of my bullets with Imperial graphite. That helped with evening out the felt seating force, but I still had more instances of harder than normal effort to seat bullets. So just for grins and giggles I stuck my bore scope into the necks of some new cases after a little twist or two with the chamfer tool, and that was an eye opener. What I thought was enough chamfer with a VLD type chamfer tool, was NOT enough. There were still edges rolled inward and rough inside. The roughness inside the case necks was quite surprising when viewed under magnification. So now I run a fine ball hone with a battery drill, through the necks of NEW cases, which definitely helps knock down the high spots some. I clean the inside necks with q tips and denatured alcohol after a few strokes with the hone, then lube the inside of the necks with Neo-Lube #2 on a Q tip. Then they go through the sizing die with a .100 spacer to partial neck size and round the neck and then get chamferd (sp?) Makes a big difference in seating effort consistency, I don't have a gauge. Still experimenting with this, hoping to bring S.D.'s down. Yeah it's extra work.

Point being that various degrees of roughness in the neck, (possibly causing some degree of galling) and an incomplete chamfer job can't be helping consistent bullet pull.


I posted this back around the first of the month, I have been using the bore scope for a while now to inspect cases. You might be amazed at how rough some manufacturer's case necks are on the inside. I am speaking of new cases and I can't help but think that it can affect bullet pull.

Very interesting observation that new cases need more aggressive chamfering on the inside of the neck. Please post some before and after pics in this thread, if you are so inclined.

Now i am curious and will have to go check a few new Lapua, Alpha and Peterson cases.... My experience is that you need a VLD shaped chamfering tool, and you need to cut deeper than you think, otherwise some cases resist the bullet pressure ring slipping past the sharp ridge where the chamfering stops. [I sometimes wish i had a tool that created a smooth blended (tangential) interface between chamfered section and the straight neck section, so there is not such a sharp corner there scratching the bullet on entry and exit.]

Yes graphite dry lube helps a lot to get more consistent bullet seating force. Also helps with bullet weld (which is a real thing).

All: Feel free to post ‘educational‘ pics (showing how a borescope can be used in new and novel ways) in this thread. Of inanimate objects found in a reloading room.... 😊
 
Note the scratches. Where does that come from??

A colleague suggested that the deep scratches found inside reloaded brass
are caused by large kernels of hard extruded powder that gets blown in between the case neck and the slowly moving bullet, once the neck expands enough to let them in, and the bullet starts to accelerate out of the case during the first 1-2 microseconds of combustion. It seems the kernels of powder are rather hard, and get dragged forcefully through the neck with the bullet acting like a mandrel, because there is enough neck clearance for the kernels to get in there. And that causes the deep scratches. He mentioned that flake and ball powders do not cause these deep scratches. And that BR folks use essentially (almost) zero neck clearance, for multiple reasons.

Is this explanation correct? Something else going on here??
 
View attachment 7366963
Roughness inside new case neck, you can see remains of Imperial dry lube after sizing. Common to this batch of cases.

Interesting, presume you used an FL die with a sizing button?

Does the virgin case prior to sizing show similar roughness? I wonder if the factory sizing process also creates minor scratches, or not.
 
Interesting, presume you used an FL die with a sizing button?

Does the virgin case prior to sizing show similar roughness? I wonder if the factory sizing process also creates minor scratches, or not.

Yes to both questions, also my Lapua, Winchester and Jag cases don't have anywhere near this kind of roughness and striation.
 
A colleague suggested that the deep scratches found inside reloaded brass
are caused by large kernels of hard extruded powder that gets blown in between the case neck and the slowly moving bullet, once the neck expands enough to let them in, and the bullet starts to accelerate out of the case during the first 1-2 microseconds of combustion. It seems the kernels of powder are rather hard, and get dragged forcefully through the neck with the bullet acting like a mandrel, because there is enough neck clearance for the kernels to get in there. And that causes the deep scratches. He mentioned that flake and ball powders do not cause these deep scratches. And that BR folks use essentially (almost) zero neck clearance, for multiple reasons.

Is this explanation correct? Something else going on here??
Just now reread this post: Very interesting the last statement about BR rifles running with almost zero neck clearance. My MPA rifle has a fairly tight chamber and virgin Lapua brass fired in that chamber will not allow a bullet to fall freely into the case. Most people believe that is not enough clearance. So i neck turned all my cases from 14.5 thou down to 12 thou and now i have 5 thou of clearance. Ample! But i also see these nasty scratches inside all of my case necks. I tend to agree that random scratched can cause some variation in neck tension, which could be a bad thing.

So wondering if i should run an experiment and turn the thick Alpha brass down to 14.5 instead of 12.0 thou, and make good use of the tight neck? Is there a point where a miniscule carbon ring from firing a 100 rounds post chamber cleaning job can cause a pressure spike?? What is the smallest neck clearance one can get away with, is it 0.2 thou? Smaller??
 
Last edited: