• Watch Out for Scammers!

    We've now added a color code for all accounts. Orange accounts are new members, Blue are full members, and Green are Supporters. If you get a message about a sale from an orange account, make sure you pay attention before sending any money!

Gunsmithing F'ing T-15 Base Screws: Stuck and Stripped

PFG

Private
Full Member
Minuteman
Dec 13, 2017
491
274
Texas
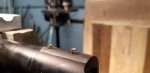
Whoever installs the MF'ing pic rail on Tikka CTR's in the factory must have the strength of 10 men and the best thread locker around.

Of the T-15s holding that mother in place, I can't budge a single one. And of course I've probably stripped the head on 2 before stopping and realizing I wasn't getting these to budge.

So what's the ticket for stuck and stripped T-15s?

Stuck: A shot of penatrant oil like PB, let it sit for a day?

Stripped heads: Looking for input on this...

Thanks.

Great rifle, terrible time getting this damn rail off.
 
If they loctite the rail a bit of heat applied to the screw head may help. Enough to return loctite to liquid. As for the stripped ones I’ve used a drill bit about the same size as the screw (the threaded shaft portion not the size of the head) and drill in the center of the head just enough to detach the head from the rest of the screw. Just take your time and don’t go to deep with drill or you’ll jack the base up. Just enough to get the head off. A reverse bit is best and may grab the head and turn it out while it drills/heats the screw. I’ve had to do this with action screws on a savage once. After getting the head off the screw came out with my fingers

FYI I’m not a gunsmith. So take my bubba gunsmithing suggestion as such
 
Last edited:
If you do drill the heads and the body doesn’t come out easy than there is some type of loctite in there and you will need to apply heat to get them out. Don’t hook onto then with vice grips etc or you may end up snapping it off. You don’t want that.
 
  • Like
Reactions: PFG
For the ones that aren't stripped, I would get two bits that fit good. I would put one bit in the handle and have it ready to use. The other bit I would heat until it is red and stick it into the screw. whenever it stopped glowing, I would remove it and quickly try to remove the screw with the one in the handle. Don't strip them.

I can't say what I would do with the stripped ones without seeing them.
 
  • Like
Reactions: Ravenworks
Be cautious heating bits like that. they are hardened... a soldering gun directly to the scree head will heat it up.

I have tig welded bits to bolts / screws from really tiny to 2 " then let them cool und they come out... kinda like thermocycling
 
Be cautious heating bits like that. they are hardened... a soldering gun directly to the scree head will heat it up.

I have tig welded bits to bolts / screws from really tiny to 2 " then let them cool und they come out... kinda like thermocycling


What ^ said, do the T15 screws that are not stripped first. Lock the rifle down and position a soldering iron with the tip in the screw head and leave it there for 15 minutes then try to remove the screw.
 
  • Like
Reactions: 2aBaC̶a̶
Be cautious heating bits like that. they are hardened... a soldering gun directly to the scree head will heat it up.

I have tig welded bits to bolts / screws from really tiny to 2 " then let them cool und they come out... kinda like thermocycling
What difference does it make that they are hardened?
 
  • Like
Reactions: Ksracer
If they are hardened and you heat them enough you change the hardening. On torx especially the engagement is on tiny corners.

Read you can soften the material
 
Releasing loctite occurs at 300 to 400 deg F. annealing steel happens at 1200 to 1500 deg F and above. with the large heat sink of the receiver and rail you'll never get there with your home depot torch. Generally when you get to the release temp you'll see a puff of smoke and smell the loctite (or epoxy) burn. You're done at that point. I see people worrying about this all the time. they don't realize how far apart the two temperatures are.

OP, if you give up on getting them out and decide to get professional help, this is an opportunity to have the gunsmith install 8-40 screws and confirm the straightness of your holes. I'm not a tikka expert but if it is like most production rifles, the screws can benefit from the upgrade. Since you're paying a smith to set it up in the mill anyway, ask how much more to rebore and rethread. I do this to a lot of R700s.

---Jerry
 
  • Like
Reactions: JohnK454
propane-torch.jpg
 
  • Like
Reactions: carlsbad
I have removed stripped and sheared off screws from a lot of expensive military gear. Over 35 years worth.

I suggest a trip to the gunsmith and let experience and expertise run its course.

Further damage will cost way more.

Ihmo
 
Plus 1 for sending to LRI. Always the best option if you arent skilled or have the tools.

Carlsbad, I was referring to whoever suggested getting a torx bit red hot then using it to heat the screw. Sorry if I wasnt clear.
 
Plus 1 for sending to LRI. Always the best option if you arent skilled or have the tools.

Carlsbad, I was referring to whoever suggested getting a torx bit red hot then using it to heat the screw. Sorry if I wasnt clear.
Who cares if the bit gets red hot. If the heat kills it you can toss it in the trash.
 
  • Like
Reactions: Ksracer
Who cares if the bit gets red hot. If the heat kills it you can toss it in the trash.

I think he’s referring to softening the corners on the head of the screw, not the bit.
 
They use what seems like blue loctite. Hit the screw heads with a torch for a few seconds and they should come loose with little effort. I fix tikkas often with stripped screws. It’s sad because they’re stupid easy to get the rails off with some heat. Bubba’s Gunsmithing is a good source of business.
 
  • Like
Reactions: PFG
Thanks for all the input.

Going to use my plumbers torch to apply heat on the torch head, and go from there.

If no luck, LRI can take a stab.

Appreciate it. Hold for an update.
 
Take the barreled action out of the stock.
Grab a clothes iron and set it on high.
Make sure the steam function is off.
Place the iron on the scope base. Come back in 15 minutes and try the screws again.

If they don't come out, send it to LRI.
 
  • Like
Reactions: phlegethon
Thanks for all the input.

Going to use my plumbers torch to apply heat on the torch head, and go from there.

If no luck, LRI can take a stab.

Appreciate it. Hold for an update.
I would not use the torch directly on the rail. Use a 16 penny nail or something and get it red hot then hold the point on the screw head for about 30 seconds.
 
  • Like
Reactions: PFG
Heat no worky. All the T15 heads look like a child took a play rock pick and went to town. Lol

Last resort would be something with a bit...either a left hand bit, etc. Haven't touch this thing with a power tool. Yet.

@LongRifles Inc. I'm not sure you guys want this one, but its beyond my skill set. I'll shoot you a PM.
 
Last edited:
A machinist will have no problem. machine off the head and take the rail off. Heat the stub to release the loctite and screw the stub out by hand. --Jerry
 
Well, it ain’t pretty. But the rail is off.

Minimal bedding/glue/goop on the base of the rail and top of the action, but those screws were SUPER Fd.

Here’s how things look:

943EE3EC-F025-4B92-88FB-60BE9E1F8952.jpeg
DDA2CB8A-66AD-472B-8F90-72673AA18999.jpeg
97C428CC-3ECC-41D4-ABE4-6C413B205FF1.jpeg


At this point, I’m simply going to tape off the top of the action, and file down the sharp ends of the broke off screws. I’m using sportsmatch rings, and only need to clamp to the built in Tikka rail.

In the future, if I ever want to use the base screw holes, I’ll need to have them drilled out and opened up. For now, I just have a few “plugs”.

It was a rodeo to even break the heads off.

3/32 drill bit into the heads
Hammer a t-15 Torx into the drilled cavity
Grab on with a adj wrench and turn til it break.

1 of the 5 screws came out. 4 broke off in the hole. Thanks Tikka.
 
Just FYI if I was going to go the “full send it” as you did I would have drilled the head off as I suggested above. Then removed the rail. Then heated the studs sticking up with a very small torch at a angle so the flame wasn’t towards the action. Waited til the loctite let loose, smoke will indicate this. Then grabbed gently with pliers and backed out. If needing more heat etc I would add more until the screw released. That was the method I was leaning into that I mentioned above.

Snapping all the screws off in the action was not one of the mentioned methods above lol. You should have sent to LRI before this point. However if it will work for you now with the rings you have than by all means great but you will
Now most likely scratch the shit out of the finish on top of the action in an attempt to file these down and make adding a 20 MOA rail etc in the future absolutely impossible until you have it fixed.

Best of luck with filing them down as there hardened and pry won’t be extremely easy to do without scuffing the action. In the future just send to LRI or someone else with experience in this. They can still fix it but you made it much harder and likely added cost to the fix as well
 
For these type of situations, I typically like to drill a hole = to the major diameter of the screw in an aluminum plate, and slip the plate over the broken screw, to protect the receiver from the torch.

Then set a nut over the broken stud, and tig weld the nut to the broken stud. The weld heat destroys the thread locking compound, and the nut allows plenty of grip for extracting the screw.

The welding takes a couple seconds, and the screw gets hot enough to destroy the thread locker. The heat dissipates before enough moves into the receiver to damage the receiver.

It's faster and easier that setting it up in a milling machine and less invasive. Many times, the stud can be threaded out with just fingers at that point.

Now that the screws have been ground to the level of the receiver, the options are more limited. It'll need set up in a milling machine, then either the broken screws extracted or the holes milled and re-tapped.
 
Well, it ain’t pretty. But the rail is off.

Minimal bedding/glue/goop on the base of the rail and top of the action, but those screws were SUPER Fd.

Here’s how things look:

View attachment 7237483View attachment 7237484View attachment 7237485

At this point, I’m simply going to tape off the top of the action, and file down the sharp ends of the broke off screws. I’m using sportsmatch rings, and only need to clamp to the built in Tikka rail.

In the future, if I ever want to use the base screw holes, I’ll need to have them drilled out and opened up. For now, I just have a few “plugs”.

It was a rodeo to even break the heads off.

3/32 drill bit into the heads
Hammer a t-15 Torx into the drilled cavity
Grab on with a adj wrench and turn til it break.

1 of the 5 screws came out. 4 broke off in the hole. Thanks Tikka.
 
Great idea, but you would need a thin rod... Less than 1/16th?


Yes. If any filler at all.

First if there was enough stud sticking up to set a nut over, I would just use the tig torch to fuse the stud and nut together with no filler.


It's still possible to do it even if the studs are broken level with the receiver, just riskier. A thin aluminum or brass plate, with a single hole (about 3/4 the diameter of the screw), is clamped in place with the hole directly over the screw. The hole is the filled with weld filler. The weld filler metal won't stick to the brass/aluminum, only to the steel screw. When the aluminum/brass plate is lifted off, it leaves a cylinder of weld metal where the hole was. The nut can be welded to that extension.

The method is common in aerospace and automotive repair shops for removing broken studs.

It's even easier to extract a broken stud from an aluminum part. I've removed screws that were 1/4" deep in the hole before. Just fill in the hole with filler rod untill the steel is flush with the surface, then hold a nut over and center weld the nut to the steel buildup. Granted, that method is easier with larger diameter holes.

Even the weld filler metal has threads when you thread the stud out. The weld steel fills in the aluminum hole without damaging the aluminum. Auto body shops use a similar method to fill holes in sheetmetal. An aluminum back plate is clamped behind the hole, then the welder lays a spiral of spot welds from the outside, in to the center, against the aluminum backer untill the hole is filled.

As low as the melting point of aluminum is, it's coefficient of thermal conductivity is so high, that the heat conducts away before enough builds up to melt the aluminum.
 
Last edited:
  • Like
Reactions: JohnK454
Lol. Thanks for all the input.

My primary goal was to remove the rail without damaging the action, making sure that I can use the built in Tikka dovetail. That was achieved. I can now slap on the Sportsmatch rings and get back to shooting.

For me, here's how it all shook out:

Option 1: Spend, at a minimum, $160 to send to LRI. Thats 1 hour of Chad's shop time, plus shipping to and shipping back. Thats 25% of the cost of the gun. How can I justify that? I couldn't. The end result of Option 1 is clean, open base screw holes - holes that I don't intend to use.

Option 2: Spend a little time and tear up a couple T-15 Torx bit or two, perform a shade tree gunsmithng job, and jack up the holes. Yep, thats what I did. Now I can get back to shooting.

This became a cost analysis, like any gun work. If I ever decide I need to use the base holes, I'll need em drilled out and re-tapped. Until then, I'll have some nicely plugged holes. Ha.
 
Late to this party, but FWIW, heat and a manual impact driver usually does the job. A lot times, all that is needed is enough downward pressure and rotational torque (simultaneously) to move a stubborn, stuck screw (once any epoxy is burnt out). You don't need to wail on it, just a quick, sharp tap (brass hammer) with the action firmly held in a vise or on a sturdy hard surface, gets the screw moving. Once loosened, it's just a standard driver to unscrew the offending fastner.
 
I would bet some of the blame goes to worn or cheap outta spec drivers .

Wish I could blame it on that, but these were tight, sharp, unused T-15 torx bits. These heads stripped from simple hand turning of bits using a handheld bit driver. No power tools to start.

I'll try to get a photo of the 1 screw that backed out. Fully caked in thread locker compound. Just a total mess.
 
Sounds like those screw may have not have been heat treated correctly (I've seen that before; they break off at the head like stiff play-doh).
 
Had the head of one of the torx screws securing the cap on my Badger Ord M40 repro scope cap snap loose.

It wasn't proud of the lower cap, broke flush with the threaded lower.

I bought a set of these...


61NlV2SQy1L._SL1043_.jpg


The tips are hardened steel with little "fingers" on the working end designed to "dig" into the screw so that you can back it out. They really are nicely manufactured in machined aluminum with drill steel tips.

These are designed for these smaller low tourque screws and very precise work.

They are reasonably priced.

When you order these and they arrive at your house take them and throw them in your trash can because they will not work.

I went to a local shop that does "micro precision welding".

I handed them my scope base, they told me to come back in an hour, I returned and they asked for ten buck and gave me my part back with absolutely no sign they had done anything to it other than that the broken screw was removed.

They welded a small piece of metal to the top of the screw and backed it out.

Gots to appreciate people with skills.
 
  • Like
Reactions: PFG
Some comments on impact drivers for gunsmith sized fasteners and drill bit extractors.

I have had a lot of success using the Grabit Micro-bit brand of extractors for removing various fasteners for #4-8 fasteners. Only requires a
power hand drill; use of a stepped down size chuck to hold the bits allows getting access to the screws on scope bases and small parts (like red dot optics) that is not always possible with a standard size chuck. Especially useful when the fastener is stuck on a red dot optic where impact hammer and / or heat is probably a poor choice of attack.

The LASER brand impact driver is a more appropriate size for small firearm fasteners as well as a profile that again lets you get into tight spaces; the 3/8" to hex adapter allows use of all hex / torx and magna-tip screw tips for firearms.

IMG_7056 copy.JPG
Screen Shot 2020-02-01 at 8.32.42 AM.png
IMG_0684 copy.JPG


IMG_7026 copy.JPG
IMG_4878 1 copy.jpg
IMG_4881 1 copy.jpg
IMG_7029 copy.JPG
IMG_0681 copy.JPG
 
  • Like
Reactions: MarinePMI
I am getting ready to change the rail on my T3x... I think they are different than the T3 that comes on the CTR.

They have the thicker rail and shafts on the standard torx bits are too thick and aren't able to get deep enough to engage the threads properly. My preference was to originally try a socket based torx, but again the shaft is too thick and will have to be dressed down to be long enough.
 
Funny. I've yet to have to resort to any of those tools shown to remove a dicked up base screw. Wanna fix this?

First, get one stuck. run down to a hardware store and buy a handful of T15 torx heads. While your at it get one of those little crack torches and a can of butane.

Get home, fill torch. Now, take a small ball bearing and set it on top of the goofed up screw head. Smack it with a ball peen hammer to cold forge and swage the socket where the T15 insert goes. Now, take the insert. Whack it into that swaged hole. Now, leave it there. It should be "stuck". Get your dope torch out and heat up the insert. Get your "sniffer" set to "high" and wait for the sweet stink that loktite gives off once its cooked.

Now, get a screwdriver and while your bear down, slowly apply the ol "lefty loosey" thing and 9/10 times it'll come free.