

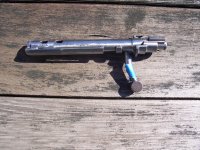
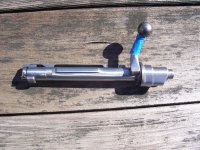
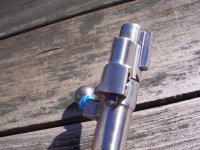
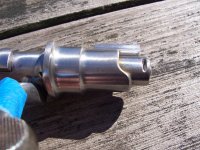
I have a FN Mauser with a BXXX serial number on bolt and reciever. I am new to this gun. It is chambered 25-06 but has no brand markings other than FN. It looks to me like somebody sporterized it after WWII; crude stock. I think it is a commercial Mauser; correct me if I'm wrong. Its safety is a forward-back 2 position right side safety that stays on the action, not a part of the bolt. How do I disassemble the bolt to clean the firing pin, spring, and moving parts? I've done the Kroil and q-tip thing and prefer to deep clean with disassembly; prefer not to ultrasonic submerge it. I see normally one places the wing safety in the central position but this bolt has no such wing safety. The firing pin spring wants to drive the firing pin forward as soon as the black plunger is pushed and the rear assembly rotated - basically it goes into the not cocked position and wants to stay there. I alread made that mistake and got it back to the cocked position. I see a little groove in the back of the body connected to the firing pin and wonder if there is a little tool to hold the spring pressure while disassembling. Another thought I had was pull the firing pin all the way back and rotate it till it's captive on the shelf before rotating the rear assembly by pushing the plunger. I stopped because I don't want to make a mess of it. Pics attached and any help will be appreciated. The extractor came off and was reinstalled using the method I found on wing safety Mauser videos. The trigger and sear on the action were really gunked up so I removed them, disassembled, cleaned, lubed and reassembled. I'm expecting a fair amount of gunk in the bolt.
- Thread starter Fupananvil
- Start date
You are using an out of date browser. It may not display this or other websites correctly.
You should upgrade or use an alternative browser.
You should upgrade or use an alternative browser.
Disregard previous request for disassembly info. I figured it out.I have a FN Mauser with a BXXX serial number on bolt and reciever. I am new to this gun. It is chambered 25-06 but has no brand markings other than FN. It looks to me like somebody sporterized it after WWII; crude stock. I think it is a commercial Mauser; correct me if I'm wrong. Its safety is a forward-back 2 position right side safety that stays on the action, not a part of the bolt. How do I disassemble the bolt to clean the firing pin, spring, and moving parts? I've done the Kroil and q-tip thing and prefer to deep clean with disassembly; prefer not to ultrasonic submerge it. I see normally one places the wing safety in the central position but this bolt has no such wing safety. The firing pin spring wants to drive the firing pin forward as soon as the black plunger is pushed and the rear assembly rotated - basically it goes into the not cocked position and wants to stay there. I alread made that mistake and got it back to the cocked position. I see a little groove in the back of the body connected to the firing pin and wonder if there is a little tool to hold the spring pressure while disassembling. Another thought I had was pull the firing pin all the way back and rotate it till it's captive on the shelf before rotating the rear assembly by pushing the plunger. I stopped because I don't want to make a mess of it. Pics attached and any help will be appreciated. The extractor came off and was reinstalled using the method I found on wing safety Mauser videos. The trigger and sear on the action were really gunked up so I removed them, disassembled, cleaned, lubed and reassembled. I'm expecting a fair amount of gunk in the bolt.
Clamp the bottom of the cocking piece in a vise.
Pull forward on the bolt body.
insert a washer or a coin between the front of the cocking piece and the back of shroud, this will hold the FP assembly back.
depress the anti-rotation lock on the left side of the shroud and unscrew the shroud, the FP stays with it.
To disassemble the FP from the cocking piece and shroud.
Clamp the FP in a vise just ahead of the spring boss on the FP.
Pull down on the shroud with your hand, you may want to wrap a rag around the shroud for this as it's a little easier on the hand if you do so.
Pulling down on the shroud compresses the main spring.
While holding the shroud down rotate the cocking peice 90 degrees in either direction, and pull the cocking peice off the end of the FP.
The cocking piece and firing pin are set up with a 3 ring interlock.
release tension on the compressed mainspring and there you have it, dissassembled.
If you wish to remove the lock from the shroud, press back on the front of the lock plunger so the small tail on the lock plunger lines up with
the center slot that is perpendicular to the slot it travels in, help the small tail of the lock plunger thru center slot and the shroud lock plunger will come out of the front of the shroud.
Sometimes that system will have old grease that is solidified, which case clean it up with a degreaser, lacquer thinner with a brush works well in a small tin pan.
clean the parts.
Reverse for re-assembly.
For re-assembly, clamp the FP back in the vise, pin standing vertically for dis and re assembly.
Put the spring on the FP.
Grab the shroud in your left hand and the cocking piece in your right hand.
Compress the main spring with the shroud and place the cocking piece on the FP and rotate it 90 degrees engaging it to the interlock.
Release tension on the spring and allow the bottom of the cocking to enter the cut out in the bottom of the shroud.
Keep the whole assembly in the vise, compress the mainspring once again and insert the washer or coin back in between the front of the cocking piece and the front of the shroud, this will hold the cocking piece back so you can screw the assembly back in the bolt.
Screw the assembly into the bolt, at which point you will notice the lock plunger makes contact with the root of the bolt handle, sometimes the root of the handle will push that plunger back for you for that additional 3/4 of a turn other times you make have to help that plunger back with the nose of a screw driver, I generally just push it back with a finger.
3/4 more rotation after that point and the FP assembly is back in the bolt and in the open and out of battery condition, cocking piece nose not in it's bolt cut out at the re-cock cam.
Pull out the washer or coin holding the cocking piece back. I usually do another grab on the bottom of the cocking piece with the vise, just pull on the bolt a small amount to release tension and remove the washer or coin.
Before you put the FP assembly back in the bolt add some lube.
Put a couple shots of synthetic lube inside the bolt and blow out excess with an air hose.
In the re-assembled state of the FP, spring and shroud, give the spring and pin a couple shots of lube, synthetic lube.
Use a small brush to swipe a bit of synthetic grease on the shroud threads.
In the case of a Mauser with a military safety or aftermarket 3 position wing safety the safety lever itself is used in it's center position to unscrew the FP assembly from the bolt.
You will notice that Mausers that are still in full miliary form have a steel bushing in the buttstock, this bushing is for disassembly and reassembly of the FP spring, shroud and cocking piece. It's actually quite ingenious how it all goes together in a toolless manner.
In the case of a 3 position aftermarket wing safety on an M98, center position on the safety is used to unscrew the FP from the bolt, and a 2 inch thick bench block with a 1/4 inch hole drill thru it serves for mainspring compression for disassembly and reassembly.
The M98 Mauser is the grand daddy of all modern bolt action designs. When you know all of the details of the M98 design, you'll never look at a Rem. 700 or clone 700 action the same same ever again. Like most folks, they just want to know where the gas goes in, beyond that, ignorance is bliss.
Thanks for all that. I did it without a vice or coin; probably use your method next time. It's all whistle clean and lubed now. It was a gunky mess.
Similar threads
- Replies
- 0
- Views
- 185
- Replies
- 2
- Views
- 427