

I've had a mid 1990's SA M1a for some time. It has a beautiful walnut stock, NM stainless barrel and trigger group. It is what SA called their "loaded version".
Decided to do a camo project, but didn't want to paint the receiver and didn't want to touch that beautiful walnut. Also didn't want to paint the scope because it is just on there temporarily. I was happy with the looks of a GAP bolt gun that I have....I had GAP black cerakote the barrel and receiver, and I liked the way it looked in a GAP camo MacMillan A5.
So, the project was to not spend a lot of money, get a synthetic stock for Krylon, cover the stainless barrel, and install a cheekpiece.
It turned out better than expected. So I thought I'd go thru the steps I took because this might help someone else. Sorry for the poor quality pics (cheap camera).
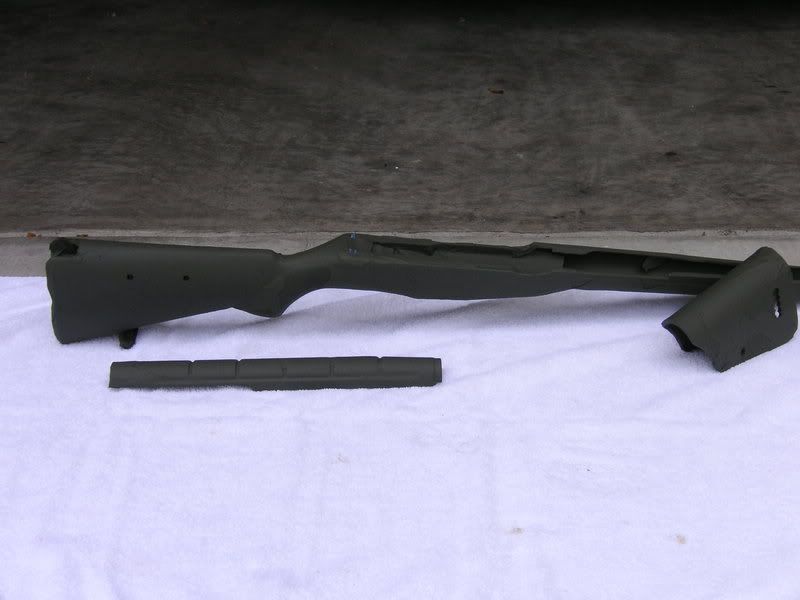
STEP 1: Get yourself a synthetic stock. I've seen used SA synthetic stocks for sale on different web sites, but I decided to buy a USGI synthetic stock from Fred's.... www.fredsm14stocks.com. Fred's inventory changes all the time, but when I got mine I bought the cheapest grade they had. For 45 bucks I got a M14 stock, handguard and butt plate. This stock was beat up. Lots of gouges, crud, and I had to deal with the selector cut out. First thing you need to do is take off the butt plate and swivels and degrease it. I used brake cleaner. Next comes some elbow grease and a lot of sanding on the old paint. Then I got a small can of auto body filler putty and filled in all the gouges and selector cut out. Sanded all the repaired areas and she looked GTG. I even hit the butt plate and swivels with some cold blue.
STEP 2: Get an adjustable cheek piece. For the first several years, I used the rifle with open sights. Then switched to an Aimpoint. By the way, I picked up a used third generation SA base. I know there are better/more expensive mounts out there, but I've been satisfyed with the SA. Blue locktite is your friend. Anyway, the Aimpoint went on a M4 and I switched to a 2-7x Leupold as a temporary answer. If you run a scope on your M1a you will need a cheekpiece. I bought one from Karsten, a Hide member. Contact him at [email protected] or PM him here.The cheekpiece is synthetic and adjustable and costs around 55 bucks. Installation is easy with a drill press, but you can do it with a portable drill. Very little prep is needed here. Just rough it up with sand paper and degrease with alcohol or acetone.
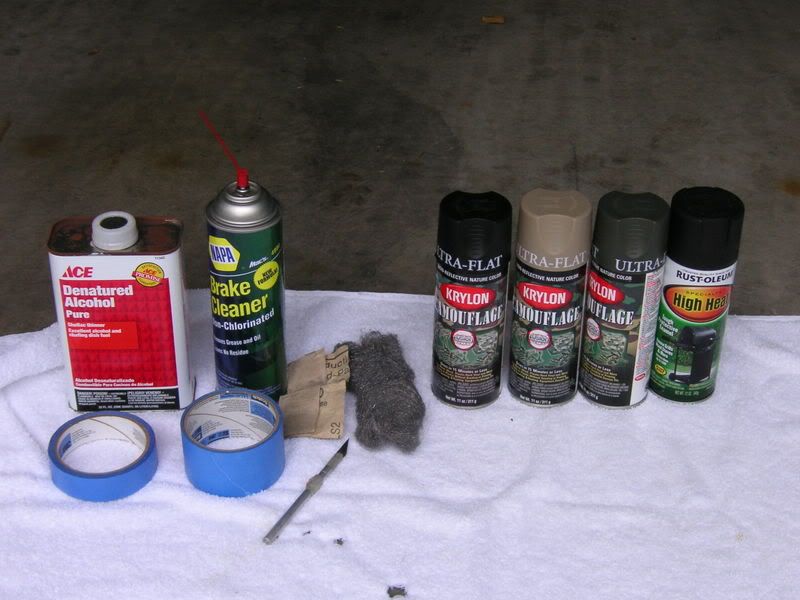
STEP 3: Get what you need for the paint job. Paint was about 5 dollars a can, and the painters tape is around 6 bucks for a 2 inch roll. Blue painters tape comes off easier and won't pull the paint if you are in a hurry. Now is the time to change the blade on your exacto knife. I used Krylon Camoflage paint in tan, black and OD to match the GAP camo.This stuff has "fusion" and really sticks to plastic/synthetics and is very flat sheen. The can of Rustoleum High Heat was for the stainless barrel. I have no experience with how this will work. If it flakes off, I've got plenty left in the can.
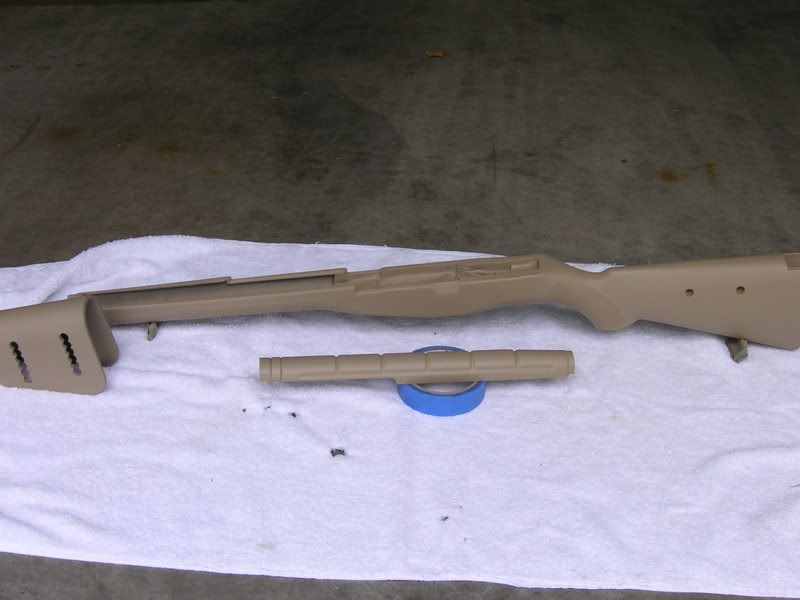
STEP4: After roughing up all the surfaces with either steel wool or sandpaper, degrease again with denatured alcohol. Time to start rattling cans. Start by spraying everything with the tan Krylon.
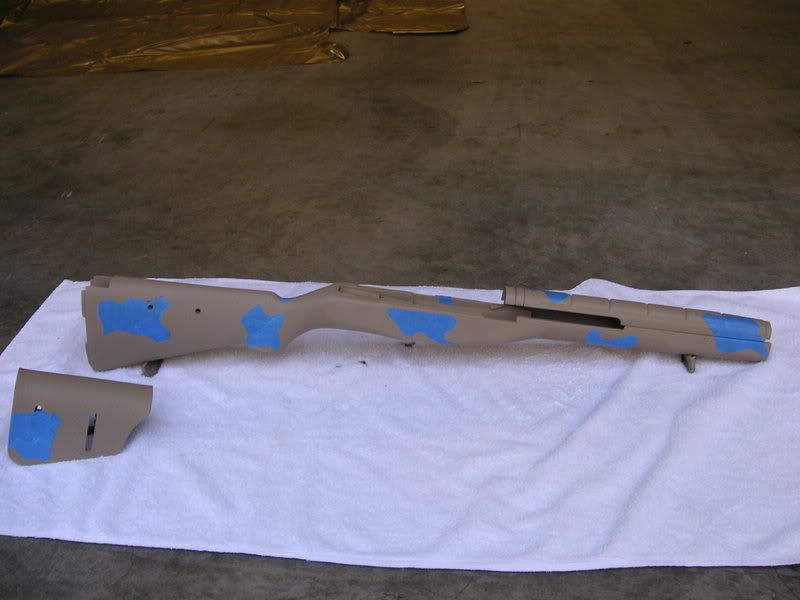
STEP 5: Let the tan dry for an hour. Get your blue painters tape and stick it on the areas you want to remain tan. Just stick the tape on in blocks, then come back with the exacto knife and cut the shapes that you want.Think in reverse...everything that you want to remain tan in color will be under the shapes you've created with the exacto knife.
STEP 6: Paint everything, even the painters tape you just laid down, in black. Let it dry for an hour. NO photo shown for this step.
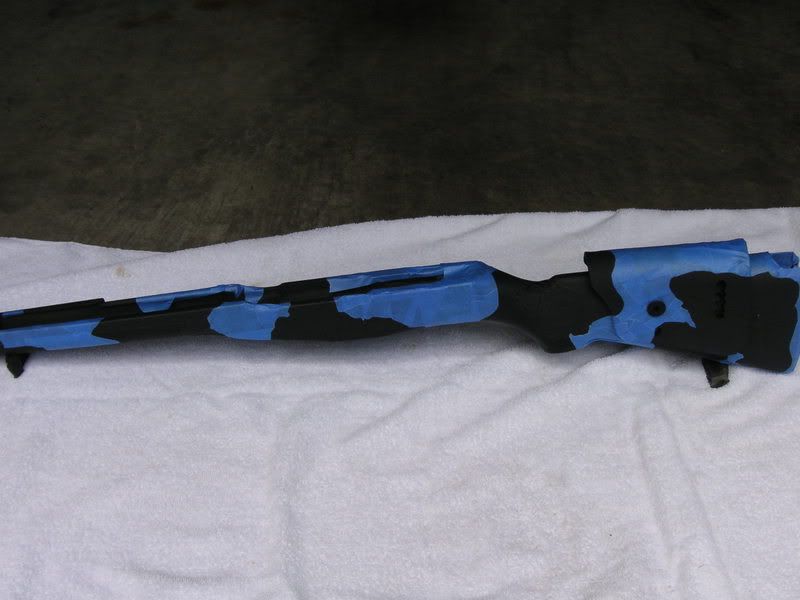
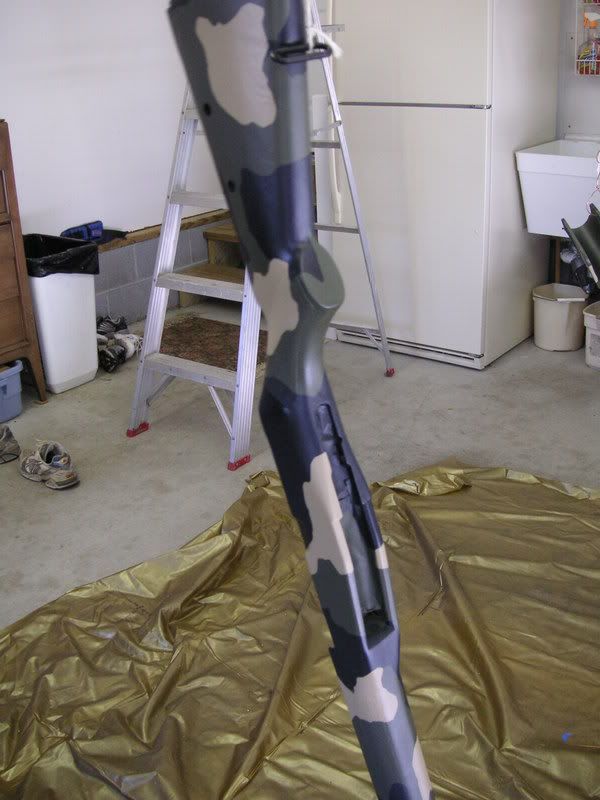
STEP 7: Do the painters tape thing again as described in step 5. Except everything you cover this time will remain black. Look carefully and you can see the outline of the first taped shapes you laid down for the tan...this will help you get your bearings for placing the tape to cover your black color.
STEP 8: Paint everything in OD. No tape needed this time. Everything that wasn't covered for tan or black will be OD. I let it all dry til the next day. You probably don't need to wait that long because this camo Krylon dries really fast.
STEP 9: Carefully remove all the tape and your finished. I decided to do another step and spray over the camo job with polyurethane. This was done to make the surfaces more chip and chemical resistant. Its up to you, but if you decide to do this make sure that the poly you get is oil based and flat or satin sheen. I used Minwax satin sheen because I already had some. A can costs around 5 dollars. Anyway, hang the stock, forend and cheekpiece and have at it. Three coats should do.
STEP 10: I let the poly dry for one day. If it has a little more sheen than you like you can try very fine steel wool. Or get some pumice (from a craft store or ask your dentist for a little). Mix the pumice with water until it is a slurry. Wrap your index finger in a old wash cloth, dab it into the slurry and GENTLY rub the poly surface. this will take off any sheen and still leave plenty of poly for protection.
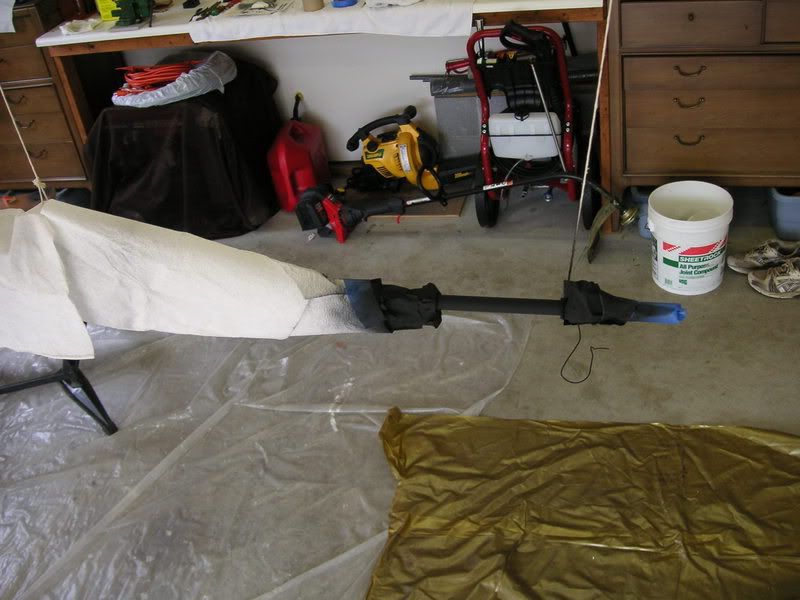
STEP 11: the barrel. Degrease with brake cleaner. Tape it off. Hang it up and hit it with the Rustoleum high heat flat black. Like I said I have no ideahow this will hold up.
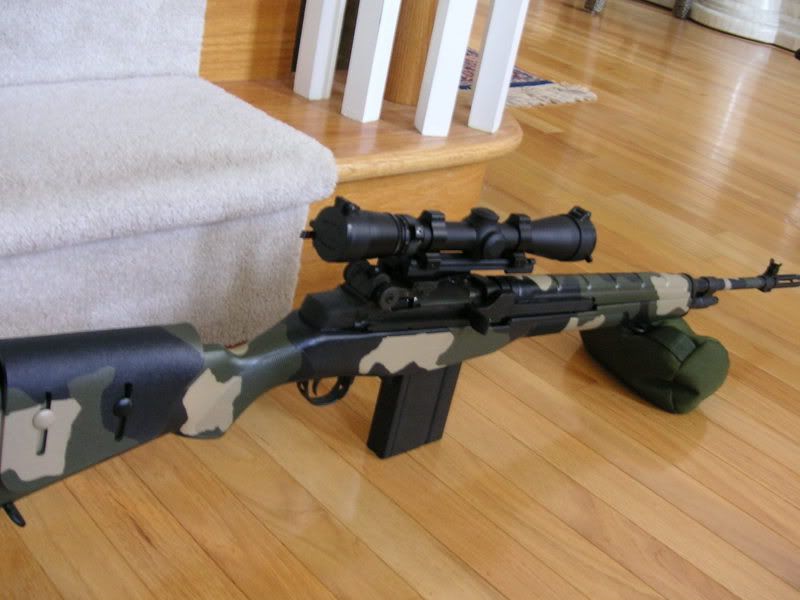
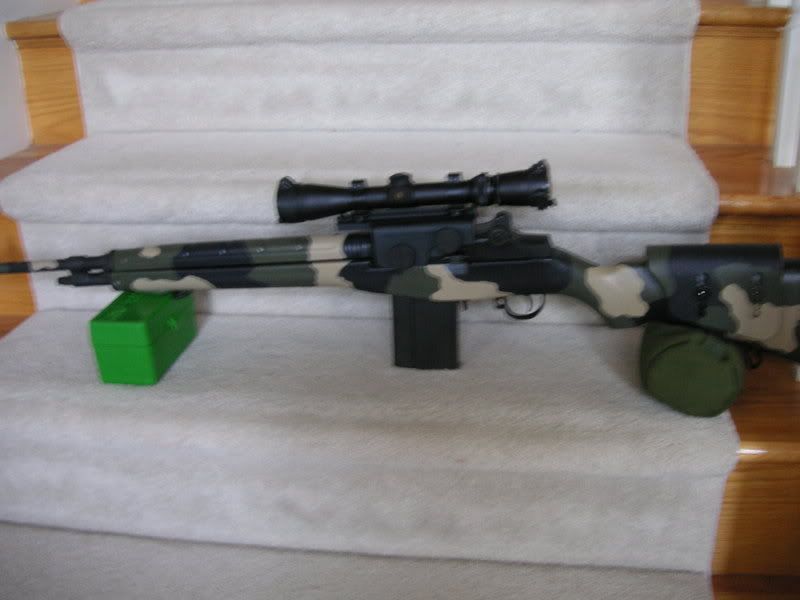
STEP 12: Put it all back together and here she is. Not a full camo job with grass shadings as seems to be more popular. But something to consider if you are not going to cover all the steel and like GAP camo. Total cost for the stock, forend, butt plate, cheek piece, and all paint materials was around 125 bucks.
Here she is with her sister, a GAP Crusader

Hope this helps someone out and saves you some time
Jack
Decided to do a camo project, but didn't want to paint the receiver and didn't want to touch that beautiful walnut. Also didn't want to paint the scope because it is just on there temporarily. I was happy with the looks of a GAP bolt gun that I have....I had GAP black cerakote the barrel and receiver, and I liked the way it looked in a GAP camo MacMillan A5.
So, the project was to not spend a lot of money, get a synthetic stock for Krylon, cover the stainless barrel, and install a cheekpiece.
It turned out better than expected. So I thought I'd go thru the steps I took because this might help someone else. Sorry for the poor quality pics (cheap camera).
STEP 1: Get yourself a synthetic stock. I've seen used SA synthetic stocks for sale on different web sites, but I decided to buy a USGI synthetic stock from Fred's.... www.fredsm14stocks.com. Fred's inventory changes all the time, but when I got mine I bought the cheapest grade they had. For 45 bucks I got a M14 stock, handguard and butt plate. This stock was beat up. Lots of gouges, crud, and I had to deal with the selector cut out. First thing you need to do is take off the butt plate and swivels and degrease it. I used brake cleaner. Next comes some elbow grease and a lot of sanding on the old paint. Then I got a small can of auto body filler putty and filled in all the gouges and selector cut out. Sanded all the repaired areas and she looked GTG. I even hit the butt plate and swivels with some cold blue.
STEP 2: Get an adjustable cheek piece. For the first several years, I used the rifle with open sights. Then switched to an Aimpoint. By the way, I picked up a used third generation SA base. I know there are better/more expensive mounts out there, but I've been satisfyed with the SA. Blue locktite is your friend. Anyway, the Aimpoint went on a M4 and I switched to a 2-7x Leupold as a temporary answer. If you run a scope on your M1a you will need a cheekpiece. I bought one from Karsten, a Hide member. Contact him at [email protected] or PM him here.The cheekpiece is synthetic and adjustable and costs around 55 bucks. Installation is easy with a drill press, but you can do it with a portable drill. Very little prep is needed here. Just rough it up with sand paper and degrease with alcohol or acetone.
STEP 3: Get what you need for the paint job. Paint was about 5 dollars a can, and the painters tape is around 6 bucks for a 2 inch roll. Blue painters tape comes off easier and won't pull the paint if you are in a hurry. Now is the time to change the blade on your exacto knife. I used Krylon Camoflage paint in tan, black and OD to match the GAP camo.This stuff has "fusion" and really sticks to plastic/synthetics and is very flat sheen. The can of Rustoleum High Heat was for the stainless barrel. I have no experience with how this will work. If it flakes off, I've got plenty left in the can.
STEP4: After roughing up all the surfaces with either steel wool or sandpaper, degrease again with denatured alcohol. Time to start rattling cans. Start by spraying everything with the tan Krylon.
STEP 5: Let the tan dry for an hour. Get your blue painters tape and stick it on the areas you want to remain tan. Just stick the tape on in blocks, then come back with the exacto knife and cut the shapes that you want.Think in reverse...everything that you want to remain tan in color will be under the shapes you've created with the exacto knife.
STEP 6: Paint everything, even the painters tape you just laid down, in black. Let it dry for an hour. NO photo shown for this step.
STEP 7: Do the painters tape thing again as described in step 5. Except everything you cover this time will remain black. Look carefully and you can see the outline of the first taped shapes you laid down for the tan...this will help you get your bearings for placing the tape to cover your black color.
STEP 8: Paint everything in OD. No tape needed this time. Everything that wasn't covered for tan or black will be OD. I let it all dry til the next day. You probably don't need to wait that long because this camo Krylon dries really fast.
STEP 9: Carefully remove all the tape and your finished. I decided to do another step and spray over the camo job with polyurethane. This was done to make the surfaces more chip and chemical resistant. Its up to you, but if you decide to do this make sure that the poly you get is oil based and flat or satin sheen. I used Minwax satin sheen because I already had some. A can costs around 5 dollars. Anyway, hang the stock, forend and cheekpiece and have at it. Three coats should do.
STEP 10: I let the poly dry for one day. If it has a little more sheen than you like you can try very fine steel wool. Or get some pumice (from a craft store or ask your dentist for a little). Mix the pumice with water until it is a slurry. Wrap your index finger in a old wash cloth, dab it into the slurry and GENTLY rub the poly surface. this will take off any sheen and still leave plenty of poly for protection.
STEP 11: the barrel. Degrease with brake cleaner. Tape it off. Hang it up and hit it with the Rustoleum high heat flat black. Like I said I have no ideahow this will hold up.
STEP 12: Put it all back together and here she is. Not a full camo job with grass shadings as seems to be more popular. But something to consider if you are not going to cover all the steel and like GAP camo. Total cost for the stock, forend, butt plate, cheek piece, and all paint materials was around 125 bucks.
Here she is with her sister, a GAP Crusader
Hope this helps someone out and saves you some time
Jack
Last edited:


