• Watch Out for Scammers!

    We've now added a color code for all accounts. Orange accounts are new members, Blue are full members, and Green are Supporters. If you get a message about a sale from an orange account, make sure you pay attention before sending any money!

Gap in muzzle after mounting Sidewinder Brake

CobraCharmer

Private
Minuteman
Jan 24, 2022
85
104
Bucks County, PA
Hi SH Peeps,
I had a question which leans more on aesthetics than actual function but it has been bugging me nonetheless.

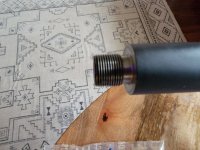
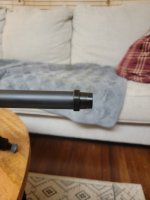
I recently got a Sidewinder Brake from Area 419 for my 7PRC build. After mounting it and torquing it down to the recommended specs, I noticed a gap between the barrel and the brake.

1703262131383.png


The gap is 0.15" wide (as measured by calipers) - and it is driving me crazy.

My question is as follows:
Should I get a high temp O-Ring that meets those dimensions or would it be advisable to get a metal spacer instead?

I am all ears.

CC
 
How hard was it to thread on the adaptor? Take the muzzle brake off, leave the adaptor on, and take a good pic from the front showing the muzzle crown inside the adaptor.
 
Can you remove it and take a picture. How long from the end of the barrel to shoulder on the threads?

No you should not put an oring or spacer in to take up the space.
 
The Adapter went on the muzzle very smoothly. Here is picture of the adapter from the front once the brake is removed. I can still see some threads.

1703268947609.png


I was able to loosen the adapter without too much effort (which makes me think i need a new wrench). I can hand tighten it so far:

1703269136672.png


5/8x24 threads on both. Here is the end of the threaded barrel.

1703268979549.png
 
The Adapter went on the muzzle very smoothly. Here is picture of the adapter from the front once the brake is removed. I can still see some threads.

View attachment 8303299

I was able to loosen the adapter without too much effort (which makes me think i need a new wrench). I can hand tighten it so far:

View attachment 8303313


5/8x24 threads on both. Here is the end of the threaded barrel.

View attachment 8303301
Can you take another picture of the thread? The picture isnt in focus, and your clipping is messing with edges.

You have another adapter to try? Or anything else that's 5/8-24? Was this adapter new when you installed it the first time?
 
  • Like
Reactions: JBoomhauer
They’re all created completely flat.
I think that might be light reflecting off the flank. The form looks okish if you look at the bottom of the picture in the white area.

Could also be that the major has been rolled over or galled.

Could have been fired when not fully seated and carbon is built up on the last 2 threads.

Cannot tell what is going on there without a better image.
 
It's a skill issue on my part and not the camera (samsung s21 ultra) on so many levels. Hopefully this is a better picture.
 

Attachments

  • 20231222_130913.jpg
    20231222_130913.jpg
    413.1 KB · Views: 88
Really looks like the threads towards the shoulder are larger than the rest. Do you have calipers, if so measure in a few places.
 
The relief cut between the threads and barrel appears unusually long. Makes me doubt the entire job the picture does not show enough detail to really know beyond that.
 
What I think I can see in those terrible shitty pictures make me think:

1) The adapter had a burr that messed up the threads on the rifle to the point it wasn't able to screw on all the way.
2) You somehow cross threaded it and it could not be screwed on all the way.
3) The threads on the barrel were junk to begin with and it would not screw on all the way.
4) The pictures are so terrible that you gotta be fucking with us

Number 3 or 4 is my pick.
 
I will try to get some better pictures going. Maybe a better focus? I appreciate everyone's patience.
Measure from the shoulder of the muzzle threading to the front of the muzzle. The Area419 adapter can only take about .650" of threads before it bottoms out. Your muzzle looks like it has an exceptionally long thread gutter (unthreaded portion between the threads and the shoulder).

Edit - I just saw the photo from the front of the adapter. It looks like there are threads ahead of the muzzle, so it must be an issue with the threads.
 
I'm an idiot - with a broken ass ratchet wrench (lasted about 20 years or so) and rookie camera skills.

Got a new wrench set and we are good to go.

Sorry to have wasted everyone's time.

Going to go cry in shame in the corner now.
 

Attachments

  • 1000005136.jpg
    1000005136.jpg
    208.5 KB · Views: 41
  • Like
Reactions: Tokay444
It shouldn't require a wrench to get it all the way on - that's a sign of trouble.

I'm guessing those threads are shit. Hard to tell from the pictures, but it looks like they are rounded off a bit. Best course of action is have your gunsmith correct the thread.

Something I hesitate to recommend is chasing the threads with a 5/8x24 cutting die.
 
Ratchet wrench? So you didn’t “torque it down?”
That's just my poor english coming through. I refer to the lot of them as ratchet wrenches. My apologies. My neighbor's torque wrench worked out just fine.

It shouldn't require a wrench to get it all the way on - that's a sign of trouble.
The instructions had me use it. Should a wrench not be used in a setup like this?

Ha! I was correct. He was fucking with us!
🫠
I wish. But no, not that diabolical. Not even close.

Glad it worked out for you. 🤣
Thanks! I was stressing out for sure.
 
  • Like
Reactions: Praeger
The instructions had me use it. Should a wrench not be used in a setup like this?

A wrench is fine to torque it up a bit. But you shouldn't need a wrench to get the adapter all the way onto the threads.

The fact that you had to use a wrench to get the adapter fully on suggests something is wrong.
 
  • Like
Reactions: Supersubes
Area 419 uses class 3 threads,. They can be a bit tight for installing "finger tight", especially dry. I have an idea of who originally built your rifle, and I doubt that the muzzle threads are out of spec. I'm glad it worked out.