Over the last few months I have seen a few Hide members inquire about Gunskins so I did a bit of research myself and from the outside they appear to be a good idea. I was expecting the arrival of a new XLR chassis for my FN SPR and decided to order a set of skins to try. I figured the chassis would come disassembled and for the most part clean so it would be easy to add the skins then assemble the chassis.
Now as a certified Krylon master I love to throw paint all over my rifles and even had my favorite painted by Short Bus over at Custom Gun Coats, along with my scope. Now for the most part prefer form over function so I don't have all the rifles done by a pro, but my one pro job just sticks out from the pack and is a functional work of art. Also I am too lazy and don't have the time to do all the stencil kits to make them prudy. And of course I live in the north east with the changing AO so with paint I can adjust the brown and green with the season. So all this played into my test run on the GunSkins and figured for short cash I could try them out and field test them.
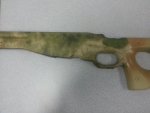
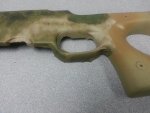
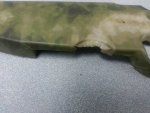
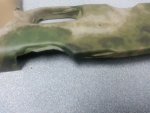
I went with the Gear Skins kit because the XLR did not meet the shape of the pre cut packages, and it arrived the next day. Talk about fast shipping, and on top of that shipping is free. I read the directions and watched the video on the site and everything seemed fairly straight forward. Just cut to fit, peal off the back, stick it on the rifle, trip with a hobby knife and hit it with a blow dryer. During the application process I found that it takes some work to get them to fit just right without getting bubbles and bends but once I got he hang of it the process went very fast. The only slow down was trimming the handguard, make sure you have a nice sharp hobby knife. After its all done a nice blast with the blow dryer to seal them to the stock and your done. I actually had a lot left over and one side of the stock (the first piece I put on) did not look that good so I decided to test how easy it is to remove. Took about 6 seconds to peal it off but around 30 seconds to get an edge to flip up so I could remove the skin. Once on they are on good and should not peal up at the edges.
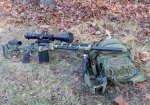
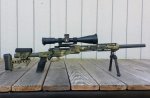
Today was training day and we had several stalking lanes set up and then some range time. After two long and one short stalk the skins held up very well. No pealing or scratching and then actually added a protective layer to the stock. So besides the visual there seems to be some value. Not sure if it will effect the stock in the long run, but it does not seem any moisture will make it under the skin layer.
So far I am pleased, but I have only one training assembly in so far. I'll post back after a few months of use, but for the money even of it falls apart its not a big deal. Will the Gunskins replace my OCD for spray painting? Perhaps, same level of satisfaction and the end product looks better then anything I can do. Will the skins replace my using Short Bus in the future for other rifles? Not a chance in hell! Side by side the AICS skins Bus painted are head and shoulders better then the skins. But next to anything I have done they provide way more form and function for about the same price/time.
Here is the website if your interested: GunSkins | Protection in Camouflage
Sully
Now as a certified Krylon master I love to throw paint all over my rifles and even had my favorite painted by Short Bus over at Custom Gun Coats, along with my scope. Now for the most part prefer form over function so I don't have all the rifles done by a pro, but my one pro job just sticks out from the pack and is a functional work of art. Also I am too lazy and don't have the time to do all the stencil kits to make them prudy. And of course I live in the north east with the changing AO so with paint I can adjust the brown and green with the season. So all this played into my test run on the GunSkins and figured for short cash I could try them out and field test them.
I went with the Gear Skins kit because the XLR did not meet the shape of the pre cut packages, and it arrived the next day. Talk about fast shipping, and on top of that shipping is free. I read the directions and watched the video on the site and everything seemed fairly straight forward. Just cut to fit, peal off the back, stick it on the rifle, trip with a hobby knife and hit it with a blow dryer. During the application process I found that it takes some work to get them to fit just right without getting bubbles and bends but once I got he hang of it the process went very fast. The only slow down was trimming the handguard, make sure you have a nice sharp hobby knife. After its all done a nice blast with the blow dryer to seal them to the stock and your done. I actually had a lot left over and one side of the stock (the first piece I put on) did not look that good so I decided to test how easy it is to remove. Took about 6 seconds to peal it off but around 30 seconds to get an edge to flip up so I could remove the skin. Once on they are on good and should not peal up at the edges.
Today was training day and we had several stalking lanes set up and then some range time. After two long and one short stalk the skins held up very well. No pealing or scratching and then actually added a protective layer to the stock. So besides the visual there seems to be some value. Not sure if it will effect the stock in the long run, but it does not seem any moisture will make it under the skin layer.
So far I am pleased, but I have only one training assembly in so far. I'll post back after a few months of use, but for the money even of it falls apart its not a big deal. Will the Gunskins replace my OCD for spray painting? Perhaps, same level of satisfaction and the end product looks better then anything I can do. Will the skins replace my using Short Bus in the future for other rifles? Not a chance in hell! Side by side the AICS skins Bus painted are head and shoulders better then the skins. But next to anything I have done they provide way more form and function for about the same price/time.
Here is the website if your interested: GunSkins | Protection in Camouflage
Sully