Hey I’m hoping someone can help me rectify a failed Timney installation.
I tried to install a Calvin Elite in my Rem 700 5r 300WM. Problem I ran in to was that the hole for the front pin was partially blocked by the bolt release lever. Regardless of what position I try, I cannot move the bolt release lever into any position that does not fully or at least partially block that pin hole. This picture shows the best I could do.

No problem, I think, because I have a skinny punch that will still fit and I'm supposed to push the pin out the other direction anyway. So I get the old trigger out and I'm ready to put the new Timney in. There's a slave pin in the front of the Timney that will need to be pushed out the left side of the barrel when the front pin is pushed back in. But wait, the friggin bolt release is partially blocking that hole, so there's no way for the slave pin to come out of the side when the real pin is pushed in.

No problem, I think, because I'll just remove the slave pin and hold everything together with my fingers while I tap in the real pin. . .
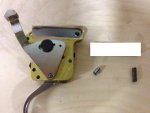
Of course, that failed, and a little spring popped out along with what I believe, based on poking around the internet, is the “sear,” but I’m a total novice so hell if I know what it really is. . . This picture shows the trigger, the spring, the sear (?), and the little slave pin that held it all together initially. (There was actually little pieces of tape on the sides of the trigger holding that slave pin in place when the trigger was still in the box).

I have come up empty on the timney site and elsewhere, and I am hoping someone here knows how to put to spring and sear (?) back together in this trigger.
Also, any suggestions on how to install this fother mucker without using the slave pin, given my partially blocked pin hole? Would you suggest removing the bolt lever and spring first, then get the pin installed in the front of the timney, and then get the bolt lever and spring back in place? All instructions I've seen say DONT let that bolt lever and spring come out, but maybe I have no choice. . .
Many thanks for any advice!!
I tried to install a Calvin Elite in my Rem 700 5r 300WM. Problem I ran in to was that the hole for the front pin was partially blocked by the bolt release lever. Regardless of what position I try, I cannot move the bolt release lever into any position that does not fully or at least partially block that pin hole. This picture shows the best I could do.
No problem, I think, because I have a skinny punch that will still fit and I'm supposed to push the pin out the other direction anyway. So I get the old trigger out and I'm ready to put the new Timney in. There's a slave pin in the front of the Timney that will need to be pushed out the left side of the barrel when the front pin is pushed back in. But wait, the friggin bolt release is partially blocking that hole, so there's no way for the slave pin to come out of the side when the real pin is pushed in.
No problem, I think, because I'll just remove the slave pin and hold everything together with my fingers while I tap in the real pin. . .
Of course, that failed, and a little spring popped out along with what I believe, based on poking around the internet, is the “sear,” but I’m a total novice so hell if I know what it really is. . . This picture shows the trigger, the spring, the sear (?), and the little slave pin that held it all together initially. (There was actually little pieces of tape on the sides of the trigger holding that slave pin in place when the trigger was still in the box).
I have come up empty on the timney site and elsewhere, and I am hoping someone here knows how to put to spring and sear (?) back together in this trigger.
Also, any suggestions on how to install this fother mucker without using the slave pin, given my partially blocked pin hole? Would you suggest removing the bolt lever and spring first, then get the pin installed in the front of the timney, and then get the bolt lever and spring back in place? All instructions I've seen say DONT let that bolt lever and spring come out, but maybe I have no choice. . .
Many thanks for any advice!!