[updated 3/15/2013]
Hello everyone! Decided to provide some video links I found online for setting up a Pelican Case.
Just a few notes I took from these videos
Materials needed:
-Pelican Case
-Black or silver Sharpie/Marker or chalk (chalk is sounds better than permanent)
-Electric knife
-Knife
-Stuff to put in the case
Things to consider:
-Put heaviest objects near wheels
-You can disassemble items to make space
-Lay out items about 1 in. from edge
-If you care about item direction in case and not seeing stencils, lay out items opposite of how you would have them in case and draw stencils on back of foam as described in 2nd video.
-Cut 'inside' stencil up to 1/4th in.
-Prep cuts with knife
-Don't pull out foam until you finish all cuts
-Use a friend or weight to hold down foam when cutting
-Take your time!
-You can always buy more foam... or save your old stuff and glue it back together. Might look like crap?
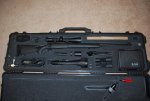
I guess you could post your own pics here or use the original pic thread for this.
http://www.snipershide.com/shooting/showthread.php?t=24695&highlight=pelican+case+photos
[Update 3/15/2013]
Found some more interesting vids!
Plastidip reinforcement (Cant testify to this but I might try it out!)
Explains how to make nice 90 degree corners
Hello everyone! Decided to provide some video links I found online for setting up a Pelican Case.
Just a few notes I took from these videos
Materials needed:
-Pelican Case
-Black or silver Sharpie/Marker or chalk (chalk is sounds better than permanent)
-Electric knife
-Knife
-Stuff to put in the case
Things to consider:
-Put heaviest objects near wheels
-You can disassemble items to make space
-Lay out items about 1 in. from edge
-If you care about item direction in case and not seeing stencils, lay out items opposite of how you would have them in case and draw stencils on back of foam as described in 2nd video.
-Cut 'inside' stencil up to 1/4th in.
-Prep cuts with knife
-Don't pull out foam until you finish all cuts
-Use a friend or weight to hold down foam when cutting
-Take your time!
-You can always buy more foam... or save your old stuff and glue it back together. Might look like crap?
I guess you could post your own pics here or use the original pic thread for this.
http://www.snipershide.com/shooting/showthread.php?t=24695&highlight=pelican+case+photos
[Update 3/15/2013]
Found some more interesting vids!
Plastidip reinforcement (Cant testify to this but I might try it out!)
Explains how to make nice 90 degree corners
Last edited: