• Watch Out for Scammers!

    We've now added a color code for all accounts. Orange accounts are new members, Blue are full members, and Green are Supporters. If you get a message about a sale from an orange account, make sure you pay attention before sending any money!

Rifle Scopes Leveling a scope: Plumb line and a flashlight

Just wanted to say that I finally got around to using it and it appears to work extremely well. Just a few tips I noticed:

-The brighter the flashlight the better
-I liked it with more magnification dialed in. I was maybe around 20 power?
-You will have to adjust your diopter almost all the way in or out (don't remember now) but anywhere else was extremely blurry.
-If it's a full length rail then you can lay the flashlight on the rail. I got creative with my AI and used foam and tape to keep the flashlight mounted in the right position so I could focus on getting the reticle even.
 
I would think you could also just move the rifle toward/away from the wall to focus the reticle instead of messing with the diopter.
 
Guys as I have stated before about not being a subject matter expert. Really. That seems to be a clear case of over complicating a pretty basic task. Not dogging you FourT6and2.
 
  • Like
Reactions: McMillan
I used this technique twice this week and it appears to work perfectly. It's very easy to do. Level the rifle then level the scope. i had to adjust the diopter in both cases . No need to go outside or to the range. Here in Utah there is always wind so an outdoor plum line can be a pain.
 
Last edited:
Is the rifle fully adjustable at the stock to remove your natural cant so you can set scope and rifle up level/level?

Do you set the rifle up in some manner to mimic your natural cant?

Do you just set scope and rifle level/level than unnaturally struggle with/fight your bodies desire to introduce natural cant?

Get a piece of white paper and a four foot level.

Make a nice level vertical line on the white paper at 100 yards.

Set up behind your rifle with NPA so good you can go to sleep.

Hold rifle in shoulder so that it feels as natural like it grew there.

Have buddy level cross hairs to your satisfaction and tighten caps.
 
  • Like
Reactions: Stoweit
pmclaine, all valid points. You can still set the rifle up to you by getting behind it in your home and then using something like the Wheeler professional leveler that clamps into your barrel. Once you are comfortable, make the barrel clamped leveler level - which will insure that the rifle stays in the same position that you liked when you were behind it. Then use the flashlight method to ensure that the reticle is level. Done and done.

I have no investment in this but it works super easy for me so I figured I'd share. It's easier than setting up a 4ft level downrange, a plumb line or dealing with the wind as mentioned above. Plus I shoot alone a lot so a two-man leveling team isn't always possible. YMMV though and all methods accomplish the same in the end.

Good deal. Rifle fit matters.

I like it, and yes its not easy to find the extra hands when you need them.
 
I just drive a nail into the top of the target frame and hang a plumb line from it.
Once I get the thing leveled to my satisfaction, I'll load a mag and try to cut the string.
I use a Spuhr mount on my gun and use their 7 degree wedge to level the scope. I work on rifle fit to eliminate cant.
 
  • Like
Reactions: Lionsbreath
pretty cool, even though a base level and a harbor freight level on top of scope works pretty quick too. Might not be as perfect, but quick and easy. Might try it next time.

PB
 
pretty cool, even though a base level and a harbor freight level on top of scope works pretty quick too. Might not be as perfect, but quick and easy. Might try it next time.

PB

Higher end scopes usually have a somewhat level turret to place a level on. My vortex PST was originally leveled that way - checking it with a plumb line however, showed that it was a decent amount off. Using levels is still assuming that the scope company got the reticle perfectly leveled inside the housing which is not always the case.

 
will have to try this out next time. I have a level set that I use now, but always open to other ways.
 

Attachments

  • photo75029.jpg
    photo75029.jpg
    61.2 KB · Views: 497
Seems like a pretty decent idea. I start off leveling my scopes with a deck of cards and then comfirm my mount job with a plumb line. Easy peasy. I’ll try the flashlight/plumb line method on my next scope mounting to see if it’s easier. I avoid the garbage leveling kits with the cheapo levels. Thanks!
 
  • Like
Reactions: Ryan.Johnson
My procedure has not let me down but this may have an advantage in that you can do it at home. My present procedure is all done at the range at 100 yards.
  1. I use the Wheeler kit to get the scope level to the rifle.
  2. I leave the barrel level attached and shoulder the rifle in my normal position. I then have a buddy adjust the barrel level so that it shows level.
  3. I then set up a tall target with a 4 foot vertical line made with a sharpie. I ensure that the line is perfectly vertical using a long level. This is done at 100 yards. I re-shoulder the rifle and check to see if the barrel level is still showing level.
  4. I adjust the scope so the vertical crosshair is parallel with the tall target vertical line.
  5. Lock the scope down and torque properly.
  6. Shoulder the rifle and recheck the barrel level and crosshairs against the vertical line.
I can do all of this at home with this new method which would be a definite plus. If the NF 7-35 with MIL-C ever shows up, that is.
 
I've been leveling my rifles with this method for some time. It works the best out of all methods i have tried.

I will usually get behind the rifle, get comfortable, and then leave it that way. Set up a plumb behind the rifle and white poster board or cardboard for the reticle to shine on and then level the reticle to the plumb. Good to go!
 
  • Like
Reactions: mudpig
I ran across this the other day and tried it out. I agree it's best to get the rifle comfortable and then level the reticle, and let the zeroing process deal with any natural cant.

But in the case of a new gun or setup where you don’t yet have a preference it's also nice to just be able to get it level on the bench at home. I’ve done this where I also sight down the bore and line it up to the plumb pencil mark on the wall. You can then mark the center lines of the bore and crosshairs on the wall and measure that to get a pretty accurate scope height for your ballistics calculator.

This method also does a good job of letting you set a permanent scope level, since you know your reticle is dead nuts level.
 

Attachments

  • Photo_Sep_02_19 07-20-09 PM-1.jpg
    Photo_Sep_02_19 07-20-09 PM-1.jpg
    311.2 KB · Views: 275
  • Photo_Sep_02_19 07-20-09 PM-3.jpg
    Photo_Sep_02_19 07-20-09 PM-3.jpg
    133.2 KB · Views: 302
Last edited:
  • Like
Reactions: Vodoun daVinci
For those with SPUHR mounts...

Would you use the included SPUHR wedge to level the scope or this flashlight method...?

I'm thinking the wedge would still be easier...?
 
I would think you could also just move the rifle toward/away from the wall to focus the reticle instead of messing with the diopter.

This is how I did it.

You can also use a a tall level versus a plumb line...not a big fan of plumb lines as it is always windy where I am
 
For those with SPUHR mounts...

Would you use the included SPUHR wedge to level the scope or this flashlight method...?

I'm thinking the wedge would still be easier...?

All you're doing with the wedge is leveling the base of the optic's housing. You are assuming that the reticle is mounted properly with respect to the bottom of the housing. You need to do this as a start and then also use a plumb, this flashlight method with a level or a tall level (6 foot) in place of a plumb to ensure that the reticle is level with respect to the fall of gravity WHEN the rifle is shouldered. If you don't do a plumb type measurement, you aren't done. Even when you do the plumb test, you aren't done as you need to do a tall target/box test to ensure your turrets are adjusting as advertised.
 
Last edited:
All you're doing with the wedge is leveling the base of the optic's housing. You are assuming that the reticle amounted properly with respect to the bottom of the housing. You need to do this as a start and then also use a plumb, this flashlight method with a level or a tall level (6 foot) in place of a plumb to ensure that the reticle is level with respect to the fall of gravity WHEN the rifle is shouldered. If you don't do a plumb type measurement, you aren't done. Even when you do the plumb test, you aren't done as you need to do a tall target/box test to ensure your turrets are adjusting as advertised.

very well said!

part of me was hoping NF has done their bit far as levelling the reticle to the bottom of the housing...
the lesson learned here is: "hoping" isn't a plan!!
 
anyone have advice on how to stop the scope rotating in the mount as you tighten the screws in the rings...?
particularly for a SPUHR mount...?
 
very well said!

part of me was hoping NF has done their bit far as levelling the reticle to the bottom of the housing...
the lesson learned here is: "hoping" isn't a plan!!

I use NF and S&B and have never had an issue but the real benefit to the method described is that you level the reticle to the fall of gravity WHILE the rifle is in position. Meaning that you are shouldering the rifle as you would when shooting versus doing it with the rifle locked in a vise or some other combination of bags, etc.
 
  • Like
Reactions: smokeon
anyone have advice on how to stop the scope rotating in the mount as you tighten the screws in the rings...?
particularly for a SPUHR mount...?

I use ARC rings for that reason

However, I do use SPUHR for AR applications. I keep the wedge in the mount while I tighten the rings. BE CAREFUL though as if you tighten too much, you won't be able to remove the wedge. I find keeping the wedge in place and tightening only two of the screws per ring to a finger tight position will keep the scope solid
 
anyone have advice on how to stop the scope rotating in the mount as you tighten the screws in the rings...?
particularly for a SPUHR mount...?

I tighten the ring screws in very small increments on opposite sides until the scope is tight enough to not move anymore and then torque as needed. You tighten too fast and they walk on you. I don't have Spuhr mounts but it seems it would work that way on those, too.

Same method for the reticle levels that mount to the scope itself.
 
  • Like
Reactions: smokeon
I use this method on all scopes i mount. And yes, i have the same problems with scopes rotating in Spuhr mounts as the screws tightens.
 
I use this method on all scopes i mount. And yes, i have the same problems with scopes rotating in Spuhr mounts as the screws tightens.

Glad I'm not the only one...!
 
The 'smith I apprenticed under back in the early 90's leveled customer scopes this way. Thus, I have done the same ever since. Currently, as a retail shop owner, I still mount scopes this way. Now, if the customer mounts the rifle canting to his NPA and it's off...well, at least when it left my shop, it was level to the world.
 
  • Like
Reactions: PFG
I used this method and it was fast and accurate - put the gun on the dining room table and level it. Put a bright light in the front of the sunshade and use magnification and focus to get a clear crisp cross hair projection on the wall. Use a level to check the horizontal and vertical square and rotate the scope until the lines are level on the projection on the wall.

Done. Perfect and fast.

VooDoo
 
  • Like
Reactions: smokeon
I scoped at Max magnification a heavy line suspended on a plumbob at 50 yards, perfect aligned center line, verified with bubble level on scope, carefully tightened down mount cap screws in x pattern per NF instructions.

Did the trick.
 
This is the only method I use now. I tried every different way I could (even using different levels) and I always had a slight cant. Finally happened across this method. Now whenever I see that my reticle is canted, I know it's me.

Getting out to the range for 100 yards or even finding enough distance for my scope's minimum parallax isn't always possible, that's why I like this method so much.

If you have the option, attach the flashlight to the barrel with a magnetic mount. It helps to set the flashlight just right and frees up your hands to move the rifle into position then adjust the scope. It's not mandatory, but sure helps.
 
All you need is you. Like masturbation.
Hold the rifle to your shoulder. Look through the scope at the wall. Is the bottom of vertical reticle distorted (bent)? If not, then it be level for you. KISS
 
I always use the flashlight method, at least for me its fast and easy to get it straight as long as the rifle is level.
 
I think we’re all saying the same thing here:
  1. Get the rifle in it’s intended firing position, then at the same time,
  2. Make sure your reticle is level when you tighten the rings.

Criteria #1 can be met by getting behind the rifle with whatever natural cant you put into the gun. Or you can level the rifle via the receiver, flat top rail, etc. Either way has pros and cons.

Criteria #2 can be met looking through the scope at a plumb line, plumb bob, etc. Or you can use a flashlight projecting the reticle onto a plumb line drawn on the wall. Either way has pros and cons.

What’s sometimes being left off is that you really need to have a way of keeping that reticle level after you tighten the rings. This goes for the zeroing job as well as when you shoot it after that. For that you can use a scope mounted permanent level, only shoot targets with level lines or plumb bobs (I’m joking here), use the horizon, trust your gut feelings, etc. I vote for a mounted scope level, and I find the flashlight method makes installing it an easy 1-man job.
 
You only need to alternately tighten two screws opposite or rather catty cornered just enough for each ring to secure the scope level. Then you just tighten all screws down similar to lug nuts. You don't need a torque driver as well. A regular driver by hand is plenty. The scope is stupid. It doesn't know the difference and won't belly ache about it. Just don't grind your teeth on it. Get a 15# dumbbell and stand it up on its end. Turn the center grip with your hand. That is what 15# torque feels like. Is anybody old enough to know how to tune a GTO motor with just a set of feeler gauges, basic tools, and no dwell meter or timing light?
 
Last edited by a moderator:
You only need to alternately tighten two screws opposite or rather catty cornered just enough for each ring to secure the scope level. Then you just tighten all screws down similar to lug nuts. You don't need a torque driver as well. A regular driver by hand is plenty. The scope is stupid. It doesn't know the difference and won't belly ache about it. Just don't grind your teeth on it. Get a 15# dumbbell and stand it up on its end. Turn the center grip with your hand. That is what 15# torque feels like. Is anybody old enough to know how to tune a GTO motor with just a set of feeler gauges, basic tools, and no dwell meter or timing light?
Apparently not. ?
 
Glad I stumbled across this, it's a quick easy method to level your scope out. I leveled mine to the action, but I think i'll mess with it a little and level it to my shooting position. Thanks for posting this.
 
Is anybody old enough to know how to tune a GTO motor with just a set of feeler gauges, basic tools, and no dwell meter or timing light?

Feeler gauge?!?! Hell, all I could afford back then was the 1/2" wrench required to break the dist loose and a straight driver to pop the cap off, so I always used a match book flap to set points.
 
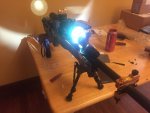
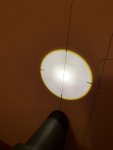
I use the flashlight method with all my rifles.

Use a plumb bob hanging from a nail with white paper taped to wall to increase visibility.

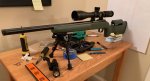
Also, you still want a small level to first check that your platform is level, then to ensure the receiver is also level. Of course mucking with stuff during the process you tend to knock out of level so check level throughout the process.

You will also want the reticle to shine as large as possible while remaining crisp on the wall. This allows the greatest "surface area" when aligning the reticle to the plumb bob. Adjusting distance from wall works well.

Once everything is aligned start to tourque down in small increments from screw to screw until snug enough that the scope doesnt move.

Put level on top turrent, it should also be level. Once confirmed, tighten rings rest of the way.

This has always worked very well for me. also like the idea of leveling to my position. Will check that out as well.

ETA: Sort of a crappy pic at a weird angle, but you get the idea. If you have a scope-level just include it in the process. One of my rifles has Steiner T rings with built in level...so you have to make sure to torque them to level during the process.

pic - Copy.jpg
 
Last edited:
Leveling the scope is great and all but what's your secret for lining the action level with the scope. While leveling the reticle?
 
@magtech

I had the "advantage" of not knowing any of this, or having done much reading on it, when I mounted my optics. I've never attempted to account for body position induced cant...so, there's something to take away. Anyhow, I leveled the action thusly for different setups:

On my AR-15s, I simply set them on a surface I've verified level (regular old hardware store level), set a level on top of the rifle to verify it's level, mount the rings and check those as well.

On my KRG SOTIC w/ Spuhr mount, I started much the same. Level surface (check), level rifle (check). Easy to do with bottom and top flats. Interesting point in all this, the bubble level in the Spuhr mount seems to be right around ~.5 deg off true when the rifle/optic are on. I should do some verification for science!

With my Winchester M70 I made the bold assumption the action ought to true-ish and used the bottom half of the rings to level the scope/action. I imagine it could really throw a wrench in things if the action is not drilled/tapped accurately as it would offset your optic with respect to the bore. That said, I just pulled the optic in preparation of bedding this action, so I'll get to do it all again.
 
It’s actually pretty simple if you do it correctly. Not trying to be a smart ass. Maybe you were having one of those days. I have them all the time.
 
I've never understood all the OCD that people invest into leveling the scope to the rifle, when what matters is only how level the scope is when in the firing position.

Put a level on the scope and make sure that level is level to the scope sure, but the angle of the scope to the rifle is almost irrelevant.

If we exaggerate the scope rotation to make the point, so the scope is on a ridiculous 45 degree angle, but the scope is level when firing, the bullet will travel a parallel path to the line of sight that is about 1 inch to the side of the POI. You probably would barely even notice that... unless you are shooting F Class.

If you are off by 10 degrees, which is a lot just by eye, you wont even notice the offset.

Just eye it up to the rifle and go with it.
 
  • Like
Reactions: wade2big