• Watch Out for Scammers!

    We've now added a color code for all accounts. Orange accounts are new members, Blue are full members, and Green are Supporters. If you get a message about a sale from an orange account, make sure you pay attention before sending any money!

Load development questions

Dildobaggins

Major Hide Member
Full Member
Minuteman
  • Jun 26, 2020
    1,009
    473
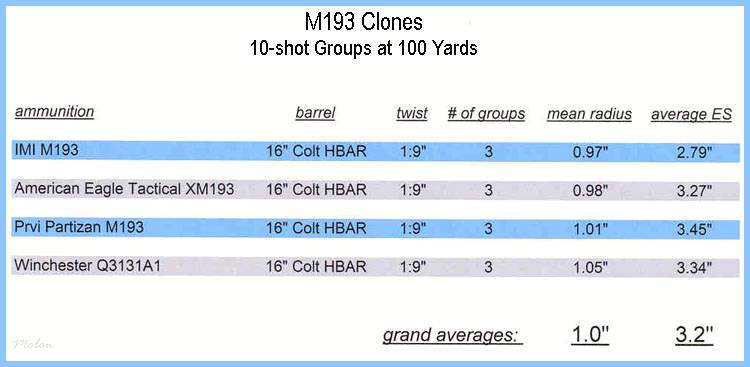
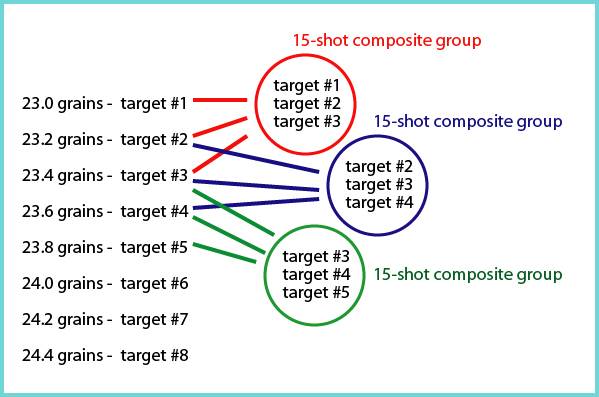
    New to reloading so forgive me. Just curious on a few things. When you do load development, let's say by starting with a low powder charge and working your way up, how many rounds/groups do you shoot per powder charge weight?

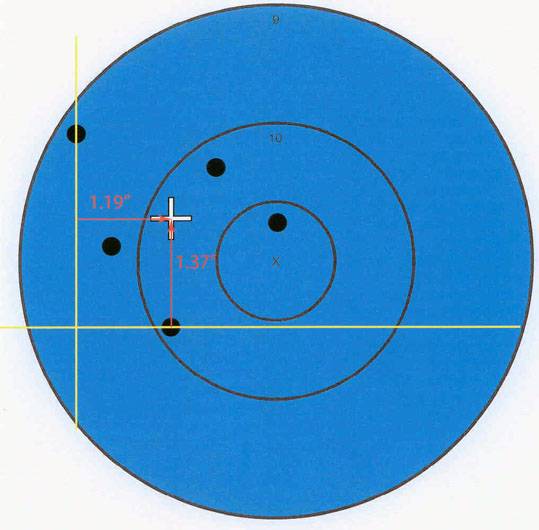
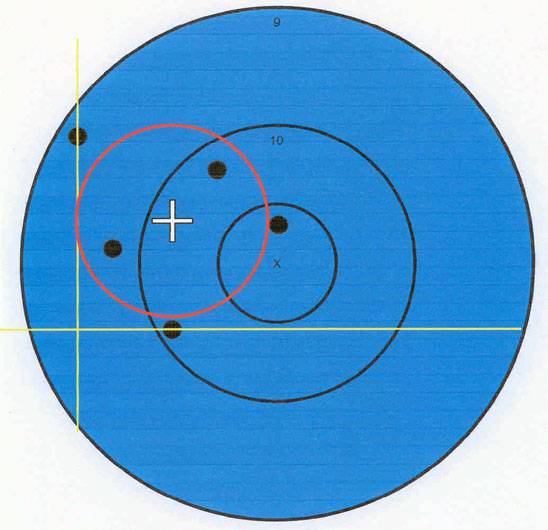
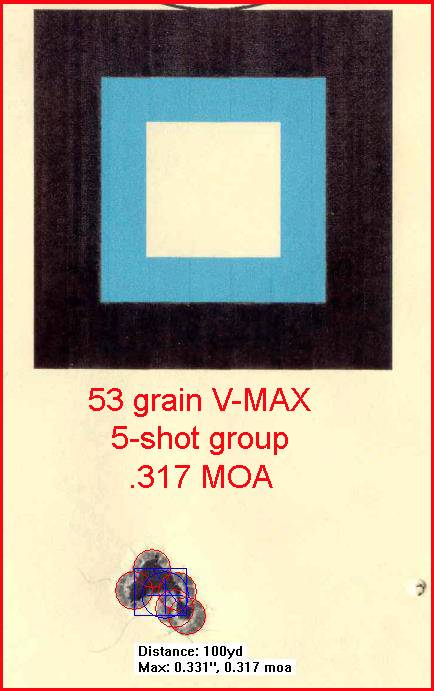
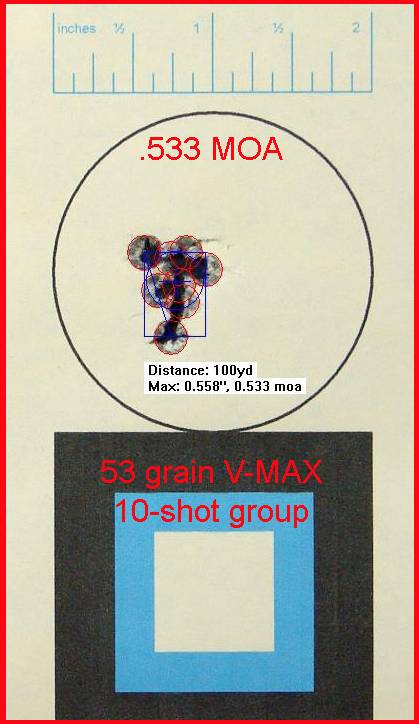
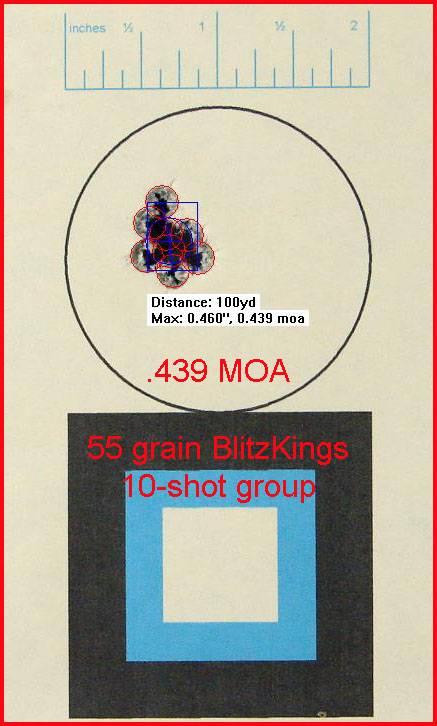
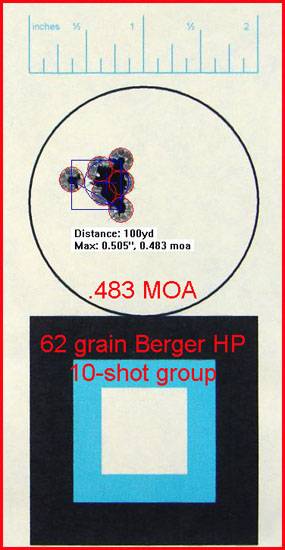
    After you have found a load you believe to be accurate, do you verify with a larger group?

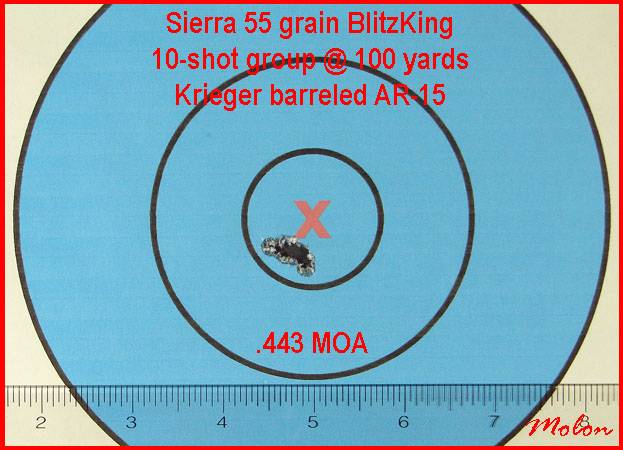
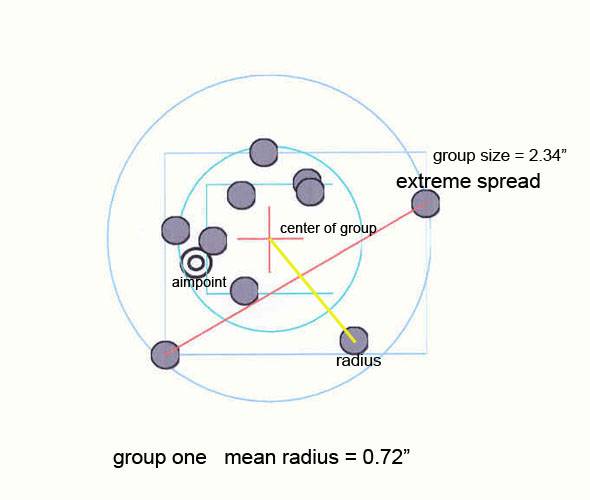
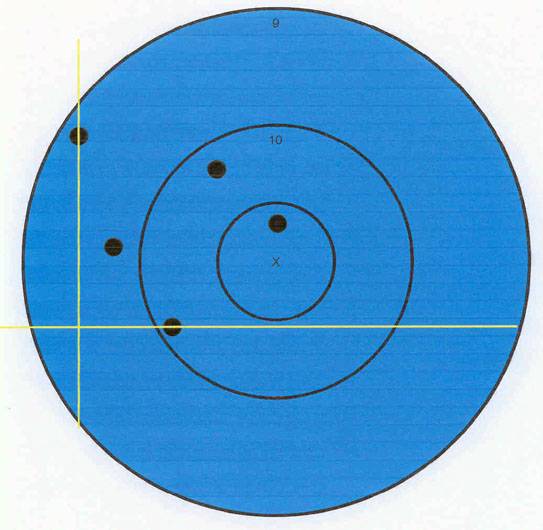
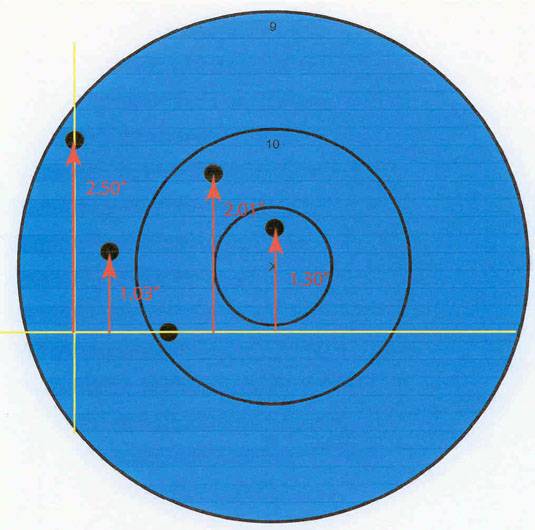
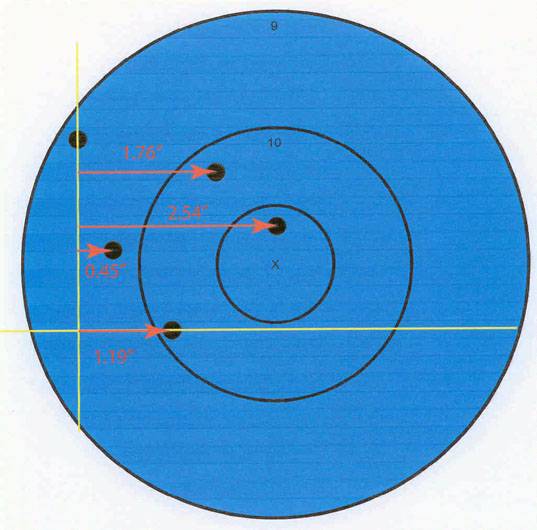
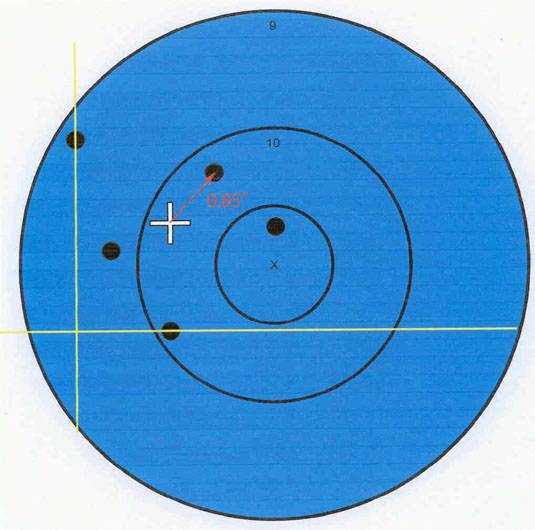
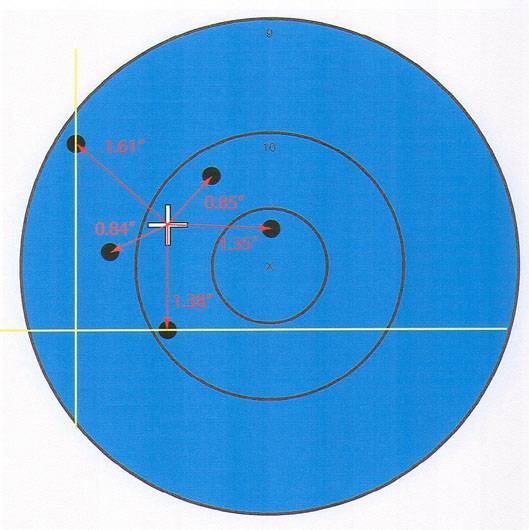
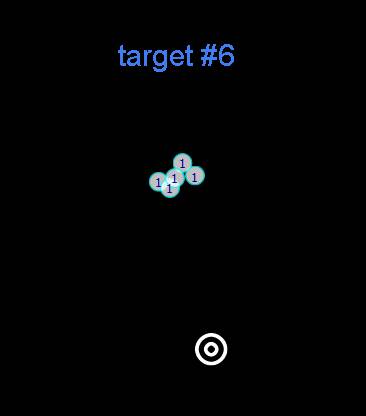
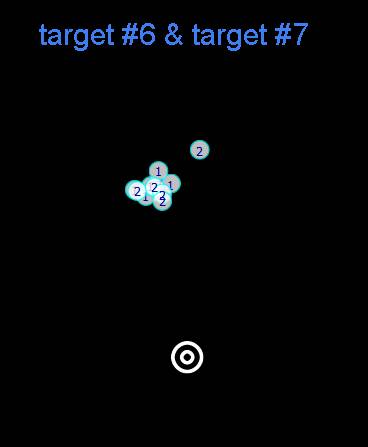
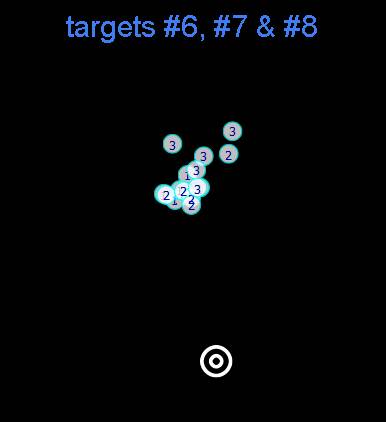
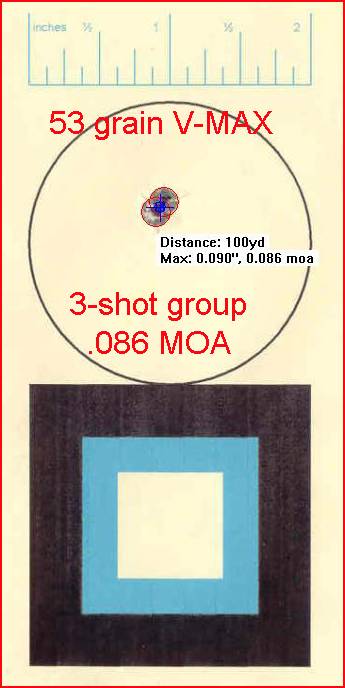
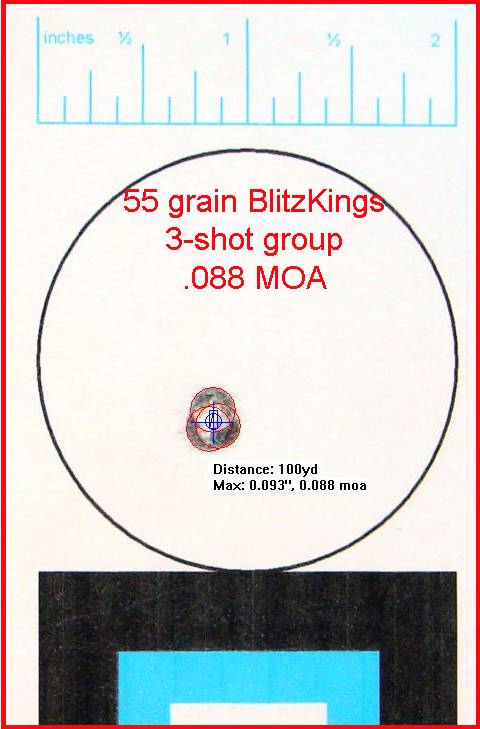
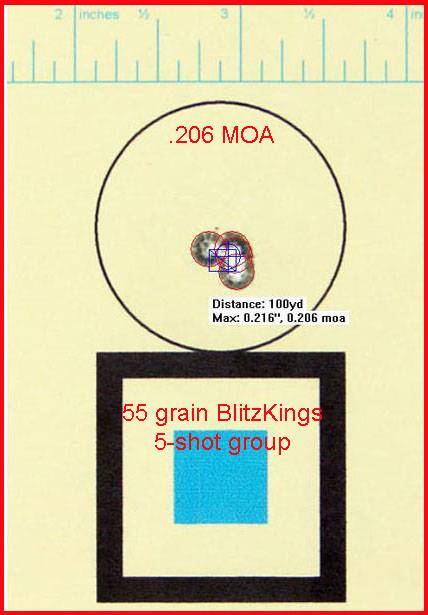
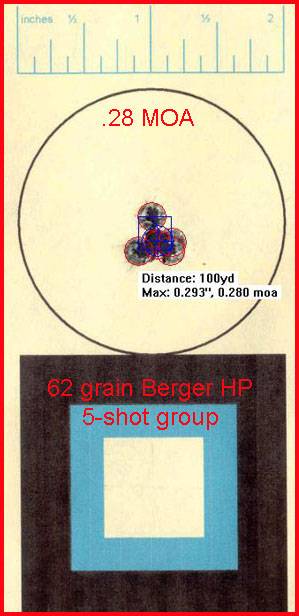
    I have been doing 2 groups of three shots per charge weight, from low to max, and then after finding one I play with seating depth, and I feel like I'm not getting any actual data from them because the sample size is too small. Would I be correct in saying this?
     
    I run a full OCW, or run a very small one across an established node, or I choose charge weight inside the node, or have just chosen a random charge inside book numbers. After the beginning phase. I usually confirm with some 100y 5 shot groups, and 5 or 10 over the chrono to get velocity. Then I shoot some groups at 600y.
     
    For me, it depends on how used I am to the rifle. If its a brand new (to me) rifle then I might as well get a few rounds down range to get a feel for it. Then I can do ladders with 5 shots per stage. I have done more but thats rare.
    If its a rifle I am used to, and bullets that I feel fairly comfortable with knowing that I will get to shoot, then 3 rounds will usually do the trick.

    After that I do a bigger batch of 20-50 rounds to confirm and then I just massproduce.

    Some bullets are more picky than others. But regular HPBT matchbullets are usually stable and easy to get to shoot. Sierras Matchkings seems to be the easy button. Atleast in 308 and 6.5 caliber.
     
    If I am using a powder I'm unfamiliar with or with a different bullet I will start at minimum load and fire one round at .5 grain increments (308) or .3 grains increments(s) to test for pressure until I'm about 94% of max load and I usually use the recommended seating depth. I then shoot 0.3 or 0.2 grain increments with 3 or 5 shot groups. I use Dan Newberry's OCW method.

    I know that most loads are going to be above 94% of max in my rifles. If I had a new rifle I would probably work up from a lower %.

    I will also verify my load selection but I seldom find an issue.
    I just started reading about the OCW method you all have mentioned. glad I asked this question, this is going to save me a shit load of time and headache I think.
     
    • Like
    Reactions: simonp
    I just started reading about the OCW method you all have mentioned. glad I asked this question, this is going to save me a shit load of time and headache I think.
    Here’s my process if not familiar with cartridge or components:

    StepWhat I'm DoingWhat I'm Looking ForNotes
    1Initial OCW 3-5 shots per groupPOI Consistency from Chg Weight to Chg Weight, MV and Pressure SignsMV Data: Im only looking at MV (not SD or ES) to see what charge weights my min required MV is met and if pressure is present at that MV where POI is consistent from increment to increment
    2Refined OCW 10-15 shots per group, adjacent CWsPOI consistency (repeated from initial OCW), group size at 100m and at 600mIf group size is not to my liking but MV and POI consistency is there, I go to seating depth testing in an additional session before going to step 3
    3Final validation - 40-60 roundsMV Consistency (SD/ES), group size, elevation hold overs at various KDs vs predicted (either via FDAC or ballistic app), overall performance impressionsIf SD/ES are reasonable (low double digits, high single digits across 40 rounds im good - i put the load into production.

    If it all comes apart, i diagnose and re-group (honestly, this very rarely happens)
    So correct me if I'm wrong. After the initial OCW do you take the node(s) you think is best, and redo the test with a larger groups?
     
    So correct me if I'm wrong. After the initial OCW do you take the node(s) you think is best, and redo the test with a larger groups?
    Yep, want to make sure the “node” is real so i shoot more rounds w/charge weights within that range. I shoot at 100 and then engage at 600m (or 500m for 5.56 nato and similar cartridges).

    It’s debatable if step 2 is truely necessary but ive been doing it for years and never had to significantly adjust a load after it proves itself in this second step.

    From there i simply pick a charge in the middle of that proven node, load 40-60 rounds at that charge weight and proceed to step 3.
    Good stuff man! Thanks!
     
    • Like
    Reactions: nn8734
    Reloading For The AR-15: Molon's Accuracy Node Detection Technique


    55_blitzking_10_shot_group_at_100_yards_-1353892.jpg


    The Accuracy Node Detection Technique (ANDT) is simply a tool to aid hand-loaders in determining the specific powder-charge that is most likely to deliver the highest level of accuracy (technically precision) from their AR-15 with a particular powder and bullet.

    Those of you familiar with Creighton Audette’s Incremental Load Development Method (Ladder Test) or Dan Newberry’s Optimal Charge Weight method may recognize that the Accuracy Node Detection Technique is based on the same underlying principle as those methods, however, the ANDT is a more refined and statistically meaningful approach to finding an accuracy node.

    The ANDT uses larger effective sample sizes for greater confidence and utilizes the mean radius to determine the radial dispersion of composite shot-groups to obtain a more exact identification of the accuracy node of a given barrel/bullet/powder combination. For those of you not familiar with the mean radius, I’ll be explaining that shortly.


    The ANDT is not dependent upon “interpreting” the data like other methods; the data is what it is and the results speak for themselves. However, keep in mind that 60% of a load’s accuracy comes from the bullet. If you’re not using a quality bullet that your barrel “likes,” no amount of powder-charge testing is going to result in a load that produces sub-MOA 10-shot groups from you AR-15.


    A chronograph is not needed for the ANDT. If you’re only interested in long-range shooting, this is not the article you‘re looking for. I developed the ANDT for working-up short range (200 yards and in) match-grade hand-loads that consistently produce sub-MOA 10-shot groups from my match-grade AR-15s.


    As I mentioned above, the ANDT utilizes the mean radius to accurately and precisely determine the radial dispersion of the composite shot-groups that we will develop using the ANDT. The demonstration below shows how to manually calculate the mean radius, but modern ballistic programs make this task far easier.


    A PRIMER ON THE MEAN RADIUS

    The mean radius is a method of measurement of the radial dispersion of shot-groups that takes into account every shot in the group. It provides a more useful analysis of the consistency of ammunition and firearms than the commonly used method of extreme spread.

    Mean radius as defined in Hatcher's Notebook “is the average distance of all the shots from the center of the group. It is usually about one third the group diameter (extreme spread)” for 10-shot groups. (The ratio is actually closer to 3.2 times the mean radius = the extreme spread, for 10-shot groups, depending on the sample size and the morphology of the particular groups sampled.)

    To obtain the mean radius of a shot-group, measure the heights of all shots above the lowest shot in the group. Average these measurements. The result is the height of the center of the group above the lowest shot. Then in the same way, get the horizontal distance of the center from the shot farthest to the left. These two measurements will locate the group center. Now measure the distance of each shot from this center. The average of these measures is the mean radius.

    Once you get the hang of measuring groups using the mean radius it becomes very simple to do. While being very simple to do, it is also very time consuming. Modern software programs such as RSI Shooting Lab and On Target make determining the mean radius a snap.

    The picture below is a screen capture from RSI Shooting Lab. The red cross is the center of the group (a little high and right of the aiming point). The long red line shows the two shots forming the extreme spread or group size. The yellow line from the red cross to one of the shots is a radius. Measure all the radii and take the average to obtain the mean radius.


    e5h310mx2lw65cuuwrfk-1350520.jpg


    Mean Radius Demonstration

    Let’s say you fired a 5-shot group from 100 yards and the resulting target looks like this. (The X-ring measures 1.5” and the 10-ring measures 3.5”.)


    pn6jf1qeuywk5a42jzcz-1350523.jpg


    The extreme spread of the group measures 2.83”, but we want to find the mean radius (or average group radius.) In order to find the mean radius we must first find the center of the group. By “eye-balling” the target most people would see that the group is centered to the left of the “X-ring” and probably a little high, but we need to find the exact location of the center of the group.

    Locating the Center of the Group

    The first step in finding the center of the group is to find the lowest shot of the group and draw a horizontal line through the center of that shot.


    hg77du60v6jwj6qnhsd2-1350521.jpg


    Next, find the left-most shot of the group and draw a vertical line through the center of that shot.


    qyqecvzn8slmls96199f-1350524.jpg


    Now measure the distance from the horizontal line to the other four shots of the group that are above that line. Add those numbers together and divide by the total number of shots in the group (5).


    k0uuxzzb1weo3ppgluz7-1350522.jpg


    2.50” + 1.03” + 2.01” + 1.30” = 6.84”

    Divide by 5 to get 1.37”. This number is the elevation component of the center of the group.

    Next we need to find the windage component of the center of the group. From the vertical line, measure the distance to the other four shots of the group that are to the right of the line. Add those numbers together and again divide by the total number of shots in the group (5).


    ncg6hkbmcv1kyyvtdua1-1350539.jpg


    1.76” + 2.54” + 0.45” + 1.19” = 5.94”

    Divide by 5 to get 1.19” This is the windage component of the center of the group.

    Finding the windage and elevation components of the center of the group is the most difficult part of this process. Once that is done the rest of the process is a piece of cake.

    Using the windage and elevation components, locate the position on the target that is 1.37” (elevation component) above the horizontal line and 1.19” (windage component) to the right of the vertical line. This location is the center of the group!


    46cr6kei23k2npjbwopy-1350538.jpg


    Determining the Mean Radius


    Now that we have located the position of the center of the group, the first step in determining the mean radius is to measure the distance from the center of the group to the center of one of the shots. This line is a single “radius”.


    vm7k0jzt5h941pfldlhj-1350545.jpg


    Now measure the distance from the center of the group to the center of each of the rest of the shots in the group. Add the measurements of all the radii together and then divide by the total number of shots in the group (5).


    lv461k9kjilx3jndshs4-1350544.jpg


    0.85” + 1.35” + 1.38” + 0.84” + 1.61” = 6.03”

    Divide by 5 to get 1.21”. This is the mean radius (or average group radius) of the group!

    Using the mean radius measurement to scribe a circle around the center of the group gives you a graphic representation of the mean radius. This shows the average accuracy of all the shots in the group. This demonstrates why the mean radius is much more useful than the extreme spread in evaluating the radial dispersion of our rifles and ammunition.


    g1480t5ca47zrae1du8i-1350552.jpg


    The table below will give you an idea of the relationship between the mean radius and extreme spread for 10-shot groups.


    e4ckmi2y36-1350551.jpg


    Here are some interesting quotes from old issues of American Rifleman on the subject:

    “Mean radius is the mean distance of bullet impacts from center of the test group. It is used in government ammunition acceptance because it takes account of every shot and comes close to maximizing the test information. While there is no exact relationship between this measure and the simpler and more convenient group diameter, the 10-shot group diameter averages slightly over 3 times the mean radius.”

    "These examples illustrate the sensitiveness of the extreme spread to number of shots in the group. Indeed, as the table indicates, the measures made to only the outside shots of the group, e.g. the extreme spread, are very sensitive to number of shots, while the measures made to all the shots, e.g. the mean radius are far less so. It may be added that the latter measures are also less variable in their representation of the group; they are more efficient. This explains why the target testing of U.S. military rifle ammunition is by mean radius."


    Now that you understand the mean radius, we can delve into some particulars of the Accuracy Node Detection Technique. For the example that I’ll be presenting in this article, I was looking for an accuracy node for the Hornady 53 grain V-MAX (#22265) when charged with VihtaVuori N133 powder and fired from my 223 Remington 24” Krieger barreled AR-15. But first, a word from our sponsor:


    WARNING!
    Reloading is an inherently dangerous activity. The information provided here is for educational purposes only. It is not intended to be used for the actual loading of ammunition by the reader. No warranty, guarantee or assurance that these loads are safe is stated, suggested or implied nor should any be inferred. Usage of this information for the actual loading of ammunition may result in malfunctions, damage and destruction of property and grave injury or death to beings human in nature or otherwise. Don't even view this information in the presence of children or small animals.


    53_grain_vmax_boxes_02-1352151.jpg


    53 V-MAX on the left . . .

    hornady_53_grain_VMAX_01_resized_02-1352152.jpg


    VihtaVuori N133 (the individual red squares in the grid below are 1/10 of an inch.)

    vihtavuori_n133_003-1353956.jpg


    24” Krieger barrel . . .

    krieger_24_inch_barrel_with_highpower_ta-1288008.jpg


    krieger_barreled_ar-15_002-1353853.jpg


    continued in the next post . . .
     
    . . . continued from the previous post


    In my experience with hand-loading for precision AR-15s that are chambered for 223 Remington, I’ve found that an accuracy node can often be identified somewhere within a 1.5 grain spread of powder-charges; not always, but often. For this example of the ANDT, I used powder-charge weights ranging from 23.0 grains to 24.4 grains of VihtaVuori N133. The criteria that I used for this particular example of the ANDT was as follows:


    I wanted to find an accuracy node that was within the limits of the precision that the factory powder measure on my Dillon XL650 was capable of throwing. When using a short-cut extruded powder like VihtaVuori N133, the Dillon factory powder measure will throw the majority of the charges within plus or minus 0.1 grains of the nominal charge. However, a significant amount of the time, the Dillon factory powder measure will throw a charge that is plus or minus 0.2 grains of the nominal charge. Therefore, I needed an accuracy node that could maintain the desired level of precision on the target, throughout a plus or minus 0.2 grain powder-charge. Hence, I used an increment of 0.2 grains in the powder-charges used for this example of the ANDT. The following eight powder-charges were used:


    Powder-charge #1 - 23.0 grains
    Powder-charge #2 - 23.2 grains
    Powder-charge #3 - 23.4 grains
    Powder-charge #4 - 23.6 grains
    Powder-charge #5 - 23.8 grains
    Powder-charge #6 - 24.0 grains
    Powder-charge #7 - 24.2 grains
    Powder-charge #8 - 24.4 grains


    The powder-charges tested in this example of the ANDT were all dispensed (not thrown) to the exact tenth of a grain using a Pact Digital powder dispenser and scale and verified on a GemPro-250 scale. The hand-loads were otherwise loaded on the Dillon XL650. Five rounds of each of the eight powder-charges were loaded, for a total of 40 rounds. Next, some actual shooting.


    reloading_bench_022-1898605-2206635.jpg


    All shooting for this example of the ANDT was conducted from my bench-rest set-up at a distance of 100 yards. The 24" Krieger barrel was free-floated. The free-float handguards of the rifle rested in a Sinclair Windage Benchrest, while the stock of the rifle rested in a Protektor bunny-ear rear bag. Sighting was accomplished via a Leupold VARI-X III set at 25X magnification and adjusted to be parallax-free at 100 yards. A mirage shade was attached to the top of the free-float hand-guard. Wind conditions on the shooting range were continuously monitored using a Wind Probe. The lower receiver housed a Geissele High-Speed National Match trigger. The set-up was very similar to that pictured below.


    benchrest_krieger_rifle_02_JPG-1287996.jpg


    The Wind Probe


    wind_probe_2016_01_framedb-1342522.jpg


    The shooting portion of the Accuracy Node Detection Technique should be conducted at a distance of 100 yards to help mitigate environmental variables. When conducting the shooting for the ANDT, you absolutely most monitor the wind conditions on the range and attempt to fire every shot under the same wind conditions. For those who think that the wind “doesn’t matter” at 100 yards, consider the following example.


    With the right ammunition, my precision AR-15s are capable of producing consistent sub-MOA 10-shot groups at 100 yards. Now, let’s say that you are a quarter of the way through the firing of 40 rounds for the ANDT. The wind has been calm up to this point. For your next shot, you miss the fact that a 7 mph wind is now blowing from 3 o’clock. The wind dies down again and you continue shooting. Three quarters of the way through testing, you miss another 7 mph wind that has kicked up, only this time it’s coming from 9 o’clock. By not paying attention to the wind, your test results have now been increased by more than 1.5 MOA, simply due to wind deflection. So yes Virginia, the wind does indeed matter at the distance of 100 yards.


    55_blitzkings_wind_drift_at_100_yards_7_-1350853.jpg


    In order for the ANDT to produce valid data, you positively have to be able to properly execute the fundamentals of marksmanship 40 times (or more) in a row. When conducting the shooting portion of the ANDT, all rounds should be fired in a round-robin manner. This means that you fire one shot only at the first target using a round from the first powder-charge, then you fire one shot only at the second target using a round from the second powder-charge and so-on until you’ve fired one round at each of the eight targets. You repeat this process until all 40 rounds have been fired. Unless you had some collateral damage, you should now have eight targets all of which have five shots on them from each of the eight different powder-charges being tested. Now it’s time to head home and analyze the data.


    A sample target . . .


    andt_sample_targets_0000c_resized-1354401.jpg


    Here’s where things get interesting. We now have eight targets and each of those targets has a 5-shot group on them that was fired in a round-robin manner. Each 5-shot group was fired using rounds loaded with the same powder-charge. For the ANDT, we are not interested in the extreme spreads of those 5-shot groups. We’re not even interested in the mean radius of the individual 5-shot groups. What we are interested in, is the mean radius of the composite groups that we’re going to form from the eight individual targets.


    To form the composite groups, we first have to individually enter the eight, 5-shot targets into the computer program. In this case, I’ll be using RSI Shooting Lab. Once the individual targets are entered into the program, we can then use the program to over-lay targets to form composite groups.


    Do you remember earlier in this article that I stated what my criteria was for this example of the ANDT? I stated that “I needed an accuracy node that could maintain the desired level of precision on the target, throughout a plus or minus 0.2 grain powder-charge. Hence, I used an increment of 0.2 grains in the powder-charges used for this example of the ANDT.” Since each target contains a 5-shot group from the same powder-charge, and each incremental powder-charge was increased by 0.2 grains, we’re going to over-lay the targets in sequences of three, to form 15-shot composite groups, giving us more effective sample sizes, particularly when used in conjunction with the mean radius. That way our 15-shot composite groups will be made up of rounds fired from three different powder-charges; the nominal powder-charge (the one in the middle), a powder-charge that is 0.2 grains less than the nominal powder-charge and a powder-charge that is 0.2 grains more than the nominal powder-charge.


    For example, the first 15-shot composite group will be formed by over-laying target #1, target #2 and target #3. The second 15-shot composite group will be formed by over-laying target #2, target #3 and target #4. We’ll continue this sequence of over-laying the individual targets to form 15-shot composite groups until all eight of the individual targets have been used to form six, 15-shot composite groups. These six, 15-shot composite groups are what we have been working towards. The mean radii of these 15-shot composite groups are going to tell us where our accuracy node lies.


    andt_composite_group_diagram_002-1352107.jpg


    Here’s a visual demonstration of the process of over-laying the individual 5-shot targets, in sequences of three, to form the 15-shot composite groups.


    Here’s target #6 by itself.


    target_6_overlay_demonstration_01-1353692.jpg


    Here’s target #6 and target #7 over-layed on each other.

    targets_6_and_7_overlay__deonstration_01-1353694.jpg


    And targets #6, #7 and #8 over-layed on each other.

    targets_6_7_8_overlay_demonstration_01-1353693.jpg


    NOTE: It is extremely important when over-laying targets for the ANDT that the targets are over-layed on the centers of the targets, not on the centers of the groups. When over-laying targets using RSI Shooting Lab, the program gives you two options: “Aim Point” and “Center”. The “Aim Point” option is the correct option to over-lay the targets on the centers of the targets. The “Center” option will over-lay the targets on the centers of the groups.


    rsi_options_screen_capture_01-1352382.jpg


    Before we get to the final results of this example of the ANDT, I’d like to use target #6 (that was shown above) to demonstrate the erroneous nature of depending upon the extreme spread of individual 5-shot groups to locate an accuracy node. The 5-shot group on target #6 has an extreme spread of 0.42”. That’s a sub-½ MOA group at 100 yards fired from a semi-automatic AR-15 (and remember too that these groups were fired round-robin). If I were using the extreme spreads of 5-shot groups to locate an accuracy node, I would think I had found it with target #6 . . . . but I would be mistaken, as we shall now see.


    Here are the mean radii of the six, 15-shot composite groups. The nominal powder-charge of the 15-shot composite group that has the smallest mean radius is the accuracy node for the 53 grain V-MAX load charged with VihtaVuori N133 and fired from my 223 Remington 24” Krieger barreled AR-15.


    andt_results_021-1353838.jpg


    And there’s the accuracy node! Targets #2, #3 and #4 over-layed on each other formed a 15-shot composite group that has a mean radius of 0.18” at 100 yards.


    andt_results_highlighted_resized_001-1353712.jpg


    targets_2_3_4_overlayed_with_mean_radius-1353709.jpg


    Now that we’ve identified the accuracy node at 23.4 grains of VihtaVuori N133, let’s take a look at what this load can do when fired from my Krieger barreled AR-15 at a distance of 100 yards.


    Hornady 53 Grain V-MAX


    3-shot group: .086 MOA


    53_vmax_3_shot_group_at_100_yards_measur-1353730.jpg


    5-shot group: .317 MOA


    53_vmax_5_shot_group_measured_and_lablel-1353849.jpg


    10-shot group: .533 MOA


    223_krieger_with_53_grain_vmax_10_shot_g-1353833.jpg


    Here are some pics of groups from other hand-loads that I developed for my Krieger barreled AR-15 using the Accuracy Node Detection Technique.


    Sierra 55 Grain BlitzKing


    3-shot group: .088 MOA

    55_blitzkings_krieger_barrel_3_shot_grou-1353770.jpg


    5-shot group: .206 MOA


    55_blitzkings_five_shot_group_measured_a-1353779.jpg


    10-shot group: .439 MOA


    55_grain_blitzkings_10_shot_group_at_100-1353790.jpg


    62 Grain Berger HP


    5-shot group: .28 MOA


    62_berger_five_shot_group_measured_and_l-1353797.jpg


    10-shot group: .483 MOA

    62_berger10_shot_group_measured_and_labe-1354276.jpg


    molon_signature_005-1357735.jpg


    Last edited:
    • Like
    Reactions: Doom
    @Molon you beat me to it!

    I've used Dan Newberry's OCW for years now and it's worked very well. I've recently begun shooting Rimfire Benchrest and have been playing with Average to Center in evaluating both my shooting and in evaluating different ammo. I planned on including that into my load development for the centerfires.

    You mentioned using RSI software to get the x,y offsets. DO you know of any other software that can do that on a shot basis?