• Watch Out for Scammers!

    We've now added a color code for all accounts. Orange accounts are new members, Blue are full members, and Green are Supporters. If you get a message about a sale from an orange account, make sure you pay attention before sending any money!

My homemade sidecharger

McLarenross

Sergeant
Full Member
Minuteman
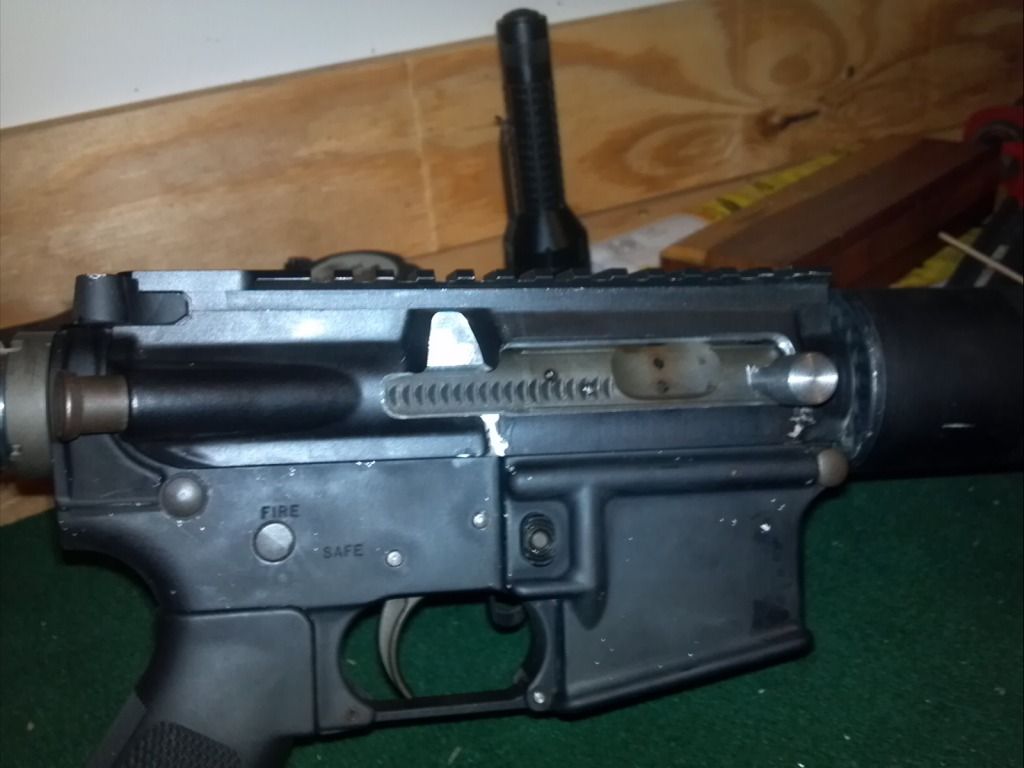
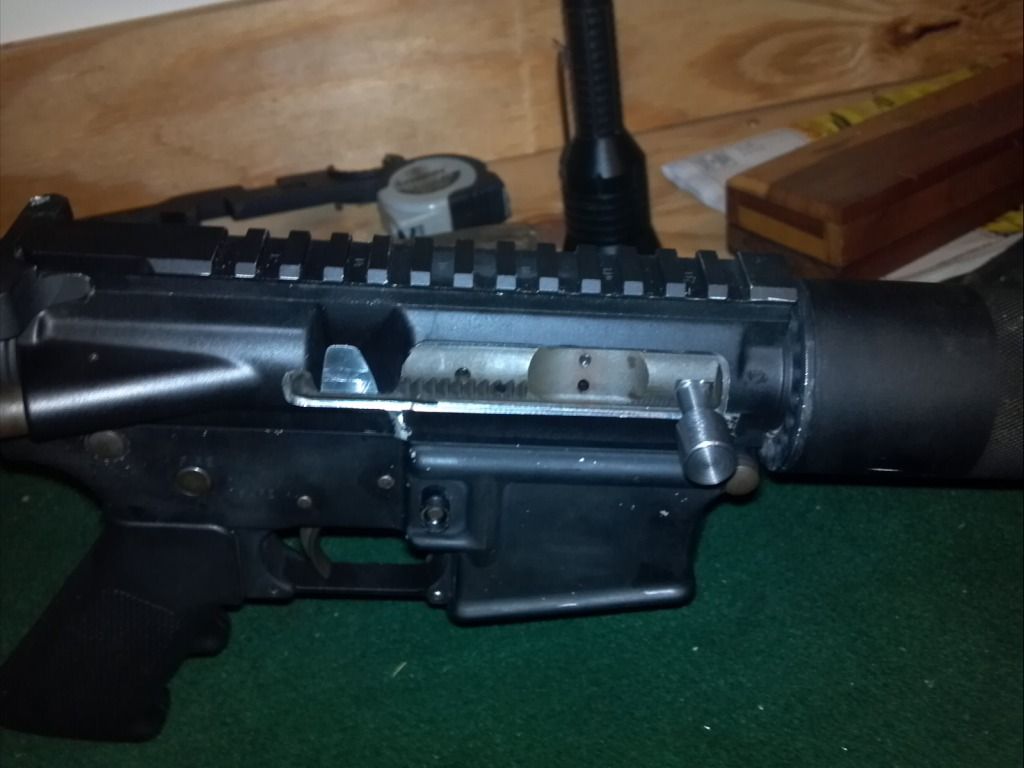
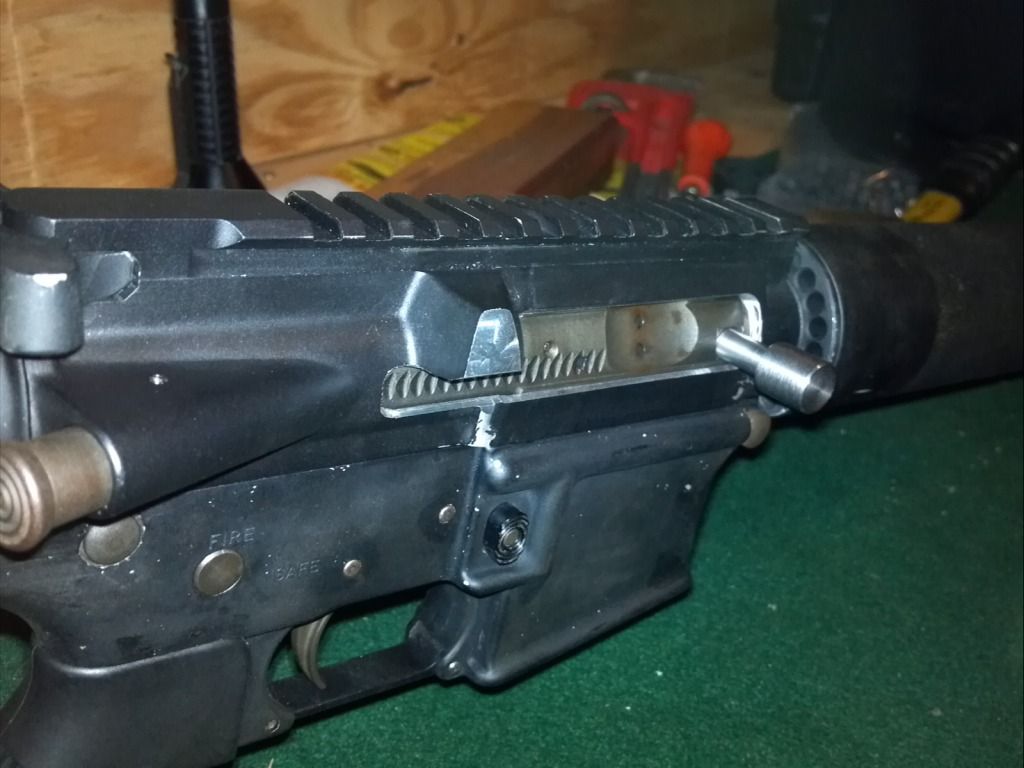
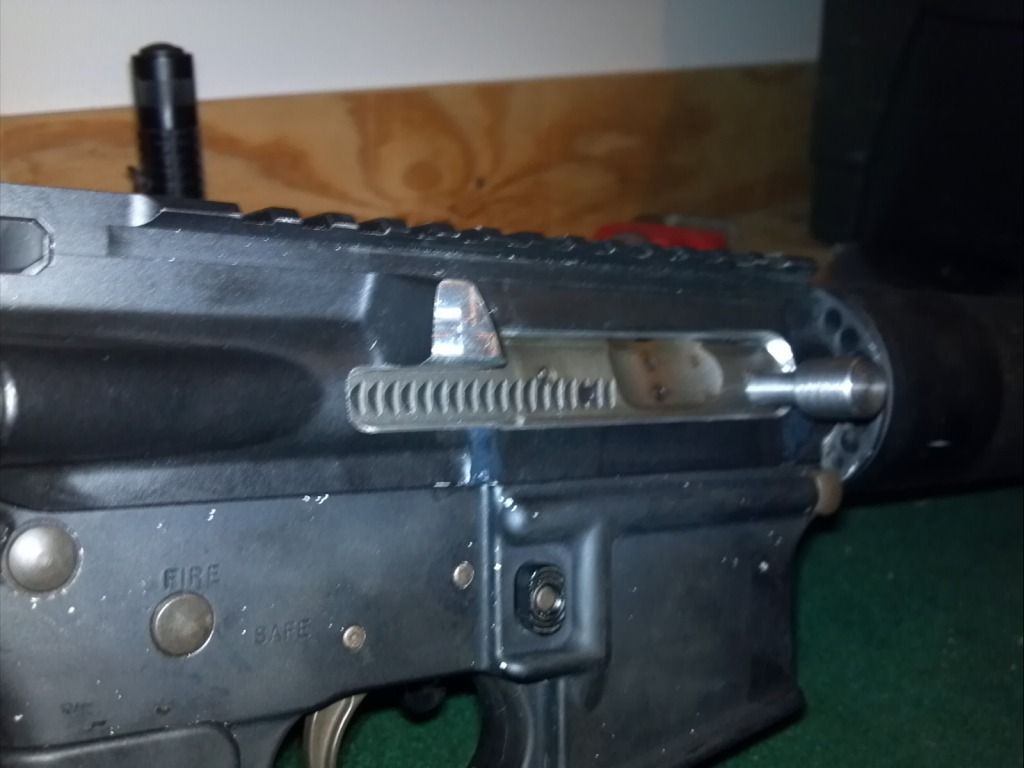
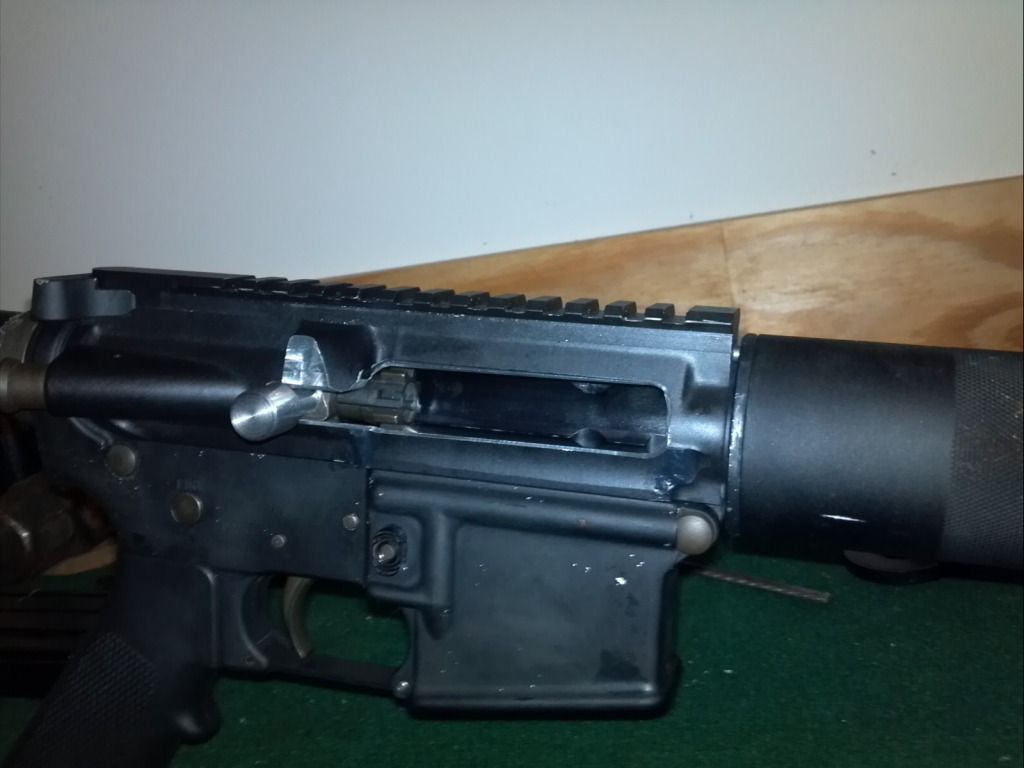
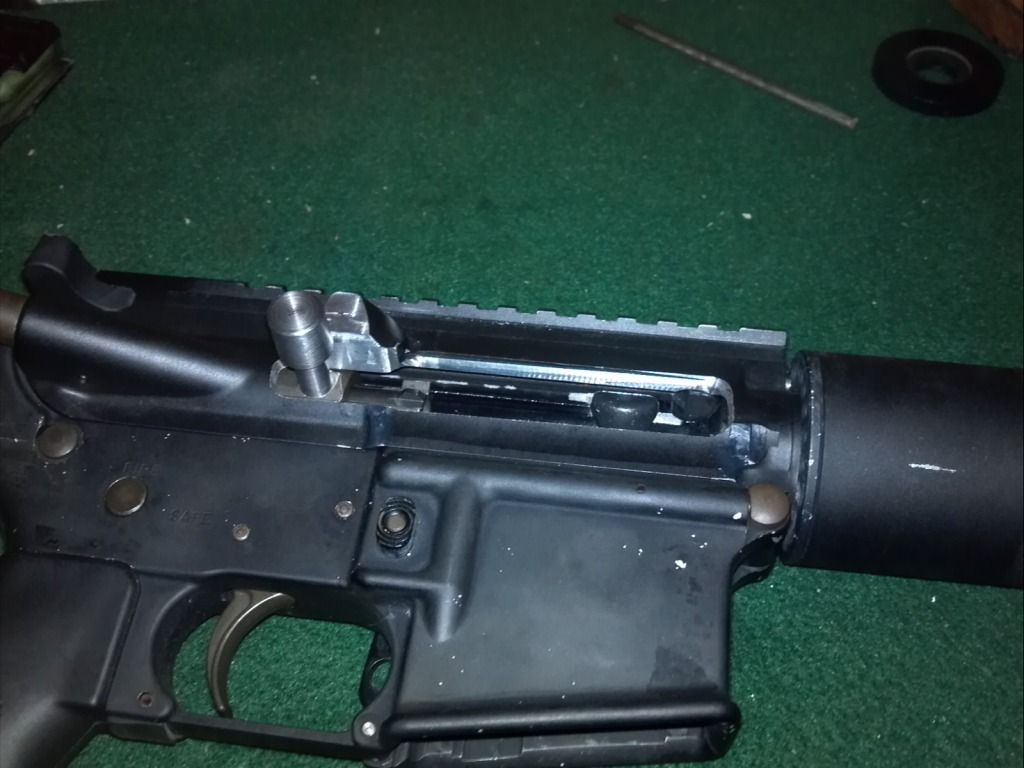
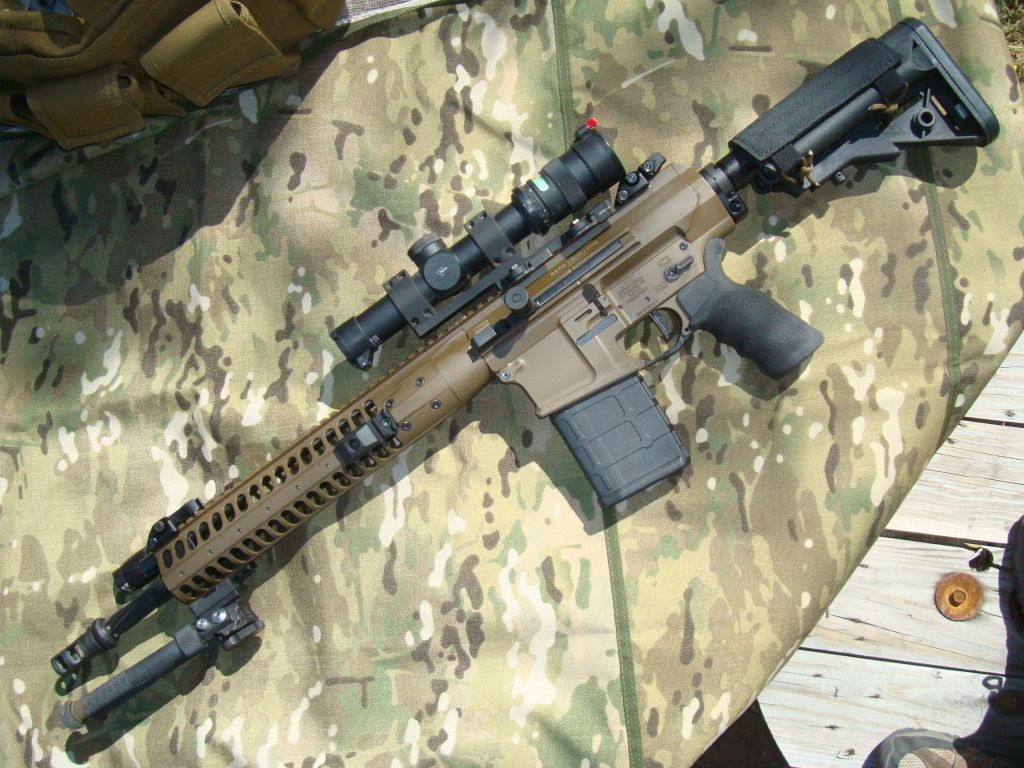
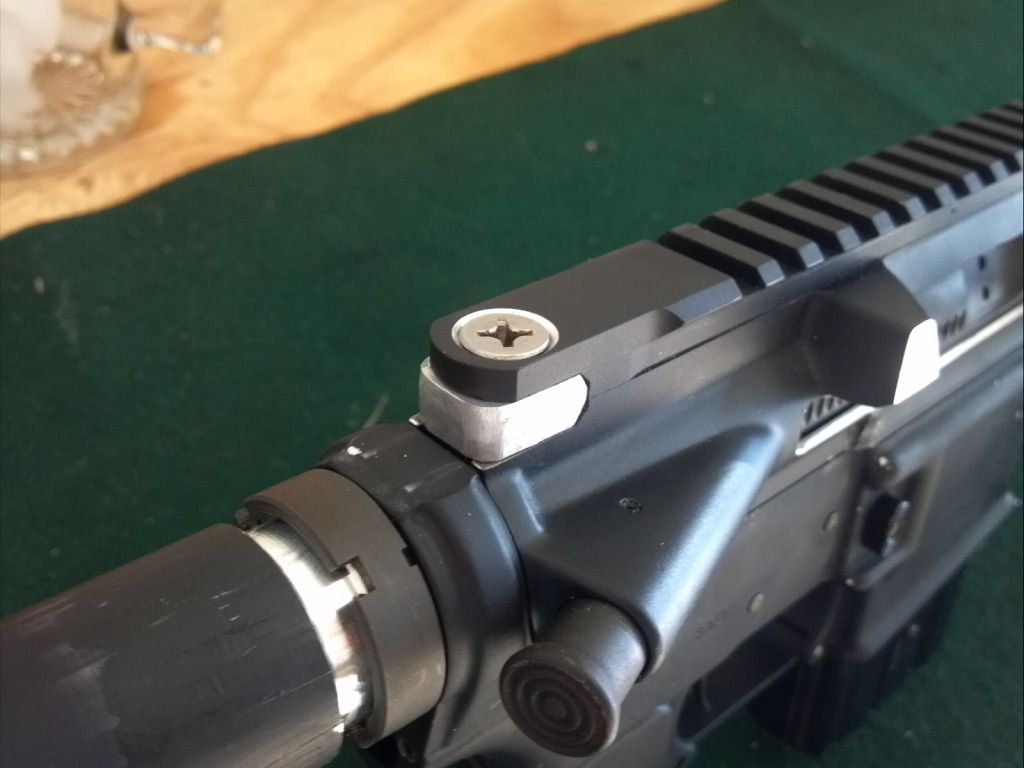
For the longest time I have had a hard on for side charging ARs. Cant tell you why or what for but I do. So today I got a wild hair up my ass and did it to my match rifle. It was actually a very easy thing to do over all. Hardest part was drilling the damn bolt carrier. I used a 3/8" carbide endmill to mill a flat on the exterior of the bolt and that got through the outside hardness. The steel itself was hard but manageable once I decided to step drill up to final ID. The bitch was the damn chrome lining of the carrier! It is so damn hard it was chipping my drill bits and trashed a tap. I got it tapped through though. The milling on the upper was straight forward and easy. I kept as much of the brass deflector as I thought was prudent. I turned the bolt handle out of some 0.500 drill rod I had. Tell me what yall think.

C360_2012-07-04-22-30-13.jpg

C360_2012-07-04-22-30-35.jpg

C360_2012-07-04-22-31-16.jpg

C360_2012-07-04-22-32-15.jpg

C360_2012-07-04-22-33-51.jpg

C360_2012-07-04-22-34-50.jpg
 
Re: My homemade sidecharger

<div class="ubbcode-block"><div class="ubbcode-header">Originally Posted By: cramey74</div><div class="ubbcode-body">Now make it ambi!! </div></div>

You evil!!
 
Re: My homemade sidecharger

With enough beer and machinery...You could be dangerous..
 
Re: My homemade sidecharger

<div class="ubbcode-block"><div class="ubbcode-header">Originally Posted By: Prebanpaul</div><div class="ubbcode-body">wow you just pissed of some serious ar makers out there. </div></div>

Yep, shaking in their boots. The Red Jacket smith recruiters will beat the paint off his door.

I doubt the companies that made side chargers just cut a hole in a standard upper but I could be wrong.

It's cool if it works for you <span style="font-weight: bold"><span style="text-decoration: underline">and</span></span> is safe though. Joking aside, I really do hope it is safe
 
Re: My homemade sidecharger

well done, it should work fine, i have a factory side charging upper on my 6MMAR and it works great, good forward assist also.
congrats.
 
Re: My homemade sidecharger

<div class="ubbcode-block"><div class="ubbcode-header">Originally Posted By: 900inch</div><div class="ubbcode-body"><div class="ubbcode-block"><div class="ubbcode-header">Originally Posted By: cramey74</div><div class="ubbcode-body">Now make it ambi!! </div></div>

You evil!! </div></div>

LOL
 
Re: My homemade sidecharger

That's pretty cool you did that. Will you put a finish on the machined surfaces?
If I wanted to try that I'd want it on the other side. Is there a problem if doing it on the other side? Of course I'm not equipped for that kind of DIY.
 
Re: My homemade sidecharger

Thanks for the input guys. I know that most companies use the heavy walled, slick side, billet uppers for this but thats mostly for looks. In doing the milling you dont get into any of the guide rails for the bolt at all and there is no weakening of the upper in any way. I had this upper already and all the machines to do it so I didnt see any reason to spend another $100 on an upper when the one I had would work fine. It would be nothing to do it as a left side charger. Just drill and tap the other side of the carrier and slot it on the off side. This rifle is in the process of being turned into my long range competition rifle. Im machining a custom 15" square hand-guard and re-barreling it to 6mmAR. Once all the work is done I will be coating the whole thing with Coyote Alumahyde II and then Krylon for a paint job over that.
 
Re: My homemade sidecharger

love the RJ references, spit coffee all over the monitor, surely will revolutionize the industry.

neat project, after making sure that it is safe and wront damage the bolt or receiver after more firing, i'd think there would be a market for it.

maybe an additional area on the front of the charging "knob" that is contured to fit the finger better (like the original top chargers) or matching the existing brass deflector contour to double as an additional brass deflector.

do a patent search, if there's not already one out there, file for a patent now! it will not be long before someone else cashes in on it, might as well pay you for the rights with residuals.
 
Re: My homemade sidecharger

I'm curious how the brass deflector is going to work now since 1/2 of it is missing...
 
Re: My homemade sidecharger

I tried to take as little off the brass deflector as possible but still ended up having to remove about 0.375 off of the top. It may or may not be functional still. Will have to fire it to find out.
 
Re: My homemade sidecharger

<div class="ubbcode-block"><div class="ubbcode-header">Originally Posted By: McLarenRoss</div><div class="ubbcode-body">I tried to take as little off the brass deflector as possible but still ended up having to remove about 0.375 off of the top. It may or may not be functional still. Will have to fire it to find out. </div></div>

Remember to wear eye pro
grin.gif
 
Re: My homemade sidecharger

Wow! Very interesting. I bet the gun is going to have some cycling issues. May have to change your buffer.
 
Re: My homemade sidecharger

<div class="ubbcode-block"><div class="ubbcode-header">Originally Posted By: bobbyfairbanks</div><div class="ubbcode-body">Wow! Very interesting. I bet the gun is going to have some cycling issues. May have to change your buffer. </div></div>
First Ive heard this. Why do you say that?
 
Re: My homemade sidecharger

What you did is cool as long as it works like it should. Look forward to seeing the rest of the build.

You should try one more like this next time.

DSC00965.jpg


Then you don't have to mess with the shell deflector
 
Re: My homemade sidecharger

<div class="ubbcode-block"><div class="ubbcode-header">Originally Posted By: bobbyfairbanks</div><div class="ubbcode-body">Wow! Very interesting. I bet the gun is going to have some cycling issues. May have to change your buffer. </div></div>
unless the charging handle drags on the receiver, there is no need to change buffers, the AR is over gasses already and that little extra wweight will not make any difference other than academicaly, in the real world it works just fine, I speak from range time experiance with such an Ar and shooting with or without the charging handle make zero dif.
good point though.
 
Re: My homemade sidecharger

<div class="ubbcode-block"><div class="ubbcode-header">Originally Posted By: cramey74</div><div class="ubbcode-body">With enough beer and machinery...You could be dangerous.. </div></div>

Tyrone, what have you done?!?!?!
 
Re: My homemade sidecharger

<div class="ubbcode-block"><div class="ubbcode-header">Originally Posted By: Broker</div><div class="ubbcode-body">I'm curious how the brass deflector is going to work now since 1/2 of it is missing... </div></div>

His charging handle will act as the brass deflector, no need for it now. I am left eye dominant and have side chargers with no brass deflectors and they are fine.
 
Re: My homemade sidecharger

<div class="ubbcode-block"><div class="ubbcode-header">Originally Posted By: Azprc</div><div class="ubbcode-body"><div class="ubbcode-block"><div class="ubbcode-header">Originally Posted By: Broker</div><div class="ubbcode-body">I'm curious how the brass deflector is going to work now since 1/2 of it is missing... </div></div>

His charging handle will act as the brass deflector, no need for it now. I am left eye dominant and have side chargers with no brass deflectors and they are fine. </div></div>
Interesting. I will be looking for this when I get to test it out.
 
Re: My homemade sidecharger

<div class="ubbcode-block"><div class="ubbcode-header">Originally Posted By: Azprc</div><div class="ubbcode-body"><div class="ubbcode-block"><div class="ubbcode-header">Originally Posted By: Broker</div><div class="ubbcode-body">I'm curious how the brass deflector is going to work now since 1/2 of it is missing... </div></div>

His charging handle will act as the brass deflector, no need for it now. I am left eye dominant and have side chargers with no brass deflectors and they are fine. </div></div>

I would think though that it might spin around where the missing tip is and have an uncontrolled flight?
 
Re: My homemade sidecharger

Nice work, but i'd watch yourself on that. It'd be very hard for a home machine setup to execute, but I'm a big fan of the non-reciprocating folding charging handles you see on the JP's. Enjoy it though.
 
Re: My homemade sidecharger

<div class="ubbcode-block"><div class="ubbcode-header">Originally Posted By: Broker</div><div class="ubbcode-body"><div class="ubbcode-block"><div class="ubbcode-header">Originally Posted By: Azprc</div><div class="ubbcode-body"><div class="ubbcode-block"><div class="ubbcode-header">Originally Posted By: Broker</div><div class="ubbcode-body">I'm curious how the brass deflector is going to work now since 1/2 of it is missing... </div></div>

His charging handle will act as the brass deflector, no need for it now. I am left eye dominant and have side chargers with no brass deflectors and they are fine. </div></div>

I would think though that it might spin around where the missing tip is and have an uncontrolled flight? </div></div>

No Brad is correct. I run an ops4 side charger and they will hit the handle and make a nice little pile at 3 o'clock
 
Re: My homemade sidecharger

<div class="ubbcode-block"><div class="ubbcode-header">Originally Posted By: OBXLongRange</div><div class="ubbcode-body">No need for a deflector DPMS slick slides don't have one. </div></div>

Yep, unless you're a lefty it's not an issue.
 
Re: My homemade sidecharger

Damn, you are braver than I. Looks awesome though, be extra careful shooting it until you know how it'll react!

Count me jealous.
 
Re: My homemade sidecharger

dude great idea! Lots of people with their opinions. I say great job. A video would be awesome!
 
Re: My homemade sidecharger

I have thought of the same thing, but with a Slick Side Upper, because it was more robust. You did a great job. What size hole did you drill into the bolt and does the handle rotate around the fastener or is it one piece?
 
Re: My homemade sidecharger

I drilled and tapped for 1/4x28tpi and machined the handle out of a solid piece of O1 1/2" drill rod. I was thinking about using a cap head screw and machining a sleeve around it but it was just as easy to machine the whole handle.
 
Re: My homemade sidecharger

Since you have the machining equipment why not machine it out of the opposite side like LWRC or JP? What's your plans with the old charging handle or are you going to leave it as-is?
 
Re: My homemade sidecharger

I could have machined it on either side and I guess. Now, looking back on it in would have been easier and made more sense to do it on the left side so as to keep the brass deflector intact but now that its done Im still happy with it. I will mill a block to bolt in place of the charging handle and fill that void.
 
Re: My homemade sidecharger

I dunno about that. If I ever do another one ill pony up the $30 and buy a #3 carbide drill bit. I can live with trashing a few dollar HSS 1/4x28 tap but I burned up way too many HSS drills to make it worth it.
 
Re: My homemade sidecharger

I want a side charger bad. What you did looks like what many of the high power shooters have been doing for years. Some on the left and some on the right.

I really like the LWRC setup but it is just too much money for me.
 
Re: My homemade sidecharger

Made the block off plate to fill the void where the charging handle sits this afternoon. Heres a few pics. I dont have a way to machine the radii on the rear of it so I just rounded them off with the bench grinder.

C360_2012-07-08-18-35-21.jpg

C360_2012-07-08-18-35-42.jpg
 
Re: My homemade sidecharger

Imho i think the brass deflector is over rated look at ur own ar and how mutch wear or traces of wear is on you'r (if any)
oh and nice job
 
Re: My homemade sidecharger

That's on my short list of projects, but I'll put the handle on the left side. That way you can maintain your grip with the right hand.
 
Re: My homemade sidecharger

I had this done to a few AR15's and an AR 10 of mine. The reason is mainly so I can now use common cheek risers for correct cheek weld. A Magpul UBR stock with the correct height cheek riser(for CTR?) works great and I've even put a Karstens on an A2 stock for an AR15 with an ACOG on it.

I've put over 700 rounds through the AR 15's and perhaps 50 rounds through the AR 10 and have had no problems. The AR 15's are now easier for my wife and the kids to use.

Young Manufacturing makes the bolt carrier and handle for the AR 15's if you don't want to or can't drill yours out. Remember to use a shoulder bolt in the carrier or you'll impinge on the bolt itself.
http://www.youngmanufacturing.net/store.php?pg1-cid38.html (scroll to the bottom of the page for a picture)


Thank you,
JoeZ
 
Re: My homemade sidecharger

I have a Mega side charger with a Young Manufacturing side-charger bolt carrier which is basically, exactly what you have created (minus the forward assist and shell deflector). One thing I noticed about my side-charging handle was it wanted to back out a little bit. Watch out for that because if you let it back out completely, you could potentially have a charging handle coming straight for your face. The way the charging handle is threaded into the bolt carrier on mine, it seems like it won't back out completely. It gets to a point where it comes loose relatively easily, but to remove it completely is actually a little bit of work. To keep mine from vibrating loose at all, I bought a very small rubber O-ring from Ace and placed it between the charging handle and carrier and it worked beautifully. Even when firing 48-50 rounds in less than 30 seconds during a 3-gun match, the carrier didn't get hot enough to melt the O-ring which surprised me. The barrel and handguard were hot after the stage, but the O-ring was intact after the match when I cleaned the rifle.

Nicely done by the way.
 
Re: My homemade sidecharger

<div class="ubbcode-block"><div class="ubbcode-header">Originally Posted By: JoeZ</div><div class="ubbcode-body">I had this done to a few AR15's and an AR 10 of mine. The reason is mainly so I can now use common cheek risers for correct cheek weld. A Magpul UBR stock with the correct height cheek riser(for CTR?) works great and I've even put a Karstens on an A2 stock for an AR15 with an ACOG on it.

I've put over 700 rounds through the AR 15's and perhaps 50 rounds through the AR 10 and have had no problems. The AR 15's are now easier for my wife and the kids to use.

Young Manufacturing makes the bolt carrier and handle for the AR 15's if you don't want to or can't drill yours out. Remember to use a shoulder bolt in the carrier or you'll impinge on the bolt itself.
http://www.youngmanufacturing.net/store.php?pg1-cid38.html (scroll to the bottom of the page for a picture)


Thank you,
JoeZ </div></div>

They provide the bolt carriers for the LAR Grizzly uppers. Considering YM wants $255 for the bolt carrier and LAR sells the whole upper receiver with bcg for $300 that's a good deal.