• Watch Out for Scammers!

    We've now added a color code for all accounts. Orange accounts are new members, Blue are full members, and Green are Supporters. If you get a message about a sale from an orange account, make sure you pay attention before sending any money!

Gunsmithing Need advise/help making cerakote finishing oven...

razoredgeknives

Private
Full Member
Minuteman
I have been searching for a while online and can't really find the answer... I have some basic wiring knowledge, but not much, so please deal with me as a noob when it comes to electrical stuff. My question is: how do I set up the heating element (i.e. from an old oven) to where I can control the heat in the oven?

I am wanting to get an old upright freezer off of craigslist, line it with high temp insulation (on the inside) and then put the heating element/thermocouple in. I just have no idea: 1. what the heating element connects to to give it heat, obviously you don't just take the wires from the extension cord and solder them to the element. 2. what I need to purchase to monitor and control the temp. 3. how i wire it all up.

Does anyone have any good resources/websites they can point me to? or just walk me through the process? Any help would be greatly appreciated... thank you.

Josh


Freezer sounds like a bad idea. (plastic parts) This might be too but while you are on craigslist, why don't you just find an oven and rob the parts?
 
A pretty good choice for an oven body can be one of those stack-on painted steel gun cabinets. Some big box sporting goods stores will have the 8-gun on sale for around $100. You can line that with insulation and still be able to hang quite a bit in there.
As far as the heating element goes, go buy an old toaster oven out of a second-hand shop and just re-purpose the element and controls from that. The temperature dial won't give you an accurate reading, but you can use a standalone thermometer (I've seen a couple people use wireless meat thermometers) to help you choose the right setting.

Another thing I have found useful is to have a method of circulating the air through the unit to keep temperatures even. I helped a friend wire up a computer case cooling fan into the circuit just to keep some airflow.
 
I used a old locker for my oven build. I would go to Aubers.com website and get a PID controller, and a SSR (solid state relay). The PID will control the temp, The SSR will make the on off contact to the heating elements. You can also pick up a thermocouple from Aubers. I can send you pics of the wireing..
 
I also used the heating elements from a Black and decker toaster oven..
 

Attachments

  • phone pics 009.jpg
    phone pics 009.jpg
    91.9 KB · Views: 257
  • phone pics 012.jpg
    phone pics 012.jpg
    93.7 KB · Views: 179
  • phone pics 013.jpg
    phone pics 013.jpg
    100.8 KB · Views: 206
I bought a stack-on gun safe for $90 on sale. Lined it with mineral wool (flash point of 1200 degrees I believe) took it to a metal shop and had them bend and line it with sheet metal and tack weld it in. Put halogen lights and rheostat to control the temp. It works pretty damn good. Problem now is I need one 4 time bigger. Total in my project was around $800, you can do it a lot cheaper. The sheet metal part is what kicked my ass. The oven paid for itself in the first month though.

Kc
 
Made mine with a Stack On 8 gun cabinet. Lined it with duct wrap. Used an element from an old electric smoker. Use a stand alone thermometer on the side.

IMG_20130601_120119_287.jpg

IMG_20130601_120137_991.jpg

IMG_20130601_120152_831.jpg
 
Last edited:
I did mine with a Stackon 14 gun cabinet lined with the silver insulation stuff cut to size. For heat I have 4-250watt heat lamps wire through 2 separate dimmer switches so I can use just 2 bulbs for stocks, or 4 for cerakote. Made a heat shield out of a piece of sheet metal formed to size. For temp I just use a meat thermometer through a small hole drilled in the door. It's ghetto, but it works. I had zero knowledge of electrical stuff when i went about making it. I figured it out by reading instructions, and watching a youtube video or 7. I like heat lamps because IMO they are less of a fire hazard than a oven heating element. I can run it full bore and it gets to about 220 to 230, and I don't worry about anything catching fire, and pulling only 1000 watts keeps me under my 1500watt limit I set for the paint booth.

Branden
 
Heres a pic of mine, looks pretty similar. I need to draw one up and build a bigger one.


Kc

The lights could be about 6" lower. When I do stocks I only run one light and set the other one in the bottom on the oven.
 
FWIW we did this. It served us well for the better part of 2 years but we eventually out grew it.

If you spend some time snooping at online auctions for food industry related items I think you'll find that for the money you can't beat a used holding/warming oven. We bought a commercial unit valued at over $18,000 (new) that will hold up to 20+ barreled actions for $600 bucks. I rewired it and put in some fancier controls (all bought on Amazon for less than $300) and now we call it the "ceracoat microwave". It will ramp up to temp in less than 5 minutes and its big enough for 3 adults to fit inside.

As with any manufacturing, go bigger than what you think you need. There's nothing stopping you from ceracoating your neighbors custom Harley frame or whatever. You just might find yourself in a neat little niche business before too long.

Good luck and hope this helps.

C.
 
If you just need to do the occasional piece, this is a cheap option. I used an old toaster oven and took some snips and cut out a circle in the top to fit a duct flange. Used pop rivets to attach the flange to the oven. Put on enough duct for a long gun, wrapped it in duct wrap, and put on a cover. I can hang small parts in the oven and barreled actions inside the duct.

jztjrk.jpg


2ywu97l.jpg
 
A lot of good advise! Thanks for all the input guys. I am wanting to begin doing this as a business soon here in SC, so I want to have tight controls and everything to function well. I will want to be able to do rifles and guns, and perhaps even be able at some point to powdercoat rims - so I would like to fix my oven to be able to handle temps up to 450 if possible. I really like the idea of lining the inside with mineral wool or something.

I also used the heating elements from a Black and decker toaster oven..

thanks for the pics! that is helpful! It looks awesome, which I could build something like that. Could you explain the wiring a little more? I see the PID controller black box on the outside top of your oven, but what are the knobs to the left of it? and what are those two "wiring boards" that are in the middle?
 
The knob to the left is just a flush mounted inline fuse, and a power switch. The wiring boards are just bus bars, so I could make multiple connections to a single wire coming from the extension cord. There was a website I went to for a lot of info. I think it was called caswell.com. It is a powder coating forum with good info on building ovens and wiring for them..
 
There sure are a lot of threads here, about building cerakote ovens. Wiring cerakote ovens. Insulating cerakote ovens. Yup,.... lots and lots of threads. PID controller threads, even.

Sure are a lot of 'em nowadays.... ain't there?
 
Anyone have any experience with a PID controller?

What is PID Control? | osPID: the Open Source PID Controller

I do controls for a living as an instrument tech. PID controls are used through out industry to control process loops. So in an oven, a PID controller is used to enter a set point, say 180 deg. The controller has relays with sets of contacts. The relay has a common that supplies power and a normally open and normally closed. When the actual temperature is below setpoint, the relay energizes and the contacts switch state. NO to Closed and NC to Open. When the oven reaches setpoint the relay will de-energize. You can also set the dead band so it will cycle between 177 and 183..... that way you are not on off on off all the time. Hope this very basic explanation helps
 
What is a good fan circulation lay out. I am thinking something like a duct fan in a tube that goes in the side near the top and then down near the bottom. I should have some way to slowly circulate right? As opposed to just a fan inside to move air but not in any paticular flow? We started with the stack on safe and smoker element and will line it this weekend but the fan is a bump in the road for us.
 
I gotta ask, what's the intent behind the fans?

If were building ovens then were using oven cure (heat activated) catalysts right? This means were not using solvents that evaporate out of the material like say- lacquer base paint -right?

Fans, least in my experience have a nasty habit of collecting dust. Just ask the wife next time she's cleaning one. That dust is a biche, specially in a shop where your blasting, sanding, polishing in such a small footprint.

It would seem to me that keeping the atmosphere in the oven as stagnant as possible would go a long way to avoiding contamination during the curing process. The only fans we have in our shop related to paint is in the booth and that's to get the overspray out of the room while spraying.
That air is filtered as it comes in. We have to change the filters often and were always pushing brooms and wiping stuff down to control the dust.

If there's something im missing, please correct me. We've used our ovens now for 2+ years with no fans and they've worked well for us.

C.
 
That would work, I looked at doing the same thing. I was looking on Craigslist because when I buy one I was going to gut it and start over. For over a year I have kept an eye out like Chad said for industrial kitchen warmers/ovens & medical stuff also. I haven't been able to find one around here.

Kc
 
Bread proofers work well too, I got one for $20 and aded some insulation and a PID to drive the elements I put in and it heats up fast and takes very little electricity to keep it at temperature.
 
I did see an oven build that did not use any fans for circulation and he has not complained, but he only had one temp gauge at the top. I should be up and running soon with one gauge up top and one down low and no fan. If it is even temp I will leave it be and call it good. Just dont want to hang a action and have the muzzle 75 degree's hotter than the action end.
 
Ours is built out of a tall school locker. I lined the bottom with firebricks to contain the elements. I used 1" thick double foil rigid insulation sold at the lumber yard in 4x8 sheets from there up on the inside. Sealed the corners with silver foil tape. No door gasket. Four years and still cooking the crap out of stuff. We hit 250 in 5 minutes and can get 450 in about 15 minutes with our 1500 watt toaster oven core. We have oven thermometers stuck in holes all over the place and it runs pretty even without the fan. I'm with Chad on the dust. We set the timer to 1 hour and when the bell rings we hit it again. Then it's done. If it had a 2 hour timer it would be great for setting it at quitting time and coming in the morning for assembly. I thought I wanted a bigger oven but I really don't like that much parts hanging around at a time. I can get two complete rifles in there minus the stocks. Just right and doesn't take up much space in the shop.
 
Here's what I used to build mine:

Gun Cabinet: $169 at Big 5 - Stack-On 14-Gun Cabinet Gun Safes & Storage

Insulation: I used ceramic refractory insulation (available on ebay)

PID controller: $38.99 on ebay - Dual Display Digital PID Temperature Controller w 6ft Thermocouple 25A Relay | eBay

Dual solid state relay: $19.99 on ebay - Dual Solid State Relay SSR 4 15VDC Input 280VAC 40A Replace Crydom D2440D | eBay

Grill element from a Jenn Air electric range top: $75 on ebay - Y04100024 5700M636 60 Grill Element Free Shipping | eBay

Terminal block: $5.99 at home depot - Gardner Bender 22 - 10 AWG 30-Amp 600-Volt 6-Circuit Terminal Block-GTB-406 at The Home Depot

High temperature wire: bought 20' of it at $2.76/ft on ebay - 12 High Temperature MGT Electric Wire Heaters per Foot 1000°F 600V Ovens | eBay

However much length of 8-3 soow cord you need plus plug end, etc... from home depot.

to wire it:

Wire the plug end on to your SOOW cord, connect the other end with spade terminals into the terminal block (ground goes to the casing of the oven you're building).
Connect two smaller wires from the 230v feed to the power terminals on the PID controller.
Connect the two wires each to the two outputs from the pid controller, these wires will need to be soldered to the small pins on the dual solid state relay.
Connect 12awg wires from the 230v feeds off the terminal block to the inputs on the dual solid state relay.
Connect your high temp wire from the outputs on the solid state relay to the two flat pins on the grill element.
Connect your thermocouple to the PID.

After that, your pretty much done with the wiring part :)

Here's a link to the thread with my entire end to end build on it: http://www.snipershide.com/shooting...er-gun-cabinet-cerakote-oven-*pic-heavy*.html


--Wintermute
 
I started with an old gun safe and a Milwakee heat gun. I had a thermometer in the top and adjusted the setting on the gun to control the temp. It worked great.

Now I have the Brownells oven, that works great as well but is a tad pricey.
 
Use the freezer take the plastic out and line with aluminum if you like. Buy a PID controller , SSR relay, thermo couple and a burner. After you have these send me a PM and I will walk you through the hookup.

1/16 DIN PID Temperature Controller (SSR control output) [SYL-2352] - $46.50 : auberins.com, Temperature control solutions for home and industry
25A SSR [MGR-1D4825] - $15.00 : auberins.com, Temperature control solutions for home and industry
K Type Thermocouple (3 ft. cable) [TC-K3] - $3.95 : auberins.com, Temperature control solutions for home and industry

You will need a 110 burner they are kinda hard to find but you can buy one for the grill like above and wire it from the SSR.
 
I'm using an old stack on gun cabinet that i insulated and used an old toaster oven as the heating element. Ive probably cured 50+ guns/parts etc in it and its good to go. I drilled a hole in the side for a digital thermometer probe.
 
Buddy of mine who builds custom 1911s and uses GunKote along with CeraKote bought a surplus circuit board curing oven off e-bay. Looked to be an excellent piece of equipment from what I could tell, so I started looking for something along those lines for my gunsmithing business, which is primarily LR rifles. Found a Yamoto DKN 810 oven on e-bay, and made a deal for $1000, including truck freight delivery from the west coast to my farm.

These things are programmable microprocessor controlled, and maintain temps within 1*C. You can program it to come up to temp and maintain it for whatever set time, then shut down. It's tall enough to hang bbl'd actions in, though when I'm doing a long action with 28" or longer bbl, I've got to hang it diagonally & support the muzzle to get it to fit. But it beats the 'ell out of the homemade oven I'd been using, and if you think a grand is waay too much scratch to spend on an oven, try duplicating this type of precision for less.

Forgot to mention - it's got air circulation, with adjustable exhaust vents.
 
so how hard do those little 110v toaster over elements have to run to get a gun cabinet sized oven up to temp to cure Cerakote on a barreled action? This thread has piqued my interest in doing Cerakote myself again. Used to do it at a former place of employment but they had nice commercial built ovens. I don't have that kind of budget so this might work out better.
 
Last edited:
so how hard do those little 110v toaster over elements have to run to get a gun cabinet sized oven up to temp to cure Cerakote on a barreled action? This thread has piqued my interest in doing Cerakote myself again. Used to do it at a former place of employment but they had nice commercial built ovens. I don't have that kind of budget so this might work out better.

Interesting you should ask.

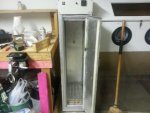
I just finished my oven yesterday. I WISH I'd found these threads before I started the project. Having looked over several of the threads in these pages I see examples of very professional looking projects. Mine's kinda butt-ugly but functionally much like the ovens represented here. I used:

* A WELL used, 2-door, metal storage cabinet that I got off Craigslist for $20
* A used convection oven that the wife picked up for about $30 from a thrift shop.
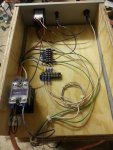
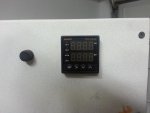
* Ebay pid/ssr like PID Digital Temperature Control Controller Rex C100 K Sensor 25DA SSR | eBay
* Roxul insulation from Lowes.com Shop Roxul 12-Pack 47-in L x 15-1/4-in W x 3-1/2-in D 15-R Stone Wool Insulation Batts at Lowes.com
* 6' of gutter down spout
* 3 rolls of pipe hanger tape Shop AMERICAN VALVE 4-in dia. x 25-ft L Galvanized Hanger Iron at Lowes.com
* 1/2" x 1/8" 
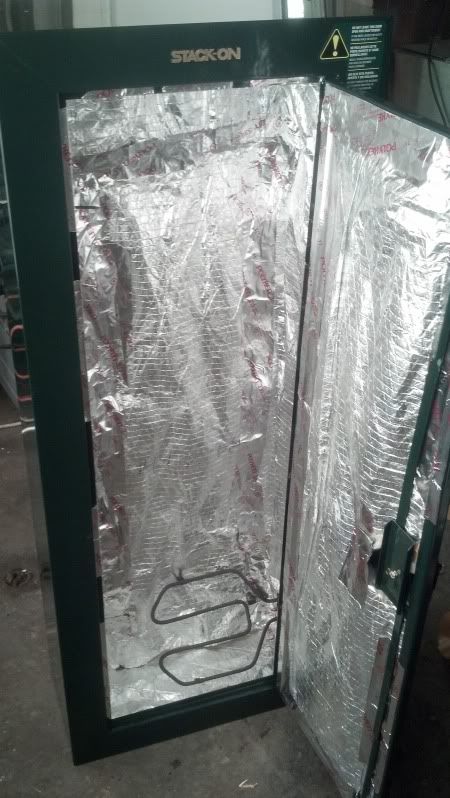
nomex high temp BBQ gasket tape

The cabinet had a metal piece that ran top to bottom and held the magnets that kept the doors closed. It also had one shelf near the top. I removed the metal piece as I figured that would just be in the way and removed the shelf from the top. I gutted the convection oven and mounted the elements in the bottom of the cabinet. Drilled a bunch of holes in the metal shelf, reinforced the sides with some aluminum angle (because it was quite flimsy) and used that as a diffuser. I cut some holes in the top of the cabinet, mounted the fan from the convection oven and routed that into the metal downspout which runs down to the bottom of the cabinet. Drilled a hole through the very middle of the cabinet/downspout to mount the thermocouple and run the wire. I used the bracket from the convection oven for the thermocouple. Whatever gaps were created where I had to drill or snip are sealed with Permatex Hi-temp RTV silicone gasket maker. Door gaps were sealed with the nomex gasket tape.

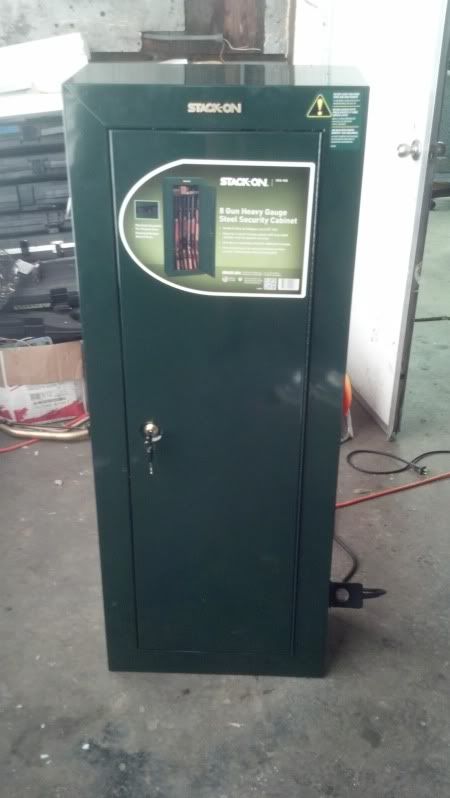
The most expensive component was the Roxul insulation. I used one "bundle" and had some left over but as I'm also finishing out the inside of the garage/shop, that didn't go to waste. While it is stiffer than standard insulation batting it's not rigid enough to just pop into the cabinet and hold itself there. I couldn't think of an elegant way to hold it in place so I just threw up my hands and used the metal pipe hanger. (Like I said, it isn't pretty.) But it seems to work. The outside doesn't get over 116 deg. where the insulation was the most difficult and in most places it's hardly even warm to the touch. I also used aluminum angle to fashion a mechanism to hold the doors shut because, frankly, I just didn't want to go back to the hardware/home store yet again.

Now, to finally answer your question... As I said, I'm using the heating elements from the counter-top convection oven. From my tests yesterday, the oven topped out at about 270 deg. but it takes quite a while to get there. It took 30 min. to get to 235 deg. 60min. = 264 deg. and 90min = 270 deg. I wasn't really happy with that after reading through some of the threads here I'm REALLy not happy with it. I will run another test today without the diffuser to see what that gets me. If it's still unsatisfactory I'll try a different heating element like something out of a smoker. I don't have 240v power in the shop yet so I have to stay with a 120v system for now and my options are somewhat limited in that respect.

Hope that helps. I'll post pictures if anyone's interested.