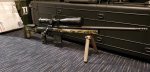
My first time doing this, it isnt perfect but I'm happy with how it turned out!
Supplies
- Krylon OD and brown rattlecan.
- Basement find black rattlecan.
- Matte clear rattle can.
- Frog painters tape.
- Bendy plastic cutting board.
- Exacto knife.
- M81 Pattern printout
Process
1. Cover cutting board with painters tape. Overlap 1/4" for each line of tape until you get to the bottom.
2. Cut the white off your printout with 1/2" white all around, tape each edge down on top of your cutting board.
3. Start at one corner of your pattern and remove paper when a shape is completed. I pretty much cut every color border and made my own shapes within the larger chunks of color. When you complete your cutouts you'll have what looks like a completed puzzle stuck on your cutting board.
4. Prep your workpiece with alcohol or degreaser.
5. I didnt need a base coat since my panels were FDE, but after you put down a base coat and it dries peel some of your camo puzzle pieces off the cutting board and apply to your project.
**Important**
I might have been a little slow to learn but it took me a minute to wrap my mind around it when I was trying to picture how it would come out.. Whatever you cover with a sticker will remain the color under the sticker, so plan ahead for your next color.
For example if you want larger patches of green than black, you'll want to use smaller stickers on top of your black coat, paint green, apply large stickers on green, paint brown and continue to your next stickers/color.
I used medium coatings of paint and can feel them when I run my finger over the surface, so keep that in mind if you want a smoother surface when completed.
I used this video to get an idea of what I was doing then modified it to get a "sticker sheet" instead of going one by one with my cutouts.