

Hopefully this will be a detailed and reasonable enough post to be stickied as it is VERY often the question arrises, "How do I paint my rubber stock?!"
Well I was just as nervous as everyone else who has a overmold stock when it comes to painting it, due to the obvious fact that rubber bends, and bending paint = paint chips and cracks.
But I finally bit the bullet, bought the paint and material I thought would help me complete the project and started working on it, and below is the list of items I used:
Remington700 SPS Tactical stock
(2) Cans of Krylon Fusion Khaki Brown Satin
(1) Can of Krylon Camo Green Satin
(1) Can of Kyrlon Clear Satin
(1) Prepping cloth to remove oils and debri
(1) Spray can attachment handle
(1) Roll of masking tape
Also I bought fake grass and leaves for my camo, but that is optional.
These materials are available at your local Lowes, Walmart, etc., but I purchased all of them from Walmart as they were pretty close to all being on the same shelf.
You will obviously want to make sure the room, garage, basement, whatever you use as a booth is well ventilated and has the ability to control air flow, or you will get high..trust me..
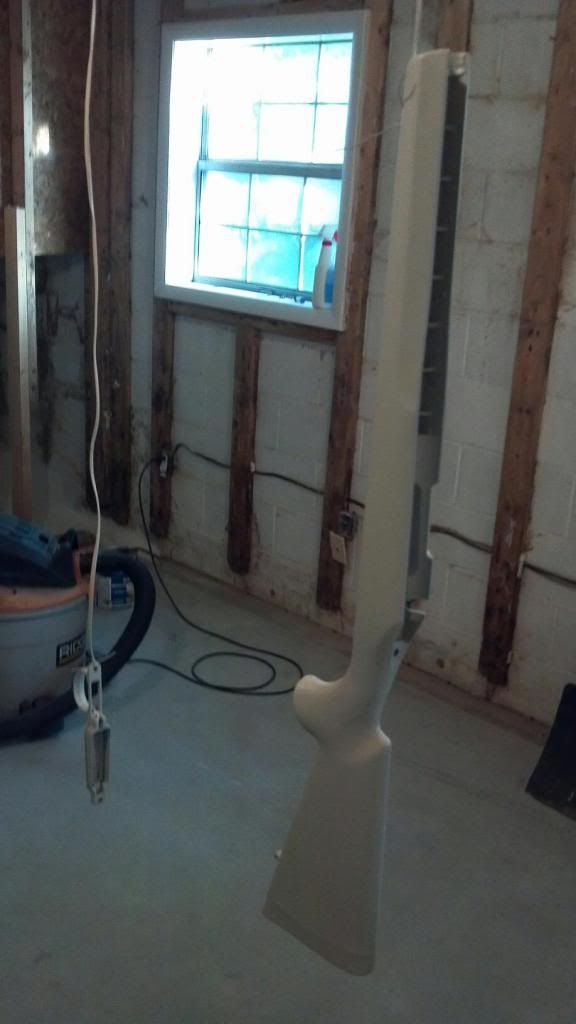
First off I seperated my stock, trigger guard assembly, and my upper components(barrel, receiever, scope, etc) and hung them all with cord. (Yes.. I am using old telephone cord, nice and strong).
Tape off anything you dont want to get painted. Knobs, open path ways to your chamber and barrel interior, and especially your scope lens. For me I had butler creek covers so I kept them closed and put old tshirt cloth inside to ensure they was covered.
Wipe down the stock with the prepping cloth to ensure they are no lint, dust, oil, or other things that will prohibit the paint from sticking securely.
For the first 48 hours I applied (4) coats of the khaki brown to the stock, and only (2) coats to the scope and other items. I did not apply so much to the upper half due to it being metal and or plastic because it will not fight the paint materials as much as the rubber overmold.
I waited around 6 hours for each coat to dry and firm to the rifle, also giving me time to rest and live my daily life. On each spray I was around 10-12 inches from my rifle, and made sure to apply evenly in quick bursts.
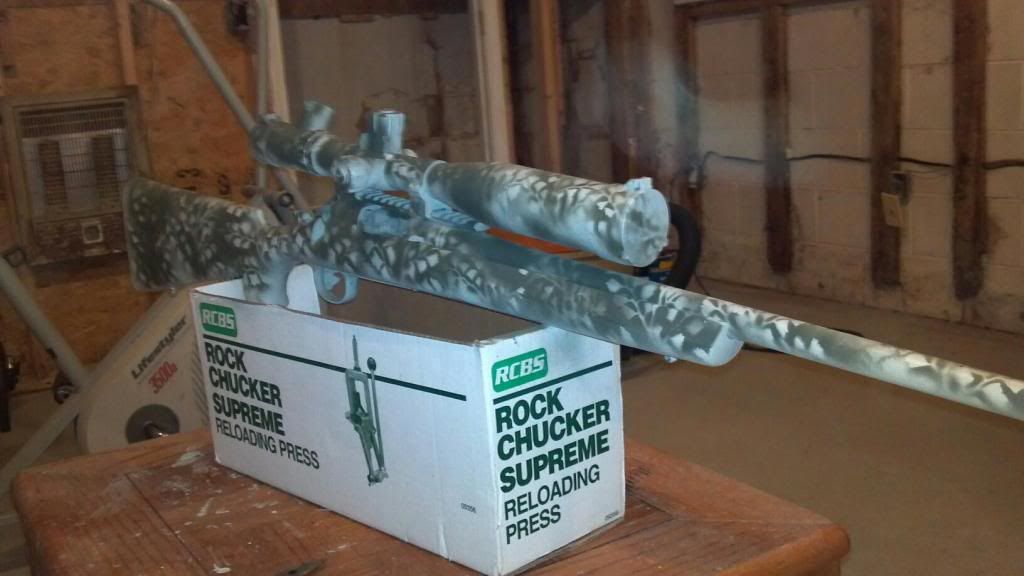
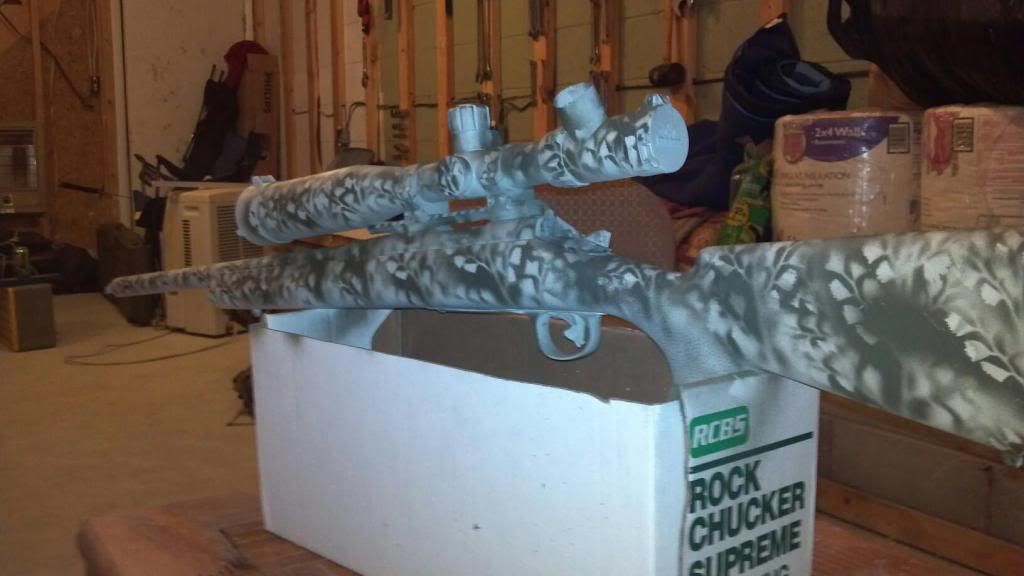
After the tan color was applied, I wanted to do some type of camo. This was my first time EVER doing anything like this, so I obviously didnt expect perfect. So I put my rifle back together, leaving the areas I wanted unpainted still masked off and covered. I sat the rifle on a open cardboard box to where it would level itself and not fall over. I made sure the fake leaves and stems were pressed firmly against the gun and once again, applied the green paint with quick back and forth bursts over the stencel. Make sure it is pressed firmly on the rifle as any risen spots will allow paint to flow under and will not create a 3D look.
You obviously would have trouble doing this in several coats, so I made sure I done it thick the first time, and then applied around 3-4 coats of clear once all was dry to give an extra layer of protection.
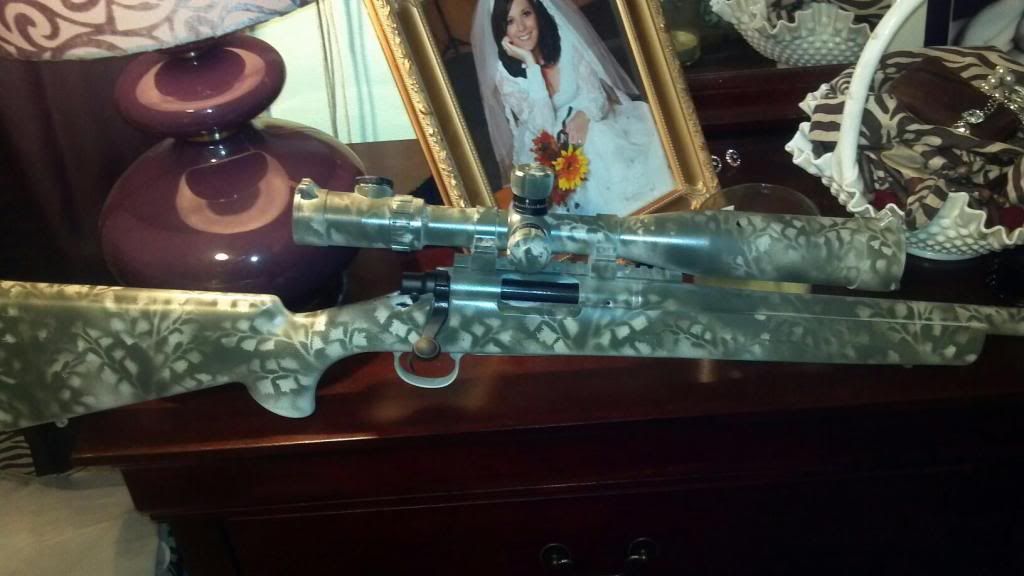
After a week or getting it out, showing it off, and a little rough housing there are no spots showing yet. I guess after time and lots of horse play there will be some wear, but it feels very thick and secure, and even with hitting it with a few tools, the stock only shows rub marks on the clear coat, nothing on the tan or camo.
BELOW ARE PICTURES OF PROCESS EXCEPT FOR LAYING THE GRASS, AS I SAID, THIS IS OPTIONAL TO YOU. THANKS FOR READING!

Well I was just as nervous as everyone else who has a overmold stock when it comes to painting it, due to the obvious fact that rubber bends, and bending paint = paint chips and cracks.
But I finally bit the bullet, bought the paint and material I thought would help me complete the project and started working on it, and below is the list of items I used:
Remington700 SPS Tactical stock
(2) Cans of Krylon Fusion Khaki Brown Satin
(1) Can of Krylon Camo Green Satin
(1) Can of Kyrlon Clear Satin
(1) Prepping cloth to remove oils and debri
(1) Spray can attachment handle
(1) Roll of masking tape
Also I bought fake grass and leaves for my camo, but that is optional.
These materials are available at your local Lowes, Walmart, etc., but I purchased all of them from Walmart as they were pretty close to all being on the same shelf.
You will obviously want to make sure the room, garage, basement, whatever you use as a booth is well ventilated and has the ability to control air flow, or you will get high..trust me..
First off I seperated my stock, trigger guard assembly, and my upper components(barrel, receiever, scope, etc) and hung them all with cord. (Yes.. I am using old telephone cord, nice and strong).
Tape off anything you dont want to get painted. Knobs, open path ways to your chamber and barrel interior, and especially your scope lens. For me I had butler creek covers so I kept them closed and put old tshirt cloth inside to ensure they was covered.
Wipe down the stock with the prepping cloth to ensure they are no lint, dust, oil, or other things that will prohibit the paint from sticking securely.
For the first 48 hours I applied (4) coats of the khaki brown to the stock, and only (2) coats to the scope and other items. I did not apply so much to the upper half due to it being metal and or plastic because it will not fight the paint materials as much as the rubber overmold.
I waited around 6 hours for each coat to dry and firm to the rifle, also giving me time to rest and live my daily life. On each spray I was around 10-12 inches from my rifle, and made sure to apply evenly in quick bursts.
After the tan color was applied, I wanted to do some type of camo. This was my first time EVER doing anything like this, so I obviously didnt expect perfect. So I put my rifle back together, leaving the areas I wanted unpainted still masked off and covered. I sat the rifle on a open cardboard box to where it would level itself and not fall over. I made sure the fake leaves and stems were pressed firmly against the gun and once again, applied the green paint with quick back and forth bursts over the stencel. Make sure it is pressed firmly on the rifle as any risen spots will allow paint to flow under and will not create a 3D look.
You obviously would have trouble doing this in several coats, so I made sure I done it thick the first time, and then applied around 3-4 coats of clear once all was dry to give an extra layer of protection.
After a week or getting it out, showing it off, and a little rough housing there are no spots showing yet. I guess after time and lots of horse play there will be some wear, but it feels very thick and secure, and even with hitting it with a few tools, the stock only shows rub marks on the clear coat, nothing on the tan or camo.
BELOW ARE PICTURES OF PROCESS EXCEPT FOR LAYING THE GRASS, AS I SAID, THIS IS OPTIONAL TO YOU. THANKS FOR READING!
