Thanks Ryan,
When you have time, post up the tools etc. for your Redfield alignment for base / rings, always looking for options…Charlie112
The alignment bars that I use on every one of my builds and original rifles are made by Kokopelli Products, but their website says that they're under new management and won't have a website up until May. You might be able to call them to see if they have any alignment bar kits in stocks and possibly buy one over the phone. You want to get the 1" kit. Their site is down, but there is a phone number on the page that is up:
https://www.kokopelliproducts.com/
Don't use the alignment bars that have the points on them, this won't give you an accurate representation of how your rings are aligned. You need to use flat faced bars, and have a hole in the front bar for holding a cleaning rod down the length of the barrel. That part is important for getting the windage screws aligned with the rifle.
Here's a great article that everyone should read on the process:
https://bulletin.accurateshooter.com/2009/12/kokopelli-ring-lapping-tool-and-scope-alignment-bars/
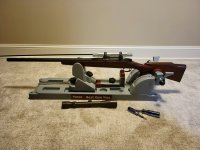
Here's a quick one I did a while back and took a few photos of. Begin by attaching base to the receiver, then attaching the rings to the base (you need to do it this way if you have a 700SA base, since the front ring overhangs the front receiver screw hole), and then begin ring alignment.
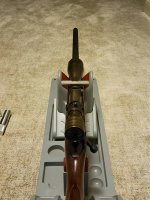
As you can see in this photo, there's a slight gap at the bottom of the alignment bars where the faces meet. I had to flip the rings around and even try other rings I had on hand until I found a perfect fit. If you only have 1 set of rings, flip them around, swap the ring caps around, whatever you need to do. If that still doesn't give you perfect alignment, then you'll need to lap the rings, which was pretty common in the Corps and many welded mounts have lapped rings.

Here's the tricky part, you need to put a cleaning rod in the hole in the front alignment bar and run that rod down the length of your barrel. This will align your front ring, then you have to use the rear windage screws at align your rear ring. When you do this, you need to keep in mind that the rod has to stay perfectly down the center of the barrel and you need to make the faces of the alignment bars touch each other perfectly. Any misalignment can cause damage to your Redfield scope and leave marks on the anodized finish.
Once your rings are perfectly aligned, remove the top caps and CAREFULLY ser them aside. You don't want to mix the up or flip them around! Use a small precision bubble level and level off your scope base.
Next, gently set your Redfield scope into the ring lowers and move into a position that gives you proper eye relief. For an M40, you don't even need to get behind the rifle, just slide the scope as far forward as it will go in the rings. This "jams" the scope into the rings when the rifle recoils, so the turret housing actually acts as a recoil lug and makes a stronger, better mount.
Once the scope is in place, use the precision bubble level to level off the elevation turret cap. This might not sound very accurate, but it actually is prettt good. The other option is to hang a plumb bob and use that to align the reticle while keeping the rifle level. There's no flat bottom on these turret housings, so you're not going to be using feeler gauges, a deck of cards, angle slide level thingy or anything else like that. Once the scope is level, slowly tighten the screws on the ring caps in a zigzag pattern.

And that's it, you've successfully mounted your Redfield scope in Redfield rings! This actually takes some time and finesse, it's not like shit today where we drop it on a Dead Level, plum bob and torque to the rifle. Take your time, get a feel for how the parts are moving and how they interact with each other. Once you get the gist of it, this will become an easier process. I've aligned a few dozen sets of rings this way and I've never had an issue or had a scope damaged.
Doing a quick search online to try to find a replacement for the Kokopelli Products alignment bars, all I could find was this:
https://www.brtshooterssupply.com.au/product/brt-scope-ring-alignment-kit-1in/
The company doesn't say if there's a hole in one of the alignment bars for a cleaning rod, so I'm going to assume it doesn't have this feature. Their lapping bar is also undersized and is made to use with sandpaper on the lower rings only. I haven't tried that method before, I've always used a lapping bar with lapping compound and I lapped the ring lowers and tops together. This company says that the ring tops self align, but I call bullshit on that. If that were the case, you'd only have to align the ring lowers with the alignment bars. You'll soon discover that the ring caps do have an effect on the bars when tightened down. So, I wouldn't buy this company's products or listen to their "advice." Someone smarter than me might come along and correct me on this, but I'm going off my experience with aligning tons of Redfield rings.
In my opinion, if you need alignment bars, you should call Kokopelli Products to see if you can order some. If those aren't available right now, you'll have to wait until their website comes back up in May or whenever they tell you that the products will be ready for sale. This is the only brand and type of alignment bars that I use. Remember, the alignment bars with the pointed ends are near worthless for precision mounting. If any of you has mad engineering skills, maybe it would be a good idea to make a few sets of these alignment bars for forum members that need them.
I've even given away dozens of sets of USMC takeoff Redfield 700SA base and medium ring sets to people on the forums. I ran out of rings a few months ago and I just sent out the last bases to guys this week. So, if you've been waiting a week or so for an update on your scope base going out, I dropped half a dozen boxes in the mail a few days ago. I've never charged anyone for these base/ring sets or bases. I just wanted to help people with their M40A1 rifle builds, since this is something they can use with a Unertl scope and not have to spend $4,000+ on a real Unertl mount. I'd much rather see people do it for free with original parts! I'll have to make a post about these base/ring sets at some point. I think I might have 1 700SA base left, if anyone needs it.
These are just some of the bases and rings I had, there were quite a bit more when I statted giving them away a few years ago. What I did for most of them was find rings that had patina/wear matching a base and then try to align them as a set (not on a rifle, no cleaning rod). I got pretty good at figuring out where to initially set the rear windage screws, so I'd get a quick alignment. This doesn't mean it will be 100% when mounted on the rifle, in regards to the barrel. It just means that these sets will be pretty close and you might now even have to lap them. I put in a decent amount of work before the base/ring sets went out the door to people.
I hope this post and the last one helps people out, feel free to ask me any questions about this or to clarify anything that doesn't make any sense. I tried to write everything out as clearly as possible and use photos to help.