• Watch Out for Scammers!

    We've now added a color code for all accounts. Orange accounts are new members, Blue are full members, and Green are Supporters. If you get a message about a sale from an orange account, make sure you pay attention before sending any money!

Reloading For The AR-15: The Accuracy Node Detection Technique

Molon

Gunny Sergeant
Minuteman
Feb 26, 2020
870
2,274
I’ve had numerous requests for this over the years, so here‘s an introduction to one of the techniques that I use for developing a hand-load for the AR-15.


Reloading For The AR-15: The Accuracy Node Detection Technique


55_blitzking_10_shot_group_at_100_yards_-1353892.jpg


The Accuracy Node Detection Technique (ANDT) is simply a tool to aid hand-loaders in determining the specific powder-charge that is most likely to deliver the highest level of accuracy (technically precision) from their AR-15 with a particular powder and bullet.

Those of you familiar with Creighton Audette’s Incremental Load Development Method (Ladder Test) or Dan Newberry’s Optimal Charge Weight method may recognize that the Accuracy Node Detection Technique is based on the same underlying principle as those methods, however, the ANDT is a more refined and statistically meaningful approach to finding an accuracy node.

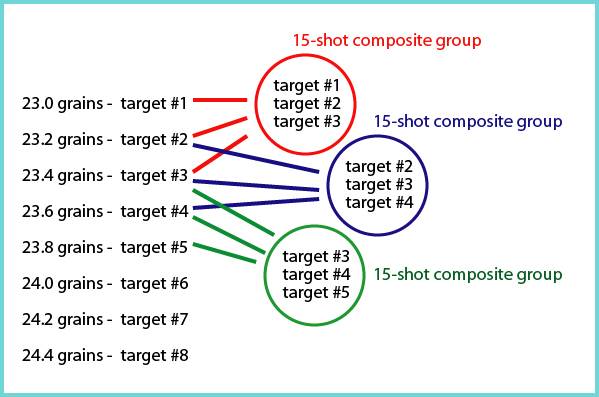
The ANDT uses larger effective sample sizes for greater confidence and utilizes the mean radius to determine the radial dispersion of composite shot-groups to obtain a more exact identification of the accuracy node of a given barrel/bullet/powder combination. For those of you not familiar with the mean radius, I’ll be explaining that shortly.


The ANDT is not dependent upon “interpreting” the data like other methods; the data is what it is and the results speak for themselves. However, keep in mind that 60% of a load’s accuracy comes from the bullet. If you’re not using a quality bullet that your barrel “likes,” no amount of powder-charge testing is going to result in a load that produces sub-MOA 10-shot groups from you AR-15.


A chronograph is not needed for the ANDT. If you’re only interested in long-range shooting, this is not the article you‘re looking for. I developed the ANDT for working-up short range (200 yards and in) match-grade hand-loads that consistently produce sub-MOA 10-shot groups from my match-grade AR-15s.


As I mentioned above, the ANDT utilizes the mean radius to accurately and precisely determine the radial dispersion of the composite shot-groups that we will develop using the ANDT. The demonstration below shows how to manually calculate the mean radius, but modern ballistic programs make this task far easier.


A PRIMER ON THE MEAN RADIUS

The mean radius is a method of measurement of the radial dispersion of shot-groups that takes into account every shot in the group. It provides a more useful analysis of the consistency of ammunition and firearms than the commonly used method of extreme spread.

Mean radius as defined in Hatcher's Notebook “is the average distance of all the shots from the center of the group. It is usually about one third the group diameter (extreme spread)” for 10-shot groups. (The ratio is actually closer to 3.2 times the mean radius = the extreme spread, for 10-shot groups, depending on the sample size and the morphology of the particular groups sampled.)

To obtain the mean radius of a shot-group, measure the heights of all shots above the lowest shot in the group. Average these measurements. The result is the height of the center of the group above the lowest shot. Then in the same way, get the horizontal distance of the center from the shot farthest to the left. These two measurements will locate the group center. Now measure the distance of each shot from this center. The average of these measures is the mean radius.

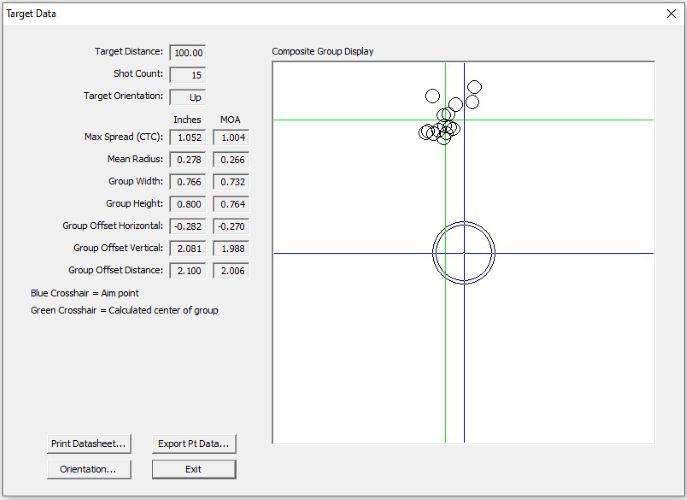
Once you get the hang of measuring groups using the mean radius it becomes very simple to do. While being very simple to do, it is also very time consuming. Modern software programs such as RSI Shooting Lab and On Target make determining the mean radius a snap.

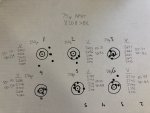
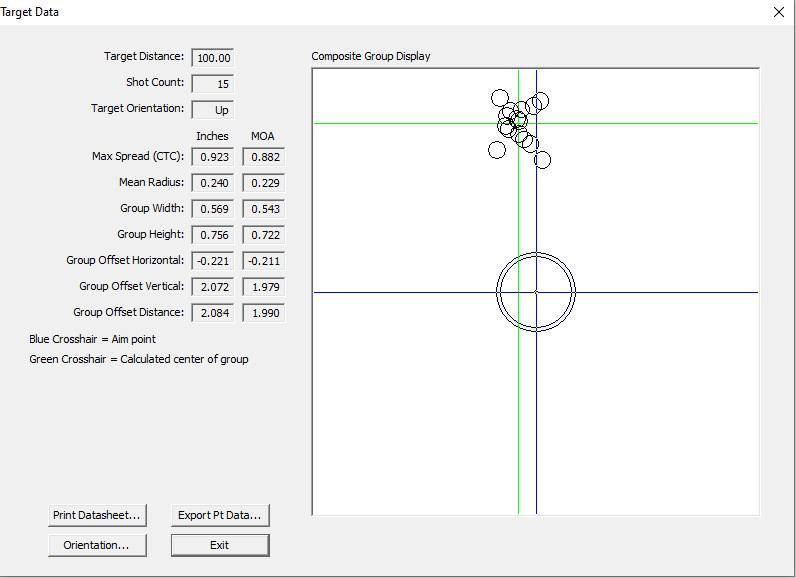
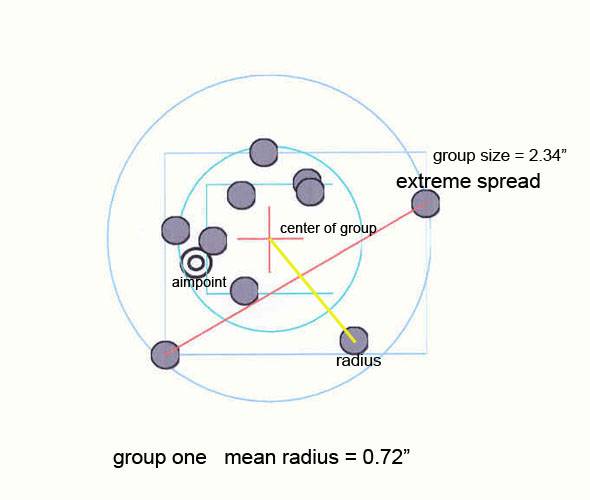
The picture below is a screen capture from RSI Shooting Lab. The red cross is the center of the group (a little high and right of the aiming point). The long red line shows the two shots forming the extreme spread or group size. The yellow line from the red cross to one of the shots is a radius. Measure all the radii and take the average to obtain the mean radius.


e5h310mx2lw65cuuwrfk-1350520.jpg


Mean Radius Demonstration

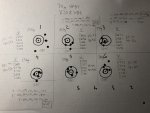
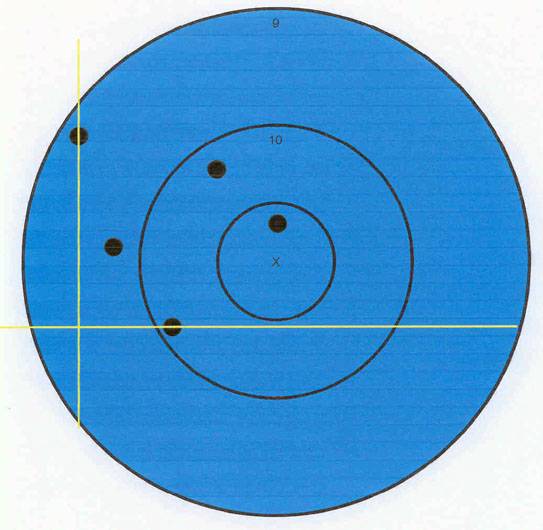
Let’s say you fired a 5-shot group from 100 yards and the resulting target looks like this. (The X-ring measures 1.5” and the 10-ring measures 3.5”.)


pn6jf1qeuywk5a42jzcz-1350523.jpg


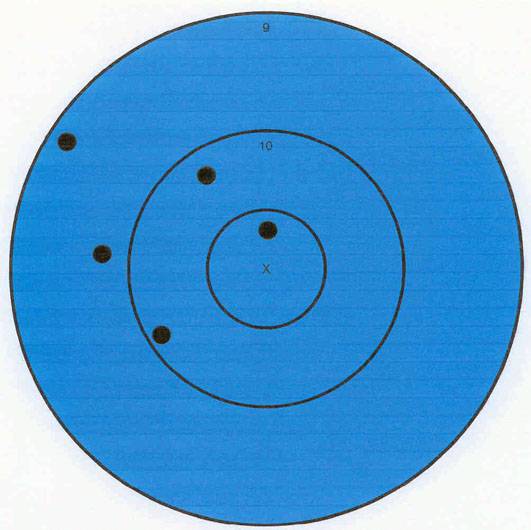
The extreme spread of the group measures 2.83”, but we want to find the mean radius (or average group radius.) In order to find the mean radius we must first find the center of the group. By “eye-balling” the target most people would see that the group is centered to the left of the “X-ring” and probably a little high, but we need to find the exact location of the center of the group.

Locating the Center of the Group

The first step in finding the center of the group is to find the lowest shot of the group and draw a horizontal line through the center of that shot.


hg77du60v6jwj6qnhsd2-1350521.jpg


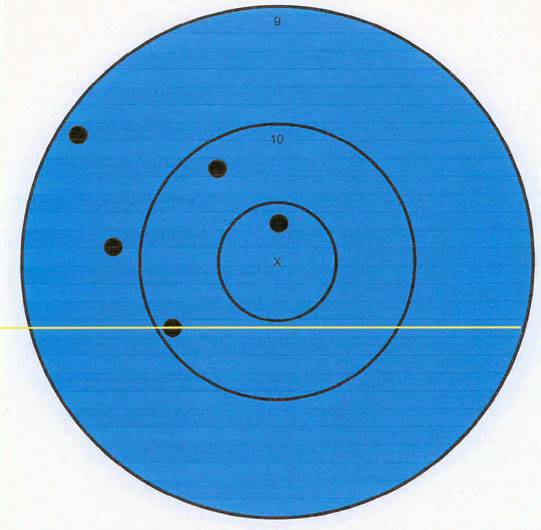
Next, find the left-most shot of the group and draw a vertical line through the center of that shot.


qyqecvzn8slmls96199f-1350524.jpg


Now measure the distance from the horizontal line to the other four shots of the group that are above that line. Add those numbers together and divide by the total number of shots in the group (5).


k0uuxzzb1weo3ppgluz7-1350522.jpg


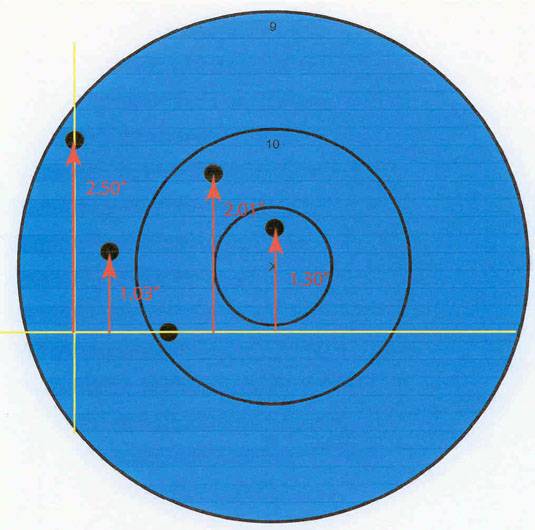
2.50” + 1.03” + 2.01” + 1.30” = 6.84”

Divide by 5 to get 1.37”. This number is the elevation component of the center of the group.

Next we need to find the windage component of the center of the group. From the vertical line, measure the distance to the other four shots of the group that are to the right of the line. Add those numbers together and again divide by the total number of shots in the group (5).


ncg6hkbmcv1kyyvtdua1-1350539.jpg


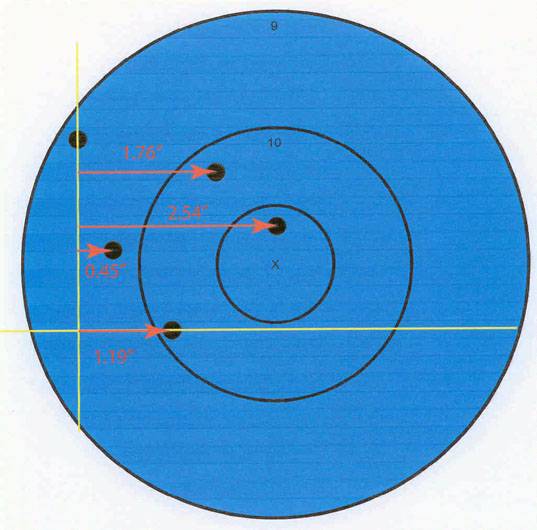
1.76” + 2.54” + 0.45” + 1.19” = 5.94”

Divide by 5 to get 1.19” This is the windage component of the center of the group.

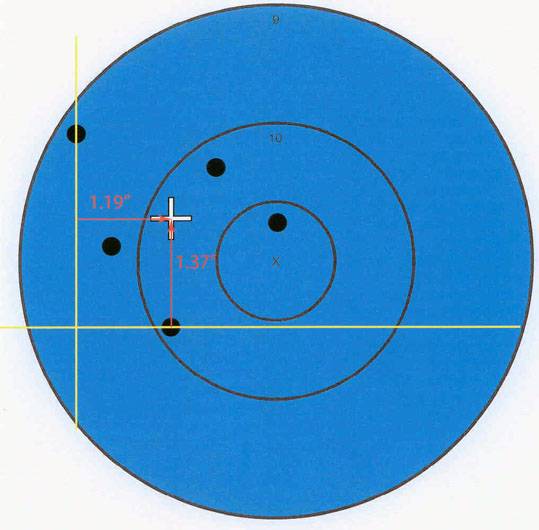
Finding the windage and elevation components of the center of the group is the most difficult part of this process. Once that is done the rest of the process is a piece of cake.

Using the windage and elevation components, locate the position on the target that is 1.37” (elevation component) above the horizontal line and 1.19” (windage component) to the right of the vertical line. This location is the center of the group!


46cr6kei23k2npjbwopy-1350538.jpg


Determining the Mean Radius


Now that we have located the position of the center of the group, the first step in determining the mean radius is to measure the distance from the center of the group to the center of one of the shots. This line is a single “radius”.


vm7k0jzt5h941pfldlhj-1350545.jpg


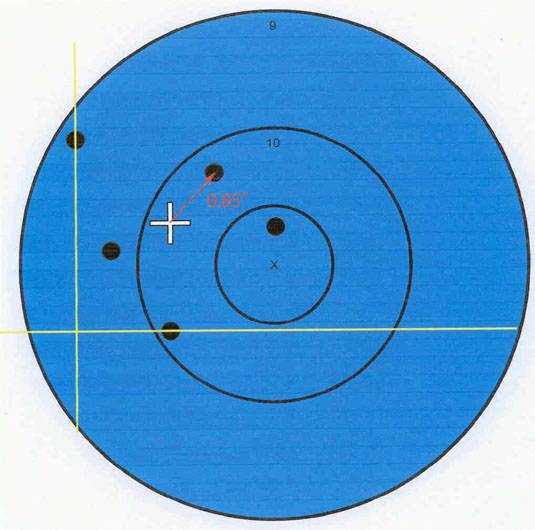
Now measure the distance from the center of the group to the center of each of the rest of the shots in the group. Add the measurements of all the radii together and then divide by the total number of shots in the group (5).


lv461k9kjilx3jndshs4-1350544.jpg


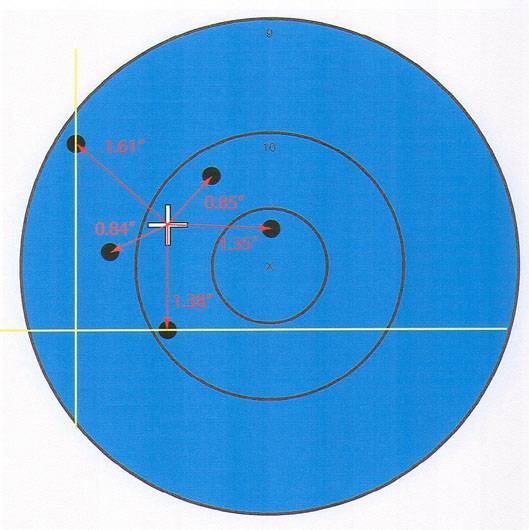
0.85” + 1.35” + 1.38” + 0.84” + 1.61” = 6.03”

Divide by 5 to get 1.21”. This is the mean radius (or average group radius) of the group!

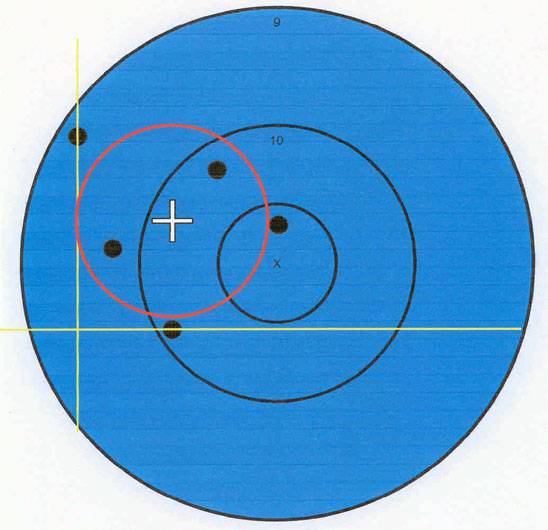
Using the mean radius measurement to scribe a circle around the center of the group gives you a graphic representation of the mean radius. This shows the average accuracy of all the shots in the group. This demonstrates why the mean radius is much more useful than the extreme spread in evaluating the radial dispersion of our rifles and ammunition.


g1480t5ca47zrae1du8i-1350552.jpg


The table below will give you an idea of the relationship between the mean radius and extreme spread for 10-shot groups.


e4ckmi2y36-1350551.jpg


Here are some interesting quotes from old issues of American Rifleman on the subject:

“Mean radius is the mean distance of bullet impacts from center of the test group. It is used in government ammunition acceptance because it takes account of every shot and comes close to maximizing the test information. While there is no exact relationship between this measure and the simpler and more convenient group diameter, the 10-shot group diameter averages slightly over 3 times the mean radius.”

"These examples illustrate the sensitiveness of the extreme spread to number of shots in the group. Indeed, as the table indicates, the measures made to only the outside shots of the group, e.g. the extreme spread, are very sensitive to number of shots, while the measures made to all the shots, e.g. the mean radius are far less so. It may be added that the latter measures are also less variable in their representation of the group; they are more efficient. This explains why the target testing of U.S. military rifle ammunition is by mean radius."


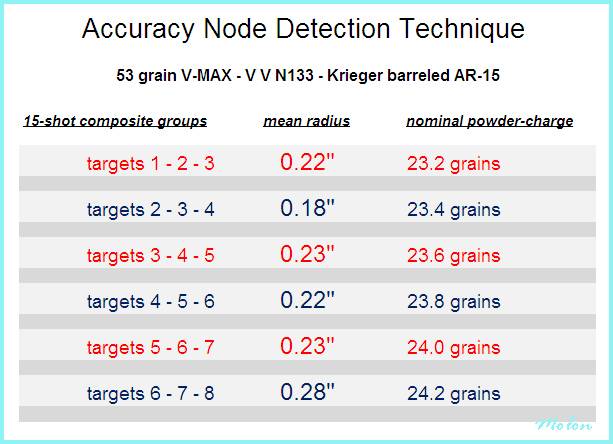
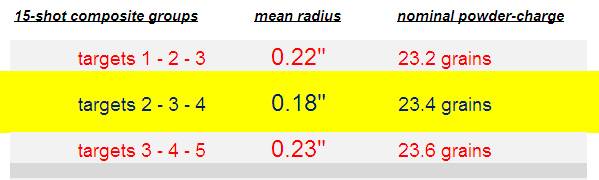
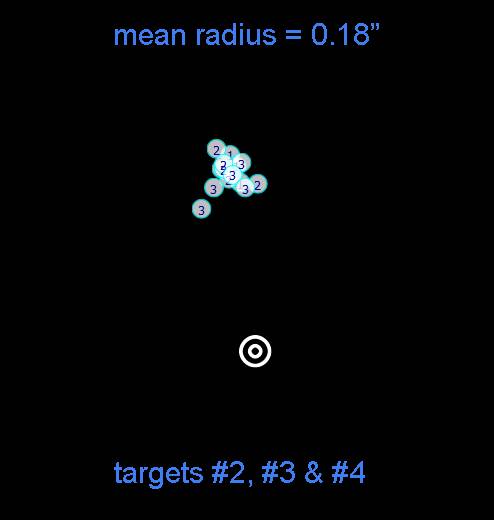
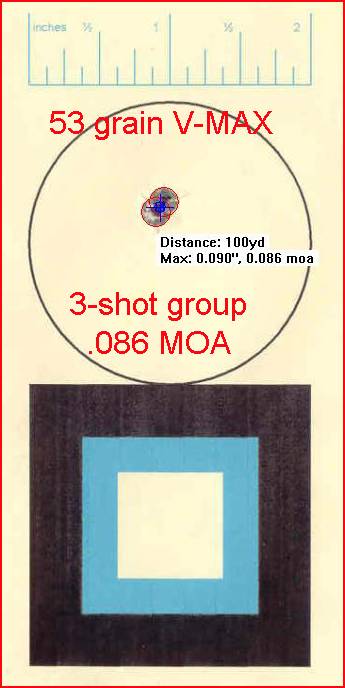
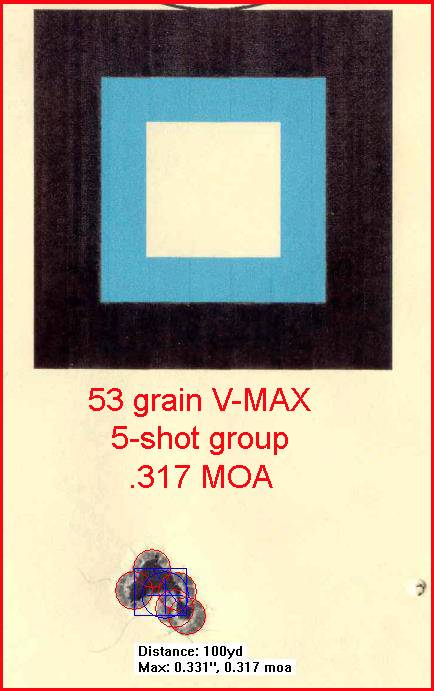
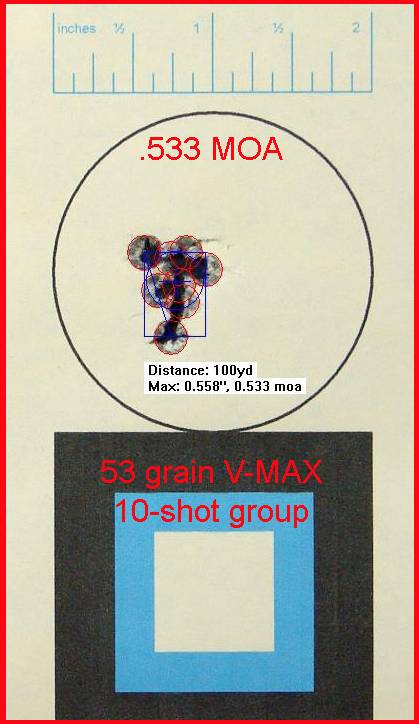
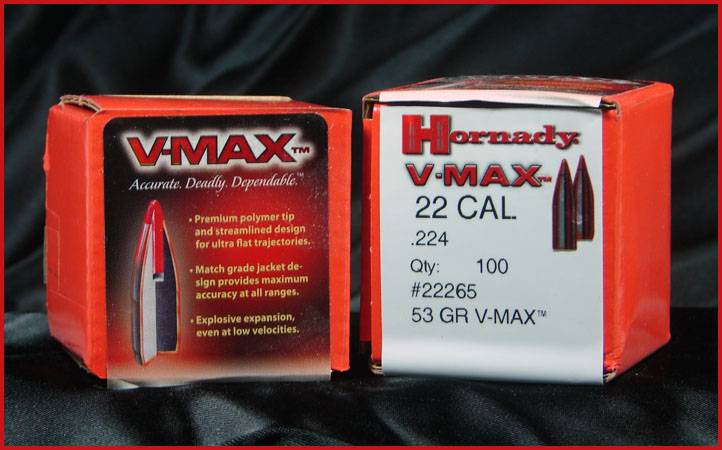
Now that you understand the mean radius, we can delve into some particulars of the Accuracy Node Detection Technique. For the example that I’ll be presenting in this article, I was looking for an accuracy node for the Hornady 53 grain V-MAX (#22265) when charged with VihtaVuori N133 powder and fired from my 223 Remington 24” Krieger barreled AR-15. But first, a word from our sponsor:


WARNING!
Reloading is an inherently dangerous activity. The information provided here is for educational purposes only. It is not intended to be used for the actual loading of ammunition by the reader. No warranty, guarantee or assurance that these loads are safe is stated, suggested or implied nor should any be inferred. Usage of this information for the actual loading of ammunition may result in malfunctions, damage and destruction of property and grave injury or death to beings human in nature or otherwise. Don't even view this information in the presence of children or small animals.


53_grain_vmax_boxes_02-1352151.jpg


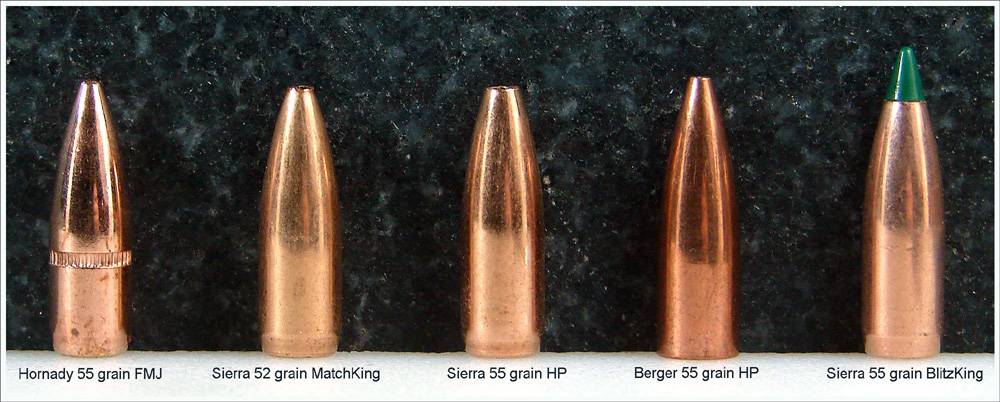
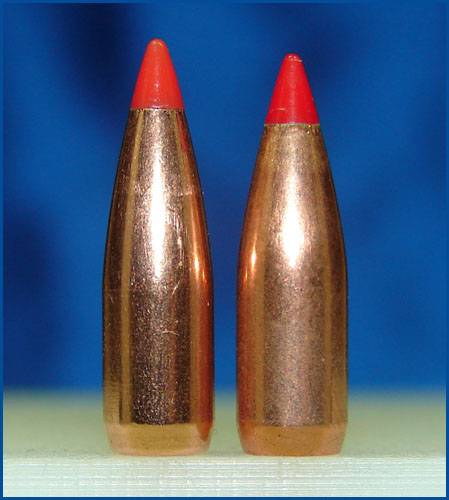
53 V-MAX on the left . . .

hornady_53_grain_VMAX_01_resized_02-1352152.jpg


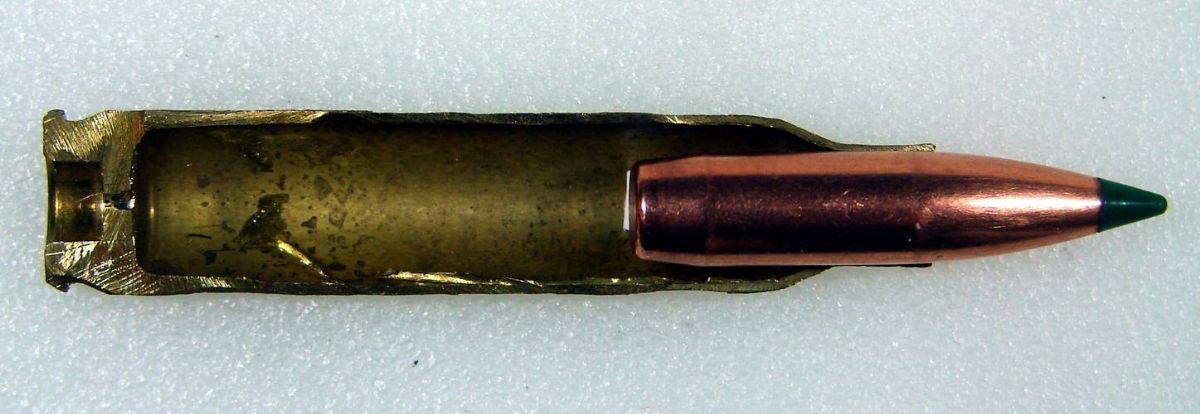
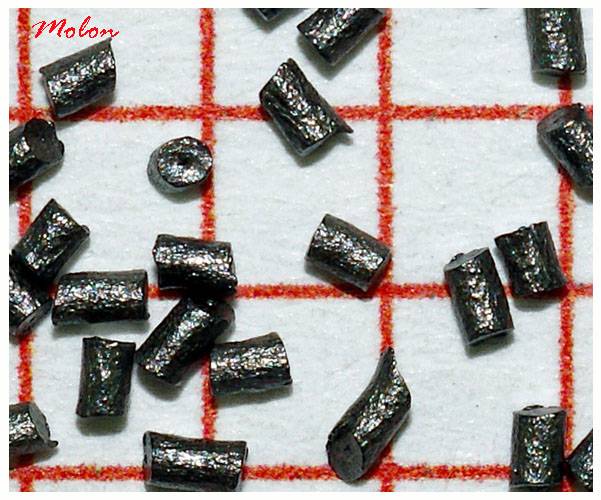
VihtaVuori N133 (the individual red squares in the grid below are 1/10 of an inch.)

vihtavuori_n133_003-1353956.jpg


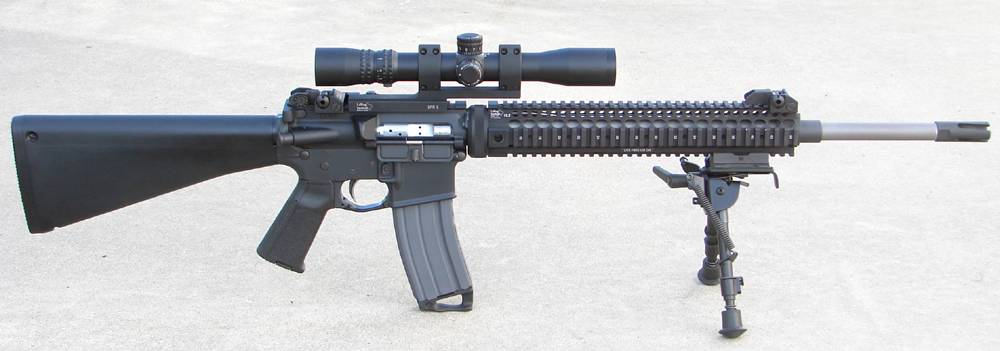
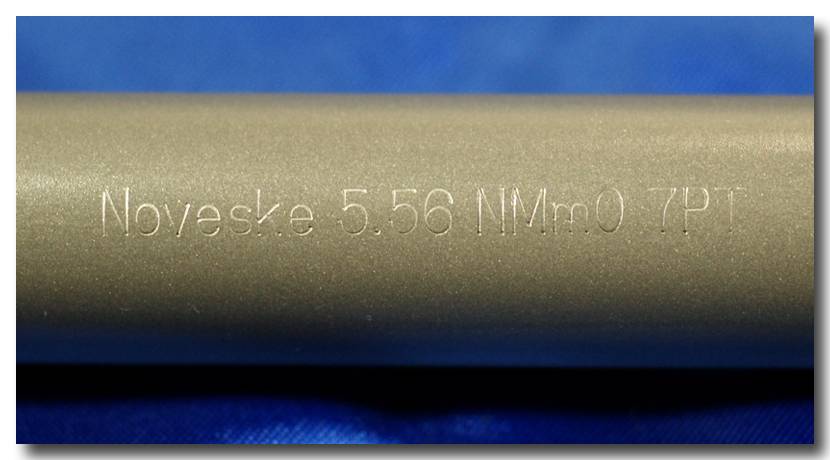
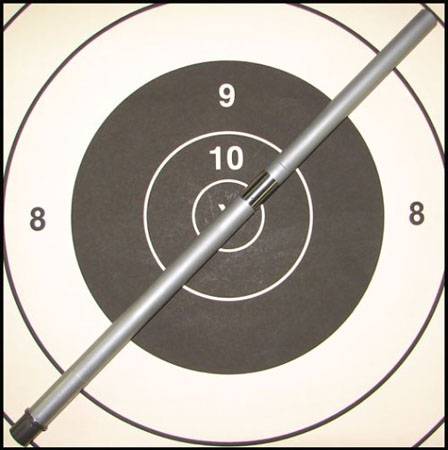
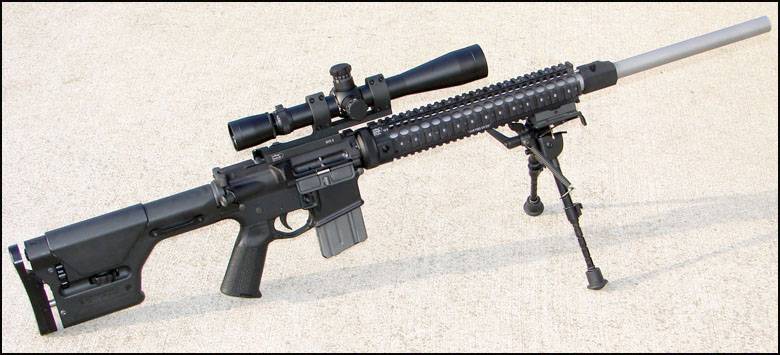
24” Krieger barrel . . .

krieger_24_inch_barrel_with_highpower_ta-1288008.jpg


krieger_barreled_ar-15_002-1353853.jpg


continued in the next post . . .
 
Last edited:
. . . continued from the previous post


In my experience with hand-loading for precision AR-15s that are chambered for 223 Remington, I’ve found that an accuracy node can often be identified somewhere within a 1.5 grain spread of powder-charges; not always, but often. For this example of the ANDT, I used powder-charge weights ranging from 23.0 grains to 24.4 grains of VihtaVuori N133. The criteria that I used for this particular example of the ANDT was as follows:


I wanted to find an accuracy node that was within the limits of the precision that the factory powder measure on my Dillon XL650 was capable of throwing. When using a short-cut extruded powder like VihtaVuori N133, the Dillon factory powder measure will throw the majority of the charges within plus or minus 0.1 grains of the nominal charge. However, a significant amount of the time, the Dillon factory powder measure will throw a charge that is plus or minus 0.2 grains of the nominal charge. Therefore, I needed an accuracy node that could maintain the desired level of precision on the target, throughout a plus or minus 0.2 grain powder-charge. Hence, I used an increment of 0.2 grains in the powder-charges used for this example of the ANDT. The following eight powder-charges were used:


Powder-charge #1 - 23.0 grains
Powder-charge #2 - 23.2 grains
Powder-charge #3 - 23.4 grains
Powder-charge #4 - 23.6 grains
Powder-charge #5 - 23.8 grains
Powder-charge #6 - 24.0 grains
Powder-charge #7 - 24.2 grains
Powder-charge #8 - 24.4 grains


The powder-charges tested in this example of the ANDT were all dispensed (not thrown) to the exact tenth of a grain using a Pact Digital powder dispenser and scale and verified on a GemPro-250 scale. The hand-loads were otherwise loaded on the Dillon XL650. Five rounds of each of the eight powder-charges were loaded, for a total of 40 rounds. Next, some actual shooting.


reloading_bench_022-1898605-2206635.jpg


All shooting for this example of the ANDT was conducted from my bench-rest set-up at a distance of 100 yards. The 24" Krieger barrel was free-floated. The free-float handguards of the rifle rested in a Sinclair Windage Benchrest, while the stock of the rifle rested in a Protektor bunny-ear rear bag. Sighting was accomplished via a Leupold VARI-X III set at 25X magnification and adjusted to be parallax-free at 100 yards. A mirage shade was attached to the top of the free-float hand-guard. Wind conditions on the shooting range were continuously monitored using a Wind Probe. The lower receiver housed a Geissele High-Speed National Match trigger. The set-up was very similar to that pictured below.


benchrest_krieger_rifle_02_JPG-1287996.jpg


The Wind Probe


wind_probe_2016_01_framedb-1342522.jpg


The shooting portion of the Accuracy Node Detection Technique should be conducted at a distance of 100 yards to help mitigate environmental variables. When conducting the shooting for the ANDT, you absolutely most monitor the wind conditions on the range and attempt to fire every shot under the same wind conditions. For those who think that the wind “doesn’t matter” at 100 yards, consider the following example.


With the right ammunition, my precision AR-15s are capable of producing consistent sub-MOA 10-shot groups at 100 yards. Now, let’s say that you are a quarter of the way through the firing of 40 rounds for the ANDT. The wind has been calm up to this point. For your next shot, you miss the fact that a 7 mph wind is now blowing from 3 o’clock. The wind dies down again and you continue shooting. Three quarters of the way through testing, you miss another 7 mph wind that has kicked up, only this time it’s coming from 9 o’clock. By not paying attention to the wind, your test results have now been increased by more than 1.5 MOA, simply due to wind deflection. So yes Virginia, the wind does indeed matter at the distance of 100 yards.


55_blitzkings_wind_drift_at_100_yards_7_-1350853.jpg


In order for the ANDT to produce valid data, you positively have to be able to properly execute the fundamentals of marksmanship 40 times (or more) in a row. When conducting the shooting portion of the ANDT, all rounds should be fired in a round-robin manner. This means that you fire one shot only at the first target using a round from the first powder-charge, then you fire one shot only at the second target using a round from the second powder-charge and so-on until you’ve fired one round at each of the eight targets. You repeat this process until all 40 rounds have been fired. Unless you had some collateral damage, you should now have eight targets all of which have five shots on them from each of the eight different powder-charges being tested. Now it’s time to head home and analyze the data.


A sample target . . .


andt_sample_targets_0000c_resized-1354401.jpg


Here’s where things get interesting. We now have eight targets and each of those targets has a 5-shot group on them that was fired in a round-robin manner. Each 5-shot group was fired using rounds loaded with the same powder-charge. For the ANDT, we are not interested in the extreme spreads of those 5-shot groups. We’re not even interested in the mean radius of the individual 5-shot groups. What we are interested in, is the mean radius of the composite groups that we’re going to form from the eight individual targets.


To form the composite groups, we first have to individually enter the eight, 5-shot targets into the computer program. In this case, I’ll be using RSI Shooting Lab. Once the individual targets are entered into the program, we can then use the program to over-lay targets to form composite groups.


Do you remember earlier in this article that I stated what my criteria was for this example of the ANDT? I stated that “I needed an accuracy node that could maintain the desired level of precision on the target, throughout a plus or minus 0.2 grain powder-charge. Hence, I used an increment of 0.2 grains in the powder-charges used for this example of the ANDT.” Since each target contains a 5-shot group from the same powder-charge, and each incremental powder-charge was increased by 0.2 grains, we’re going to over-lay the targets in sequences of three, to form 15-shot composite groups, giving us more effective sample sizes, particularly when used in conjunction with the mean radius. That way our 15-shot composite groups will be made up of rounds fired from three different powder-charges; the nominal powder-charge (the one in the middle), a powder-charge that is 0.2 grains less than the nominal powder-charge and a powder-charge that is 0.2 grains more than the nominal powder-charge.


For example, the first 15-shot composite group will be formed by over-laying target #1, target #2 and target #3. The second 15-shot composite group will be formed by over-laying target #2, target #3 and target #4. We’ll continue this sequence of over-laying the individual targets to form 15-shot composite groups until all eight of the individual targets have been used to form six, 15-shot composite groups. These six, 15-shot composite groups are what we have been working towards. The mean radii of these 15-shot composite groups are going to tell us where our accuracy node lies.


andt_composite_group_diagram_002-1352107.jpg


Here’s a visual demonstration of the process of over-laying the individual 5-shot targets, in sequences of three, to form the 15-shot composite groups.


Here’s target #6 by itself.


target_6_overlay_demonstration_01-1353692.jpg


Here’s target #6 and target #7 over-layed on each other.

targets_6_and_7_overlay__deonstration_01-1353694.jpg


And targets #6, #7 and #8 over-layed on each other.

targets_6_7_8_overlay_demonstration_01-1353693.jpg


NOTE: It is extremely important when over-laying targets for the ANDT that the targets are over-layed on the centers of the targets, not on the centers of the groups. When over-laying targets using RSI Shooting Lab, the program gives you two options: “Aim Point” and “Center”. The “Aim Point” option is the correct option to over-lay the targets on the centers of the targets. The “Center” option will over-lay the targets on the centers of the groups.


rsi_options_screen_capture_01-1352382.jpg


Before we get to the final results of this example of the ANDT, I’d like to use target #6 (that was shown above) to demonstrate the futility of using the extreme spreads of individual 5-shot groups to locate an accuracy node. The 5-shot group on target #6 has an extreme spread of 0.42”. That’s a sub-½ MOA group at 100 yards fired from a semi-automatic AR-15 (and remember too that these groups were fired round-robin). If I were using the extreme spreads of 5-shot groups to locate an accuracy node, I would think I had found it with target #6 . . . . but I would be mistaken, as we shall now see.


Here are the mean radii of the six, 15-shot composite groups. The nominal powder-charge of the 15-shot composite group that has the smallest mean radius is the accuracy node for the 53 grain V-MAX load charged with VihtaVuori N133 and fired from my 223 Remington 24” Krieger barreled AR-15.


andt_results_021-1353838.jpg


And there’s the accuracy node! Targets #2, #3 and #4 over-layed on each other formed a 15-shot composite group that has a mean radius of 0.18” at 100 yards.


andt_results_highlighted_resized_001-1353712.jpg


targets_2_3_4_overlayed_with_mean_radius-1353709.jpg


Now that we’ve identified the accuracy node at 23.4 grains of VihtaVuori N133, let’s take a look at what this load can do when fired from my Krieger barreled AR-15 at a distance of 100 yards.


Hornady 53 Grain V-MAX


3-shot group: .086 MOA


53_vmax_3_shot_group_at_100_yards_measur-1353730.jpg


5-shot group: .317 MOA


53_vmax_5_shot_group_measured_and_lablel-1353849.jpg


10-shot group: .533 MOA


223_krieger_with_53_grain_vmax_10_shot_g-1353833.jpg


Here are some pics of groups from other hand-loads that I developed for my Krieger barreled AR-15 using the Accuracy Node Detection Technique.


Sierra 55 Grain BlitzKing


3-shot group: .088 MOA

55_blitzkings_krieger_barrel_3_shot_grou-1353770.jpg


5-shot group: .206 MOA


55_blitzkings_five_shot_group_measured_a-1353779.jpg


10-shot group: .439 MOA


55_grain_blitzkings_10_shot_group_at_100-1353790.jpg


62 Grain Berger HP


5-shot group: .28 MOA


62_berger_five_shot_group_measured_and_l-1353797.jpg


10-shot group: .483 MOA

62_berger10_shot_group_measured_and_labe-1354276.jpg


molon_signature_005-1357735.jpg


Last edited:
Dude, go science! I have always just measured group size with a caliper and picked the smallest. This blows that out of the water. I've got so much to learn, thanks for taking the time to write all this out.
 
  • Like
Reactions: TACC
Your method of overlaying groups to find an accuracy node is pretty neat, I thought about doing the same to find a standard deviation node with a chronograph, although I am unsure of how well it will work.
1586232129637.png


something like this, I just used some data I had saved, but I figure it might be more useful if I had more than 5 charges.

Any suggestions?

-Kirby
 
Your method of overlaying groups to find an accuracy node is pretty neat, I thought about doing the same to find a standard deviation node with a chronograph, although I am unsure of how well it will work.

Logically it should generate the same sort of tolerance to over- and under-thrown charges. I'm going to run off and do the math on some of my ladder tests and see what I come up with....
 
Only issue with RSI Shooting labs is it looks like its only good on Windows, so us Mac boys are out.

any other software that can do that?

I'm doing load development with the Hornady 75gr BTHP and XBR 8208 and I did the round robin OCW style like above, 5 shots each, but I also ran them over a chrono. Any who, all but one group was between 0.7-0.9 MOA... so its hard to see a clear winner and would like to try this approach.

heres the whole round robin target...
 

Attachments

  • IMG_4318.jpg
    IMG_4318.jpg
    326.3 KB · Views: 108
Well I got bored and went ahead and hand jammed 3 of my 6 groups from above....to the best of my hand ability.

Unfortunately I won't be able to do composite groupings but I just did the individual for groups 2, 3, and 4. I've done a satterlee load ladder once already with this powder and bullet and I came to 23.4/23.5gr from that. But I've done probably 5-6 different load developmetns with this rifle...partially because I wanted to learn and get better, and partially because I wasn't getting the results I wanted with TAC, so I switched powders as well.

Heres the mean radius for the 3 groups:
2 = 0.313"
3 = 0.259"
4 = 0.339"

Very interesting way of doing this OP, thanks for showing It.


Heres my target with calculations. I am shooting for long distance as well so SD's are important to me. After looking at my other load development with this powder, and the velocity make ups, I think I'm going to load at 23.3 and 23.5 and see which one does better regarding keeping the outlier velocities out of the mix. I am also tempted to push past 24.0gr of XBR...but idk..thats far above max and although my brass isn't looking much worse than the lower charges, I'd rather not push it. 24.0gr is averaging 2740fps out of my 18" suppressed AR.
 

Attachments

  • IMG_4319.jpg
    IMG_4319.jpg
    357.9 KB · Views: 121
Only issue with RSI Shooting labs is it looks like its only good on Windows, so us Mac boys are out.

any other software that can do that?

I'm doing load development with the Hornady 75gr BTHP and XBR 8208 and I did the round robin OCW style like above, 5 shots each, but I also ran them over a chrono. Any who, all but one group was between 0.7-0.9 MOA... so its hard to see a clear winner and would like to try this approach.

heres the whole round robin target...

It looks to me like you've got a reasonably wide node around ~23.4-23.8gr, which makes sense since 23.5-23.6gr is known to be a good shooting load with that bullet. You have to consider position of the groups, not just size (and the mean radius does consider position, as long as you stack them on the aiming point not group center, as Molon said).

Here's the thing though - play with seating depth, you'll probably find even better accuracy by finding the optimum depth. I learned recently about varying the powder charge for each seating depth as well; that really helps to highlight which seating depth works best across a range of powder charges. Last time I did this (a few weeks ago) I found a very acceptable load even though the powder charges varied by 1.4gr; that won't always happen but when it does, I'll take it! This makes for a very robust load that can tolerate charge weight and velocity variations without ruining accuracy.
 
  • Like
Reactions: Gustav7
It looks to me like you've got a reasonably wide node around ~23.4-23.8gr, which makes sense since 23.5-23.6gr is known to be a good shooting load with that bullet. You have to consider position of the groups, not just size (and the mean radius does consider position, as long as you stack them on the aiming point not group center, as Molon said).

Here's the thing though - play with seating depth, you'll probably find even better accuracy by finding the optimum depth. I learned recently about varying the powder charge for each seating depth as well; that really helps to highlight which seating depth works best across a range of powder charges. Last time I did this (a few weeks ago) I found a very acceptable load even though the powder charges varied by 1.4gr; that won't always happen but when it does, I'll take it! This makes for a very robust load that can tolerate charge weight and velocity variations without ruining accuracy.

So you’re playing with seating depth even with AR’s? I’ve had a theory my rifle prefers seating around 2.245” as opposed to the 2.26 that everyone always says “just do 2.26 and forget it”. But I’ve only tried it once and it appeared that 2.245(ish) gave me better groups but I didn’t investigate more. And I probably should have.
 
Absolutely seating depth matters ! Search in the depot for @padom threads on accuracy testing with with different barrels. He posted up lots of data, much more than i have, with pix. Also, i think his nodes were the same as yours (and mine matched his in the same barrels).
 
  • Like
Reactions: supercorndogs
Absolutely seating depth matters ! Search in the depot for @padom threads on accuracy testing with with different barrels. He posted up lots of data, much more than i have, with pix. Also, i think his nodes were the same as yours (and mine matched his in the same barrels).

Well I mean i know it matters with bolt guns and what not, but sooo many people are always like, "Oh you can't chase lands with AR's cause of mag lenght, so just load to 2.26"

I always felt there was more to it than that. This has definitely revamped my thoughts on why my rifle seemed to like 2.245 (with 77gr TMK's) over 2.26. I'll look into padom's threads. Thanks for the help!
 
It looks to me like you've got a reasonably wide node around ~23.4-23.8gr, which makes sense since 23.5-23.6gr is known to be a good shooting load with that bullet. You have to consider position of the groups, not just size (and the mean radius does consider position, as long as you stack them on the aiming point not group center, as Molon said).

Here's the thing though - play with seating depth, you'll probably find even better accuracy by finding the optimum depth. I learned recently about varying the powder charge for each seating depth as well; that really helps to highlight which seating depth works best across a range of powder charges. Last time I did this (a few weeks ago) I found a very acceptable load even though the powder charges varied by 1.4gr; that won't always happen but when it does, I'll take it! This makes for a very robust load that can tolerate charge weight and velocity variations without ruining accuracy.

I was trying to look at position as well, but I don't have alot of experience with interpreting OCW, so I think I was second guessing myself a little too. I've always done load development with group size, chrono readings, then verifying at 400-500yds (I have full access to 750yds). But after reading this original post, I wanted to try this method.

Can you walk me through how you went about changing powder charge for different seating depths...like your method of doing it? You can PM me if we're starting to hijack the thread, although I feel its good info to put out there.
 
Very articulate explanation. Very easy to read and enjoy.

As always, I Thank you for taking your time and effort to help educate this country bumpkin.... ( Lol , that means me )
 
Well I mean i know it matters with bolt guns and what not, but sooo many people are always like, "Oh you can't chase lands with AR's cause of mag lenght, so just load to 2.26"

I always felt there was more to it than that. This has definitely revamped my thoughts on why my rifle seemed to like 2.245 (with 77gr TMK's) over 2.26. I'll look into padom's threads. Thanks for the help!
I am just beginning to play with the 77gr tmk's. Do you have a posted recipe of what is working for you, and what are you using them in, if you don't mind me asking?
 
I am just beginning to play with the 77gr tmk's. Do you have a posted recipe of what is working for you, and what are you using them in, if you don't mind me asking?

AR-15
18" Lothar Walthar 1:8 suppressed

I found loads with TAC and XBR 8208. TAC I did a full load development and practiced with it. I found two nodes, 23.4gr and 24.5gr. TAKE IT SLOW moving up to 24.5gr, its almost at NATO max. 23.4gr was more consistent, but overall my rifle did not like TAC with temperature swings, so I abandoned it for XBR.

With XBR I only did a short couple work ups before I switched to Hornady 75gr HPBT. But my 10 shot ladder test (x2), yielded me with 23.4gr. My OCW/ANDT testing for the 75's are posted above. I'm going to try 23.3 and 23.5 and mess around with seating depth.
 
Thanks. I've shot a few thru a 16" colt 1-7 twist. Had some loaded with tac that showed promise down around 23.2-23.3 and around 23.9. Glad to hear you're having some luck with 8208. Xbr availability is kinda spotty around here, but I have some I'll try.
 
  • Like
Reactions: Gustav7
24.5 must be a magical node, because I hit one there too. No pressure signs on my rig...
Same. I've tried it a couple times, and it was a tad erratic with velocity with temp fluctuations. THAT BEING SAID, i've heard plenty of guys who have not had that problem. Supposedly it is very temp stable for a ball powder. If you can find a good node, shouldn't be an issue anyways. I would have loved to stick with it but it wasn't in the cards.

I went up to 24.7gr. which is nato max. No pressure signs on my brass, but was getting damn gassy. I prolly wouldn't go over that though.
 
  • Like
Reactions: adamjma
So you’re playing with seating depth even with AR’s? I’ve had a theory my rifle prefers seating around 2.245” as opposed to the 2.26 that everyone always says “just do 2.26 and forget it”. But I’ve only tried it once and it appeared that 2.245(ish) gave me better groups but I didn’t investigate more. And I probably should have.

Yes, definitely play with seating depth for ARs too. Forget what the mouth breathers say about that. I usually test between 2.300" and about 2.200", but that depends on the bullet so some get seated shorter. For example I've been using a 6mm 100gr SPT lately that is at only 2.180" seated into the lands, so don't assume every bullet can go to mag length. Also keep in mind that ASC mags will let you seat out to 2.300" or a little longer.

For the different charge weights at each seating depth - I pick a powder charge range, generally somewhere near max when seated at the max length (which I've already verified in my rifle, no guessing), and for each seating depth I load one round of each charge in 0.3-0.4gr increments. If you use a loading block you can load each powder charge in columns, and then use each row for a different seating depth.

The actual charge and increments are not that important, the goal is to find a seating depth that is most accurate across a range of velocities and charge weights. I have found that to show a much more pronounced difference than powder charge weights. From there you can tune for the optimum charge weight.
 
  • Like
Reactions: Gustav7
Yes, definitely play with seating depth for ARs too. Forget what the mouth breathers say about that. I usually test between 2.300" and about 2.200", but that depends on the bullet so some get seated shorter. For example I've been using a 6mm 100gr SPT lately that is at only 2.180" seated into the lands, so don't assume every bullet can go to mag length. Also keep in mind that ASC mags will let you seat out to 2.300" or a little longer.

I'm running .223/5.56, with 75gr Hornady's. I picked my two charges I want to investigate further: 23.3gr and 23.5gr. I know they're close to each other but I'd like to see what happens. any who Ioaded up a seating depth test loadout with both charge weights. Now I don't usually actually measure by OAL except to get the round about length for reference, but it looked like this:
5 rounds loaded for each seating depth and each charge.
2.26"(1.839)
2.255"(1.834)
2.250"(1.829)
2.245"(1.824)

Are you suggesting an even bigger gap for seating depth? What I don't want to run into is pushing pressures up by seating the bullet too short.

I'll see where this takes me. Sort of using it as a load confirmation as well as a seating depth test.

I appreciate your insight into this.

I suggest testing in at least .010"-.015" increments at first, fine tune in smaller increments after that if you want. 2.260", 2.245", 2.230", etc. You might be surprised how much jump some bullets like, and you're already quite a ways off the lands at mag length so no point in testing in small increments.

Easy enough to go back and seat some of those deeper.
 
I suggest testing in at least .010"-.015" increments at first, fine tune in smaller increments after that if you want. 2.260", 2.245", 2.230", etc. You might be surprised how much jump some bullets like, and you're already quite a ways off the lands at mag length so no point in testing in small increments.

Makes sense. I went back and seated to 2.26, 2.25, 2.24, and 2.23. We'll see how that goes. On a side note, I'm gaining A LOT of confidence in my Forster Ultra Micrometer Seating die lol. That thing is money. I went from 2.26 down to 2.23, back up, and everything in between to the 50 thou mark at each interval. This is on a Dillon 550 with Armanov floating die/locking toolhead. VERY happy that it's giving me that much consistency.
 
Is there another piece of software that we can use?

There is OnTarget Precision Calculator / OnTarget TDS - PC, Taran (Javascript, runs from a folder),shotGroups (requires running the R programming language, but should run natively on MacOS)... so basically, no, not unless you're willing to put some effort in.

Probably the easiest solution would be to run Windows 10 inside some sort of virtual machine emulator like Oracle VirtualBox (free download) so that the software is effectively running inside a PC/x86 environment. It's actually pretty easy to set up and run, in the overall scheme of things - but it's probably an order of magnitude more than what the average Mac user is accustomed to.
 
I tried the On Target TDS once for doing this, but I came back to using RSI Shooting lab.

I recently got re-acquainted with RSI Shooting Lab. I'd forgotten that it had a target analysis module in it. It is kind of nice how it lets you overlay groups for comparison.
 
Your method of overlaying groups to find an accuracy node is pretty neat, I thought about doing the same to find a standard deviation node with a chronograph, although I am unsure of how well it will work. View attachment 7292447

something like this, I just used some data I had saved, but I figure it might be more useful if I had more than 5 charges.

Any suggestions?

-Kirby


Well, you could try my Accuracy Node Detection Technique.:)

..
 
Last edited:
  • Haha
Reactions: Gustav7
Well, you could try my Accuracy Node Detection Technique.:)

..

yes it certainly gives you some impressive results, but you mentioned it’s usefulness for finding a load that shoots great at ranges up to 200 yards, do you find that you get consistent velocities?

-Kirby
 
Velocity, arrg.
Forgotten, es and sd.

Was a " tool less" approach.
And at 200yd speed not a huge factor for ss ammo.
 
Is there another piece of software that we can use?


I spent a little more time using On Target TDS. It's a little more cumbersome to over-lay groups compared to RSI Shooting Lab, but once you've exported and imported the files of the targets to be over-layed, it works great for the Accuracy Node Detection Technique.

I used On Target TDS to over-lay targets #6, #7 and #8 as I did in the original post of this thread and the results were virtually identical to those obtained using RSI Shooting Lab.


On Target TDS

ANDT_composite_group_6_7_8_with_TDS_01_r-1429691.jpg
 
Here’s another example of my Accuracy Node Detection Technique; this time using the software program, On Target TDS. The AR-15 barrel used in this example was a stainless-steel 20” Noveske HBAR with polygonal rifling, a 1:7’ twist and the Noveske Match Mod 0 chamber. According to the late John Noveske, the Match Mod 0 chamber “was developed to fire MK262 Mod 1 on AUTO in hot environments."


noveske_20_inch_ar15_outside_02_resized-1618837.jpg


noveske_HBAR_01_resized_framed-1618501.jpg


noveske_HBAR_barrel_stamp_framed-1618504.jpg


WARNING!

Reloading is an inherently dangerous activity. The information provided here is for educational purposes only. It is not intended to be used for the actual loading of ammunition by the reader. No warranty, guarantee or assurance that these loads are safe is stated, suggested or implied nor should any be inferred. Usage of this information for the actual loading of ammunition may result in malfunctions, damage and destruction of property and grave injury or death to beings human in nature or otherwise. Don't even view this information in the presence of children or small animals.


The projectile used for this example was the Sierra 55 grain BlitzKing and the powder used was VihtaVuori N133. The following eight powder charges were used:


Target #1 - 24.0 grains

Target #2 – 24.2 grains

Target #3 – 24.4 grains

Target #4 – 24.6 grains

Target #5 – 24.8 grains

Target #6 – 25.0 grains

Target #7 – 25.2 grains

Target #8 – 25.4 grains


55_grain_bullets_comparison_04_resizedb-1618659.jpg


VihtaVuori N133

vihtavuori_n133_003-1353956.jpg


This test was conducted in the same manner as described in the original post of this thread. Eight 5-shot groups were fired in a round-robin manner to obtain six sets of three consecutive targets. These six sets of three consecutive targets were over-layed on each other using the On Target TDS software program to form six 15-shot composite groups and the mean radius was used to find the accuracy node. The results are shown in the graphics below.


andt_20_inch_noveske_barrel_001-1618493.jpg


Groups #5, #6 and #7 over-layed . . .


noveske_20_inch_andt_compsite_target_001-1618623.jpg


……
 
Last edited:
  • Like
Reactions: buggz and Tx_Aggie
I am just beginning to play with the 77gr tmk's. Do you have a posted recipe of what is working for you, and what are you using them in, if you don't mind me asking?

The 77 grain TMK eats-up a lot of case volume in the 5.56/223 Remington, so extruded powders are going to be quite compressed at AR-15 magazine length. I tend to favor ball powder with this particular bullet.


77_tmk_in_sectioned_case_001_resized-2207878.jpg


sierra_tipped_mk_02b_resized_JPG-2207888.jpg


....
 
Awesome write up. Just printed them off to add to all the others that you have posted.
Please keep your work coming.