I began reloading about a year ago. I started with reading several books that are written by the big manufacturers. I also read lots of stuff on the internet. What I learned is everyone has a different opinion on what the order of operations should be when you get to the bench with your freshly fired brass. I would like to hear some different opinions on what the process should look like including trimming, turning necks and checking concentricity. Thanks in advance for your replies.
Join the Hide community
Get access to live stream, lessons, the post exchange, and chat with other snipers.
Register
Download Gravity Ballistics
Get help to accurately calculate and scope your sniper rifle using real shooting data.

Install the app
How to install the app on iOS
Follow along with the video below to see how to install our site as a web app on your home screen.
Note: This feature may not be available in some browsers.
You are using an out of date browser. It may not display this or other websites correctly.
You should upgrade or use an alternative browser.
You should upgrade or use an alternative browser.
Reloading Order of Operations
- Thread starter Josh1978
- Start date
... I would like to hear some different opinions on what the process should look like including trimming, turning necks and checking concentricity. Thanks in advance for your replies.
It might help if you described your rifle and the type of shooting you are preparing your ammunition for.
I am currently loading for my RPR 6.5 prc. My goal is to shoot in some F class matches eventually. (not with this rifle) My current goal is to perfect my loading technique so when I am ready to start shooting in competition, that part will be out of the way.
I am currently loading for my RPR 6.5 prc. My goal is to shoot in some F class matches eventually. (not with this rifle) My current goal is to perfect my loading technique so when I am ready to start shooting in competition, that part will be out of the way.
If you want some of the best info you can get in F class, keep tabs on Erik Cortina on FB. Every so often he does a reloading/wind theory class. It’s worth it to fly down from wherever you are and take it.
Thanks for the info. I will start looking at what all he has to offer.If you want some of the best info you can get in F class, keep tabs on Erik Cortina on FB. Every so often he does a reloading/wind theory class. It’s worth it to fly down from wherever you are and take it.
I began reloading about a year ago. I started with reading several books that are written by the big manufacturers. I also read lots of stuff on the internet. What I learned is everyone has a different opinion on what the order of operations should be when you get to the bench with your freshly fired brass. I would like to hear some different opinions on what the process should look like including trimming, turning necks and checking concentricity. Thanks in advance for your replies.
OK, here my "opinion" on case prep
") . . .
. . .First, when you get new brass the process is a little different than after you've fire formed. So my very first step is to get the cases fire formed so the cartridges are uniform to the barrel's headspace. Sometimes it may actually take two firing to get that done with all the cases in the lot you intend to use. But before the first firing the I'll trim, chamfer and deburr the cases then set the neck tension to .002 by running a mandrel through the mouth. Often the neck tension will be .003 or more and the seating resistance for new cases is high and may require some lube inside the neck to reduce that resistance when seating.
So, after cases have been fire formed and annealed it's time to turn the necks. Here's the steps I take:
Deprime
Clean primer pocket with uniformer
Anneal (I anneal before cleaning so that the cleaning removes the burnt on residue)
Dry Tumble Clean - about 2 hrs (I use medium grain rice, long grain sticks in the flash holes)
Full Length Size (without the expander ball to maintain consentricity)
Dry Tumble Clean - about 10 minutes to removed lube
Trim case to length (I use a Giraud trimmer, which will also take care of the chamfering and deburring)
Run Expander Mandrel to size neck for turning
Turn Neck - removing about .001 (if that's what it takes to get down to the thinnest part - for my .308 I turn it down to .014)
Now that the necks are turned, my case prep process after each firing is this:
Deprime
Clean primer pocket with uniformer
Anneal
Dry Tumble Clean (about 2 hrs)
Neck size with Lee Collet Die (having a mandrel that gives me .002 neck tension)
Bump Shoulder back .002
Trim cases to length (using Giraud trimmer)
Then prime, charge, seat and fire.
If the cases happen to not chamber easy due to the repeated neck sizing, I'll full length size which will add an additional step of quick cleaning to remove lube.
Note too that I have not deburred any flash holes as I use Lapua and Peterson brass which I found don't need it. For any other brass, I'd do it in the first part of preping new cases before I do the first firing using a 21st Century flash hole deburring tool for it's design in avoiding chamfering the hole.
Last edited:
In the first paragraph, when you talk about setting neck tension by running a mandrel through the case neck to get the desired neck tension, are you doing this with a neck sizing die?OK, here my "opinion" on case prep
First, when you get new brass the process is a little different than after you've fire formed. So my very first step is to get the cases fire formed so the cartridges are uniform to the barrel's headspace. Sometimes it may actually take two firing to get that done with all the cases in the lot you intend to use. But before the first firing the I'll trim, chamfer and deburr the cases then set the neck tension to .002 by running a mandrel through the mouth. Often the neck tension will be .003 or more and the seating resistance for new cases is high and may require some lube inside the neck to reduce that resistance when seating.
So, after cases have been fire formed and annealed it's time to turn the necks. Here's the steps I take:
Deprime
Clean primer cup with uniformer
Anneal (I anneal before cleaning to that the cleaning removes the burnt on residue)
Dry Tumble Clean - about 2 hrs (I use medium grain rice, long grain sticks in the flash holes)
Full Length Size (without the expander ball to maintain consentricity)
Dry Tuble Clean - about 10 minutes to removed lube
Trim case to length (I use a Giraud trimmer, which will also take care of the chamfering and deburring)
Run Expander Mandrel to size neck for turning
Turn Neck - removing about .001 (if that's what it takes to get down to the thinnest part - for my .308 I turn it down to .014)
Now that the necks are turned, my case prep process after each firing is this:
Deprime
Clean primer cup with uniformer
Anneal
Dry Tumble Clean (about 2 hrs)
Neck size with Lee Collet Die (having a mandrel that gives me .002 neck tension)
Bump Shoulder back .002
Trim cases to length (using Giraud trimmer)
Then prime, charge, seat and fire.
If the cases happen to not chamber easy due to the repeated neck sizing, I'll full length size with will add an additional step of quick cleaning to remove lube.
Note too that I have not deburred any flash holes as I use Lapua and Peterson brass which I found don't need it. For any other brass, I'd do it in the first part of preping new cases before I do the first firing using a 21st Century flash hole deburring tool for it's design in avoiding chamfering the hole.
I understand what you are saying. You are using an expander mandrel to set neck tension. Sorry I am a little slow at times. LolIn the first paragraph, when you talk about setting neck tension by running a mandrel through the case neck to get the desired neck tension, are you doing this with a neck sizing die?

Thank you for your reply. I am going to print that off and use it like a check list as I go through the reloading steps.
BTW, I didn't do a very good job of proof reading and I refered to primer "cup" instead of primer "pocket" as I should have. Thought I'd point that out as I didn't want to have any confusion as to what I was really talking about.

Last edited:
Here is my process and rational for precision reloading:
1. Wipe clean brass with clean cloth. This keeps crap out of dies.
2. Deprime - I use a Mighty Armory Universal die to deprime. I started out with Lee Universal Depriming die and went through a ton of pins. The MA is still working on original pin for more than 3k cases
3. Anneal - I anneal each reloading. I run an AMP to get the best consistency. I started out with Annealeez which worked great but was somewhat slow. The AMP is 4 minutes for 50 rounds.
4. Lube - I use Dillon Lube or my own mix of 10:1 99% isopropyl alcohol to liquid lanolin. Never get stuck cases. Early on uses other brands and suffered several stuck cases, so I switched and solved the problem
5. Size - I do full length neck sizing each reloading. I use the Redding Type S dies with titanium nitride coating neck bushing. I remove the depriming stem and expansion button. On a Redding T7 press. Usual runout is .0005”. I use the Redding Competition Shell Holder to allow me to precision control of shoulder bump. I also use the Whidden click adjust dies which provides excellent control and consistency. Measurement are done with iGaging Absolute calipers with Forester precision case shoulder gauge and Ogive measurement gauge. Very consistent results and calipers are durable.
6. Clean - I wet tumble with 50/50 mix of SS pins and Southern Shine SS Chips. Solution is hot water with a good squirt of Dawn and 1/4 9 mm case of Lemishine. I recommend adjusting Lemishine based on the water you have. I run for 2-3 hours. Do not leave brass in solution for extended periods. Will turn the brass pinkish color. It has not damaged brass and will return to brass color after several cleanings. Brass comes out clean inside and outside. Makes inspection easier.
7. Dry - I towel dry after separating SS media then use a dehydrator to completely dry. Take 2 hours for complete drying. Multiple trays allows me to sort batch and calibers.
8. Inspection - I completely inspect each case for any flaws focusing on interior case head area for any signs of incipient case separation.
9. Trim/Debur/Chamfer - I use a Giraud case trimmer which performs all three action at one time. Can do 50 cases in less than 5 minutes. The result is all cases are consistent. I tried several other good brands but had inherent weaknesses.
10. Priming - I use the T7 press to prime. The feel allows me to sense any soft primer pockets which are culled out for fouler round. I mark them with marker and segregate them out. I do batches of 50.
11. Powder Charge - this is a topic of much discussion. This is my process. I run an A&D FX120i with Autoloader and Autotrickler and Area 419 enhancements. The scale provided incredible accuracy and is very fast. 8 seconds from pan insert to finished load with .02 grain (1 kernel of H4350/Varget)consistency. I previously tried several other scales which were good but slow. I kept my RCBS Chargemaster 1500 as a backup.
12. Bullet Seating - I mostly use Redding Competition Micrometer And Whidden Micrometer dies. Measurement are always done to ogive. In combination with Redding T7 resultant runout is sub .001” mostly .0005”.
As I seating I pay attention to felt pressure as seating. If I feel an inconsistency I cull the round. Rarely happens. I like the T7 because once I set the dies, I don’t have to touch them between sessions.
13. Labelling - I label each box with specifics of the loading on the primary label. Includes caliber, gun, date, loading data, case data, bullet data, primer data. Small secondary label records each batch to track times reloaded.
14. Unloading - I try to chronograph a few rounds of each batch to maintain data. I keep each box segregated to keep accurate track of number of reloadings.
15. Go back to 1.
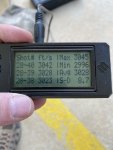
This has produced very consistent rounds. When I do verifications SDs are always single digit and mostly sub 5.
I have attached a batch of 40 rounds chronographed with SD of 8.7 FPS.
Happy Loading.
1. Wipe clean brass with clean cloth. This keeps crap out of dies.
2. Deprime - I use a Mighty Armory Universal die to deprime. I started out with Lee Universal Depriming die and went through a ton of pins. The MA is still working on original pin for more than 3k cases
3. Anneal - I anneal each reloading. I run an AMP to get the best consistency. I started out with Annealeez which worked great but was somewhat slow. The AMP is 4 minutes for 50 rounds.
4. Lube - I use Dillon Lube or my own mix of 10:1 99% isopropyl alcohol to liquid lanolin. Never get stuck cases. Early on uses other brands and suffered several stuck cases, so I switched and solved the problem
5. Size - I do full length neck sizing each reloading. I use the Redding Type S dies with titanium nitride coating neck bushing. I remove the depriming stem and expansion button. On a Redding T7 press. Usual runout is .0005”. I use the Redding Competition Shell Holder to allow me to precision control of shoulder bump. I also use the Whidden click adjust dies which provides excellent control and consistency. Measurement are done with iGaging Absolute calipers with Forester precision case shoulder gauge and Ogive measurement gauge. Very consistent results and calipers are durable.
6. Clean - I wet tumble with 50/50 mix of SS pins and Southern Shine SS Chips. Solution is hot water with a good squirt of Dawn and 1/4 9 mm case of Lemishine. I recommend adjusting Lemishine based on the water you have. I run for 2-3 hours. Do not leave brass in solution for extended periods. Will turn the brass pinkish color. It has not damaged brass and will return to brass color after several cleanings. Brass comes out clean inside and outside. Makes inspection easier.
7. Dry - I towel dry after separating SS media then use a dehydrator to completely dry. Take 2 hours for complete drying. Multiple trays allows me to sort batch and calibers.
8. Inspection - I completely inspect each case for any flaws focusing on interior case head area for any signs of incipient case separation.
9. Trim/Debur/Chamfer - I use a Giraud case trimmer which performs all three action at one time. Can do 50 cases in less than 5 minutes. The result is all cases are consistent. I tried several other good brands but had inherent weaknesses.
10. Priming - I use the T7 press to prime. The feel allows me to sense any soft primer pockets which are culled out for fouler round. I mark them with marker and segregate them out. I do batches of 50.
11. Powder Charge - this is a topic of much discussion. This is my process. I run an A&D FX120i with Autoloader and Autotrickler and Area 419 enhancements. The scale provided incredible accuracy and is very fast. 8 seconds from pan insert to finished load with .02 grain (1 kernel of H4350/Varget)consistency. I previously tried several other scales which were good but slow. I kept my RCBS Chargemaster 1500 as a backup.
12. Bullet Seating - I mostly use Redding Competition Micrometer And Whidden Micrometer dies. Measurement are always done to ogive. In combination with Redding T7 resultant runout is sub .001” mostly .0005”.
As I seating I pay attention to felt pressure as seating. If I feel an inconsistency I cull the round. Rarely happens. I like the T7 because once I set the dies, I don’t have to touch them between sessions.
13. Labelling - I label each box with specifics of the loading on the primary label. Includes caliber, gun, date, loading data, case data, bullet data, primer data. Small secondary label records each batch to track times reloaded.
14. Unloading - I try to chronograph a few rounds of each batch to maintain data. I keep each box segregated to keep accurate track of number of reloadings.
15. Go back to 1.
This has produced very consistent rounds. When I do verifications SDs are always single digit and mostly sub 5.
I have attached a batch of 40 rounds chronographed with SD of 8.7 FPS.
Happy Loading.
Attachments
Very similar here to @wpgk58 with a couple exceptions:
I am setting final neck tension with an expander mandrel
I use the Redding competition 3-die set and size necks / bump shoulder in separate steps as needed
Trim/Chamfer/Deburr is with a Henderson Trimmer
Primal Rights Primer Seater
Using Imperial Dry Lube before seating
Parts of this process are new for me, and I'm playing with load development on two rifles right now, so jury is still out on final accuracy and ES.
I tumble in walnut media and nu-finish car wax over night
Anneal case necks
Quick in/out of the neck with nylon brush
Full Length resize
Clean primer pocket
Trim chamfer with my Giruad, my brass is trimmed .010 from the end of the chamber, usually takes a few firings before the Giruad blade even touches the neck
Prime brass
Charge cases
seat bullets
Anneal case necks
Quick in/out of the neck with nylon brush
Full Length resize
Clean primer pocket
Trim chamfer with my Giruad, my brass is trimmed .010 from the end of the chamber, usually takes a few firings before the Giruad blade even touches the neck
Prime brass
Charge cases
seat bullets
Thank you all for your replies. I have never heard of the Whidden click dies so I will have do do some research.
The fx120i is my next purchase for my reloading bench. Can I purchase that scale with the auto trickle or is that something I have to purchase as an add on?
The fx120i is my next purchase for my reloading bench. Can I purchase that scale with the auto trickle or is that something I have to purchase as an add on?
It seems like I am in a constant state of load development. I like to tinker so I will try different bullets and powder to see how the perform. Gives me a better understanding but leaves me with a lot of 3/4 pound bottles of powder.Very similar here to @wpgk58 with a couple exceptions:
I am setting final neck tension with an expander mandrel
I use the Redding competition 3-die set and size necks / bump shoulder in separate steps as needed
Trim/Chamfer/Deburr is with a Henderson Trimmer
Primal Rights Primer Seater
Using Imperial Dry Lube before seating
Parts of this process are new for me, and I'm playing with load development on two rifles right now, so jury is still out on final accuracy and ES.

It seems like I am in a constant state of load development. I like to tinker so I will try different bullets and powder to see how the perform. Gives me a better understanding but leaves me with a lot of 3/4 pound bottles of powder.
It's when I find that I am buying bullets that I might want to try...when I have finished using the 3000 bullets I have that I KNOW shoot well...that's when I know I'm in trouble...
Similar threads
- Replies
- 38
- Views
- 1K
- Replies
- 14
- Views
- 557
- Replies
- 11
- Views
- 1K
