I picked up a used rem 700 ADL varmint 223 with a cracked trigger guard (plastic) around the rear screw, ordered an steel replacement from midway and this is the issues I'm having. The guard fits tightly and you have to kind of work it in but there's a little bit of play, also the back end fits flush with the stock but the front juts out slightly, when attempting to torque it down you can feel the screws binding, I'm assuming I may have to sand the front end down a little but wanted to here your guys opinion first. This is a factory replacement ADL trigger in steel ( black matte) it should drop right in, why I'm having so much trouble I don't know.
Join the Hide community
Get access to live stream, lessons, the post exchange, and chat with other snipers.
Register
Download Gravity Ballistics
Get help to accurately calculate and scope your sniper rifle using real shooting data.

Install the app
How to install the app on iOS
Follow along with the video below to see how to install our site as a web app on your home screen.
Note: This feature may not be available in some browsers.
You are using an out of date browser. It may not display this or other websites correctly.
You should upgrade or use an alternative browser.
You should upgrade or use an alternative browser.
Gunsmithing Rem 700 trigger guard upgrade issue.
- Thread starter Clayed21085
- Start date
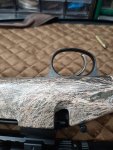
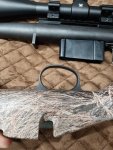
Here's a few picks so we are on the same page, you can see the difference with action out and after it's been tightened down, and the screws are not binding as bad as I initially thought, dropping the back screw in first seems to help and everything seems secure, just the front part seems a little pushed out.
Attachments
I would say try to remove a bit of stock material from beneath the front of the trigger guard where it's being held up.
This type of stuff is pretty common even between the same Manufacturer, Model, etc. It's easier to remove material from the stock than the steel trigger guard. Just got out a very little at a time until your ADL guard is flush with the stock. That should help your binding issue too as the screw holes should line up better.
At least that's how I'm picturing it in my mind.
ETA: If you go too far, digging into the stock then that's ok. You can fill with bedding compound or JB Weld, etc... to get the perfect level you want. I'm not very familiar with factory Remington 700 ADL stocks. Got any pics of the opening in the stock for the ADL trigger guard? I know some 700 factory stocks are kind of hollow like. Just curious as to what the interior of your stock looks like. That'll help us guide you on how to remove material to level the trigger guard. Hopefully it's stock material holding it up and not something else, steel...
Can you tell what it is being held up by? Stock material or?

It's just stock material, synthetic stuff, easy to sand I would assume. I'm thinking just regular fine sandpaper would work?
Assuming just plain course sandpaper, followed by some fine stuff? In the area where the front of the guard is being pushed up. Unless there's a particular tool/method. As you see in the picture it doesn't have to go down very much.
Remington also uses thin washers under the rear of the trigger guard to level them out.
I've had 4 rifles with the extra washer(s).
I've had 4 rifles with the extra washer(s).
I would use a washer, but I don't want the back screw going in any shallower than it is, I think slightly sanding down the front is the ticket. But I will keep that in mind, are they metal washers?Remington also uses thin washers under the rear of the trigger guard to level them out.
I've had 4 rifles with the extra washer(s).
Just make sure the front and rear surfaces under the trigger guard are parallel or it will break the new guard.
Use some type of straight edge to verify it.
Use some type of straight edge to verify it.
Wouldn't the trigger guard itself be your straight edge? With one side higher you can see that under it the stock is not perfectly parallel to the other side?Just make sure the front and rear surfaces under the trigger guard are parallel or it will break the new guard.
Use some type of straight edge to verify it.
You can use it as a straight edge if you install one bolt and look to see if it sits level.
Pull that bolt and install the other. If it doesn't raise up on either end, then you should be good
Pull that bolt and install the other. If it doesn't raise up on either end, then you should be good
I just sanded down the material a little inside the stock last night with what I had, the guard isn't completely flush with the stock but it is sitting much flatter and the bolts go in smoother without binding, so for the most part I'm happy and I'm not sure if going any further is necessary?
I just sanded down the material a little inside the stock last night with what I had, the guard isn't completely flush with the stock but it is sitting much flatter and the bolts go in smoother without binding, so for the most part I'm happy and I'm not sure if going any further is necessary?
It's up to you really... If your happy with it then it is fine. The major factor here is that your trigger guard screws are now fitting properly. You can mess with it and get it perfectly flush without much hassle. Good practice if you ever plan on bedding a stock too. It's a lot of trial and error sometimes fitting stocks without milling them out. Even then there's usually a little hand fitting to get everything just right.
As long as your good with it, thats all that matters. Good job on getting it fixed by the way, always a good feeling to solve a problem and get it fixed.
Similar threads
- Replies
- 7
- Views
- 412
- Replies
- 5
- Views
- 407
