• Watch Out for Scammers!

    We've now added a color code for all accounts. Orange accounts are new members, Blue are full members, and Green are Supporters. If you get a message about a sale from an orange account, make sure you pay attention before sending any money!

Fieldcraft Rifle Painting Tutorial

Trigger Monkey

Ronin
Full Member
Minuteman
  • Apr 29, 2005
    4,227
    4,962
    Winchester Virginia
    I received quite a few PM's when I painted my rifle and saw even more when JerryR painted his, all of them asking the same thing...How did you do that? Well I painted two of my rifles last week and thought it would be a good opportunity to show you how I and Jerry painted our rifles. The materials necessary are:

    Masking Tape
    Alcohol or Acetone
    Paper Towels / Lint Free Rags
    Exacto knife or Box Cutters
    Ear Plug
    Krylon Ultra Flat Khaki, Green, and Brown
    1 or 2 Bundles of Fake Grass or Real Grass for that matter.

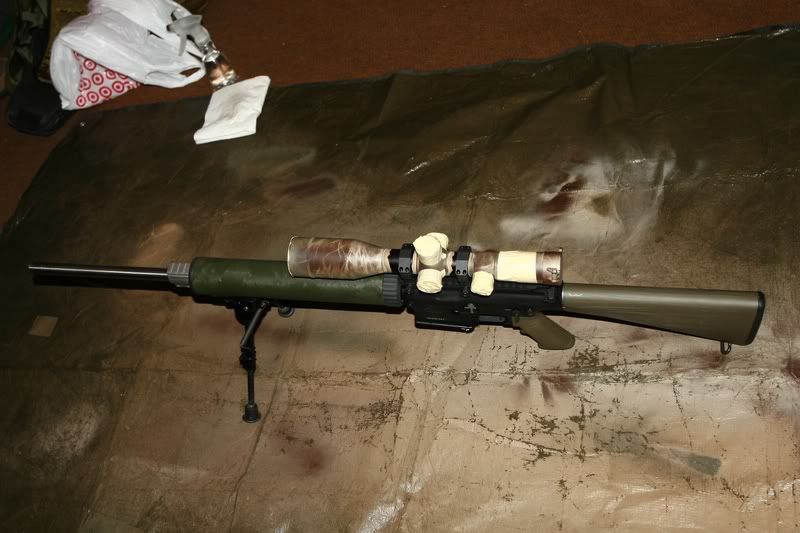
    Step 1...Preparation
    This is the most important step and involves taping off the action, trigger, turrets, objective lens, and anything else you don't want painted. Next is roughing up plastic parts with fine grit sand paper to allow the paint to adhere better. Degreasing the rifle and components is done to remove the oils from the hands, cleaning solvents, etc..that may prevent the paint from sticking and curing properly. Plug the barrel with the ear plug to prevent paint from getting down into the bore. In the end the rifle will look something like this:
    PT1.jpg


    Step 2....The base coat.
    I like to use the Krylon Ultra Flat Khaki as a base coat when I paint. It's actually pretty simple, use a slow sweeping motions going the length of the weapon without creating runs. It will start out looking like this:
    PT3.jpg


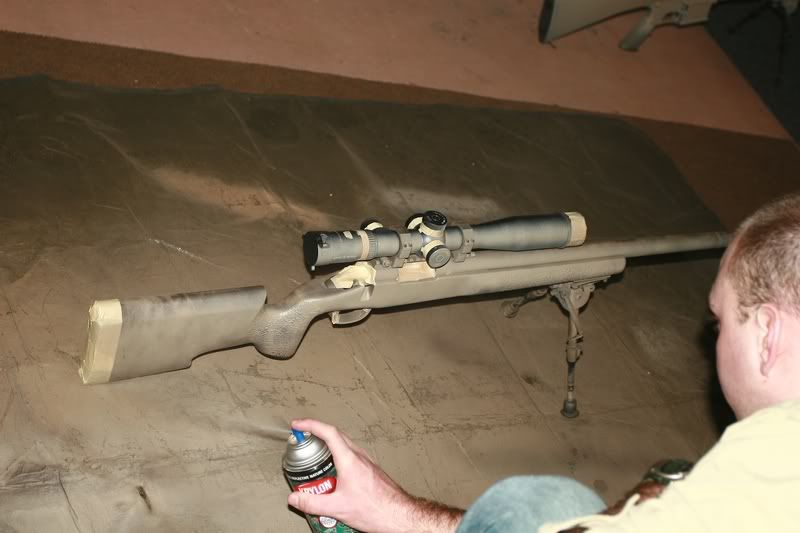
    And end looking like this:
    PT5.jpg


    If it's kind of chilly where I'm painting then I'll use a blow dryer to help the paint dry initially and then I let it sit for 15 minutes. I've found that if it cold out when painting the paint will turn out more glossy, especially the brown, but using a blow dryer helps take care of that.

    Step 3...Using the stencil
    Take the bundle of grass(real or fake) and splay it out with your hand and hold it up to the rifle. This is where the pattern comes down to personal preferance, if you just use short shots of paint then you'll get the more grassy texture, using sweeping motions will give you a blend of splotching and some streaking. I like to start with green,here's a photo example:
    PT6.jpg


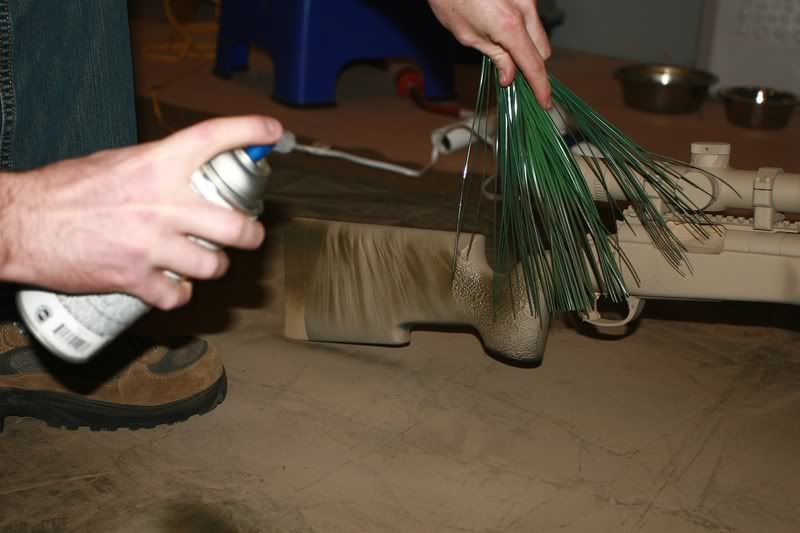
    The AR10 after getting some green:
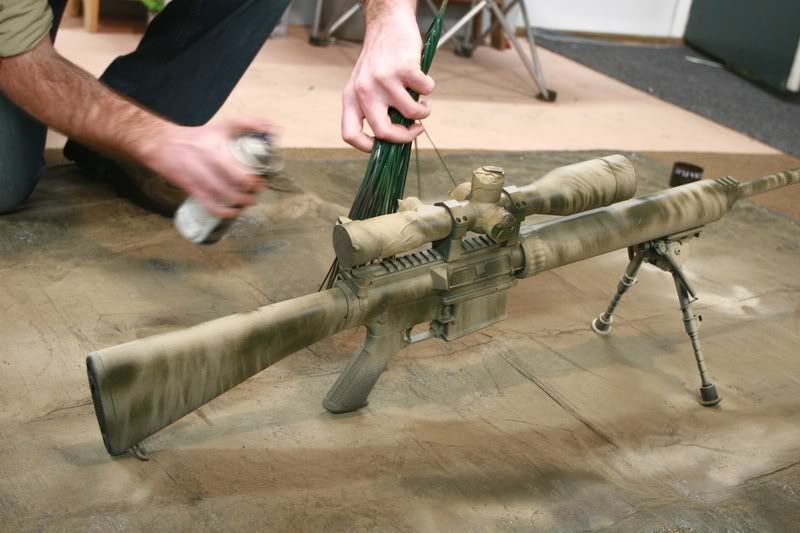
    PT9.jpg

    The Remington:
    PT7.jpg


    Again let sit for 15 minutes.

    Step 4...Now on with the Brown
    PT8.jpg


    You can alternate the position of the bundle to creat different patterns and textures to help break up the rifle. Let sit 15 minutes.

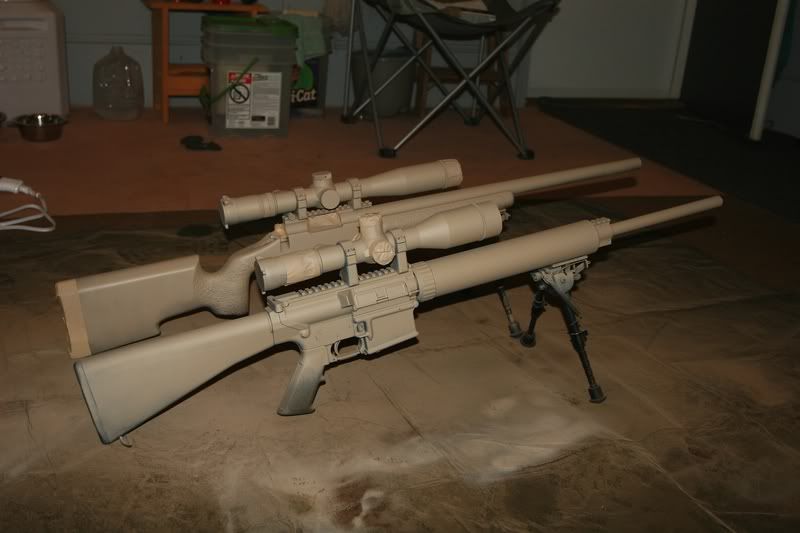
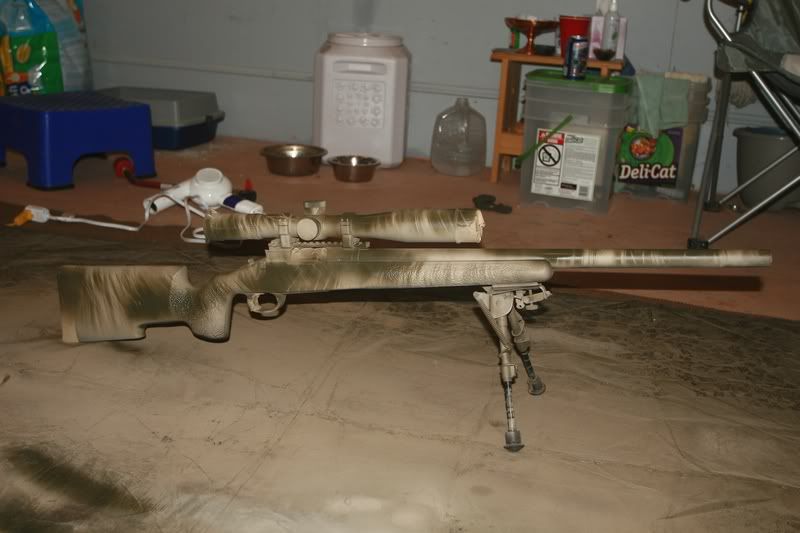
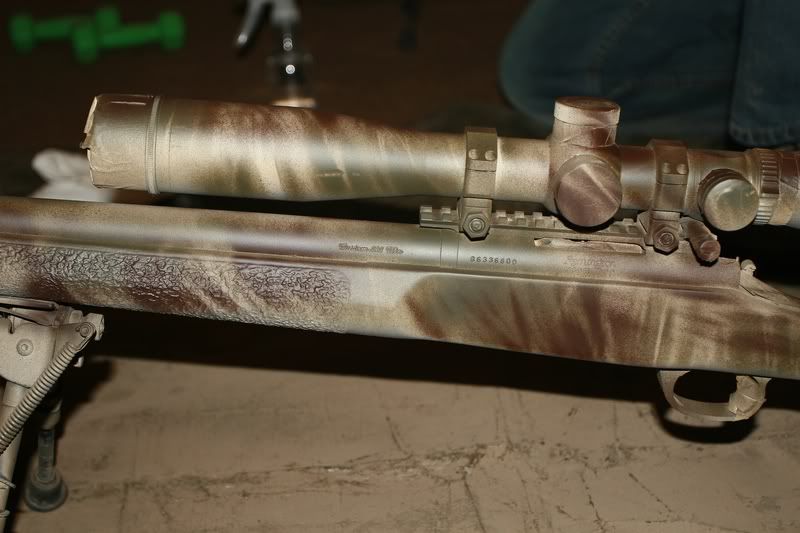
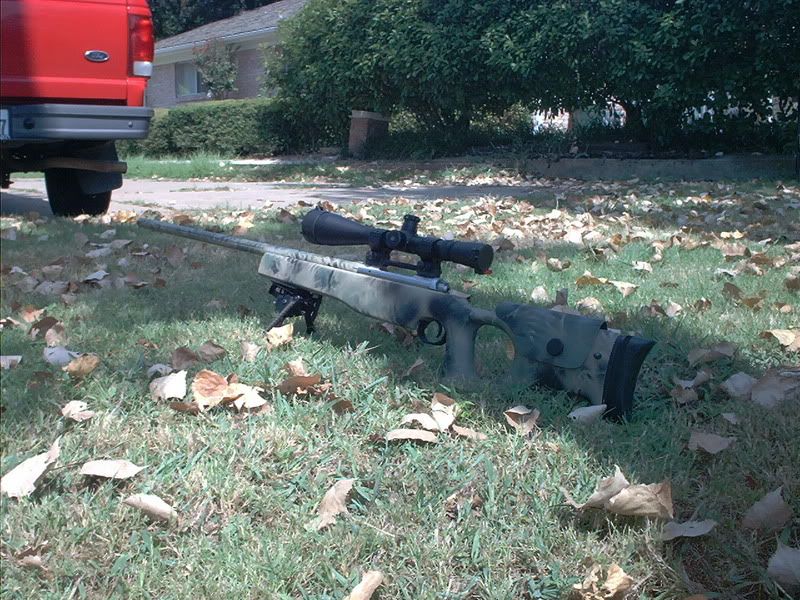
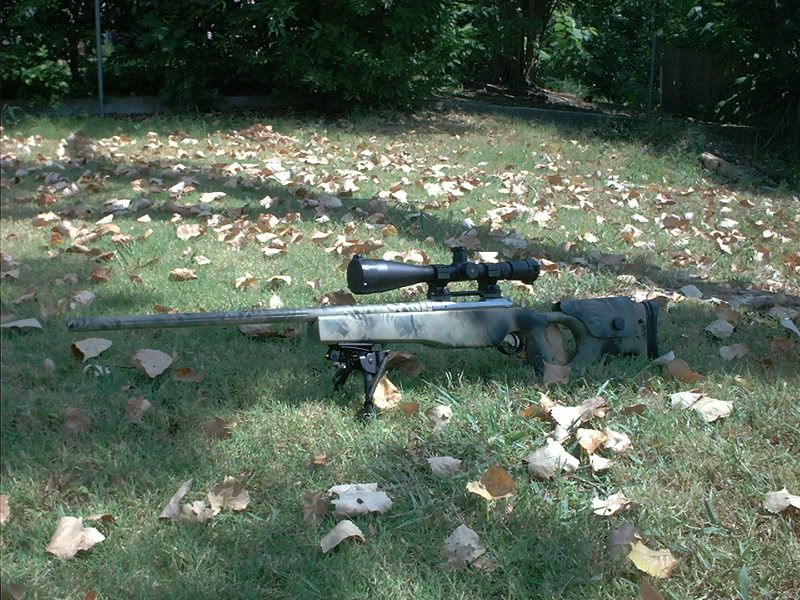
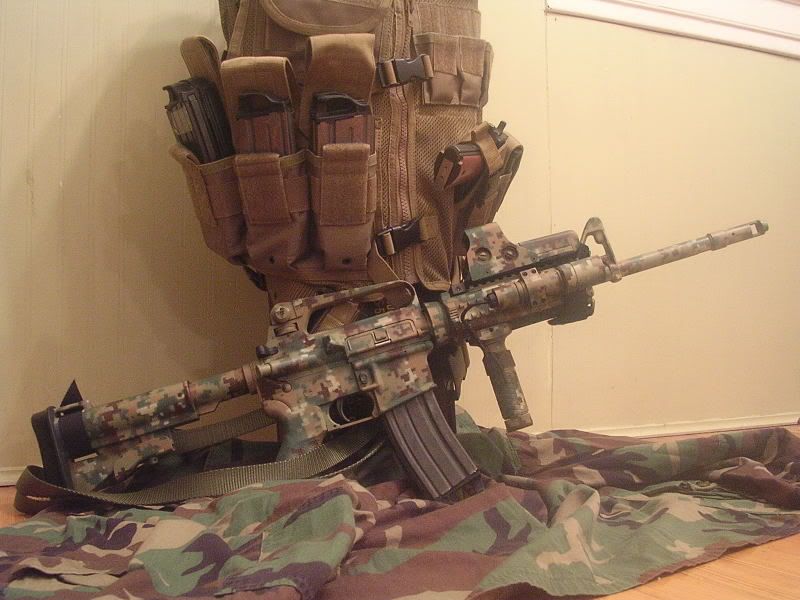
    Step 5...The end result:
    PT10.jpg

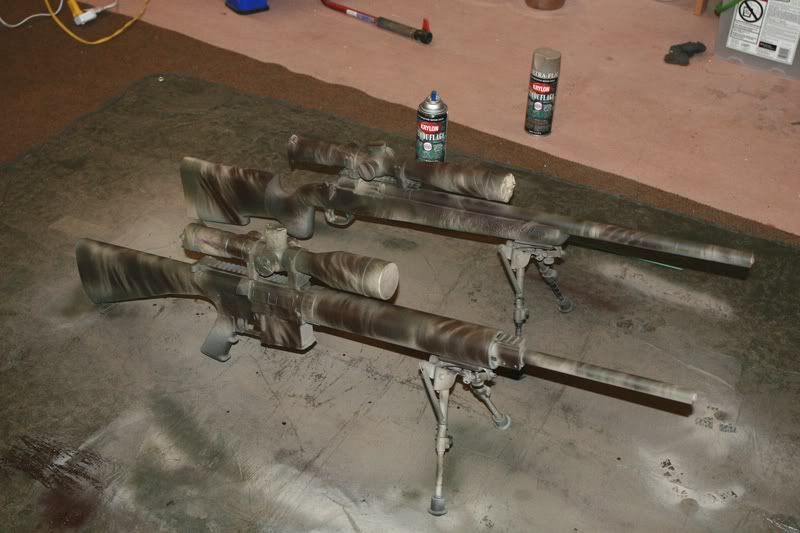
    $20 worth of stuff to paint $10,000 worth of optics and guns, ain't life grand.

    It's at this time that you peel off the masking tape and remove the barrel plug...congratulations you've just painted a rifle.

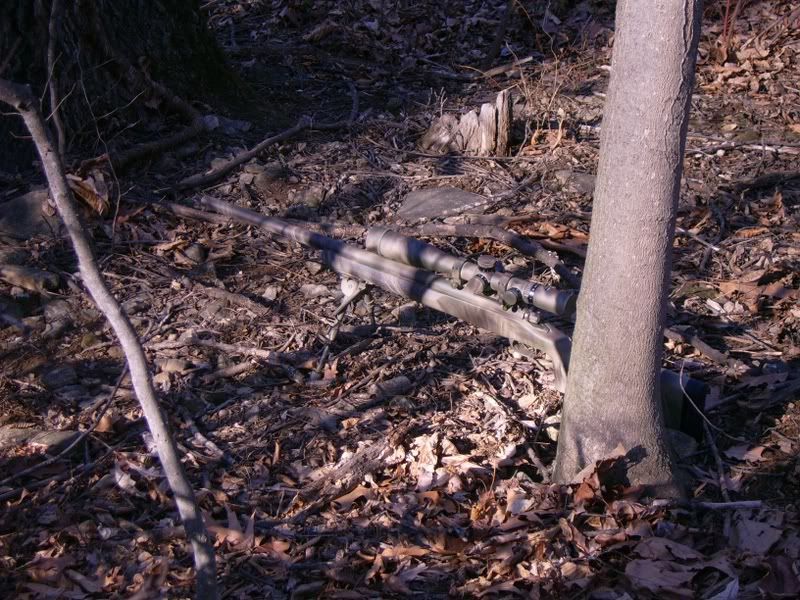
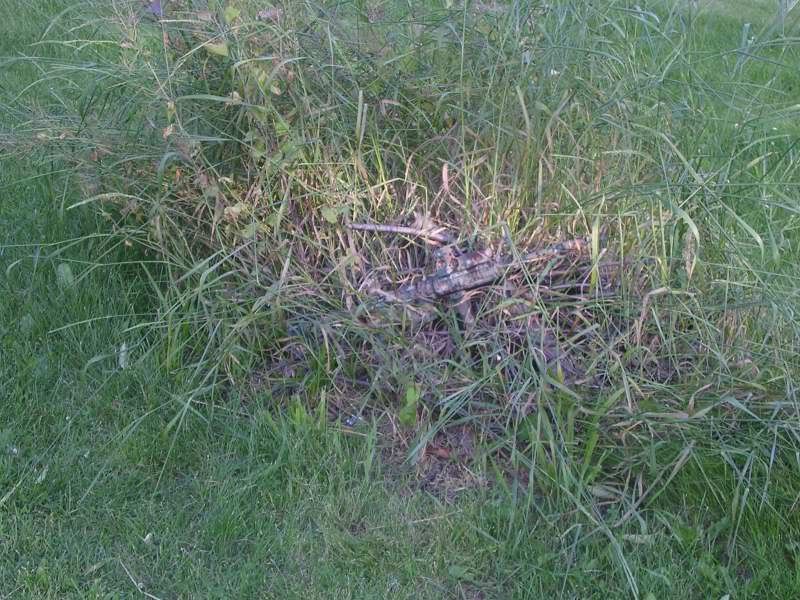
    Here's the Remington in the woods to see how the pattern/color combination works:
    PT11.jpg


    Re: Rifle Painting Tutorial

    Nice job with the paintjobs and the tutorial! It should be very helful to some members.

    s6
     
    Re: Rifle Painting Tutorial

    Good tutorial. Thanks for taking the time to do it. Rifles turned out great.
     
    Re: Rifle Painting Tutorial

    What do you use to protect the lenses of your scope other than the B/C flip up caps?

    Ed
     
    Re: Rifle Painting Tutorial

    You can line the inside with cotton balls and I've heard of some people using a piece of celophane. In all of the weapons I've painted thoughI've never had a problem with paint leaking but that doesn't mean it couldn't happen. The BC caps that came on the two S&B's are very secure and close tight so I was confident I wouldn't get any paint on the ocular lenses.
     
    Re: Rifle Painting Tutorial

    That's exactly how I do it. Usually use some cedar as well.

    clarice.jpg
     
    Re: Rifle Painting Tutorial

    Great pics and tutorial! It will help me paint my new Marlin 22mag coming in this week. Thanks!
     
    Re: Rifle Painting Tutorial

    Trigger Monkey

    Bro this is exatley what I have been looking for. Great tutorial, easy to follow, great pics. I feel confident to tackle my 700P now.


    Thanx
    Scrat
     
    Re: Rifle Painting Tutorial

    Do you guys worry about the Krylon melting near the action and muzzle from the solvents and oils? Or does that just add to the magic?
     
    Re: Rifle Painting Tutorial

    You just blast it again every once in a while if it wears off too much.
     
    Re: Rifle Painting Tutorial

    Great post! The only thing I would add is that you should practice your pattern on some cardboard to make sure that it is the look that you are wanting. You will have a good idea of what it will look like and may want to spread or tighten the pattern or use a different material to ge the look you are wanting.

    Excellent tutorial.

    Cuda.
     
    Re: Rifle Painting Tutorial

    <span style="font-size: 11pt"><span style="font-family: 'Comic Sans MS'"><span style="color: #3333FF"><span style="font-style: italic"><span style="font-weight: bold">Good write up very similar to my process. Its all in the prep work, masking tape and playdoh are your friends here, only thing i do different is the base coat. I use duracoat for well obvious reasons, the base never gets removed just spray some krylon etc to touch or change camo scheme.</span></span></span></span></span>
     
    Re: Rifle Painting Tutorial

    Great post, thanks much!
     
    Re: Rifle Painting Tutorial

    thanks helped a lot with painting BB gun for practice next step up is my rifle tomorrow

    what is that you used as your stencil
     
    Re: Rifle Painting Tutorial

    Trigger Monkey et al;

    How has your rifle held its paint? Has any worn off or just washed away?

    I just painted an old Crosman pellet rifle today, mostly using your technique. I wanted to try a cheap gun before I tackle my Rem 700 with Leupold.

    The Krylon camo paint dries (so far) with a very flat finish. Looks like my flat interior latex in my house, which will stain if you touch it with a sweaty hand...does this happen with your rifle?

    I was thinking about going with a gloss paint, if that is more "print proof"(?).

    Thanks.

    bluedsteel
     
    Re: Rifle Painting Tutorial

    Dude...honestly I don't worry about getting dirty prints on the finish or if it's chippig off because my gun gets used and I'm proud of the fact. It's Krylon...if it wears down too much then I grab a couple of cans and re-do the finish, that's all, it's not supposed to last forever.
     
    Re: Rifle Painting Tutorial

    Great thread guys, outstanding tutorial......Ive got to see if the department will let me paint my baby up, then again, if I just do it, it'll be too late for them to complain......
     
    Re: Rifle Painting Tutorial

    Mike TRT....<div class="ubbcode-block"><div class="ubbcode-header">Originally Posted By: Mike TRT</div><div class="ubbcode-body">Great thread guys, outstanding tutorial......Ive got to see if the department will let me paint my baby up, then again, if I just do it, it'll be too late for them to complain...... </div></div>

    Exactly! Don't ask. Just grab the rattle can and get to work. Thats what I did with my department guns.

    s6
     
    Re: Rifle Painting Tutorial

    So yeah, posted this last night buuuut it got axed.
    Awesome paint job, good tutorial, kudos.
    First question: The idea of taking Krylon to any of my rifles makes me pretty nervous. Trigger, could you go into a little more detail as to what needs to be done to prep the gun so as to prevent damage?
    Second question: What kind of scheme would one choose if the rifle would only be used in urban environments? I was thinking like matching up krylon colors to asphalt, cement, stucco, fence, brick, etc. Any ideas or tips?

    Thanks!
     
    Re: Rifle Painting Tutorial

    To prep the surface you first have to make sure that it's free from dirt, oils, and any other residue that would prevent the paint from sticking. One way I do this is to simply use 90% rubbing alcohol in a spray bottle or acetone on a rag and completely rub down gun, every part that is going to get painted gets sprayed. With some plastic parts like the stock or flip caps I'll rough the surface up with a piece of sand paper to help the paint stick. Go back over those areas with acetone or rubbing alcohol to remove an loose particles.
    Next is making sure all of those areas that you don't want paint to get to are taped off and this is probably the most time consuming part. I use straight masking tape and I use both the 1" and 2" wide rolls to tape off the optic, action, trigger area, gas port, etc... At this point you can leave the bolt in the weapon and then tape up the ejection port, this way the bolt shroud and bolt handle will have the same pattern and shading. If you're nervous about getting paint inside the flip caps just stuff the inside with cotton balls and you should be fine. Also make sure to seal off the muzzle to prevent paint from entering the bore, you can use tape or an ear plug.
    As for pattern, use what you think will work best in your urban environment and how you might operate in that environment. I've been thinking about this very subject by looking around at what's in my town and honestly the scheme that I have on there right now would probably work. There is a lot of greens, browns, and tans already around the town with some concrete or asphalt too. There really is no easy answer because I'd probably just use the finish that I have now and worry about finding a good shooting position where the I'm back in the shadows. However some ideas to think about are instead of using leavies, use some cardboard to make more blocky shapes and angles similar to bricks, boards, and boxes. There really is no easy answer but I hope this helps and gives you some ideas.
     
    Re: Rifle Painting Tutorial

    <div class="ubbcode-block"><div class="ubbcode-header">Originally Posted By: Trigger Monkey</div><div class="ubbcode-body">To prep the surface you first have to make sure that it's free from dirt, oils, and any other residue that would prevent the paint from sticking. One way I do this is to simply use 90% rubbing alcohol in a spray bottle or acetone on a rag and completely rub down gun, every part that is going to get painted gets sprayed. With some plastic parts like the stock or flip caps I'll rough the surface up with a piece of sand paper to help the paint stick. Go back over those areas with acetone or rubbing alcohol to remove an loose particles.
    Next is making sure all of those areas that you don't want paint to get to are taped off and this is probably the most time consuming part. I use straight masking tape and I use both the 1" and 2" wide rolls to tape off the optic, action, trigger area, gas port, etc... At this point you can leave the bolt in the weapon and then tape up the ejection port, this way the bolt shroud and bolt handle will have the same pattern and shading. If you're nervous about getting paint inside the flip caps just stuff the inside with cotton balls and you should be fine. Also make sure to seal off the muzzle to prevent paint from entering the bore, you can use tape or an ear plug.
    As for pattern, use what you think will work best in your urban environment and how you might operate in that environment. I've been thinking about this very subject by looking around at what's in my town and honestly the scheme that I have on there right now would probably work. There is a lot of greens, browns, and tans already around the town with some concrete or asphalt too. There really is no easy answer because I'd probably just use the finish that I have now and worry about finding a good shooting position where the I'm back in the shadows. However some ideas to think about are instead of using leavies, use some cardboard to make more blocky shapes and angles similar to bricks, boards, and boxes. There really is no easy answer but I hope this helps and gives you some ideas.</div></div>
    Gracias!
     
    Re: Rifle Painting Tutorial

    I just kryloned my 270WSM tonight, and I used brake-kleen and it took all of the oils off of it, a little air blow job and it is ready. Removed the trigger assembly and put the bolt back in and locked it down and started spraying.

    But like said before it is just krylon and not a beauty contest, just spray again if it gets worn and if it looks bad just grab the brake-kleen again.

    I will get up some simple pics to add on here.

    Joe Oakes
     
    Re: Rifle Painting Tutorial

    Just sand down the stock a little with a finer grit sandpaper. you just need to get some of the finish off of it, so it becomes slightly porous.
     
    Re: Rifle Painting Tutorial

    Excellent posts!

    I've got some painting to do.
     
    Re: Rifle Painting Tutorial

    Trigger Monkey,

    Great tutorial, I am planning on painting my rifle that way. I have one question. I live in Northern Michigan and I was wondering if having a light or dark base coat will work better where I live and shoot. The area has a lot of pines and a lot of green.
     
    Re: Rifle Painting Tutorial

    Any idea on what the guys at CWSI used to lay down the "mesh look" on their rifles. I have tried all mil issued crap I have, every camo cover, netting, ... I can lay my hands on. None turn out as well as theirs.
     
    Re: Rifle Painting Tutorial

    I've accomplished many different camo patterns, since working with ghillie suit, this has been the most effective camo on my rifle (s).

    Went about mine, like the ones posted above.

    509411-big.jpg


    509412-big.jpg


    I also,some times add burlap or ghillie wrap, around scope & barrel.
    (hasnt messed up MOA any.)

    TG
     
    Re: Rifle Painting Tutorial

    This is what I did to my Savage 12 FVSS .308.
    It's a work in progress. I used Krylon paint and local vegitation for the spray patterns.
    I haven't painted the scope yet because I'm waiting for my low rings which are back-ordered.

    Savage 12 FVSS
    Technicarbon Dynamics Stock

    Savage308_1.jpg
    Savage308.jpg
     
    Re: Rifle Painting Tutorial

    This is a Krylon job I did awhile back. Just matched colors to my AO. Cost me $22 in paint and $42 in beer. MARPAT was fun but the next one will probably use the grass/brush pattern or something similar. Did see one once that used a field net-looked great.

    Somewhere in this brush.....
    DSCN1868.jpg


    is this rig.
    SHTF2.jpg
     
    Re: Rifle Painting Tutorial

    Looks damn good PFC. Here is a shorty that my friend wanted to buy from me if we'd camo it for him. He wanted something diff and actually helped. Sprayed it with matte clear to help protect finish but that has to be toned down after it cures for a few more days.
    P1000118.jpg

    P1000119.jpg

     
    Re: Rifle Painting Tutorial

    I used this tutorial to help me paint my rimfire. First camo job I have ever done. I think it turned out well. Painted my barrel too. Had a little trouble with that.

    Before
    url]
    [/img]

    After
    url]
    [/img]


    Re: Rifle Painting Tutorial

    Thanks for the info . I have toyed with camo enough now that all my buddies want me to do their stuff but have never used this process . This rifle took me less than a half an hour using the plan outlined here .

    517305-big.JPG


    517306-big.JPG
     
    Re: Rifle Painting Tutorial

    You guys do good work!!! Those really look nice. I have not tried the grass pattern but I like that.. Here is a McMillan M1A stock I just did for a guy, and my Remy 338 Win mag I bedded in an HS sporter stock
    These colors are Woodland green&Brown, Desert Tan
    4vq5ier.jpg

    4xy9axk.jpg

    4lnw2mr.jpg


    These colors are OD Green, Woodland Brown,matte Black
    29tppg.jpg

    f20rae.jpg

    am6sk9.jpg
     
    Re: Rifle Painting Tutorial

    painted the 700P and 700LTR's tonight with my mate luke in the garage. tamiya model paint Dark Brown (RAF) and Dark Green (RAF).

    textured with scrim netting at the end over the earth brown base.


    good to go, will get field pics asap.

    DSC00465.jpg


    DSC00477.jpg


    DSC00485.jpg


    DSC00531aa.jpg


    DSC00521va.jpg


    DSC00529ba.jpg


    DSC00535a.jpg


    DSC00536a.jpg


    DSC00531aa.jpg


    hope you like
    grin.gif
     
    Re: Rifle Painting Tutorial

    Where did you guys buy the paint? I went to Lowes, Home Depot and Walmart and could not find Krylon in any of the above mentioned colors.
     
    Re: Rifle Painting Tutorial

    <div class="ubbcode-block"><div class="ubbcode-header">Originally Posted By: SymteX</div><div class="ubbcode-body">Where did you guys buy the paint? I went to Lowes, Home Depot and Walmart and could not find Krylon in any of the above mentioned colors. </div></div>

    ACE hardware stores
     
    Re: Rifle Painting Tutorial

    Thanks for the info guys! What a great topic. Now i have to find a paint similar to your krylon, cause australia does not have it.. and do it after my frigging exams next week