

I thought you guys might be interested in hearing about my experience taking a tactical rifle gunsmithing class with Robert Gradous.
<span style="font-weight: bold">Robert Gradous Rifles Gunsmithing Class
</span>
Tactical Rifle build parts list:
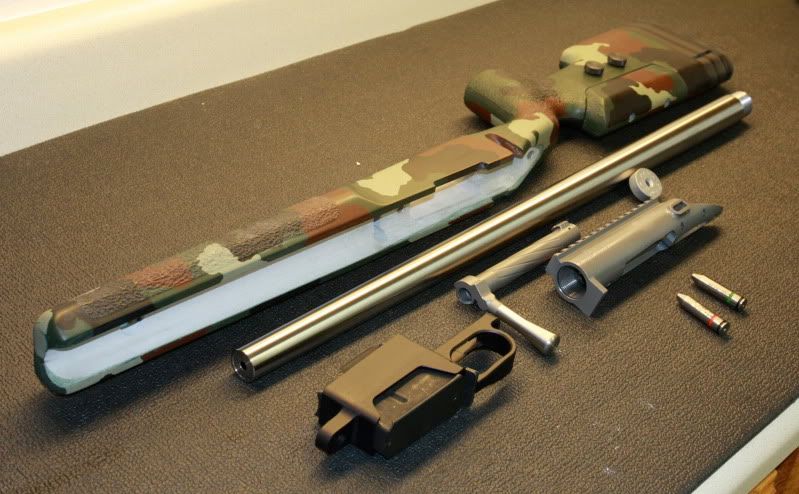
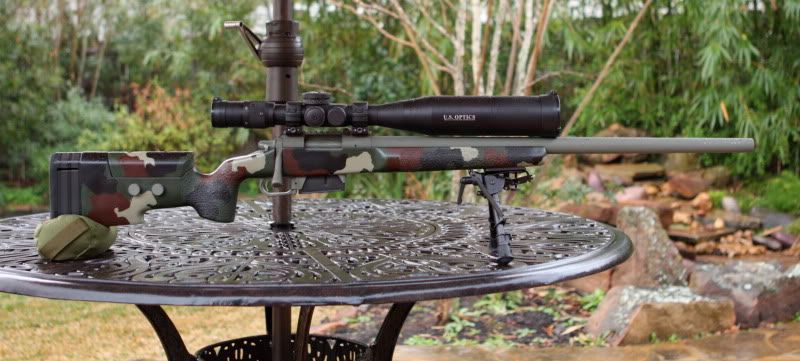
<ul style="list-style-type: disc">[*] Surgeon short action repeater[*] 5C MTU contour 7.5 twist in .243[*] Detachable Bottom Metal[*] HVR Trigger[*] A-5 stock with adjustable cheek piece woodlands camo[/list]
A special thanks of appreciation to Preston Pritchett and all the people at Surgeon Rifles, Inc. for the Action, Bottom metal, Jewell HVR trigger and McMillan stock. Additionally, Tim North at Broughton Barrels who sent two barrels. Without help from these great people this project wouldn’t have been possible.
Day One: Meet and greet.
I met up with Bill Zollo and followed him to Robert Gradous’s workshop. After introductions and a full tour of the facilities, we all piled into Robert’s truck with his son’s hunting rifle and headed to a field a half mile away that had a 4’x4’ steel plate. Robert started off and shot at the plate 500 yards away using his driver’s mirror as a rest. Robert wanted to give me the full comforts of a Texas deer shoot, so he let me follow his lead and shoot off his mirror too. Later, Robert and I went back to his shop and went over the next days schedule. We stayed awhile going over all the parts that we were going to be working with; barrel, action, stock, bottom metal and trigger. We made the necessary measurements that we will need, so that first thing the following day we are on the lathe making cuts.
Day Two: First day of the rifle build. Barrel work.
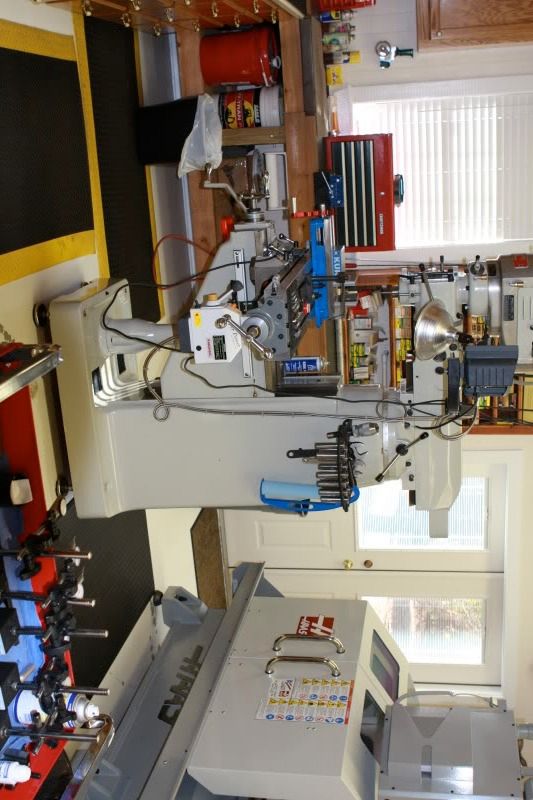
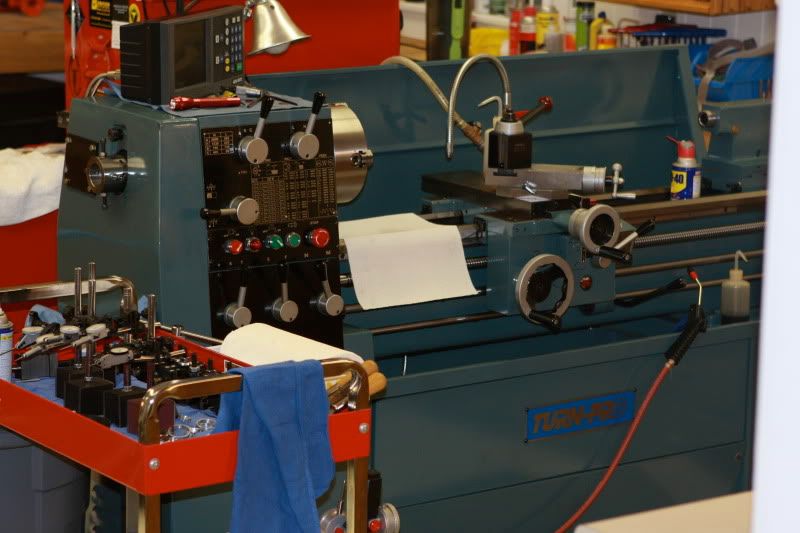
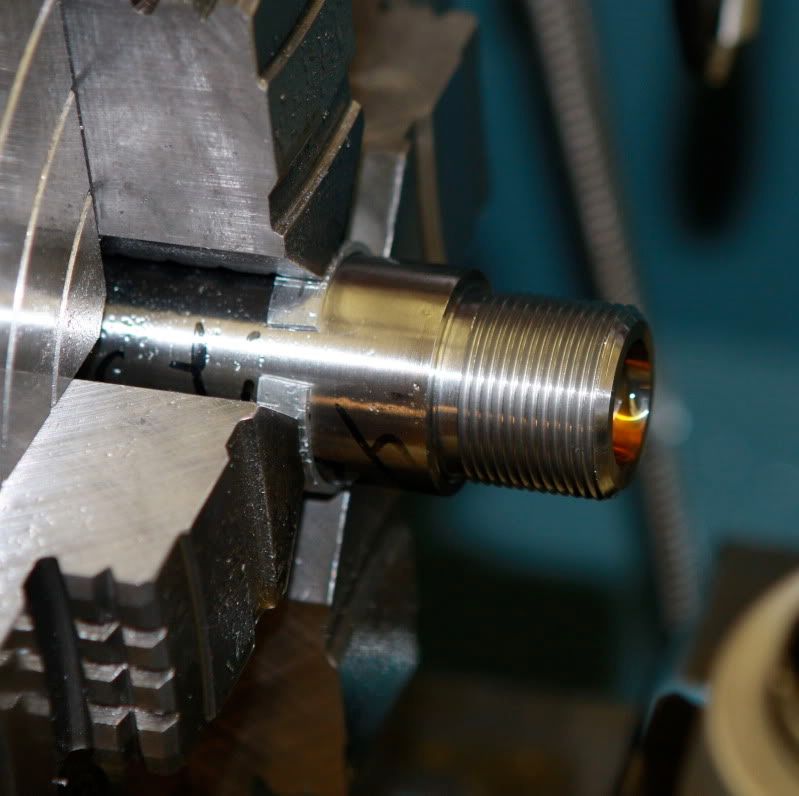
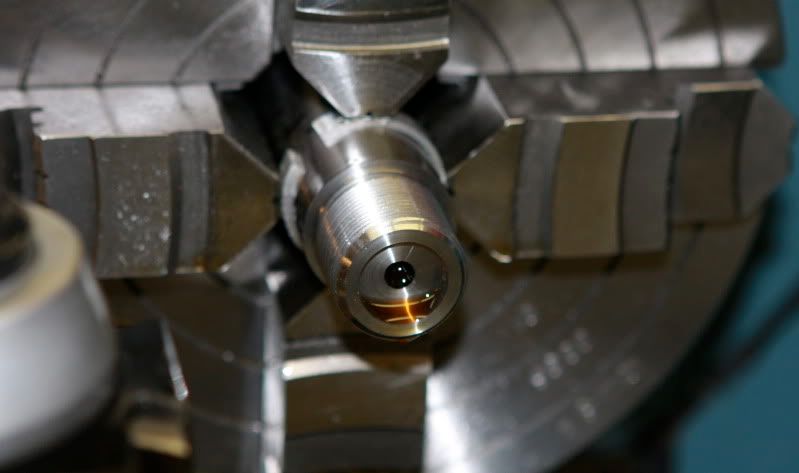
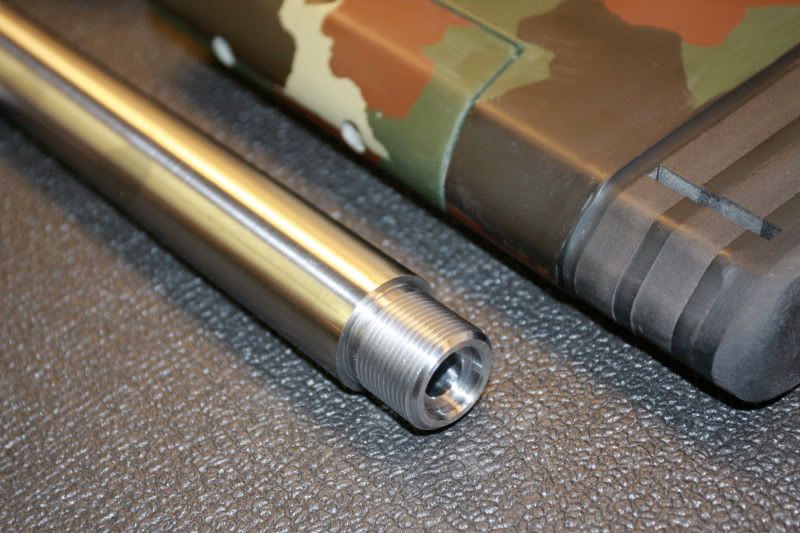
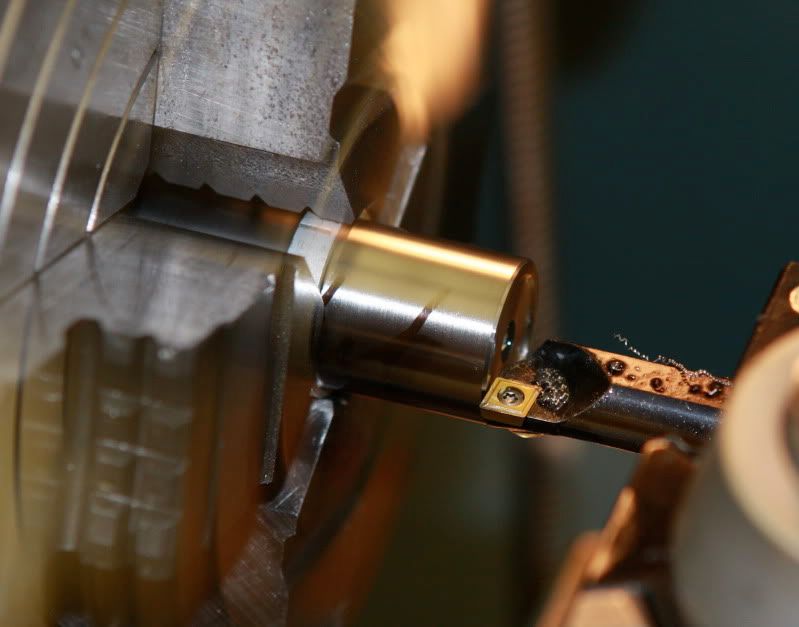
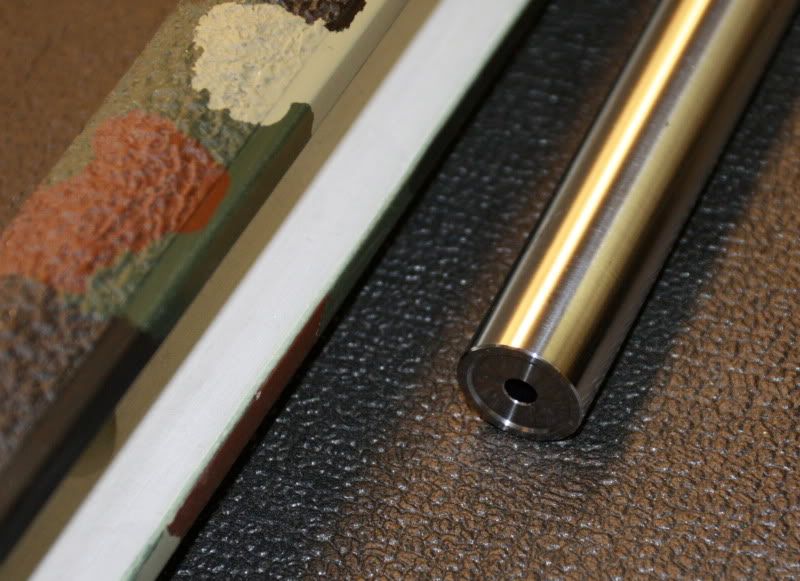
I meet Robert at his shop at 7:00 am to start the build. First things first, we cleaned his already spotless “surgeons operation room” he calls his workshop. This necessary part didn’t take long and after the lathe was cleaned we inserted the Broughton barrel to get it lined up. Robert explained every component, every tool, and every step we did as well as the reasons behind it. The barrel took around 15 - 20 min. to get positioned in the lathe perfect. We went over the dimensions of the cuts that we were going to make, again, to double check our measurements from the previous night. Robert explained how the lathe works with all the controls, knobs, gears and levers. He stood real close and watched me perform the tasks he was instructing me to make. Robert made me feel real comfortable over the lathe. When it was time to perform a task on the barrel that required some real skill, Robert and I switched places. Robert cut the threads on the barrel after I cut down the barrel to the dimensions we needed. After we had the barrel ready for chambering, we needed a break to get ready for the most challenging and stressful part of the barrel build. After lunch, Robert rolled up his sleeves and 3 hours later the barrel was chambered, bore scoped and measured. Robert was a happy man. The barrel was perfect. Perfect. If I gave the dimensions of what the test indicators read, Robert said nobody would believe it. Nobody. I really wished we had a movie camera to prove what those test indicators read. We double checked all the dimensions of what was needed on the chambering end of the barrel before removing the barrel and turning it around so we could put on the crown. Both Robert and I discussed the length of barrel and decided to cut it to 26”. Robert said, the crown was the most critical part of the barrel after a perfect chamber, and I was going to make all the cuts. Robert stood real close and talked me through the entire process. Robert made one initial cut on the inside of the bore as his only cut on the crown. I was pretty happy with the end result.
Day Three: Cerakote and Stock bedding.
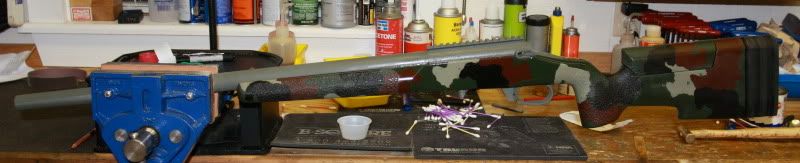
We met at 7:00 am sharp and gathered all the components for the rifle build. The stock came with small pillars already in the stock, however, after a conversation with Surgeon, we decided on replacing them with the large ones supplied by Surgeon. We went over all the parts looking for problems that would need to be addressed. After putting the rifle together several times we went to work. We cut out the old pillars, and prepped all the metal pieces that were going to be coated with cerakote. The cerakote process was applied after all the metal was cleaned, surface was pure, heated then cooled and hung on hangers to be painted. After all the pieces were coated, they were returned to the oven and baked. When the parts came out of the oven, we put the rifle back together to see any potential problems that would need to be addressed. You get the point. I don’t recall the exact number of times that we put the rifle together looking for issues. Robert wasn’t satisfied with the bottom metal cerakote coating and wanted to do it again. We decided to do it after we bedded the stock. At the end of the day, the stock was bedded and all metal coated. So we called it a night and closed up shop.
Day Four: Clean-up bedding and final assembly.
We met again at 7:00 am sharp. Robert was already in the shop as he couldn’t wait to pull the stock off the barreled action to look at our bedding work. We were met in the shop by Bill Zollo like the previous days as he just got off work from his other job. I don’t know how the man does it. Bill took some photos and performed some business work for the class then left us to get some work done. We took the stock over to the milling machine and cut out all the bedding that we didn’t need or want. This was a pretty neat process. After the machine work on the stock, we did the rest by hand. We fell behind schedule by the time lunch rolled around with all the distractions going on in the shop. Robert was understandably flustered by the loss of time and where we were on the schedule and where we needed to be. Robert and I went to lunch and made a game plan to get back on schedule. When we returned to the shop we went over the morning work and anything that I needed to review; at a more accelerated pace then that of the morning. Time was now our enemy and we had to get through this day back on track. Robert had me get the trigger instructions and tell him how I would adjust the trigger. With his observation, I put the trigger on the stock and adjusted it until it was exactly what I wanted. In the afternoon, we had also stripped the bottom metal of cerakote and went through the process of re-coating it. This proved problematic as I had convinced Robert to coat the metal in a green not black color. He had Olive drab in the shop and I wanted a lighter color. Robert added Battleship Gray to the Olive Drab to lighten in up. For all the metal pieces this application was successful, however, on the bottom metal with all the angles used in coating the results were less than satisfactory to Robert. He worked tirelessly to understand why, and even an initial phone call to NIC Industries didn’t result in a solution. We ran a test on the Battleship Gray coating without mixing it with Olive Drab and the results were exactly what we were looking for. We decided to buy the color that NIC Industries has already and proceed with the build. Robert cleaned and prepared the barrel for the following days break-in procedure.
Day Five: Barrel break-in.
Robert met me at our usual time and we went over the days plans of breaking in the barrel. This was where we would see if we have a broken gun or a shooter. Robert preached all week that a gun is considered broken to him until he sees it shoot. We mounted an existing scope I had and took it to the reloading room. I pre-loaded a fire-forming load before I arrived in Georgia, as I didn’t want to waste time while at the class. I used a slow powder that didn’t result a complete burn in the 26” barrel. I followed Robert’s instructions to the letter for the break-in procedure. The rifle didn’t take long to reveal the real beauty of this build. The gun proved to “Not be Broken.” With a fire-forming load using a less than ideal powder; resulting in the shoulder of the Ackley Improved case not to be 100% formed, the rifle shot very tiny groups. I can’t tell you how happy both Robert and I are.
Conclusion.
This class was more than I ever thought that it was going to be. I left the class with knowledge that I didn’t have previous and gained an insight to what a highly talented gunsmith can do. I had a great time and feel the one on one instruction couldn’t have been a better way to learn the art of gunsmithing. One week isn’t enough training to start to do this alone, however, it does allow me to have a better understanding of all the aspects of a tactical rifle build. I don’t have a specific load developed for this rifle as of this writing, but I truly believe that when I do I will have a 1000 yard tactical rifle that could run with anyones rifle. If you can’t take Robert Gradous’s Gunsmithing Class, I would strongly recommend you consider him for your rifle build. I couldn’t be happier with the rifle we built together and look forward to the other rifles he builds for me.
<span style="font-weight: bold">Robert Gradous Rifles Gunsmithing Class
</span>
Tactical Rifle build parts list:
<ul style="list-style-type: disc">[*] Surgeon short action repeater[*] 5C MTU contour 7.5 twist in .243[*] Detachable Bottom Metal[*] HVR Trigger[*] A-5 stock with adjustable cheek piece woodlands camo[/list]
A special thanks of appreciation to Preston Pritchett and all the people at Surgeon Rifles, Inc. for the Action, Bottom metal, Jewell HVR trigger and McMillan stock. Additionally, Tim North at Broughton Barrels who sent two barrels. Without help from these great people this project wouldn’t have been possible.
Day One: Meet and greet.
I met up with Bill Zollo and followed him to Robert Gradous’s workshop. After introductions and a full tour of the facilities, we all piled into Robert’s truck with his son’s hunting rifle and headed to a field a half mile away that had a 4’x4’ steel plate. Robert started off and shot at the plate 500 yards away using his driver’s mirror as a rest. Robert wanted to give me the full comforts of a Texas deer shoot, so he let me follow his lead and shoot off his mirror too. Later, Robert and I went back to his shop and went over the next days schedule. We stayed awhile going over all the parts that we were going to be working with; barrel, action, stock, bottom metal and trigger. We made the necessary measurements that we will need, so that first thing the following day we are on the lathe making cuts.
Day Two: First day of the rifle build. Barrel work.
I meet Robert at his shop at 7:00 am to start the build. First things first, we cleaned his already spotless “surgeons operation room” he calls his workshop. This necessary part didn’t take long and after the lathe was cleaned we inserted the Broughton barrel to get it lined up. Robert explained every component, every tool, and every step we did as well as the reasons behind it. The barrel took around 15 - 20 min. to get positioned in the lathe perfect. We went over the dimensions of the cuts that we were going to make, again, to double check our measurements from the previous night. Robert explained how the lathe works with all the controls, knobs, gears and levers. He stood real close and watched me perform the tasks he was instructing me to make. Robert made me feel real comfortable over the lathe. When it was time to perform a task on the barrel that required some real skill, Robert and I switched places. Robert cut the threads on the barrel after I cut down the barrel to the dimensions we needed. After we had the barrel ready for chambering, we needed a break to get ready for the most challenging and stressful part of the barrel build. After lunch, Robert rolled up his sleeves and 3 hours later the barrel was chambered, bore scoped and measured. Robert was a happy man. The barrel was perfect. Perfect. If I gave the dimensions of what the test indicators read, Robert said nobody would believe it. Nobody. I really wished we had a movie camera to prove what those test indicators read. We double checked all the dimensions of what was needed on the chambering end of the barrel before removing the barrel and turning it around so we could put on the crown. Both Robert and I discussed the length of barrel and decided to cut it to 26”. Robert said, the crown was the most critical part of the barrel after a perfect chamber, and I was going to make all the cuts. Robert stood real close and talked me through the entire process. Robert made one initial cut on the inside of the bore as his only cut on the crown. I was pretty happy with the end result.
Day Three: Cerakote and Stock bedding.
We met at 7:00 am sharp and gathered all the components for the rifle build. The stock came with small pillars already in the stock, however, after a conversation with Surgeon, we decided on replacing them with the large ones supplied by Surgeon. We went over all the parts looking for problems that would need to be addressed. After putting the rifle together several times we went to work. We cut out the old pillars, and prepped all the metal pieces that were going to be coated with cerakote. The cerakote process was applied after all the metal was cleaned, surface was pure, heated then cooled and hung on hangers to be painted. After all the pieces were coated, they were returned to the oven and baked. When the parts came out of the oven, we put the rifle back together to see any potential problems that would need to be addressed. You get the point. I don’t recall the exact number of times that we put the rifle together looking for issues. Robert wasn’t satisfied with the bottom metal cerakote coating and wanted to do it again. We decided to do it after we bedded the stock. At the end of the day, the stock was bedded and all metal coated. So we called it a night and closed up shop.
Day Four: Clean-up bedding and final assembly.
We met again at 7:00 am sharp. Robert was already in the shop as he couldn’t wait to pull the stock off the barreled action to look at our bedding work. We were met in the shop by Bill Zollo like the previous days as he just got off work from his other job. I don’t know how the man does it. Bill took some photos and performed some business work for the class then left us to get some work done. We took the stock over to the milling machine and cut out all the bedding that we didn’t need or want. This was a pretty neat process. After the machine work on the stock, we did the rest by hand. We fell behind schedule by the time lunch rolled around with all the distractions going on in the shop. Robert was understandably flustered by the loss of time and where we were on the schedule and where we needed to be. Robert and I went to lunch and made a game plan to get back on schedule. When we returned to the shop we went over the morning work and anything that I needed to review; at a more accelerated pace then that of the morning. Time was now our enemy and we had to get through this day back on track. Robert had me get the trigger instructions and tell him how I would adjust the trigger. With his observation, I put the trigger on the stock and adjusted it until it was exactly what I wanted. In the afternoon, we had also stripped the bottom metal of cerakote and went through the process of re-coating it. This proved problematic as I had convinced Robert to coat the metal in a green not black color. He had Olive drab in the shop and I wanted a lighter color. Robert added Battleship Gray to the Olive Drab to lighten in up. For all the metal pieces this application was successful, however, on the bottom metal with all the angles used in coating the results were less than satisfactory to Robert. He worked tirelessly to understand why, and even an initial phone call to NIC Industries didn’t result in a solution. We ran a test on the Battleship Gray coating without mixing it with Olive Drab and the results were exactly what we were looking for. We decided to buy the color that NIC Industries has already and proceed with the build. Robert cleaned and prepared the barrel for the following days break-in procedure.
Day Five: Barrel break-in.
Robert met me at our usual time and we went over the days plans of breaking in the barrel. This was where we would see if we have a broken gun or a shooter. Robert preached all week that a gun is considered broken to him until he sees it shoot. We mounted an existing scope I had and took it to the reloading room. I pre-loaded a fire-forming load before I arrived in Georgia, as I didn’t want to waste time while at the class. I used a slow powder that didn’t result a complete burn in the 26” barrel. I followed Robert’s instructions to the letter for the break-in procedure. The rifle didn’t take long to reveal the real beauty of this build. The gun proved to “Not be Broken.” With a fire-forming load using a less than ideal powder; resulting in the shoulder of the Ackley Improved case not to be 100% formed, the rifle shot very tiny groups. I can’t tell you how happy both Robert and I are.
Conclusion.
This class was more than I ever thought that it was going to be. I left the class with knowledge that I didn’t have previous and gained an insight to what a highly talented gunsmith can do. I had a great time and feel the one on one instruction couldn’t have been a better way to learn the art of gunsmithing. One week isn’t enough training to start to do this alone, however, it does allow me to have a better understanding of all the aspects of a tactical rifle build. I don’t have a specific load developed for this rifle as of this writing, but I truly believe that when I do I will have a 1000 yard tactical rifle that could run with anyones rifle. If you can’t take Robert Gradous’s Gunsmithing Class, I would strongly recommend you consider him for your rifle build. I couldn’t be happier with the rifle we built together and look forward to the other rifles he builds for me.


