

Gunsmithing RPR action wrench
- Thread starter Doc68
- Start date
You are using an out of date browser. It may not display this or other websites correctly.
You should upgrade or use an alternative browser.
You should upgrade or use an alternative browser.
You don’t need an action wrench.
What are you trying to do?
What are you trying to do?
Remove a barrel. The old barrel nut is looking rough and my armorers wrench keeps slipping off of it.You don’t need an action wrench.
What are you trying to do?
Wrap it in something to protect the action or use something in the jaws of a bench vise.
Make sure the vise is mounted solid to the bench. Tighten the action in the vise and be prepared to crank down on the barrel but to get it it loose. They way over tighten it at the factory. Heat helps.
Make sure the vise is mounted solid to the bench. Tighten the action in the vise and be prepared to crank down on the barrel but to get it it loose. They way over tighten it at the factory. Heat helps.
LRI has a wrench for the rpr it’s about $100 https://www.longriflesinc.com/produ...ger-rpr-and-ar15s?_pos=1&_sid=a38953272&_ss=r

I wouldn’t call that an action wrench, it’s a tool for the factory barrel nut only. I think it’s deceiving to call it an action wrench. A true action wrench turns the action while the barrel is in a barrel vise or clamp.LRI has a wrench for the rpr it’s about $100 https://www.longriflesinc.com/produ...ger-rpr-and-ar15s?_pos=1&_sid=a38953272&_ss=r
Yes you are correct it’s the tool for the rpr barrel nut not action.
I just use a standard AR barrel nut wrench. Here's how I did my RPR barrel: (spoiler, it's not difficult if you have a brain and tools n shit)
1. Remove handguard and barrel nut retainer on bottom of action.
2. Put action in vise with soft jaws or leather.
3. Put barrel nut wrench on barrel nut parallel to floor.
4. Wack that fucker (end of barrel wrench farthest from nut) with a dead blow hammer once or twice. Done.
5. Remove barrel, unscrew barrel nut from old barrel.
6. Put light coat of grease on threads of new barrel.
7. Screw on barrel nut onto new barrel.
8. Screw barrel into action most of the way. Put "go gauge" with a piece of .002" steel shim with dab of grease on it onto the back of gauge.
9. Place gauge under extractor and guide into chamber, close bolt.
10. Screw barrel into action until barrel stops and hand tighten.
11. Move bolt handle up/down. Should have slight resistance. Good.
12. Hand tighten barrel nut against action and tighten just a hair with wrench.
13. Withdraw "go gauge" and try and chamber "no-go gauge". Should not chamber. If it does, reset to Step 9.
14. Take barrel wrench, and whack that fucker a couple times to tighten it. Done.
15. Reassemble. Remount all your tacticool shit. Re-zero. Enjoy the next 2000-3000 rounds. Rinse, repeat.
Here is a picture of my super-Gucci tacticool AR barrel wrench, multi tool, bottle opener I used to change my barrel. If it's stupid, but it works, it ain't stupid:
Last edited:
You can certainly use an AR-15 armorer tool. -sometimes...hell, even most of the time.
I made the tool I offer after watching a hundred or more people destroy their shit when this gun was first released. "Someone" at Ruger had a very tortured youth and he takes his frustration out during barrel assembly. It's a completely random thing and it still happens to this day. Some come apart just fine. Others are so absurdly tight that you need a 3' breaker bar.
You may have one of these, you may not. You will, however, find out immediately when you go to remove the barrel. My tool is designed to engage the entire circumference of the barrel spanner because when you get one of these impossible ones, you find out real fast where the limitation is in your equipment. Keep in mind, Ruger, last I checked, will not sell a replacement spanner nut to anyone other than an FFL. I've not kept up on whether that is still the policy, but it was for several years. So again, plan your stuff accordingly because the last thing you want to do is ruin that part.
To date, nobody has broken an LRI wrench nor have they murdered the barrel nut.
As for the receiver:
Grabbing onto it is a really, really bad idea IMO. There are no raceways inside the RPR receiver body. About the only thing a guy could hope to latch onto is the slabs on the sides or the bolt release. Neither is a good option regardless of whether the thing is on stupid tight or not.
Your better path here is using a barrel vice and gaining purchase on the cylinder combined with the tool to remove/reinstall the barrel nut.
Keep in mind, I have done a metric shit ton of these guns and every widget I sell is born from a problem that needed to be solved. There are certainly more affordable tools available. I leave it to you to decide if the quality is there to provide you a lifetime of service.
The drawer of killed armorer wrenches that I have answered that for me a long time ago.
Hope this helps and good luck
C.
I won’t name names, but when I had to remove my factory barrel, it was one of your guys that told me to just put the action in a vise instead of using a barrel vise. This was a long time ago so perhaps better practices have since put in place. Incidentally you will be getting my action here shortly so Kaleb can do some milling on the trigger slot.You can certainly use an AR-15 armorer tool. -sometimes...hell, even most of the time.
I made the tool I offer after watching a hundred or more people destroy their shit when this gun was first released. "Someone" at Ruger had a very tortured youth and he takes his frustration out during barrel assembly. It's a completely random thing and it still happens to this day. Some come apart just fine. Others are so absurdly tight that you need a 3' breaker bar.
You may have one of these, you may not. You will, however, find out immediately when you go to remove the barrel. My tool is designed to engage the entire circumference of the barrel spanner because when you get one of these impossible ones, you find out real fast where the limitation is in your equipment. Keep in mind, Ruger, last I checked, will not sell a replacement spanner nut to anyone other than an FFL. I've not kept up on whether that is still the policy, but it was for several years. So again, plan your stuff accordingly because the last thing you want to do is ruin that part.
To date, nobody has broken an LRI wrench nor have they murdered the barrel nut.
As for the receiver:
Grabbing onto it is a really, really bad idea IMO. There are no raceways inside the RPR receiver body. About the only thing a guy could hope to latch onto is the slabs on the sides or the bolt release. Neither is a good option regardless of whether the thing is on stupid tight or not.
Your better path here is using a barrel vice and gaining purchase on the cylinder combined with the tool to remove/reinstall the barrel nut.
Keep in mind, I have done a metric shit ton of these guns and every widget I sell is born from a problem that needed to be solved. There are certainly more affordable tools available. I leave it to you to decide if the quality is there to provide you a lifetime of service.
The drawer of killed armorer wrenches that I have answered that for me a long time ago.
Hope this helps and good luck
C.
You can certainly use an AR-15 armorer tool. -sometimes...hell, even most of the time.
I made the tool I offer after watching a hundred or more people destroy their shit when this gun was first released. "Someone" at Ruger had a very tortured youth and he takes his frustration out during barrel assembly. It's a completely random thing and it still happens to this day. Some come apart just fine. Others are so absurdly tight that you need a 3' breaker bar.
You may have one of these, you may not. You will, however, find out immediately when you go to remove the barrel. My tool is designed to engage the entire circumference of the barrel spanner because when you get one of these impossible ones, you find out real fast where the limitation is in your equipment. Keep in mind, Ruger, last I checked, will not sell a replacement spanner nut to anyone other than an FFL. I've not kept up on whether that is still the policy, but it was for several years. So again, plan your stuff accordingly because the last thing you want to do is ruin that part.
To date, nobody has broken an LRI wrench nor have they murdered the barrel nut.
As for the receiver:
Grabbing onto it is a really, really bad idea IMO. There are no raceways inside the RPR receiver body. About the only thing a guy could hope to latch onto is the slabs on the sides or the bolt release. Neither is a good option regardless of whether the thing is on stupid tight or not.
Your better path here is using a barrel vice and gaining purchase on the cylinder combined with the tool to remove/reinstall the barrel nut.
Keep in mind, I have done a metric shit ton of these guns and every widget I sell is born from a problem that needed to be solved. There are certainly more affordable tools available. I leave it to you to decide if the quality is there to provide you a lifetime of service.
The drawer of killed armorer wrenches that I have answered that for me a long time ago.
Hope this helps and good luck
C.
Just ordered one. A bit pricey, but glad this tool is available.
Thank you for providing great tools for us little ones ??
Rich
Yeah I’m pretty sure they hired a former nfl linebacker as the torque guy.Pro tip: If you think you've torched it enough, you haven't. Compared to the first one I worked on to my last one it took a lot of time torching that bastard nut to get it loose.
Yeah I have that exact same piece of crap it broke and slipped on the RPR pipe wrench did it the first time. I have a good barrel vise it has never slipped. I think some people have the crappy vises.I just use a standard AR barrel nut wrench. Here's how I did my RPR barrel: (spoiler, it's not difficult if you have a brain and tools n shit)
1. Remove handguard and barrel nut retainer on bottom of action.
2. Put action in vise with soft jaws or leather.
3. Put barrel nut wrench on barrel nut parallel to floor.
4. Wack that fucker (end of barrel wrench farthest from nut) with a dead blow hammer once or twice. Done.
5. Remove barrel, unscrew barrel nut from old barrel.
6. Put light coat of grease on threads of new barrel.
7. Screw on barrel nut onto new barrel.
8. Screw barrel into action most of the way. Put "go gauge" with a piece of .002" steel shim with dab of grease on it onto the back of gauge.
9. Place gauge under extractor and guide into chamber, close bolt.
10. Screw barrel into action until barrel stops and hand tighten.
11. Move bolt handle up/down. Should have slight resistance. Good.
12. Hand tighten barrel nut against action and tighten just a hair with wrench.
13. Withdraw "go gauge" and try and chamber "no-go gauge". Should not chamber. If it does, reset to Step 9.
14. Take barrel wrench, and whack that fucker a couple times to tighten it. Done.
15. Reassemble. Remount all your tacticool shit. Re-zero. Enjoy the next 2000-3000 rounds. Rinse, repeat.
Here is a picture of my super-Gucci tacticool AR barrel wrench, multi tool, bottle opener I used to change my barrel. If it's stupid, but it works, it ain't stupid:
View attachment 7224575
Pro tip: If you think you've torched it enough, you haven't. Compared to the first one I worked on to my last one it took a lot of time torching that bastard nut to get it loose.
To date I have never used a torch to remove an RPR barrel. With the correct tools, it's not needed.
I won’t name names, but when I had to remove my factory barrel, it was one of your guys that told me to just put the action in a vise instead of using a barrel vise. This was a long time ago so perhaps better practices have since put in place. Incidentally you will be getting my action here shortly so Kaleb can do some milling on the trigger slot.
I'm assuming that this was some time ago. When these first hit the scene in 2015 we were sorting out the best path for working on them just like everyone else. My remarks are current practice. I couldn't even tell you what we were doing 5 years ago.
Regardless, if someone here told you to just squish it in a vice, that was bad advise and we don't do that.
Just ordered one. A bit pricey, but glad this tool is available.
Thank you for providing great tools for us little ones ??
Rich
Your welcome.
Your welcome.
Damn, just got the email saying it's shipped. That's fast!!!!
Shoutout to @LongRifles Inc. , got my barrel nut wrench in today. Thing is built like a damn tank. I got my old barrel off with almost no effort.
Thanks again to the Longrifles team.
Rich
Thanks again to the Longrifles team.
Rich
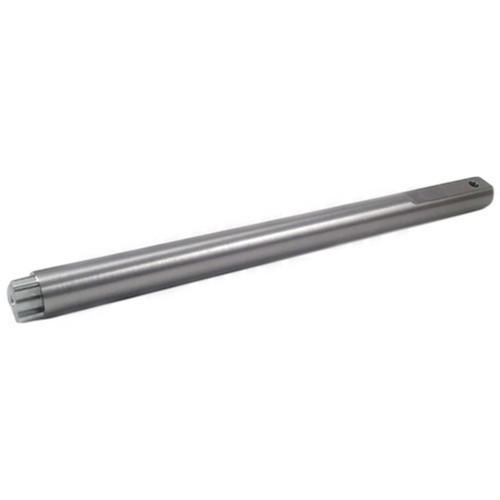
Update to this thread and not sure if it’s old news or not, but I see anarchy outdoors make a reaction rod for the RPR action and midway has some discontinued seekins rods. If you’ve never used a reaction rod, you’re missing out.
 www.anarchyoutdoors.com
Action Rod for Ruger Precision & Ruger American Rifles
If you want to swap out the barrel on your Rugar rifle, the search has ended. The Anarchy Outdoors branded rifle action rod, for the Ruger Precision and American Rifle models, has your back. This rod slips into the action providing overall support for those needed barrel changes, giving the home...
www.anarchyoutdoors.com Broke it. Receiver came loose fairly easily, I know not how. Nut remains and I’m bleeding lol. I emailed you at LRI.You can certainly use an AR-15 armorer tool. -sometimes...hell, even most of the time.
I made the tool I offer after watching a hundred or more people destroy their shit when this gun was first released. "Someone" at Ruger had a very tortured youth and he takes his frustration out during barrel assembly. It's a completely random thing and it still happens to this day. Some come apart just fine. Others are so absurdly tight that you need a 3' breaker bar.
You may have one of these, you may not. You will, however, find out immediately when you go to remove the barrel. My tool is designed to engage the entire circumference of the barrel spanner because when you get one of these impossible ones, you find out real fast where the limitation is in your equipment. Keep in mind, Ruger, last I checked, will not sell a replacement spanner nut to anyone other than an FFL. I've not kept up on whether that is still the policy, but it was for several years. So again, plan your stuff accordingly because the last thing you want to do is ruin that part.
To date, nobody has broken an LRI wrench nor have they murdered the barrel nut.
As for the receiver:
Grabbing onto it is a really, really bad idea IMO. There are no raceways inside the RPR receiver body. About the only thing a guy could hope to latch onto is the slabs on the sides or the bolt release. Neither is a good option regardless of whether the thing is on stupid tight or not.
Your better path here is using a barrel vice and gaining purchase on the cylinder combined with the tool to remove/reinstall the barrel nut.
Keep in mind, I have done a metric shit ton of these guns and every widget I sell is born from a problem that needed to be solved. There are certainly more affordable tools available. I leave it to you to decide if the quality is there to provide you a lifetime of service.
The drawer of killed armorer wrenches that I have answered that for me a long time ago.
Hope this helps and good luck
C.
Attachments
Broke it. Receiver came loose fairly easily, I know not how. Nut remains and I’m bleeding lol. I emailed you at LRI.
That's a first!
We'll mail you a new one.
3ftDamn dude......how long was your cheater bar.....I've put 150 ft/lb on mine and nothing like that......
Doc

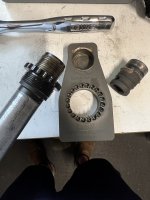
Is this the right way to turn it. Clockwise from the breech. It ain’t budging.
Heat is your friendView attachment 8225936
Is this the right way to turn it. Clockwise from the breech. It ain’t budging.
I tried. Is that the right way?Heat is your friend
I tried. Is that the right way?
If I'm understanding your picture correctly, no, that is not the right way. You're tightening that nut further against the barrel; that's why you broke the wrench.
You need to unscrew the nut from the breech end, not tighten it on there further. Lefty loosey - righty tighty, so go the opposite direction of your yellow arrow.
Well, lots of people are saying the opposite, like it’s a muzzle device. Counterclockwise looking from the muzzle. MaddeningIf I'm understanding your picture correctly, no, that is not the right way. You're tightening that nut further against the barrel; that's why you broke the wrench.
You need to unscrew the nut from the breech end, not tighten it on there further. Lefty loosey - righty tighty, so go the opposite direction of your yellow arrow.
Easier to put it at sideways not up and down.. put towards the left side and push down 9 0clock or even 10 but no more
You're going the wrong direction. You should be going this wayWell, lots of people are saying the opposite, like it’s a muzzle device. Counterclockwise looking from the muzzle. Maddening
Well, lots of people are saying the opposite, like it’s a muzzle device. Counterclockwise looking from the muzzle. Maddening
It shouldn't be maddening if you stop and look at it for a second. It unscrews from the breech end, not from the muzzle. You see the shoulder on the barrel in front of the nut, right? Your first pic with the broken wrench shows that. The barrel nut can't keep going that direction when it's hard against the shoulder.
You can turn it towards the muzzle when first loosening the barrel from the action, but to remove the barrel nut from the barrel you have to unscrew it from the breech.
It's just a simple nut and bolt. Don't overthink it. You're going the wrong way.
Makes sense. I emailed Chad at LRI and he said I was doing it right but I guess I explained it poorly. Guys elsewhere said counter clockwise from muzzle but you’re right it doesn’t make sense. I will try yet again.It shouldn't be maddening if you stop and look at it for a second. It unscrews from the breech end, not from the muzzle. You see the shoulder on the barrel in front of the nut, right? Your first pic with the broken wrench shows that. The barrel nut can't keep going that direction when it's hard against the shoulder.
You can turn it towards the muzzle when first loosening the barrel from the action, but to remove the barrel nut from the barrel you have to unscrew it from the breech.
It's just a simple nut and bolt. Don't overthink it. You're going the wrong way.
Still won’t budge. Hanging off of a 3 ft breaker bar lol. Oh well, I shall send it in. Too bad they don’t sell the barrel nuts. I guess that’s how I got the receiver to come off. I tightened the nut just a little allowing them to separate.
Last edited:
I guess that’s how I got the receiver to come off. I tightened the nut just a little allowing them to separate.
Because that's how it works. The nut goes one way to separate from the receiver, but then has to back off in the other direction to remove from the barrel. You've already gone gorilla tight against the barrel shoulder so it's gonna take at least that much force or more to get it off.
Or have someone stick it in a lathe and turn the barrel shoulder down to relieve the pressure.
JMHO but you probably owe LRI for that free action wrench replacement, since you were cranking it the wrong way. But not my business so I won't say more about it.
I agree, I can afford the $100. Curiously I did for sure tell him I was going counterclockwise from the muzzle though. Also, the welding on the replacement is MUCH more robust.Because that's how it works. The nut goes one way to separate from the receiver, but then has to back off in the other direction to remove from the barrel. You've already gone gorilla tight against the barrel shoulder so it's gonna take at least that much force or more to get it off.
Or have someone stick it in a lathe and turn the barrel shoulder down to relieve the pressure.
JMHO but you probably owe LRI for that free action wrench replacement, since you were cranking it the wrong way. But not my business so I won't say more about it.
Also are you saying you have to tighten the nut first anyway to get them to separate? I’ve done AR’s a savage and a rem 700 without thinking about it but I guess my ignorance got the best of me here
Last edited:
9.20.2023:
I have an update regarding the failure of our tools. A gent in NV suffered a recent failure and emailed us about it. After looking closely at the photo, he was doing everything correctly. He took the rifle to a local shop, and their attempts to remove it also failed. They returned the rifle to the owner, and he proceeded to contact Ruger directly.
As relayed to us by the client and after speaking with the owner of the shop in Nevada, the Ruger customer service rep that he spoke with admitted there is a problem on their end, and they are making an effort to rectify it. I was not provided any details to answer what that actually means.
Moving forward:
I am ordering material for another run of these today and am going to look to see about adding additional material to the lugs of the wrench to improve its strength.
If you have one of our tools and it fails, we will replace it or refund your money. The ONLY stipulation is that you used it correctly.
Mechanical aptitude among people varies. If you get Lefty/Loosey confused and kill the tool because of it, I can't help you.
C.
I sent you my barrel. The second wrench you sent me was much more robustly welded to my untrained eye. Please charge me for the first wrench when you send it the barrel back.9.20.2023:
I have an update regarding the failure of our tools. A gent in NV suffered a recent failure and emailed us about it. After looking closely at the photo, he was doing everything correctly. He took the rifle to a local shop, and their attempts to remove it also failed. They returned the rifle to the owner, and he proceeded to contact Ruger directly.
As relayed to us by the client and after speaking with the owner of the shop in Nevada, the Ruger customer service rep that he spoke with admitted there is a problem on their end, and they are making an effort to rectify it. I was not provided any details to answer what that actually means.
Moving forward:
I am ordering material for another run of these today and am going to look to see about adding additional material to the lugs of the wrench to improve its strength.
If you have one of our tools and it fails, we will replace it or refund your money. The ONLY stipulation is that you used it correctly.
Mechanical aptitude among people varies. If you get Lefty/Loosey confused and kill the tool because of it, I can't help you.
C.
Ruger way over torque the barrel nut at the factory. Something in the realm of well over 100 foot pounds. It’s ridiculous.9.20.2023:
I have an update regarding the failure of our tools. A gent in NV suffered a recent failure and emailed us about it. After looking closely at the photo, he was doing everything correctly. He took the rifle to a local shop, and their attempts to remove it also failed. They returned the rifle to the owner, and he proceeded to contact Ruger directly.
As relayed to us by the client and after speaking with the owner of the shop in Nevada, the Ruger customer service rep that he spoke with admitted there is a problem on their end, and they are making an effort to rectify it. I was not provided any details to answer what that actually means.
Moving forward:
I am ordering material for another run of these today and am going to look to see about adding additional material to the lugs of the wrench to improve its strength.
If you have one of our tools and it fails, we will replace it or refund your money. The ONLY stipulation is that you used it correctly.
Mechanical aptitude among people varies. If you get Lefty/Loosey confused and kill the tool because of it, I can't help you.
C.
Way more than 100. I originally did mine the right way and convinced myself I was doing it wrong way. It’s like it’s welded on
I sent you my barrel. The second wrench you sent me was much more robustly welded to my untrained eye. Please charge me for the first wrench when you send it the barrel back.
Earlier this year I purchased a power feed, rotary welding table. With it, we were finally able to use my wire feed MIG welder to assemble the tools. Prior pieces were always TIG welded by hand. (my hands, lol)
Never had a TIG weld fail until earlier this summer when someone put a 4' long bar off the tool and hung from it.
Last edited:
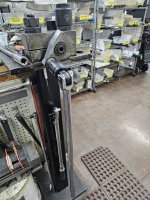
I WIN. 3/4" drive breaker bars rule.
Lol.
Kalli is boxing it back up now.
Lol.
Kalli is boxing it back up now.
Attachments
Last edited:
Thank you! My limitation was my vise yours looks bomb proof. Dude you didn’t even charge me for the shipping lol. Well, my next barrel will come from you lol. I already had a criterion replacement from a couple years ago but I will go ahead and get another one as funds allow soon. When the website says for 105 grain berger or whatever bullet, will say, 107 smk still shoot well in it? Thanks Chad!I WIN. 3/4" drive breaker bars rule.
Lol.
Kalli is boxing it back up now.
To everyone else: Chad’s customer service was 10/10, highly recommended.
Ok I put my new barrel on. 6cm barrel and used 6.5 go/no go gauges. I used an rpr action wrench and Chad’s wrench and screwed the barrel nut and receiver against eachother: barrel nut counterclockwise and receiver clockwise (anti seize on threads). The barrel nut is not against the end of the threads on the barrel like on the oem barrel. It can’t be, otherwise the the bolt will not close on the go gauge; i.e., the receiver will be too far threaded forward and the headspace will be too small. I assume this is correct procedure.
Ok I put my new barrel on. 6cm barrel and used 6.5 go/no go gauges. I used an rpr action wrench and Chad’s wrench and screwed the barrel nut and receiver against eachother: barrel nut counterclockwise and receiver clockwise (anti seize on threads). The barrel nut is not against the end of the threads on the barrel like on the oem barrel. It can’t be, otherwise the the bolt will not close on the go gauge; i.e., the receiver will be too far threaded forward and the headspace will be too small. I assume this is correct procedure.
Similar threads
- Replies
- 4
- Views
- 306