
i enjoy trying to personalize and improve the items i own. i understand that all things in life are a compromise on some level and i try to understand what compromises were originally made and why. i then form a goal with the item and began to think about what variables i can change that help me reach these goals. sometime this desire for perfection results in non-functional materials when i am done. as illogical as it may sound for some, it is the experience i gain that increases the chances of me achieving future goals.
trigger:
lengthened sheer.
cut several springs and stretched slightly
removed accu-blade.
polished trigger surfaces.
11ounce pull with ~1/32" of creep.
bolt:
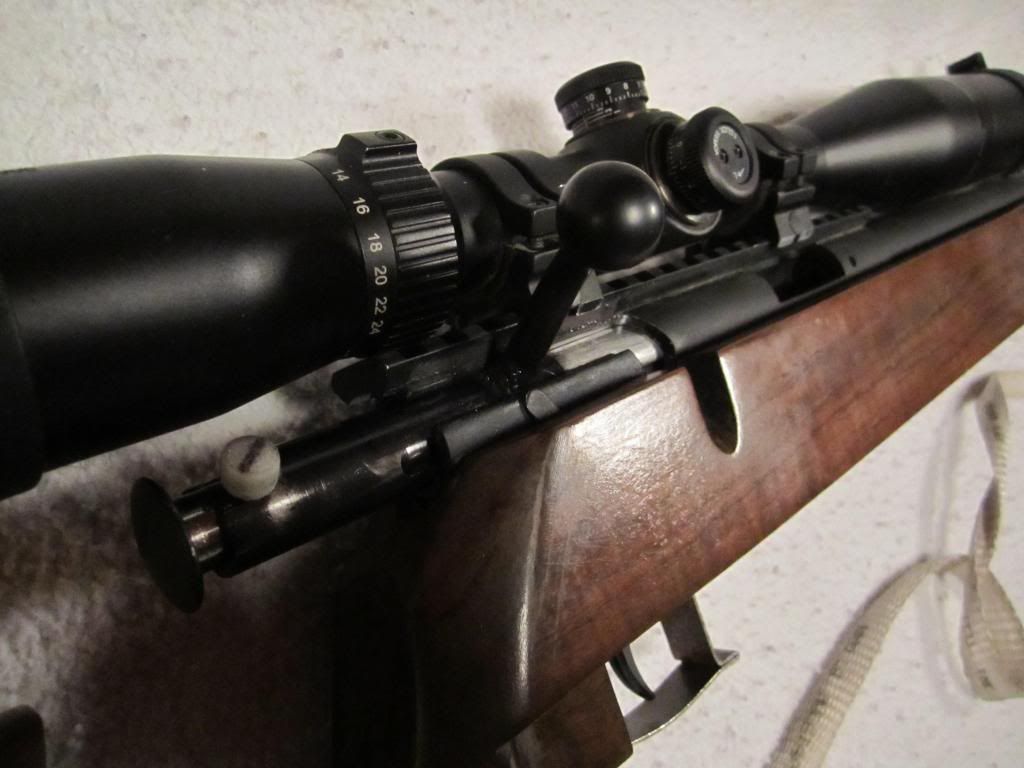
reshaped the rear bolt; in an effort to reduce weight and improve firing pin speed. removed some material from middle of firing pin bolt and polished the interior of the receiver and exterior of firing pin bolt. removed the peak on the cocking ramp
**removed material from the inside of the cocking ramp to reduce effort by way of less friction.
had to reshape the bolt handle close to the bolt for added clearance over the rings. added material to the top side of the bolt handle were it slides on receiver to have a tighter tolerance but still slight wiggle to help feed rounds. removed the sharp edges on bolt smoothed out but not polished the firing pin and ejector arms. made a new cocking pin out of stainless steel drill bit and a nylon nob. there was a noise that bothered me when cocking pin slide off the peak and became ready to fire. this is why i used nylon and also increased the size of the nob so that there is very little drop of the cocking pin when it slides off into the open area when you lock the bolt handle down. before it would pop off the peak and make an audible click.
receiver:
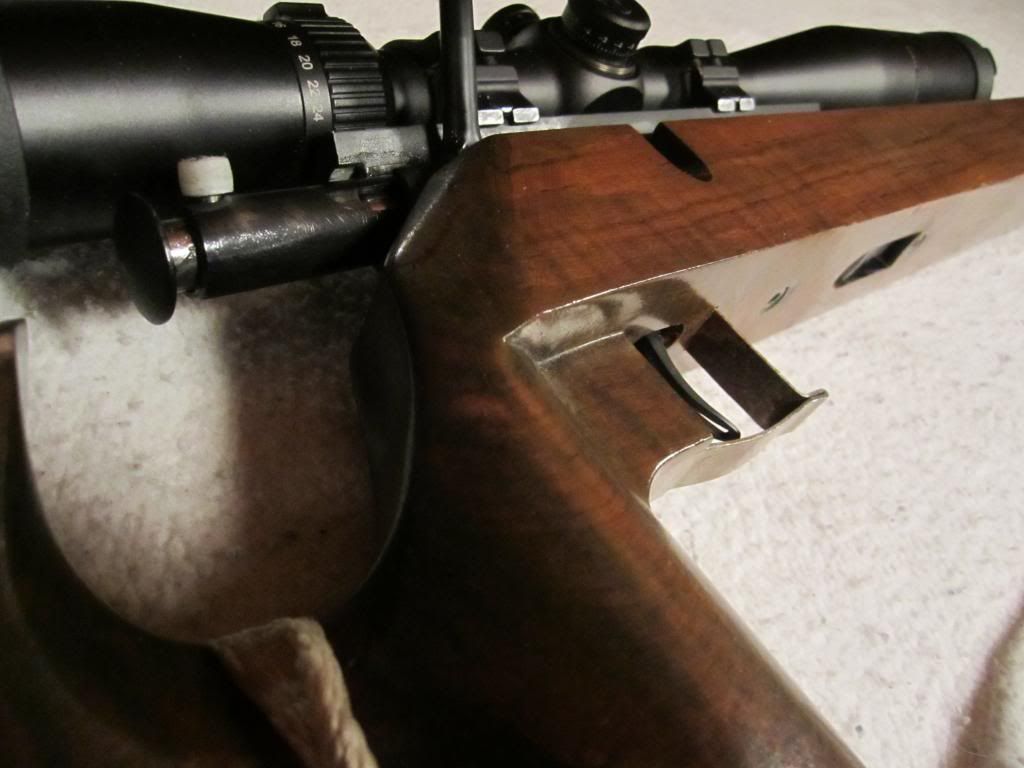
squared up the port to compliment the other sharp edges.
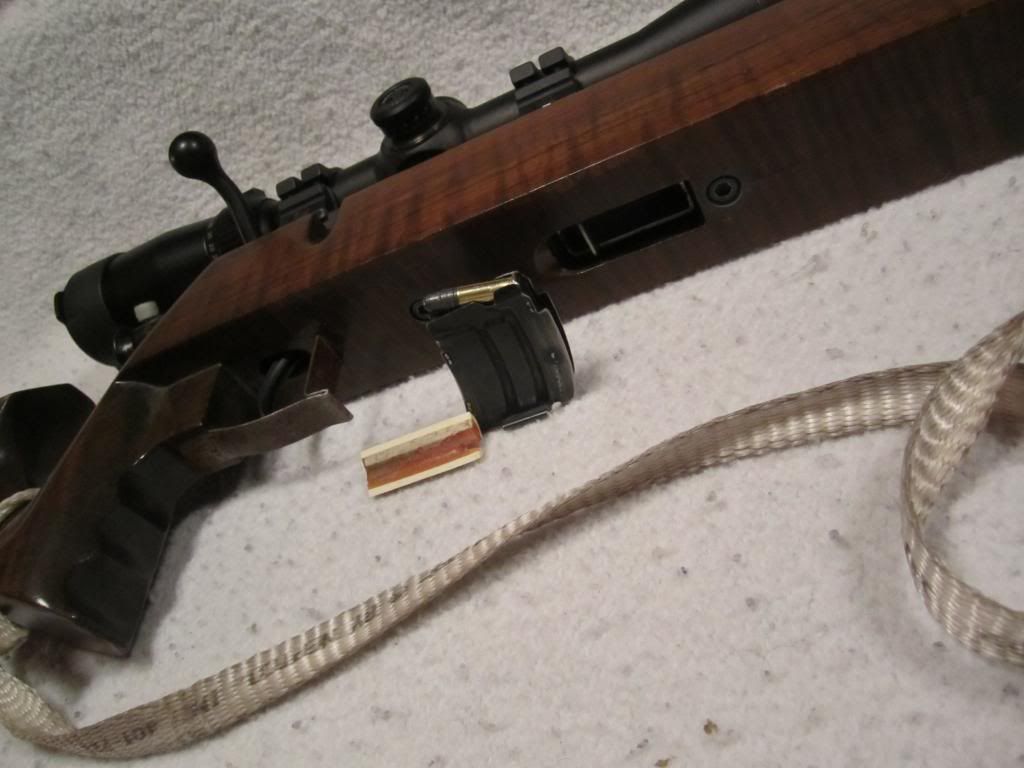
removed material and modified the magazine and the receiving metal so that the bottom of the stock would be flat and all hardware countersunk. the magazine is now 3+1. this required several tweaks to make work, of which are not really important as few others would likely ever want to do this and those that would can figure it out.
rail:
modified and bedded generic picitanny rail to full length of receiver.
safety:
reformed and free floated the lever to hug the receiver as close as possible.
removed the nob
removed some spring pressure to make a little easier to function.
shaved the red safety dot
filled the engraved "s" for cleaner look.
rings:
weaver quad lows
added material to rings to create bare minimum clearance to move the
adjustable power(only one sheet of paper can float); this is why there
is ~1/16" gap between the front of the scope and barrel. i may remove
some material from the middle of the rail so that i can drop the scope
right down to the barrel.
removed a little material for added clearance from bolt handle
scope:
hawke varmint 6-24x44 with sunshade.
clearanced the front flip up cover to allow the scope to be mounted
lower and still free floated
made my stock with what i had available to me for nothing but lots of time; i will not quantify hours spent.
the following parts are bedded to create no noticeable shift of impact between removal of receiver; front of front action screw lug(not much of the back of the pillar), the back of the magazine, the complete middle pillar, majority of the rear action pillar (only 1/4" of back side) and the rear little pillar is bedded the back half. i used window glazing and grease as a release from the bedding. the top of the stock was left flat so i used a level to check and recheck several times during the bedding of the rail and receiver.
after some research i saw no reason to use anything other than the commercial jbweld(larger tubes and cost ~15$ if i recall correctly)
the legal wording on the barrel was filled and the rifle was airbrushed with an flat black enamel paint that was laying around. i
did a texture paint for several reasons; helps when one has to reapply paint, unique, helps with my ocd and perfectionist tendencies. my attention to detail is disturbing and i never reach the vision i have in my head but the texture helps as it is one less part i can screw up while still providing the aforementioned benefits.
created a tool that allows me to pick and feed one round at a time without touching the rounds with my fingers from the packaging. i wanted to mount the rail as low as possible and did not want to file a relief for my fingers to make it work. so i came up with the above solution so that i can bring my vision to fruition.
the stain is vinegar and steel wool to create a traditional stain once used. after it was applied i then sanded to help pop the grain a little. the denser grain does not absorb the stain as far so when it is sanded it returns to in natural lighter color and the softer grain lightens up a little but still keeps a little of the added color. in the past people would then burn the wood to add another dimension. i tried this and thought it made the wood a little to dark. the trigger guard was left to rust to help support the theme of the rusted finish.
i drilled holes below the rear inlet to help promote a better bond of the trigger guard. i did not want to use a screw if i did not have to. i spent more time that i want to admit with a razor blade to create the front inlet so that the guard can be slide through, bent over and bonded. before it was glued the guard was very secure so i have little worries about having to add a screw to keep it in place and taking away from the cleaner, minimalist look i am trying for. this simpler, clean look i try to resonate with most of the decisions with this stocks shape.
i am happy enough with this to put my work out for others to critique but truth be told there are several flaws that i have lost sleep over. i am not happy with the finish on the stock but i will not invest any more time trying to fix it as it will still have the remaining flaws. i would rather just build another stock to replace this one.
the butt plate is a flip flop sandwiched with white plastic accent. i plan on adding some black silicone to the flip flop to help promote more grip with the shooters shoulder. i will make a form around the butt pad and just fill it up with silicone and than level the top.
update: the butt plate now repeats the pattern imaged 2 more times for a total of 3 of each material.
the barrel was cut about 1.5" and i did a makeshift crown with a carriage bolt and lapping compound. i cut the barrel out of rage as i had a couple supersonic rounds. the accuracy is still great but i would like to image it can be increase with a proper crown; will shoot lapua center x's inside of 5/16" most of the time at 50 yards.
created a single shot adapter out of some pvc tube and epoxy. it drops into place and does not slide back and forth nor rotate. this is that piece observed next to the magazine in the images.
trigger:
lengthened sheer.
cut several springs and stretched slightly
removed accu-blade.
polished trigger surfaces.
11ounce pull with ~1/32" of creep.
bolt:
reshaped the rear bolt; in an effort to reduce weight and improve firing pin speed. removed some material from middle of firing pin bolt and polished the interior of the receiver and exterior of firing pin bolt. removed the peak on the cocking ramp
**removed material from the inside of the cocking ramp to reduce effort by way of less friction.
had to reshape the bolt handle close to the bolt for added clearance over the rings. added material to the top side of the bolt handle were it slides on receiver to have a tighter tolerance but still slight wiggle to help feed rounds. removed the sharp edges on bolt smoothed out but not polished the firing pin and ejector arms. made a new cocking pin out of stainless steel drill bit and a nylon nob. there was a noise that bothered me when cocking pin slide off the peak and became ready to fire. this is why i used nylon and also increased the size of the nob so that there is very little drop of the cocking pin when it slides off into the open area when you lock the bolt handle down. before it would pop off the peak and make an audible click.
receiver:
squared up the port to compliment the other sharp edges.
removed material and modified the magazine and the receiving metal so that the bottom of the stock would be flat and all hardware countersunk. the magazine is now 3+1. this required several tweaks to make work, of which are not really important as few others would likely ever want to do this and those that would can figure it out.
rail:
modified and bedded generic picitanny rail to full length of receiver.
safety:
reformed and free floated the lever to hug the receiver as close as possible.
removed the nob
removed some spring pressure to make a little easier to function.
shaved the red safety dot
filled the engraved "s" for cleaner look.
rings:
weaver quad lows
added material to rings to create bare minimum clearance to move the
adjustable power(only one sheet of paper can float); this is why there
is ~1/16" gap between the front of the scope and barrel. i may remove
some material from the middle of the rail so that i can drop the scope
right down to the barrel.
removed a little material for added clearance from bolt handle
scope:
hawke varmint 6-24x44 with sunshade.
clearanced the front flip up cover to allow the scope to be mounted
lower and still free floated
made my stock with what i had available to me for nothing but lots of time; i will not quantify hours spent.
the following parts are bedded to create no noticeable shift of impact between removal of receiver; front of front action screw lug(not much of the back of the pillar), the back of the magazine, the complete middle pillar, majority of the rear action pillar (only 1/4" of back side) and the rear little pillar is bedded the back half. i used window glazing and grease as a release from the bedding. the top of the stock was left flat so i used a level to check and recheck several times during the bedding of the rail and receiver.
after some research i saw no reason to use anything other than the commercial jbweld(larger tubes and cost ~15$ if i recall correctly)
the legal wording on the barrel was filled and the rifle was airbrushed with an flat black enamel paint that was laying around. i
did a texture paint for several reasons; helps when one has to reapply paint, unique, helps with my ocd and perfectionist tendencies. my attention to detail is disturbing and i never reach the vision i have in my head but the texture helps as it is one less part i can screw up while still providing the aforementioned benefits.
created a tool that allows me to pick and feed one round at a time without touching the rounds with my fingers from the packaging. i wanted to mount the rail as low as possible and did not want to file a relief for my fingers to make it work. so i came up with the above solution so that i can bring my vision to fruition.
the stain is vinegar and steel wool to create a traditional stain once used. after it was applied i then sanded to help pop the grain a little. the denser grain does not absorb the stain as far so when it is sanded it returns to in natural lighter color and the softer grain lightens up a little but still keeps a little of the added color. in the past people would then burn the wood to add another dimension. i tried this and thought it made the wood a little to dark. the trigger guard was left to rust to help support the theme of the rusted finish.
i drilled holes below the rear inlet to help promote a better bond of the trigger guard. i did not want to use a screw if i did not have to. i spent more time that i want to admit with a razor blade to create the front inlet so that the guard can be slide through, bent over and bonded. before it was glued the guard was very secure so i have little worries about having to add a screw to keep it in place and taking away from the cleaner, minimalist look i am trying for. this simpler, clean look i try to resonate with most of the decisions with this stocks shape.
i am happy enough with this to put my work out for others to critique but truth be told there are several flaws that i have lost sleep over. i am not happy with the finish on the stock but i will not invest any more time trying to fix it as it will still have the remaining flaws. i would rather just build another stock to replace this one.
the butt plate is a flip flop sandwiched with white plastic accent. i plan on adding some black silicone to the flip flop to help promote more grip with the shooters shoulder. i will make a form around the butt pad and just fill it up with silicone and than level the top.
update: the butt plate now repeats the pattern imaged 2 more times for a total of 3 of each material.
the barrel was cut about 1.5" and i did a makeshift crown with a carriage bolt and lapping compound. i cut the barrel out of rage as i had a couple supersonic rounds. the accuracy is still great but i would like to image it can be increase with a proper crown; will shoot lapua center x's inside of 5/16" most of the time at 50 yards.
created a single shot adapter out of some pvc tube and epoxy. it drops into place and does not slide back and forth nor rotate. this is that piece observed next to the magazine in the images.
