Re: Setting Up your Sizing Dies
<div class="ubbcode-block"><div class="ubbcode-header">Originally Posted By: Tripwire</div><div class="ubbcode-body">Not directed at you Furrball, but pay attention, you might learnt sumthin'......
<div class="ubbcode-block"><div class="ubbcode-header">Originally Posted By: suasponte</div><div class="ubbcode-body">Yes, the dies should be tightened down with a wrench and checked if your sizing more than 50-100 rounds.
Also, the ring style shims are a better design than the feeler gages. I have Skips and use them too. However, I still do use the feeler gages for sizing.
With my shell holder floating in the ram the brass self centers itself in the die. The force is inline and should not put any axial loads into the die. The load on the die itself is strictly a shear load. Thus the use of a feeler gage under the lock ring will not induce runout into the case.
As for the Sinclair gage I am not familiar and do not know the answer.
Terry </div></div>
Just for shits and giggles I did a little proof testing. If only to bolster my position, since I hate being told I'm wrong. No, I'm not going to trash any brass to further prove my point, so this will have to do towards supposition of fact.
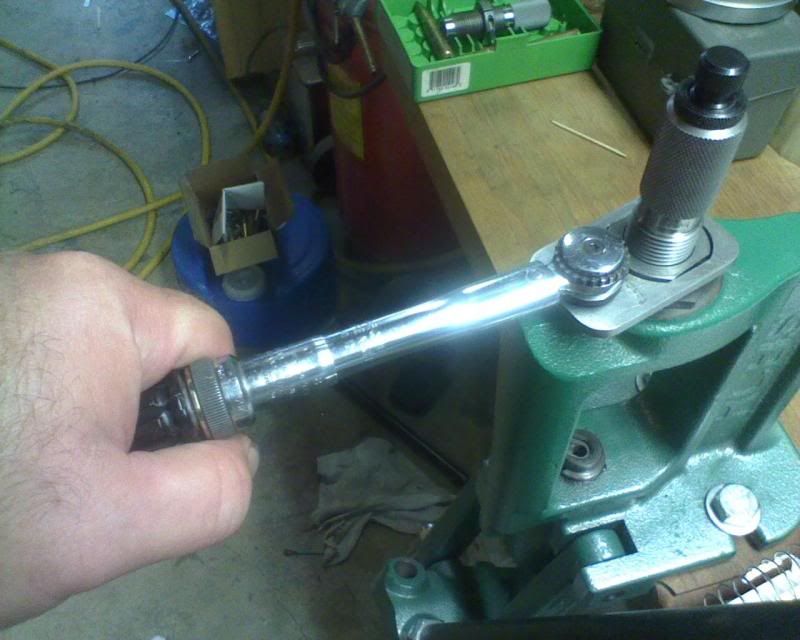
Shown is the same press (maybe a year old) as the OP's, same locking rings, and a Redding micrometer seater die, as that's what was already in the press, but you'll get the point.
First pic is to show the inherent slop in the threads....I stacked .090" under one side, pulled the die forward, and measured .108" in the rear. That's a difference of .018" across 7/8" by just pulling the slack out if it.
Next demostrates the OP's feeler gauge deal, with .090 stacked under the back side, with it "hand tight" as defined likely by Furrball...which equates to about maybe 50ish inch pounds on my torque wrench, this time. The front under the lock ring measures .081". a difference of .009" across the 7/8" diameter of the die.
The last is the same set up as before with the die torqued to 100 inch pounds, a fair representation of anybody's "wrench tight" via anybody's standard cresent wrench. A fair bit more than Furrball's handtight, but not as much as my normal 200 inch pounds of torque...since I really don't want to chance stressing my threads. .090" under the back and .074" under the front, a difference of .016" across the 7/8" diameter of the die.
I'm not going to bother determining what the vertical displacement of the die is as you don't hafta eat a shit sandwich to know it's going to taste like shit. "Floating" shell holder or not, it's likely to induce unnecessary, preventable, runout. Since I'm fairly partial to my tolerance of .000" to 001" TIR on turned necks, I'm going to stick with squared up dies and my torque wrench.
</div></div>
Your ammo will NOT shoot any differently if you have +/-.0005" of shoulder setback, a half thou difference in shoulder bump isn't going to make a slightest bit of difference in anything.
I guess you torque you seating die also thinking it will give you exact bullet seating depths or less run out.
A sizing die set on an o-ring were it can float will give consistent sizing to less than a half thou with properly annealed brass and have less sizing induced run out.
Tight, loose, it doesn't matter, the key is to make sure it stays where you put it after set and doesn't move.
This thread has given me a good laugh if nothing else.