I have an Anschutz 54.18 ms-r in immaculate shape that I was hoping to use for a local silhouette/long range match. I can't find it in me to drill the stock for sling stud/pic rail. Anyone have any suggestions for a bipod/shooting sticks for use in prone? Would prefer adjustable if possible. Thanks in advance
Join the Hide community
Get access to live stream, lessons, the post exchange, and chat with other snipers.
Register
Download Gravity Ballistics
Get help to accurately calculate and scope your sniper rifle using real shooting data.

Install the app
How to install the app on iOS
Follow along with the video below to see how to install our site as a web app on your home screen.
Note: This feature may not be available in some browsers.
-
Quick Shot Challenge: What’s the most underrated gear you never leave home without?
Contest ends Wednesday, join now for the chance to win free Hide merch!
Join contest
You are using an out of date browser. It may not display this or other websites correctly.
You should upgrade or use an alternative browser.
You should upgrade or use an alternative browser.
Shooting sticks/bipod without adapter ideas?
- Thread starter 10ring1
- Start date
I haven't seen what you're looking for...with that said, I would suggest shooting off a bag for prone, since you don't want to put a bipod on it. I agree with the reason you don't want to put a stud on. Take a look at Cole-Tac, Armageddon Gear, Wiebad; there are other companies also, but the will give you a starting place if that is an option you'd consider.

Shooting Rests | Bench Rest Shooting Stands | Caldwell
Shop A Wide Selection Of Shooting Rests From Caldwell. Choose from a large variety of styles of rifle rests, pistol rests and competition shooting rests
 www.caldwellshooting.com
I've got one, used from a concrete bench only, not bad, but not a top quality item either.
When going light without at least my Outdoorsmans (rarely) I just lace my CF collapsible walking sticks together with the already in place nylon hand loops. By varying the spread I can shoot prone to stnding on the right terrain.
A tripod with a HOG saddle. Get one that the legs almost go flat. Like this

10 RING,
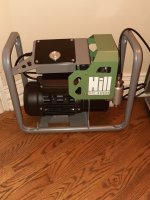
I agonized over this very same issue. I have a pristine Air Arms NJR 100 that they stopped making around 1995.
It was the pinnacle of air gun technology at the time and is still a great gun. It had an Olympic two stage trigger and
was regulated for shot to shot consistency. (+- 5 fps. ) This one had been used once prior to me getting it six months ago.
It gets filled to 3000 psi and gets 70 accurate shots. The little Hill compressor pumps up to 4500 psi.
After considering various ways to buy or make a clamp on unit, maybe even using the clamp from a big tri-pod,
I finally decided to stop fighting it and do what needed to be done. I used to machine for a living and knew what to ask for.
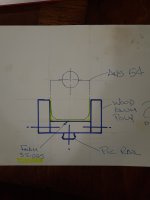
I picked out the exact location for a back and front stud considering the visual balance and the action screw. I asked the
guy to drill me a hole and minimum depth 3/8" diameter spot face so the surface would be flat and not on a crown. ( Radii )
The lower section of the butt is at an angle and I asked him to do the work at a right angle to that surface. ( shown in image #4 )
The front was done the same way, at right angles to the surface and a shallow 3/8" spot face in the stippling.
I only needed the front stud but I have a thing with symmetry and only having one stud felt stupid.
Then I used a stud / Pic rail adapter, Caldwell I believe to mount my Atlas CAL.
The vast majority of these guns stayed in the UK and most of them on the internet have studs. Very few people would
know that they were added and ultimately, it's my gun for now and would never hurt it's resale value.
great ammo is about $16.00 / 500
I was wondering why you could not use your UIT rail..... I see you don't have one. Ya know... If you added a stud and
decided you didn't like it, you could always remove it and have your local machine shop cut you a slot for an Anschutz
UIT rail and virtually nobody would be the wiser. My two old 54s have them as does my brand new 1903.
I totally understand your angst in any case.... In my case, I don't want to screw with a heavy front ROCK BR machine rest.
They are unrefined and just plain bug me !!
I agonized over this very same issue. I have a pristine Air Arms NJR 100 that they stopped making around 1995.
It was the pinnacle of air gun technology at the time and is still a great gun. It had an Olympic two stage trigger and
was regulated for shot to shot consistency. (+- 5 fps. ) This one had been used once prior to me getting it six months ago.
It gets filled to 3000 psi and gets 70 accurate shots. The little Hill compressor pumps up to 4500 psi.
After considering various ways to buy or make a clamp on unit, maybe even using the clamp from a big tri-pod,
I finally decided to stop fighting it and do what needed to be done. I used to machine for a living and knew what to ask for.
I picked out the exact location for a back and front stud considering the visual balance and the action screw. I asked the
guy to drill me a hole and minimum depth 3/8" diameter spot face so the surface would be flat and not on a crown. ( Radii )
The lower section of the butt is at an angle and I asked him to do the work at a right angle to that surface. ( shown in image #4 )
The front was done the same way, at right angles to the surface and a shallow 3/8" spot face in the stippling.
I only needed the front stud but I have a thing with symmetry and only having one stud felt stupid.
Then I used a stud / Pic rail adapter, Caldwell I believe to mount my Atlas CAL.
The vast majority of these guns stayed in the UK and most of them on the internet have studs. Very few people would
know that they were added and ultimately, it's my gun for now and would never hurt it's resale value.
great ammo is about $16.00 / 500
I was wondering why you could not use your UIT rail..... I see you don't have one. Ya know... If you added a stud and
decided you didn't like it, you could always remove it and have your local machine shop cut you a slot for an Anschutz
UIT rail and virtually nobody would be the wiser. My two old 54s have them as does my brand new 1903.
I totally understand your angst in any case.... In my case, I don't want to screw with a heavy front ROCK BR machine rest.
They are unrefined and just plain bug me !!
Attachments
Last edited:
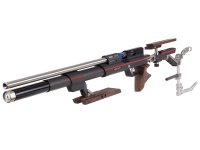
My (new to me) Weatherby Mark XXII (Anschutz 64) has sling studs. The wood is beautiful...I haven't done anything with it yet, it appears as NIB, the previous owner must have never shot it.
OP, please post a picture of your Anschutz, would love to see it.
OP, please post a picture of your Anschutz, would love to see it.
No. Nothing at allDoes the Annie have a freeland rail by chance?
That would be an awesome solution but the main match I shoot is bipod only... although someone mentioned a bag in front which may be a possibility
That definitely looks good...I think I am still precontemplative angst. Lol10 RING,
I agonized over this very same issue. I have a pristine Air Arms NJR 100 that they stopped making around 1995.
It was the pinnacle of air gun technology at the time and is still a great gun. This one has been used once prior to me
getting it six months ago. After considering various ways to buy or make a clamp on unit ( like one from a big tri-pod
that I could attach a Pic section to, I finally decided to stop fighting it and do what needed to be done. I used to
machine for a living and knew what to ask for. I picked out the exact location for a back and front stud. I only needed the
front but I have a thing with symmetry. I asked the guy to drill me a hole and minimum depth 3/8" spot face so the surface
would be flat and not on a crown. ( Radii )
The lower section of the butt is at an angle and I asked him to do the work at a right angle to that surface. ( shown in image #4 )
The front was done the same way, at right angles to the surface and a shallow 3/8" spot face.
Then I used a stud / Pic rail adapter, Caldwell I believe to mount my Atlas CAL.
The vast majority of these guns stayed in the UK and most of them on the internet have studs. Very few people would
know that they were added and ultimately, it's my gun for now and would never hurt it's resale value.
I was wondering why you could not use your UIT rail..... I see you don't have one. Ya know... If you added a stud and
decided you didn't like it, you could always remove it and have your local machine shop cut you a slot for an Anschutz
UIT rail and virtually nobody would be the wiser. My two old 54s have them as does my brand new 1903.
I totally understand your angst in any case.... In my case, I don't want to screw with a heavy front ROCK BR machine rest.
They are unrefined and just plain bug me !!
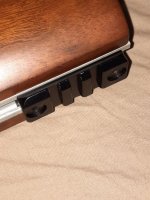
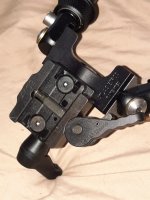
10Ring1,
VERY pretty gun !! If you ever need a Pic rail and your 54 doesn't have holes in the receiver, It's wise to
put #7 shot in the set screw holes to protect your receiver. Even brass tip set screws leave witness
marks on the bluing. I had voiced my concerns to Bob at DIP and that is what he suggested.
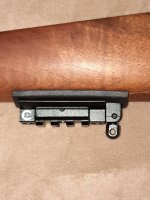
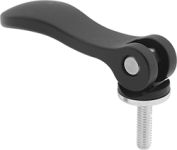
Nice BKL rings.... Do you know what the center threaded hole in the second photo is for?
It's a fantastic feature !! You can use one of the fasteners to widen the dovetail. Dove tails are not all 11mm.
They seem to vary from about 10.6 to 11.4 mm
They make a screw in level you can put in the hole but that is not what it is for.
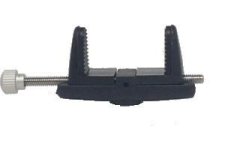
Since you have to have a tri-pod, you may find a way to clamp to the rifle and attach three slot picatinny rail
to it. I have some military trainers that need a bi-pod that cant be drilled. Some I could hide the hole under the
barrel band but something like the Winchester 52 needs the band to retain the barrel.
The clamp below opens to 4" and cost $14.00. If I went that way, I would see how much of that long screw I needed and
cut the additional off. The clamp underside has a 1/4-20 tapped hole so a flat head screw through the Pic rail
may be all you need. Maybe a 1/16" roll pin or epoxy for anti rotate.
If you get sick of your 54 you can always get an Anschutz 9015 Field Target for $4500.00 plus tax. ;-)
VERY pretty gun !! If you ever need a Pic rail and your 54 doesn't have holes in the receiver, It's wise to
put #7 shot in the set screw holes to protect your receiver. Even brass tip set screws leave witness
marks on the bluing. I had voiced my concerns to Bob at DIP and that is what he suggested.
Nice BKL rings.... Do you know what the center threaded hole in the second photo is for?
It's a fantastic feature !! You can use one of the fasteners to widen the dovetail. Dove tails are not all 11mm.
They seem to vary from about 10.6 to 11.4 mm
They make a screw in level you can put in the hole but that is not what it is for.
Since you have to have a tri-pod, you may find a way to clamp to the rifle and attach three slot picatinny rail
to it. I have some military trainers that need a bi-pod that cant be drilled. Some I could hide the hole under the
barrel band but something like the Winchester 52 needs the band to retain the barrel.
The clamp below opens to 4" and cost $14.00. If I went that way, I would see how much of that long screw I needed and
cut the additional off. The clamp underside has a 1/4-20 tapped hole so a flat head screw through the Pic rail
may be all you need. Maybe a 1/16" roll pin or epoxy for anti rotate.
If you get sick of your 54 you can always get an Anschutz 9015 Field Target for $4500.00 plus tax. ;-)
Attachments
Thank you for the great info. I did not really know what the threaded hole on the BKLs were for but that would've been one of my guesses. They were on the rifle when I bought it.
That clamp looks like it may be just the ticket. Where did u find it? I have an atlas with a clamp like the next pic. I could def mod that clamp in the first pic to fit the bipod.
And before I would spend that much I would drop it.into a 10/22 stock and slam a pic rail on it . LoL
That clamp looks like it may be just the ticket. Where did u find it? I have an atlas with a clamp like the next pic. I could def mod that clamp in the first pic to fit the bipod.
And before I would spend that much I would drop it.into a 10/22 stock and slam a pic rail on it . LoL
To be forthcoming.... I went onto the internet and did a 3 minute search for "tri-pod clamps"
It was one of many that came up. I didn't know how much money you wanted to spend or if you would ever want a Tri-Pod
so I was looking for something cheap and virtually disposable.
A longer one would do better. The one above is only about an inch deep. BTW... I search using Images until I get close.

 kestrelmeters.com
I just went to Evil bay and found this one too.... #313709385273
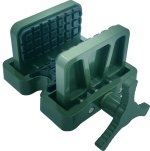
Since you only have one gun to make or buy a saddle for, you may consider making one. Since your stock basically has
a square shape it would be very easy. You could use some nice walnut or aluminum or even black Delrin. If you got some
foam about 3/16" thick, you could make the bottom structural piece about 3/16" inch wider than your stock. When you
tightened the side plates the rest of the foam would protect and grip your stock just like the purchased clamps do.
Your pic rail would be screwed to the underside of your saddle. Not elegant but cheap and simple. Just thinking out load.
EDIT: this cam was an after thought.... You could use wing nuts too but they are ugly !!
You could make something really cool. Now I'm going to have to for my military trainers.
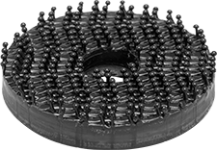
There is a great 3M product called Dual Loc that you may want to keep in mind for other problems.
It can be bought at Lowes and likely HD. It is basically super Velcro. Instead of hook and loop of fabric, it uses mushroom
shaped heads that firmly interlock. Both surfaces have the mushrooms. Some has adhesive while some can be screwed
down. ( See photo 4 ) We use the screw down type for scuba gear that needs the ability to break away if needed. It is really
cool stuff.
The link below calls it "snap together fastener shapes.
 www.mcmaster.com
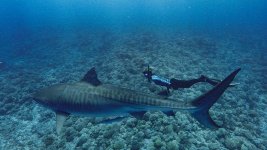
See Kori Garza and Kamakai, 18 foot long tiger shark, the largest tiger shark known to exist.
Actual photo of him and Kori and not a photographic illusion.
Don't say CANT .... LoL
It was one of many that came up. I didn't know how much money you wanted to spend or if you would ever want a Tri-Pod
so I was looking for something cheap and virtually disposable.
A longer one would do better. The one above is only about an inch deep. BTW... I search using Images until I get close.
Kestrel Tripod Clamp
The Kestrel tripod clamp holds every type of Kestrel Meter, and attaches to any standard tripod extension poles with a ¼-20 mounting screw. If you are using the Vane Mount, you will not need this clamp. Maximum 4 in / 11 cm grip opening. Compatible with: Kestrel 1000-3500, Kestrel 4...
I just went to Evil bay and found this one too.... #313709385273
Since you only have one gun to make or buy a saddle for, you may consider making one. Since your stock basically has
a square shape it would be very easy. You could use some nice walnut or aluminum or even black Delrin. If you got some
foam about 3/16" thick, you could make the bottom structural piece about 3/16" inch wider than your stock. When you
tightened the side plates the rest of the foam would protect and grip your stock just like the purchased clamps do.
Your pic rail would be screwed to the underside of your saddle. Not elegant but cheap and simple. Just thinking out load.
EDIT: this cam was an after thought.... You could use wing nuts too but they are ugly !!
You could make something really cool. Now I'm going to have to for my military trainers.
There is a great 3M product called Dual Loc that you may want to keep in mind for other problems.
It can be bought at Lowes and likely HD. It is basically super Velcro. Instead of hook and loop of fabric, it uses mushroom
shaped heads that firmly interlock. Both surfaces have the mushrooms. Some has adhesive while some can be screwed
down. ( See photo 4 ) We use the screw down type for scuba gear that needs the ability to break away if needed. It is really
cool stuff.
The link below calls it "snap together fastener shapes.
McMaster-Carr
McMaster-Carr is the complete source for your plant with over 595,000 products. 98% of products ordered ship from stock and deliver same or next day.
www.mcmaster.com
See Kori Garza and Kamakai, 18 foot long tiger shark, the largest tiger shark known to exist.
Actual photo of him and Kori and not a photographic illusion.
Don't say CANT .... LoL
Attachments
-
 ANS 54 FOAM LINED NON ADJUSTABLE SADDLE.jpg279.7 KB · Views: 86
 -
 CANT-00.jpg216.5 KB · Views: 69
 -
 $65.00.jpg208.5 KB · Views: 70
 -
 McMaster Carr part #87535k41.png27.6 KB · Views: 74
 -
 sharkfest-world39s-biggest-tiger-shark.jpeg62 KB · Views: 70
 -
 Snap-Together Fastener Shapes 2.png20.9 KB · Views: 61
 -
 Snap-Together Fastener Shapes.png17.4 KB · Views: 82
 -
 CAM.png16.1 KB · Views: 77
Last edited:
Thank you for all the great info and resources. Those clamps are def something to consider.. would have to adapt them to a bipod. I am not 100% certain at this point if a low tripod is acceptable. Trying to get clarification on that.To be forthcoming.... I went onto the internet and did a 3 minute search for "tri-pod clamps"
It was one of many that came up. I didn't know how much money you wanted to spend or if you would ever want a Tri-Pod
so I was looking for something cheap and virtually disposable.
A longer one would do better. The one above is only about an inch deep. BTW... I search using Images until I get close.
Kestrel Tripod Clamp
The Kestrel tripod clamp holds every type of Kestrel Meter, and attaches to any standard tripod extension poles with a ¼-20 mounting screw. If you are using the Vane Mount, you will not need this clamp. Maximum 4 in / 11 cm grip opening. Compatible with: Kestrel 1000-3500, Kestrel 4...
I just went to Evil bay and found this one too.... #313709385273
Since you only have one gun to make or buy a saddle for, you may consider making one. Since your stock basically has
a square shape it would be very easy. You could use some nice walnut or aluminum or even black Delrin. If you got some
foam about 3/16" thick, you could make the bottom structural piece about 3/16" inch wider than your stock. When you
tightened the side plates the rest of the foam would protect and grip your stock just like the purchased clamps do.
Your pic rail would be screwed to the underside of your saddle. Not elegant but cheap and simple. Just thinking out load.
EDIT: this cam was an after thought.... You could use wing nuts too but they are ugly !!
You could make something really cool. Now I'm going to have to for my military trainers.
There is a great 3M product called Dual Loc that you may want to keep in mind for other problems.
It can be bought at Lowes and likely HD. It is basically super Velcro. Instead of hook and loop of fabric, it uses mushroom
shaped heads that firmly interlock. Both surfaces have the mushrooms. Some has adhesive while some can be screwed
down. ( See photo 4 ) We use the screw down type for scuba gear that needs the ability to break away if needed. It is really
cool stuff.
The link below calls it "snap together fastener shapes.
McMaster-Carr
McMaster-Carr is the complete source for your plant with over 595,000 products. 98% of products ordered ship from stock and deliver same or next day.
See Kori Garza and Kamakai, 18 foot long tiger shark, the largest tiger shark known to exist.
Actual photo of him and Kori and not a photographic illusion.
Don't say CANT .... LoL
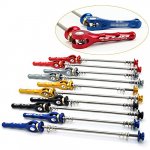
I was just at Walmart looking for Bike quick release wheel skewers but found none. :-( They make front and rear btw. The front are short and the rear a bit wider to accommodate the rear cassette. ( sprocket ). Most any bike shop should have them. As you can see, they come in all sorts of colors and have different handle shapes. I'm going to go to McMaster Carr and likely use a cheap polymer like black Delrin. It's easy to machine
even on a router table or other wood working tools. It's best cut with carbide blades that have teeth that are wider than the blade itself to keep the heat and friction to a minimum.
Then some through holes in the base and side plates. Easy peasy !! I know I likely diminish it's difficulty because I used
to weld, machine and spent 28 years in mechanical design but it looks like a 60/90 minute job for me. The aluminum pic rail is simple,
purchased screw on piece. I'm sure I will need to buy a metric die to extend the threads on the rod and then cut it's length to suit my
needs but that is all simple stuff. It's probably a good time to interject that I enjoy making things. You start with raw stock and an hour
later your holding something that you created. I just pulled my front wheel skerw and it has a maximum dimension of 110mm between the flanged bolts. And have diameters of 18.8mm. They should all be close to that since they go on bikes. The rods measure 4.75mm dia. which seems odd but the pitch is 0.8. Therefore it is a M5 x .8. For me... it will be a fun little project since I don't like outside temps in the 20s.
Attachments
Similar threads
- Replies
- 6
- Views
- 568
- Replies
- 0
- Views
- 199
- Replies
- 10
- Views
- 499
- Replies
- 2
- Views
- 414
- Replies
- 2
- Views
- 510
