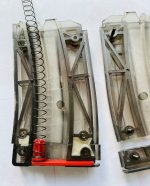
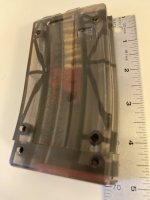
The Black Dog magazines I use in a AR15 lower with a 22LR conversion upper are only available in the longer length (both 10 and 25 round models). I cannot use them when shooting prone or from the bench because of the length. I only load with a maximum of 10 rounds. The following is a quick way reduce the overall height to just under 5” and still load 10 rounds. This only works with the magazines that use a brass screw and nut for assembly.
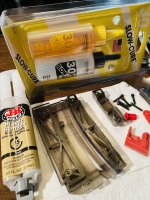
The magazines are made of a polycarbonate plastic. Because of this I used two part epoxy glue that was thick enough to fill small gaps. You can see the brands I used in one of the pictures.
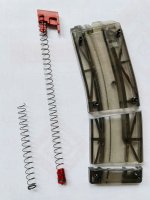
First I removed the internal spring, follower, plug and retaining plate and reassembled the magazine without the internals. I then used a radial arm saw to cut out a section. The cuts were about 3/16” below the middle set of screws and 3/16” above the two bottom screws. The location of the cuts are shown in the second photo. The middle section was discarded.
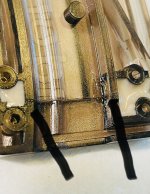
I next unscrewed the halves and used the clear slow cure epoxy to glue the lower piece to the upper for only one side of of the magazine. There is a critical point here. Two internal support ribs must be in correct alignment. The outside edges will not align. No problem. Just sand the misaligned external edged so they are smooth after the unit is assembled. This is cosmetic. I didn’t bother with this step. There is a photo with arrows that point to the critical alignment location. I held the two pieces flat on the table and in place until the slow cure clear epoxy set.
I don’t know if the next step is actually necessary but I already had at home a two part epoxy that will fill large gaps and set up correctly. I filled the gap between each of the two opposing screws only on the assembly side that was previously epoxied. This was to strengthen the possibly weak butt joint between the upper and lower pieces. The light color epoxy used for filler can be seen in the photo that also shows the correct positioning of the ribs.
I sanded (200 and 600 wet to dry) off the epoxy that I inadvertently got on the edges and smoothed the channel for the spring where epoxy overflowed the joint. Last, I cut the spring down to 6” and reassembled the magazine. I did not need to use any epoxy on the other side of the assembly. The brass screws held everything in alignment .
The magazine functions the same as it did before being shortened.
There is a similar modification described on the AR15.com forum that accomplishes the same thing without using epoxy but does require the use of a milling machine. I used epoxy because I didn’t have a milling machine.
The magazines are made of a polycarbonate plastic. Because of this I used two part epoxy glue that was thick enough to fill small gaps. You can see the brands I used in one of the pictures.
First I removed the internal spring, follower, plug and retaining plate and reassembled the magazine without the internals. I then used a radial arm saw to cut out a section. The cuts were about 3/16” below the middle set of screws and 3/16” above the two bottom screws. The location of the cuts are shown in the second photo. The middle section was discarded.
I next unscrewed the halves and used the clear slow cure epoxy to glue the lower piece to the upper for only one side of of the magazine. There is a critical point here. Two internal support ribs must be in correct alignment. The outside edges will not align. No problem. Just sand the misaligned external edged so they are smooth after the unit is assembled. This is cosmetic. I didn’t bother with this step. There is a photo with arrows that point to the critical alignment location. I held the two pieces flat on the table and in place until the slow cure clear epoxy set.
I don’t know if the next step is actually necessary but I already had at home a two part epoxy that will fill large gaps and set up correctly. I filled the gap between each of the two opposing screws only on the assembly side that was previously epoxied. This was to strengthen the possibly weak butt joint between the upper and lower pieces. The light color epoxy used for filler can be seen in the photo that also shows the correct positioning of the ribs.
I sanded (200 and 600 wet to dry) off the epoxy that I inadvertently got on the edges and smoothed the channel for the spring where epoxy overflowed the joint. Last, I cut the spring down to 6” and reassembled the magazine. I did not need to use any epoxy on the other side of the assembly. The brass screws held everything in alignment .
The magazine functions the same as it did before being shortened.
There is a similar modification described on the AR15.com forum that accomplishes the same thing without using epoxy but does require the use of a milling machine. I used epoxy because I didn’t have a milling machine.