Here is another approach to this issue. This method is not for everyone, it is fussy and you have to disassemble your bolt. The primary advantages:
- it works without measurement tools or if your battery dies.
- it is cheap
- you don't have to reset your tooling (press and die) every time you reload.
- it is easy to make controllable changes to your brass length
I assume that you have a 7/8x14 press and full length sizing die. Further that you installed the die into the press with a lock ring that you do not move - in other words, in order to use the die, you just screw it down into the press until the lock ring is tight against the press. This technique only works if fired brass is longer than unfired brass - all of my bottleneck rifle brass is like that.
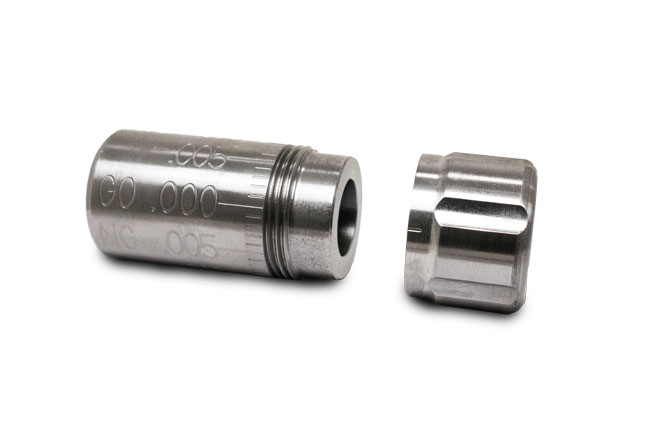
Open the Brownells web site and search for this part number 749-001-325WS
These are shims that you can insert under the lock ring. A set costs about $15. I use mine like this:
- Remove the firing pin and ejector pin from my bolt - I have an empty bolt body.
- put a 10-thou shim under the lock ring and screw the FL die into the press
- lube a piece of fired brass and size it.
- Insert the brass into the chamber and try to close the bolt. In my case, that brass will be too long, the bolt won't close.
- Replace the 10-thou shim with 9-thou shim, repeat with a new piece of brass
- continue reducing shim thickness until the bolt "almost but not quite" closes with no finger pressure.
That piece of brass and die+shim setting is the length of my chamber. If I want another 2-thou, reduce the shims by 2-thou and size away. Note your shims, the next time you load for this gun all you have to do is select the right shims and screw the die into the press.
I use a new piece of brass because reusing the same piece of brass doesn't give me repeatable results. I torque the die into the press - I use 70 inch pounds, I should probably use more but 70 works for me. When sizing, use plenty of lube - again repeatable results. When sizing, lower the press handle and leave it there for 5 or more seconds before raising it - again repeatable results. I have to remove both the firing pin and ejector in order to get consistent results - YMMV. I use a die with a neck button. If your die doesn't sufficiently reduce the neck all the way to the shoulder, no amount of shoulder bump will allow the bolt handle to close without pressure. If you shoot different headstamps, you should check the shim settings for each one.
If you use measurement tools (many are talked about above, I have four different tools), you can get the right settings without disassembling your bolt and you can check you brass without using the gun. The only measurement tool I have used that gives me repeatable results is the RCBS Precision Mic and I sometimes struggle with it - YMMV.
This technique works with any brass or chamber. I think it also works with a semi-auto - I suspect that disassembling the bolt may be harder. If you have two 308s, you can have two different shim settings without changing the lock ring. Periodically check the lock ring, if it gets loose you have to recalibrate.