I'm very new to reloading, and I've tried to research this but still have a few questions. Please bear with me.
1. I have a Forster co-ax I got for a song off a buddy who's taking some considerable time off from shooting. I also have the Redding 6.5 CM Competition die set with body die, bushing die, and micrometer seating die. At the advice of some members here, and in doing research I also bought a Redding full length S type bushing die. From what I read, I'm looking for .002 - .0015" bump in the shoulder, but most everything I read involved shell holders that adjust incrementally to aid in setting this. Obviously the co-ax does not have this feature (but it is an option to convert to that I'm not opposed to necessarily). Do I pull the handle all the way down and thread the FL S type die down until it contacts the s-jaws, then start turning it in or out until I get the desired set back? This seems pretty difficult and tedious to do in the thousands of a inch. The good news though is I'm loading for one gun with the dies so once they're set I can just leave them (I think?) and not worry.
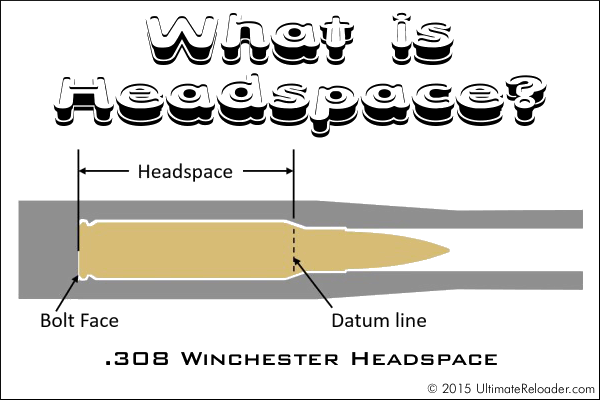
2. I have a Hornady comparator gauge. I understand its supposed to measure the datum line of the shoulder, and I take a once fired case and subtract the .002 or .0015" to find my target length. My question here is does the resizing and or firing change where it measures from? Is there a better way to measure headspace or will this suffice? Just want to make sure everything is consistent and safe on this critical measurement.
3. On the new Redding FL type s die, it came with what looks like a silver expander and a second smaller black mandrel to hold the decapping pins. I'm using a Redding universal to decap, so I wont be installing a decapping pin, but what do I do with the rest of the components? The gentleman on the Panhandle Precision channel on YouTube just scrapped it all and threw the busing in the cavity and turned it down and backed it off a tad so it would float. Is this acceptable, or should I leave the stem in with the smaller mandrel and just not install a decapping pin?
4. I'm going do start with 100 pieces of once fired Prime brass that I shot out of my AI I'm loading for, but I got 200 pieces of once fired Lapua 6.5 CM in the deal as well. 100 fired from his Surgeon and 100 fired from my old custom R700. I know they were only fired once, so I'm not worried there, but my question is will my die settings change with different brass? I have a few different bushings because I know Lapua is a bit thicker and my neck bushing will change, but will the bump setting change as well?
I know this was a long winded post, and I appreciate the help in advance. I'm sure you guys will see more from me when I actually start, just trying to wrap my mind around it before I get going. Waiting on an inline fabrications mount for the coax so it'll fit better on my work bench.
Thanks guys,
Ryan.
1. I have a Forster co-ax I got for a song off a buddy who's taking some considerable time off from shooting. I also have the Redding 6.5 CM Competition die set with body die, bushing die, and micrometer seating die. At the advice of some members here, and in doing research I also bought a Redding full length S type bushing die. From what I read, I'm looking for .002 - .0015" bump in the shoulder, but most everything I read involved shell holders that adjust incrementally to aid in setting this. Obviously the co-ax does not have this feature (but it is an option to convert to that I'm not opposed to necessarily). Do I pull the handle all the way down and thread the FL S type die down until it contacts the s-jaws, then start turning it in or out until I get the desired set back? This seems pretty difficult and tedious to do in the thousands of a inch. The good news though is I'm loading for one gun with the dies so once they're set I can just leave them (I think?) and not worry.
2. I have a Hornady comparator gauge. I understand its supposed to measure the datum line of the shoulder, and I take a once fired case and subtract the .002 or .0015" to find my target length. My question here is does the resizing and or firing change where it measures from? Is there a better way to measure headspace or will this suffice? Just want to make sure everything is consistent and safe on this critical measurement.
3. On the new Redding FL type s die, it came with what looks like a silver expander and a second smaller black mandrel to hold the decapping pins. I'm using a Redding universal to decap, so I wont be installing a decapping pin, but what do I do with the rest of the components? The gentleman on the Panhandle Precision channel on YouTube just scrapped it all and threw the busing in the cavity and turned it down and backed it off a tad so it would float. Is this acceptable, or should I leave the stem in with the smaller mandrel and just not install a decapping pin?
4. I'm going do start with 100 pieces of once fired Prime brass that I shot out of my AI I'm loading for, but I got 200 pieces of once fired Lapua 6.5 CM in the deal as well. 100 fired from his Surgeon and 100 fired from my old custom R700. I know they were only fired once, so I'm not worried there, but my question is will my die settings change with different brass? I have a few different bushings because I know Lapua is a bit thicker and my neck bushing will change, but will the bump setting change as well?
I know this was a long winded post, and I appreciate the help in advance. I'm sure you guys will see more from me when I actually start, just trying to wrap my mind around it before I get going. Waiting on an inline fabrications mount for the coax so it'll fit better on my work bench.
Thanks guys,
Ryan.