• Watch Out for Scammers!

    We've now added a color code for all accounts. Orange accounts are new members, Blue are full members, and Green are Supporters. If you get a message about a sale from an orange account, make sure you pay attention before sending any money!

Spigot for XLR Element

ah1356

Private
Supporter
Full Member
Minuteman
May 27, 2013
93
120
Nashville, TN
I have 2 rifles in XLR Elements. The only thing I don’t like about the chassis is that I have not been about to find a good spigot mount option for my bipods. With a little help from a buddy with a mill, I finally have a solution.

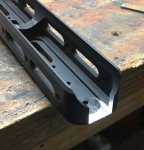
First we cut the nose of the forearm to continue the existing flat surface forward. I’m guessing this voids the warranty...
7A6F5EAB-2B2C-46EB-9CDF-46224460D097.jpeg

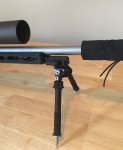
Then we shaved a few thousandths off the edges of a BT63 Nose Rail and reshaped the end a bit so that it would fit in the slot in the forearm. It is mounted using the existing threaded holes in the chassis with screws that I shortened to be flush. The final system leaves about .20 clearance for the barrel and moves the bipod forward about 3-4 inches and up about an inch. It’s much more stable now. As an unexpected benefit, it is also a little more maneuverable in and out of ports.

A94961E8-2889-4344-A22B-23321C178AC4.jpeg

90494037-F1D6-4CD7-A38C-9C6C8DA6019A.jpeg
 
This is pretty awesome. I have been looking at arca rail extenders to use as a makeshift spigot mount. But this looks doable. Thanks for the write up
 
This is pretty awesome. I have been looking at arca rail extenders to use as a makeshift spigot mount. But this looks doable. Thanks for the write up

A generic arca rail will bolt right on, I put one on mine, 350 mm I think, a 400 would give you a full rail and the extension.
 
The arca rail would project the bipod forward, but this approach also raises the bipod so it is closer to the barrel.
 
That's very cool, and now maybe I'll be willing to cut into mine. Had much the same thought, but was thinking crazy hole drilling. Maybe following your lead I can cut a box for the MDT front adapter. But it's scary to cut that much on these things!

So far, I have just finagled a Vertabrae Tikka T3 rail+spigot adapter to fit on the front of my Element. Normally I document everything, but don't have great photos. This shows how much more I could move it up, for comparison even though we don't have the same bipod at all.
2018-03-17 19.25.53.jpg
 
Very cool. I may do this. I wonder why xlr dosnt offer anything like this. It seems very popular on other chassis
 
  • Like
Reactions: shoobe01
It’s a heavy Palma barrel. There is 0.20 clearance so it should work with just about any barrel profile.
 
Me too. I am 99% sure it will fit. The rail is lower than the highest internal structure inside the forearm of the chassis. I’ll post confirmation when the barrel arrives and is installed.
 
The new MTU barrel arrived. I don’t have it installed yet but it is going to fit with no issues at all. It’s not even close to interfering.
 
Okay, did mine. Disclaimer: you don't care. I am a big weirdo who likes the PH style bipods. For most of you, this is more about how easy it is to drill holes in an aluminum chassis to make it do whatever you want, than anything else.

Short version:
  • XLR Element. Remington 700. Bought an aluminum spigot from Vertabrae (love everything they make!)
  • Drilled hole in front of stock/chassis, after carefully measuring to make sure the top of the bipod is no closer to the barrel than the top of the stock channel.
    • As it turns out, that's really far away. I probably should have just gone ahead and made it closer.
  • Drilled it out.
  • Filed a lot.
    • This is a mistake. I do not have machine tools really, and my clever plans to block off the interior to drill a channel didn't quite work
    • IF someone else wants to do this, and doesn't have some enormous barrel that needs the room, drill a few mm higher so the stud is against but not "in" the lower part of the chassis.
    • Or, have a machinist and mill on hand!
  • Drilled a hole across the stud, drove two screws up through the mounting points
    • Front one through the stud
    • Back one rear of it
    • Both go through a bracket I made of aluminum channel
  • Now, if not pre-assembly, aluminum cold black everything
  • Paint it, and the stock entirely


Photos explain it better than me typing... Before, a Vertabrae stud/rail for the T3, but as you see it's pretty low:
2018-10-06 14.45.43.jpg


Measure, mark, make jigs. This was sketchy, metal jigs would be better but this is what I did.
2018-10-07 14.05.40.jpg


I got no shots of reaming, etc. Sorry. Loose installed ready to be tightened:
2018-10-07 15.41.25.jpg


All assembled. So high I had to reverse my side rail as it bumped into it!
2018-10-14 00.03.14.jpg


Shoots like a dream. Very happy with it. Some entirely other issues with the rifle now, dammit, but this works!
2018-10-14 00.04.41.jpg
 
I have discovered one downside to this setup but it was easily resolved. When shooting from the top of a barrel or the peak of a rooftop the bipod is too far forward to use effectively. There is another location available to mount a rail section under the forearm, so I did that. The quick release on the bipod lets me move it easily between the spigot and the rail, or take it off for a barricade or other scenario where I don’t need it.