

I plan to paint and sponge my rifle stock to somewhat resemble a Manners the best I can. Does anyone have any pictures of rifles they have done and any tips? I know I will have to use a sponge with a large pore size but was curious if anyone had any recommendations for what worked best for them. Also curious on what paint has held up the best. I do not have access to an paint gun of any sort so will have to be done with rattle can. I also plan to use a few layers of matte clear coat to add some durability once complete. Thanks
Gunsmithing Stock Sponge Painting
- Thread starter bmicek
- Start date
You are using an out of date browser. It may not display this or other websites correctly.
You should upgrade or use an alternative browser.
You should upgrade or use an alternative browser.

I bought some sea sponges at Michaels Crafts Hobby Lobby probably has them too, then used Krylon Camo paints by spraying the paint into the cap then dabbing with the sponge. Finished up with a coat of clear mat Krylon. Has held up well.
basically i did as above (sea sponges and krylon camo). this was for my browning a-bolt hunting rifle and i didn't want anything reflective so no clear coat, though i guess i could get some sort of satin clear coat. if i really go at it, i can scrape a little off, but i guess that will just add to the camo (random) effect. plus i can always dab on more paint. i did wipe the stock down with mineral spirits prior to painting.
Makes me smile to see that ugly-assed scope on such a beautiful camo job!
Come on..... it's only a scope... SPRAY IT!!!
By the way, I have the same ugly-assed scope and was thinking of hitting it on the next Duracoat session.
Come on..... it's only a scope... SPRAY IT!!!
By the way, I have the same ugly-assed scope and was thinking of hitting it on the next Duracoat session.
To each their own. I like the way the scope looks on my rifle. Hope your Duracoat session goes well.
Bradley Adjustable cheek rest. Pricey, but a very good product.
nice job!
I just buy the large rectangle sponges and cut them into large fries across their width. I spray the end of the sponge and dab it on a board until I get it printing the way I want. I always finish with darkest color printing as light as possible.
I sprayed and sponged my entire RPR. Pictures are posted in the Ruger Precision Rifle Discussion thread, page 46, the post is dated Sep 2, 2018.
<https://www.snipershide.com/shooting/threads/ruger-precision-rifle-discussion.6252612/page-46>
I used a paper punch to create small masking dots to protect gas ports, power and parallax settings and all serial numbers. I talked to Burris tech support to be certain not to void the warranty. Used Krylon flat camo. If it gets roughed up in use, I can just touch up with a sponge. The suppressor will get redone this spring after I see how bad the heat darkens the colors. Don't sweat the small stuff, blemishes and scratches won't have a significant affect on the camo affect. Don't put the base coat on so thick you glue moving parts together.
Just finished this on up.
It will get a matte clear coat in a few days. The clear will deepen the colors just a touch.

It will get a matte clear coat in a few days. The clear will deepen the colors just a touch.
Tried to post 3 picks, only one worked. Let's try again 
Just finished this on up.
It will get a matte clear coat in a few days. The clear will deepen the colors just a touch.
View attachment 7015474
Is that the stock I think it is? Wow, very nice.
Lol, yes it is. It will be for my guest rifle.Is that the stock I think it is? Wow, very nice.
Looks good!Tried to post 3 picks, only one worked. Let's try again View attachment 7015679

I did two stocks a couple of weeks ago. Drove the 50+ miles round trip to Wal-Mart for sea sponges. When I got home I realized the sponges were harder than a three day erection and just made small patterns Went ahead with the small pattern, then added a larger pattern in olive drab with a "regular" cleaning sponge.
The second stock was a cheap black synthetic. Sprayed it with a texture paint, then added a bunch of vertical webbing. Top coated both with satin clear Krylon.

The second stock was a cheap black synthetic. Sprayed it with a texture paint, then added a bunch of vertical webbing. Top coated both with satin clear Krylon.
Attachments
HiI did two stocks a couple of weeks ago. Drove the 50+ miles round trip to Wal-Mart for sea sponges. When I got home I realized the sponges were harder than a three day erection and just made small patterns Went ahead with the small pattern, then added a larger pattern in olive drab with a "regular" cleaning sponge.
The second stock was a cheap black synthetic. Sprayed it with a texture paint, then added a bunch of vertical webbing. Top coated both with satin clear Krylon.View attachment 7016075View attachment 7016076
How did you do the hair like effect on the second stock?
Thanks
Ive been looking at a lot of paintjobs recently and think i want to go with an LRI type sponge. Any ideas on how to make this look? It would be great for coyotes.
Picture is stolen off the hide.
.JPG")
Picture is stolen off the hide.
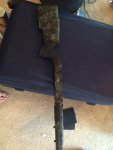
Ended up painting up abs sponging my stock today. Gotta say, it’s not what I was wanting exactly. Wish I would’ve went with bigger sponge blotches like a newer Manners stock has. May redo it sometime. Still doesn’t look that bad but not quite what I was going for.
Attachments
This is Rust-oleum Stone.
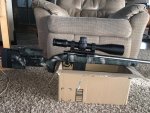
This is an older junker of a 700 SA factory tupperware stock I had laying around.
The stock is 1/2 gray, and 1/2 tan
I know it's not sponged...but I wanted to try out the speckle paint, before I venture into paint sponging a stock...
Great thread guys
Thanks!


This is an older junker of a 700 SA factory tupperware stock I had laying around.
The stock is 1/2 gray, and 1/2 tan
I know it's not sponged...but I wanted to try out the speckle paint, before I venture into paint sponging a stock...
Great thread guys
Thanks!
Last edited:
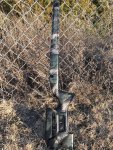
Here’s a few others Scimitar(my brother) did for me. Some are straight sponge, some are sponge and stencils.


Ive been looking at a lot of paintjobs recently and think i want to go with an LRI type sponge. Any ideas on how to make this look? It would be great for coyotes.
Picture is stolen off the hide.
View attachment 7016583
I'd spray the base color then cut a sponge into thinner strips for the pattern, should be pretty easy.
Nice job, you looking to get rid of that stock when you are done?Test run on a stock I don’t use.View attachment 7226382View attachment 7226383
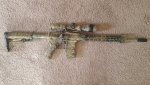
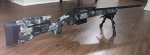
I went with Brownells Alumi-Hide in parkerized grey/ coyote/and Stainless with two coats of the grey and natural sponge from hobby lobby . My receiver is stock black and the barrel is bead blasted stainless scope is a GEN II RAZOR on a McMillan A-3G in olive drab.
So far the alumihide is holding up to solvents and normal abuse!
So far the alumihide is holding up to solvents and normal abuse!
I ended up hitting it with a semi gloss clear coat and it made the colors pop even more. So I actually kind of like it now! Enough to probably just leave it how it is.
I think your stock turned out great.
Since @Geno C. tagged me, I guess he wants me to post a few pics up, so here goes.
This was my first attempt.
Two more a couple days later.
And the last one I did a couple of weeks ago.
For anyone wanting to do this, it's easy as hell.
Clean and mask the stock.
Start with the darker colors and go to town on it.
The base coat color can give a difference in color depth.
I started with either black or FDE.
@TampaBud started with a green base on this one.
If things get messed up, let it dry a bit and paint over it.
Vary the pressure on the sponge and you'll get different effects.
I like to overlap the colors a bit. Some people like them completely separated.
As pointed out above, the matte or satin clear coat really makes the difference.
To make things easier, I sprayed paint into paper bowls and it made dabbing and wipe off easier in case I got too much on the sponge.
Not necessarily, but I don’t need it ether.Nice job, you looking to get rid of that stock when you are done?
Not as good as others posted, but I like it. Best advice would be to dab the sponge on cardboard and get a feel for how to apply it with a good pressure and appropriate amount of paint .
.


I was curious on the second stock how you did the webbing. I would like to do red webbing on a black stock I have.
I did two stocks a couple of weeks ago. Drove the 50+ miles round trip to Wal-Mart for sea sponges. When I got home I realized the sponges were harder than a three day erection and just made small patterns Went ahead with the small pattern, then added a larger pattern in olive drab with a "regular" cleaning sponge.
The second stock was a cheap black synthetic. Sprayed it with a texture paint, then added a bunch of vertical webbing. Top coated both with satin clear Krylon.View attachment 7016075View attachment 7016076
Similar threads
- Replies
- 1
- Views
- 276
- Replies
- 4
- Views
- 539