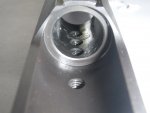
After seeing how this gun's barrel is retained (the set screws mashing the barrel) I think it explains the very different accuracy some people are experiencing. I think how heavy handed the factory assembler is could vary how the bore is constricted at this most critical place on the barrel...ie...at the throat of the bore.
If you slug a quality barrel you can feel ANY outside constriction (even a slightly over torqued tuner on the muzzle, or if a threaded bbl is over torqued to the receiver) in the bore. This is not as critical in a gun using a jacketed bullet, as brass has "spring" and will not be as affected by a tight spot in the bore.
BUT...pure lead (.22 RF) is "dead", ie...it has no "spring back" and ANY deformation of the bullet in the bore stays deformed after the constriction.
If it was me, I would not use the highly torqued set screws to install a new high end barrel (I would even fix this on a FACTORY bbl).
I would do the following:
1. Remove barrel, make sure ALL old adhesive is removed from receiver. Temporarily install new barrel, set headspace (.042 feeler guage), and LIGHTLY torque setscrews in proper location.
2. Check function, go out and shoot a couple boxes of shells and make sure everything works properly (fix/adjust as needed).
3. Tighten/loosen the REARMOST (the one only over the chamber) setscrew several times as to make a little divot in the barrel...just so you can put the bbl back in EXACTLY the same spot on reassembly (you'll be able to see and feel the setscrew go back into the divot upon reassembly).
4. Disassemble everything, clean everything with brake cleaner to degrease. I'd use Rocksett (or one of the proper Loctite compounds) and coat all mating surfaces, then install the barrel, and replace the setscrew (just to locate the bbl.). I like Rocksett, as you just have to soak overnight in water to remove, no heat needed.
5. When cured, loosen the setscrew.....I would probably reinstall the three setscrews with blue Loctite at very low torque (ie...only use short end of allen wrench to tighten).
This would relieve the bore mashing stress of the three setscrews. Might even make a factory barrel shoot better!
I think I'll post this in the main TIKKA thread as well.... Thanks Kissofdeath for the good pics that explains/shows the details of assembly!