I really only need a top rail to mount my radius. If anyone can point me in the right direction to where i am not dropping 300 to 500 bucks on rails that'd be great.
Join the Hide community
Get access to live stream, lessons, the post exchange, and chat with other snipers.
Register
Download Gravity Ballistics
Get help to accurately calculate and scope your sniper rifle using real shooting data.

Install the app
How to install the app on iOS
Follow along with the video below to see how to install our site as a web app on your home screen.
Note: This feature may not be available in some browsers.
You are using an out of date browser. It may not display this or other websites correctly.
You should upgrade or use an alternative browser.
You should upgrade or use an alternative browser.
UPDATE: Made bushnell lmss rails
- Thread starter jb41291
- Start date
I really only need a top rail to mount my radius. If anyone can point me in the right direction to where i am not dropping 300 to 500 bucks on rails that'd be great.
I'd give Badger a call and see if you can buy a single rail instead of the full kit.

Contacted badger and bushnell about trying to purchase the top rail only. Unfortunately, we were not able to work anything out. Bought an aim sports uncut picatinny rail and will try to jimmy rig something stable enough to mount my radius.
Contacted badger and bushnell about trying to purchase the top rail only. Unfortunately, we were not able to work anything out. Bought an aim sports uncut picatinny rail and will try to jimmy rig something stable enough to mount my radius.
I know there's been discussion with the LMSS2 of Bushnell offering the rails for sale, and possibly even including a single rail in the box. As far as I know, there's been no change in the layout for the rails between the original and the 2, so when the 2 comes out this fall, you may be able to get one direct from Bushnell.
Here is my solution to not spending over $200 on rails for my lmss. Going to hd later to buy a longer screw and washers to fill the gap in the back. Estimated cost $15 and 1 hour of work in the garage.


Last edited:
That’s awesome! I’ll be doing the same for my radius!! Thanks! Outta curiosity how far have you been able to reach with that setup? I have the same kit but haven’t been able to justify buying the 500 dollar rails
I was able to range and verify out to 1,092. I haven't ranged furtherThat’s awesome! I’ll be doing the same for my radius!! Thanks! Outta curiosity how far have you been able to reach with that setup? I have the same kit but haven’t been able to justify buying the 500 dollar rails
The furthest target i have ranged was 1092 yards. It holds zero pretty well.That’s awesome! I’ll be doing the same for my radius!! Thanks! Outta curiosity how far have you been able to reach with that setup? I have the same kit but haven’t been able to justify buying the 500 dollar rails
Contacted badger and bushnell about trying to purchase the top rail only. Unfortunately, we were not able to work anything out. Bought an aim sports uncut picatinny rail and will try to jimmy rig something stable enough to mount my radius.
The finished product looks great!! Which rail piece did you buy? There’s a couple different thickness ones off amazon that I found.
I bought the 12" x .31" aim rail then cut it down and drilled a whole to line it up.The finished product looks great!! Which rail piece did you buy? There’s a couple different thickness ones off amazon that I found.
I bought the 12" x .31" aim rail then cut it down and drilled a whole to line it up.
Perfect! Thank you!!
No problem. Your gunna have to use washers between the rail and scope. Play around with the combinations until you are able to get the rail parallel to the scope body. You may also have to purchase slightly longer screws.Perfect! Thank you!!
No problem. Your gunna have to use washers between the rail and scope. Play around with the combinations until you are able to get the rail parallel to the scope body. You may also have to purchase slightly longer screws.
Yeah I’m planning on having to make a cover / spacer for the longer screw towards the rear. It’s what I did with the bottom plate I use for my tripod so I wouldn’t turn or over torque a single screw. Used two mount points. Much more stable. Just hadn’t been able to find a long enough picatinny rail section before now. Guess my amazon search skills were lacking.
Doing more research and found an aim pic rail that’s 12”x.64. I’m thinking about milling down the underside of the rail where the front screw / objective area is and it might not need a spacer in the rear. I don’t have the spotter yet as I just ordered it this morning. But what’s the thread pitch on the screws that you used?
I would have to double check the thread size. Worst comes to worst grab the stock screws and take 1 with you to a hardware store.
anyone know what the actual screw size is? I prefer not to strip the threads guessing.
Use a screw checker

BROWNELLS SCREW CHEK'R | Brownells
Tells size, threads-per-inch, diameter, length, tap series, body drill size, and tap drill for machine screws; use to check size of wood and sheet metal screws plus standard rivets. Covers all standard sizes, including 6-48. Use to cut unhardened ...
 www.brownells.com
or take one of the scope screws with you to the hardware store, every hardware store has a screw checker for you to screw in your screw to verify the pitch.
I bought the 12" x .31" aim rail then cut it down and drilled a whole to line it up.
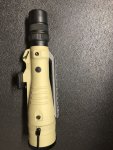
same here.. just chopped it and had the hole drilled. (used the front location from the factory rail)
Yours looks prettier than mine! I used a hand drill for my rail haha. I might just order an new rail and see if you could finish it like that. I was also going to have a buddy of mine turn me some aluminum spacers to exact height instead of using multiple pieces of steel washers and delrin spacers. In all my process took 30 mins and $15. So I can't complain.same here.. just chopped it and had the hole drilled. (used the front location from the factory rail)
View attachment 7352796
Yours looks prettier than mine! I used a hand drill for my rail haha. I might just order an new rail and see if you could finish it like that. I was also going to have a buddy of mine turn me some aluminum spacers to exact height instead of using multiple pieces of steel washers and delrin spacers. In all my process took 30 mins and $15. So I can't complain.
as long as u throw some paint on there, it looks great. I had a buddy machine mine. I also sprayed the cut end of the rail in a Wlamart flat black spray can and seemed to match perfectly.
I 3D printed mine. I used a PETG plastic which is relatively strong and resistant to heat. It is not as strong as aluminum, but this is not a high stress part. I would rather have the part brake as opposed to putting that shock on the optic. But, haven’t broke anything.
Attachments
looks good....u mind making afew more?I 3D printed mine. I used a PETG plastic which is relatively strong and resistant to heat. It is not as strong as aluminum, but this is not a high stress part. I would rather have the part brake as opposed to putting that shock on the optic. But, haven’t broke anything.

I 3D printed mine. I used a PETG plastic which is relatively strong and resistant to heat. It is not as strong as aluminum, but this is not a high stress part. I would rather have the part brake as opposed to putting that shock on the optic. But, haven’t broke anything.
Would you be willing to share the files for those of us with access to printers?
Similar threads
- Replies
- 4
- Views
- 789
- Replies
- 15
- Views
- 598
- Replies
- 22
- Views
- 1K
