Poll:
Who would you rather have rubbing oil on your wood?
○ n2ishun
○ Bigfatcock
Who would you rather have rubbing oil on your wood?
○ n2ishun
○ Bigfatcock
Well... It was a little more than just polishing up a factory barreled action. Remington Custom Shop rifles were all hand-fitted and headspaced, so you were getting closer to a custom built rifle than a production line special...Wth that ^^^^ said, us poors still like pretty rifles. A nice stock on a rossi ain't hurting anyone.
How many Remington 700s were done at the custom shop? In the end its still a 700, but it looks better.
Well... It was a little more than just polishing up a factory barreled action. Remington Custom Shop rifles were all hand-fitted and headspaced, so you were getting closer to a custom built rifle than a production line special...
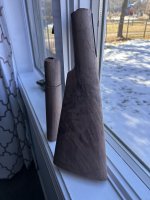
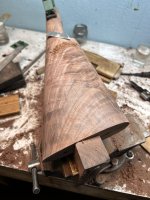
Yeah, this is a learning experience for me, really never done any gun wood before. I got all the big scratches out, started sanding. Following the lines of the figure seems to work ok. I went 120g then 180, raised the grain with a damp cloth between grits. 220 is up next. Sandpaper glued to a block for flatness. Is there much point in going to 320-400grit?The razor files are pretty aggressive, especially for the state the stock was already in. I probably would have used an 11 or 14 rasp since it was pretty close on dimensions.
I’d have to see the wood wet before I can make a recommendation on going to 320-400. High grit will help if blotch is a problem, as will a pre-stain conditioner.Yeah, this is a learning experience for me, really never done any gun wood before. I got all the big scratches out, started sanding. Following the lines of the figure seems to work ok. I went 120g then 180, raised the grain with a damp cloth between grits. 220 is up next. Sandpaper glued to a block for flatness. Is there much point in going to 320-400grit?
I’d have to see the wood wet before I can make a recommendation on going to 320-400. High grit will help if blotch is a problem, as will a pre-stain conditioner.
I bought the sight and a plug for the dovetail. The dovetail plug doesn’t fit well and just falls out. The rear safety peep sight is ok.Jump onto Stevesgunz website. He sells some items for Rossi's you might find enjoyable. His gunsmithing video for Rossi/win92s is super helpful. I used the info to clean up the machining marks in my 1892 and to tune the action. He also offers a peep sight plug for the ugly rossi safety.
FYI-- Rossi quality has been consistantly getting better these last few years. The several I have shot recently were pretty darn nice.
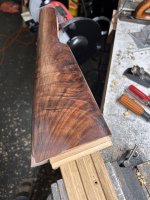
If you like the way it looks now then I would be good at 220. Moving to 300 grit might help the curl be more defined when you apply your oil finish, but I think it looks pretty good as it sits. Looks like that stock has nice chatoyance.
It looks like there are still a lot of sanding marks left in it from the rasps or lower grits. I'd take it back down to 120 and bring it back up to remove all the sanding marks.View attachment 8402412View attachment 8402413View attachment 8402414
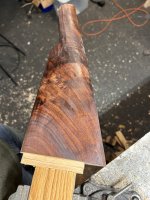
Getting a lot of “streaking” in the finish when it dries. This was after using 320g sandpaper on a block and sanding in finish. I decided to just use pre made saw dust and sprinkle it in the oil then rub it all in with a 3m fine(probably 400 ish grit) finish pad. That really cut down on the streaks after wiping off the oil but it’s not perfect. Going to sand between coats this time and see if that helps too.
It soaked up so much oil the first few coats. Minwax tung oil 2:1 ratio with mineral spirits. No wax or anything else.It looks like there are still a lot of sanding marks left in it from the rasps or lower grits. I'd take it back down to 120 and bring it back up to remove all the sanding marks.
In the second picture it almost looks like dried wax has been applied before being buffed, kind of paste wax-ish. Or it could just be that that part of the stock is more thirsty than the rest of the stock. What finish are you using?
For your first coat I'd recommend a thinned finish (whatever you're using), and heavily saturate the stock. Let it sit and watch to see if there is any uneven absorption. Feed more oil to the spots that absorb more oil. Keep feeding it until it stops absorbing. Then completely wipe the stock down. Let dry for however long is recommended by your finish+ an additional 24 hour period. For subsequent coats you can apply with a foam applicator or quality brush. Apply in one direction and overlap applications by about 1/8th inch. It should settle smooth. Or you can hand rub it in.
What look are you going for? Subdued oil finish or shiny?It soaked up so much oil the first few coats. Minwax tung oil 2:1 ratio with mineral spirits. No wax or anything else.
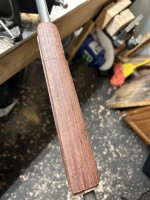
It’s super hard to see the scratches when wet. Kinda like it drys different down in the scratches and turns white.
subdued I thinkWhat look are you going for? Subdued oil finish or shiny?
Your might be oversized. One of my winchesters was out of spec. I think I got the dovetail plug from brownells, its been a few years agoI bought the sight and a plug for the dovetail. The dovetail plug doesn’t fit well and just falls out. The rear safety peep sight is ok.
I wish I could find the pic rail/peep that came on the Rossi “triple black” to cover the holes/dovetail.
I wish I could find the pic rail/peep that came on the Rossi “triple black” to cover the holes/dovetail.