
Making a solid wood rifle stock from scratch – Nicholas Gebhardt
This entire project merely started as an idea rolling through my mind in the summer of 2019. I was enjoying a few days with some long-time friends of mine and as usual, my mind drifted toward rifle projects. I wanted to do something completely different than what is normal in the tactical/precision rifle community; I wanted to return to a wooden stocked rifle. But I wanted it to be custom fit to me, not an off-the-shelf fit everybody option. I wanted it to have a look that was unmistakable, eye-catching, and beautiful even in the realm of fancy wood grades. It had to be truly custom, and to be truly custom, I would have to do it myself from start to finish.

I wouldn’t say I play a lot of chess, but I like the game and the strategy that you need to have to win, especially against an equally competent opponent. This whole precision rifle game is much the same way, you need a strategy and be always forward thinking. For my stock idea, my mind went toward making a chess board layout down the sides with the end grain of the wood; oak and walnut would provide the contrasting colors. I was sitting on a couch mulling this over in my mind when my buddy says “whatcha thinkin about over there?” I hadn’t really realized it, but I was basically staring off into space and had been quiet for some time. My response was a simple, “Just thinking about stuff, a new stock idea.” That’s when the discussion really began. I explained what I was thinking about, how I’d go about putting it together, and the whole deal. Now our other friend, usually the guy with a very close relationship with the good-idea-fairy, chimed in. He took my idea a bit further and thought that instead of having the pieces oriented perpendicular to the centerline of the bore, to put them at an angle so more of the grain would show through and have a cooler look along the top edge of the stock.
Further discussion amongst us and we determined a herringbone pattern would have to be the best option. A day or two later we all went to Wal-Mart and found a set of Jenga blocks to make a bit of a working model to fully see how this idea would end up looking. A few minutes later and I concluded this would be the best option; a herringbone pattern with two different woods for contrast. Fortunately, I have access to a very well stocked wood working shop, so making sure everything was flat, square, and true should be easy enough. I would need several layers of glued together blocks to make this a reality, but first, which woods would be the best? Should I stick with Oak and Walnut, or are there better options? Would the grain structure matter?
A discussion with the high school wood shop teacher had me convinced to use Maple and Cherry for the stock instead of Oak and Walnut. Oak has an open grain to it where Maple and Cherry are much more closed. Plus, the colors of Maple and Cherry, I thought, would look very nice as well. With that, it was settled in my mind as to the wood selection.
My lumber store is small, but they do have a nice selection of tools, equipment, wood, and whatever else a handyman might need around the home. I was not expecting them to have Maple or Cherry in stock but figured they could at least order it in for me. Fortunately, they had a couple boards each of Maple and Cherry. These boards had been sitting, rather standing in the corner, for what the owner figured had to be two or three years. “That’s perfect” I said aloud, “the boards will be sufficiently dried out.” Now the real work was to begin.
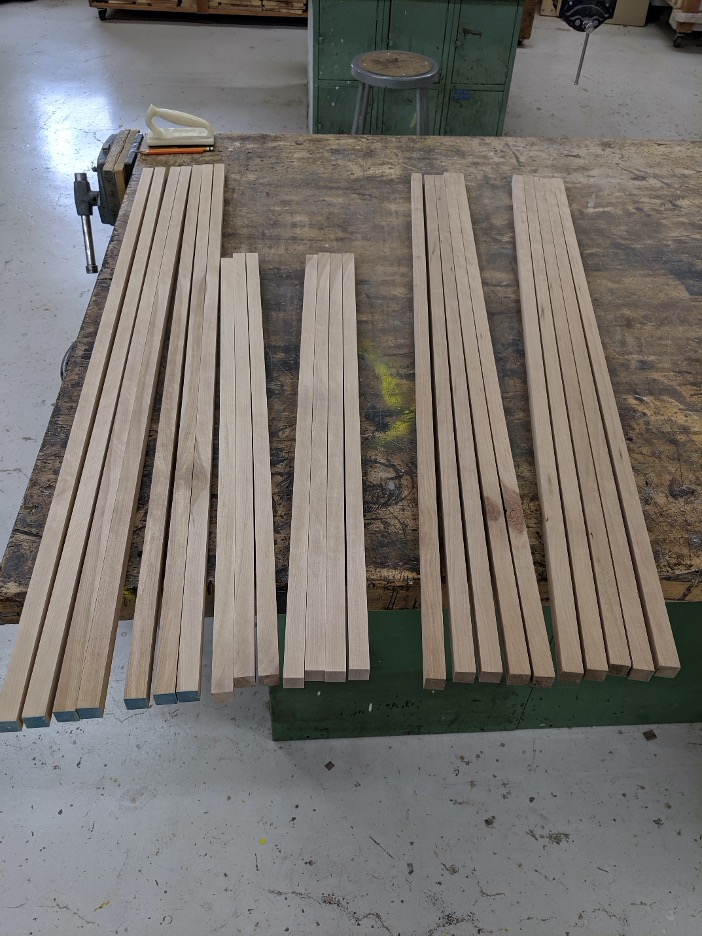
My very first step was to ensure the boards were all the same exact thickness and entirely flat. Through the surface planer at the wood shop they went, one at a time, until no defects could be seen on either side of either board. The next step was to run one side of each board across the jointer to make sure I had a perfectly flat edge on one side before ripping them down into multiple sticks on the table saw.
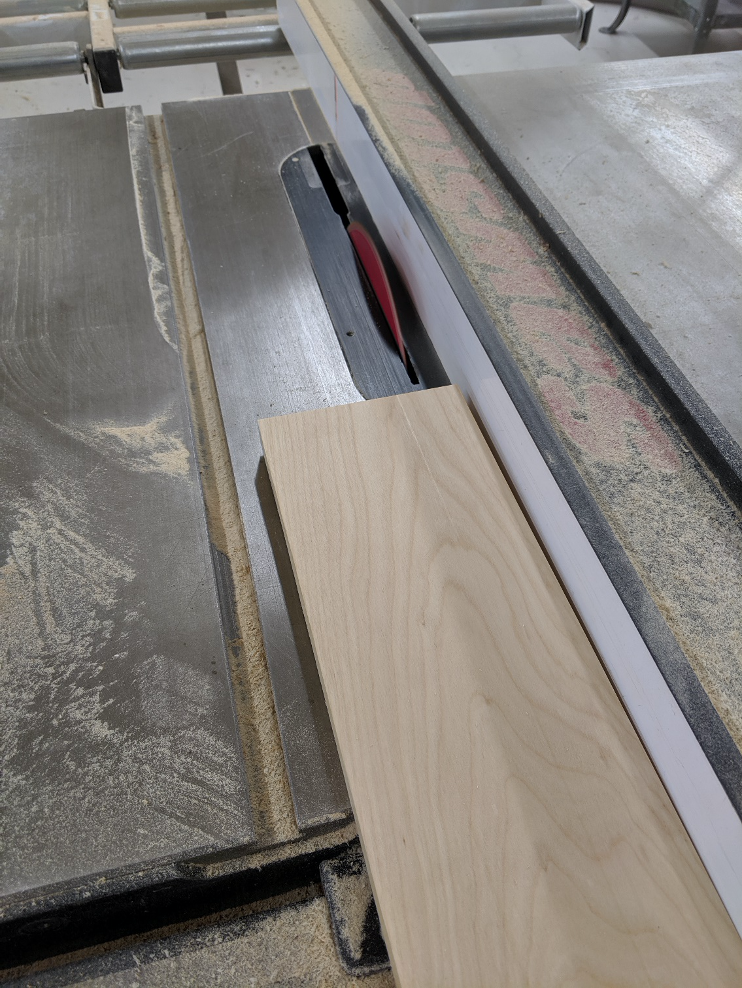
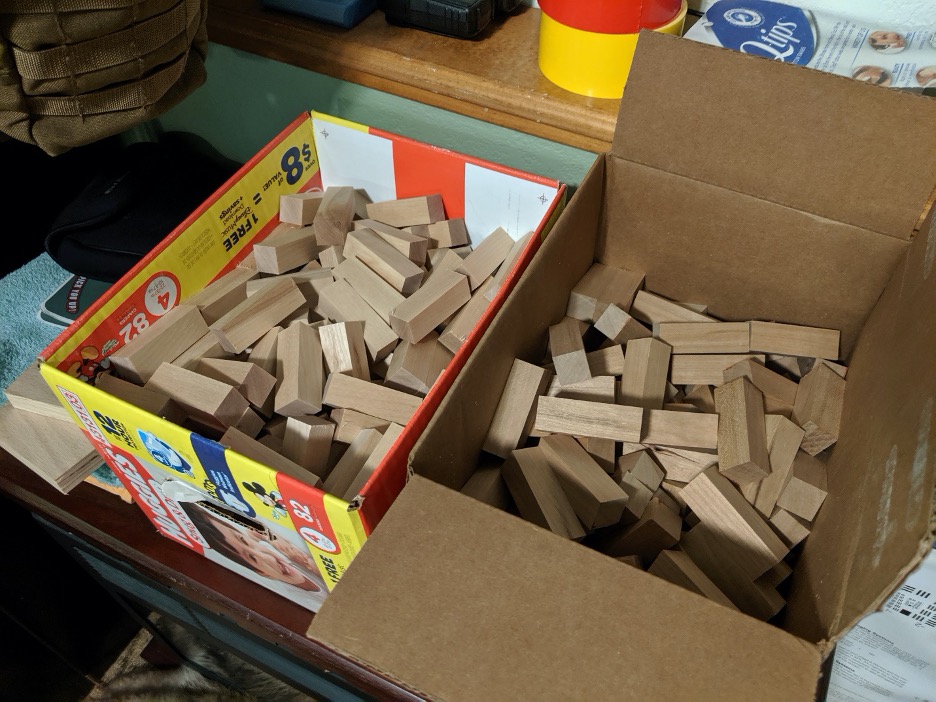
Third, the boards made several passes through the table saw and I then had several lengths of board that were all about 7/8” square, and ready to get chopped up into 2.5” long Jenga-like pieces. To the chop saw I went and eventually two boxes of little Maple and Cherry pieces sat before me, ready to be glued together. My glue of choice was Gorilla wood glue as I had read excellent reviews on it.
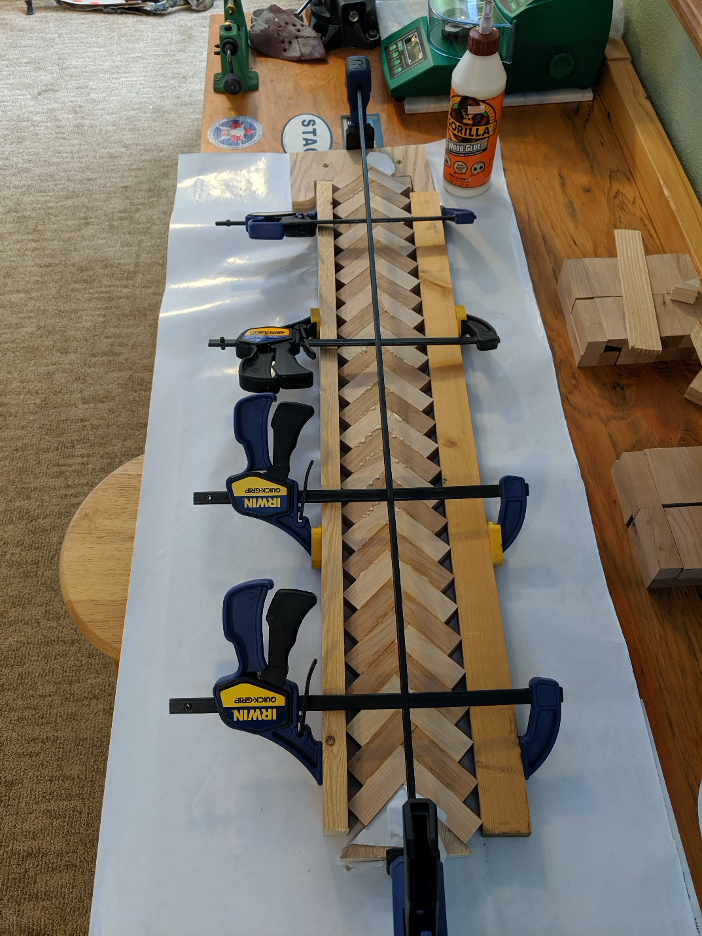
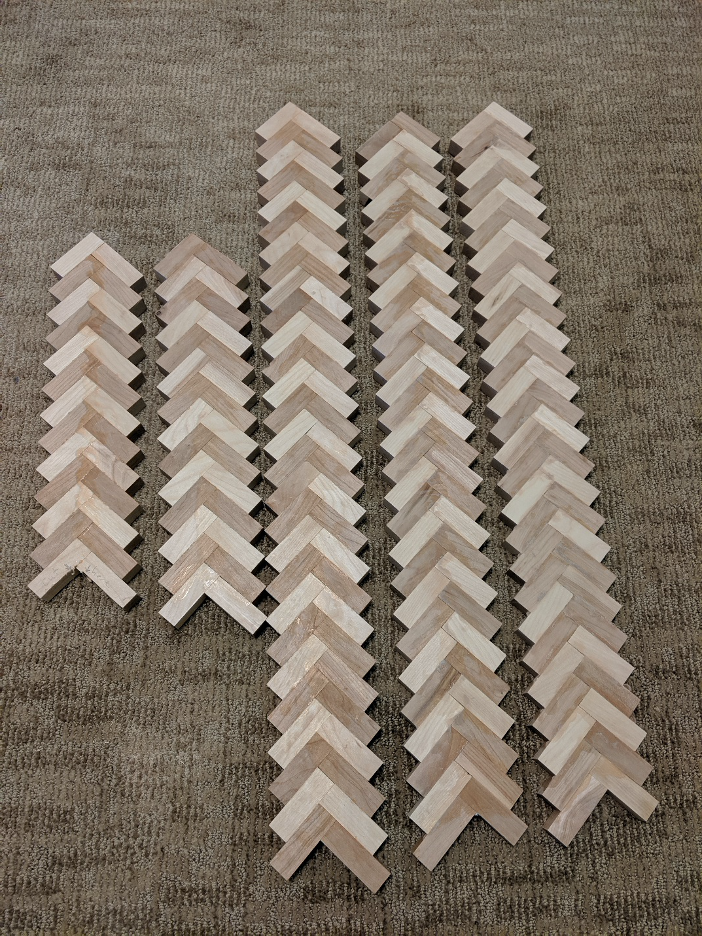
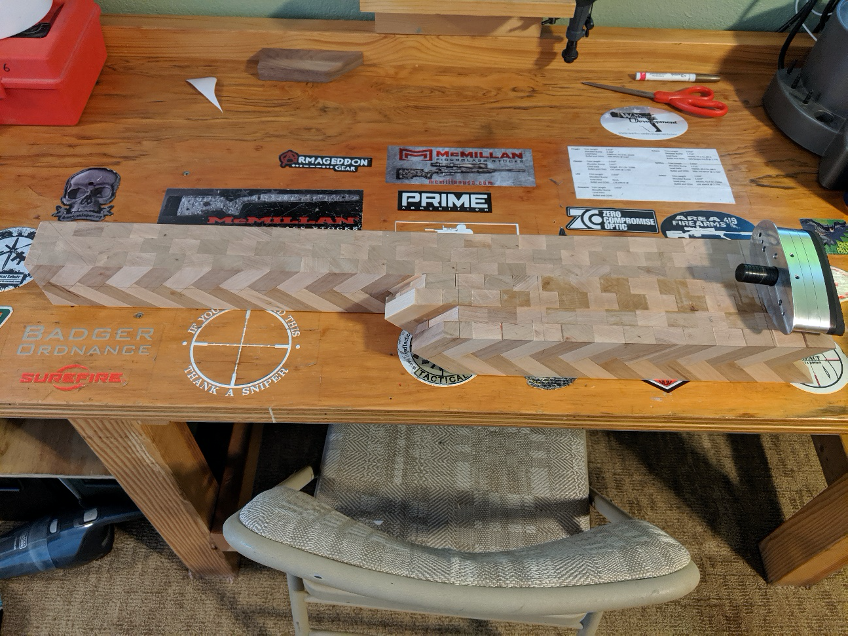
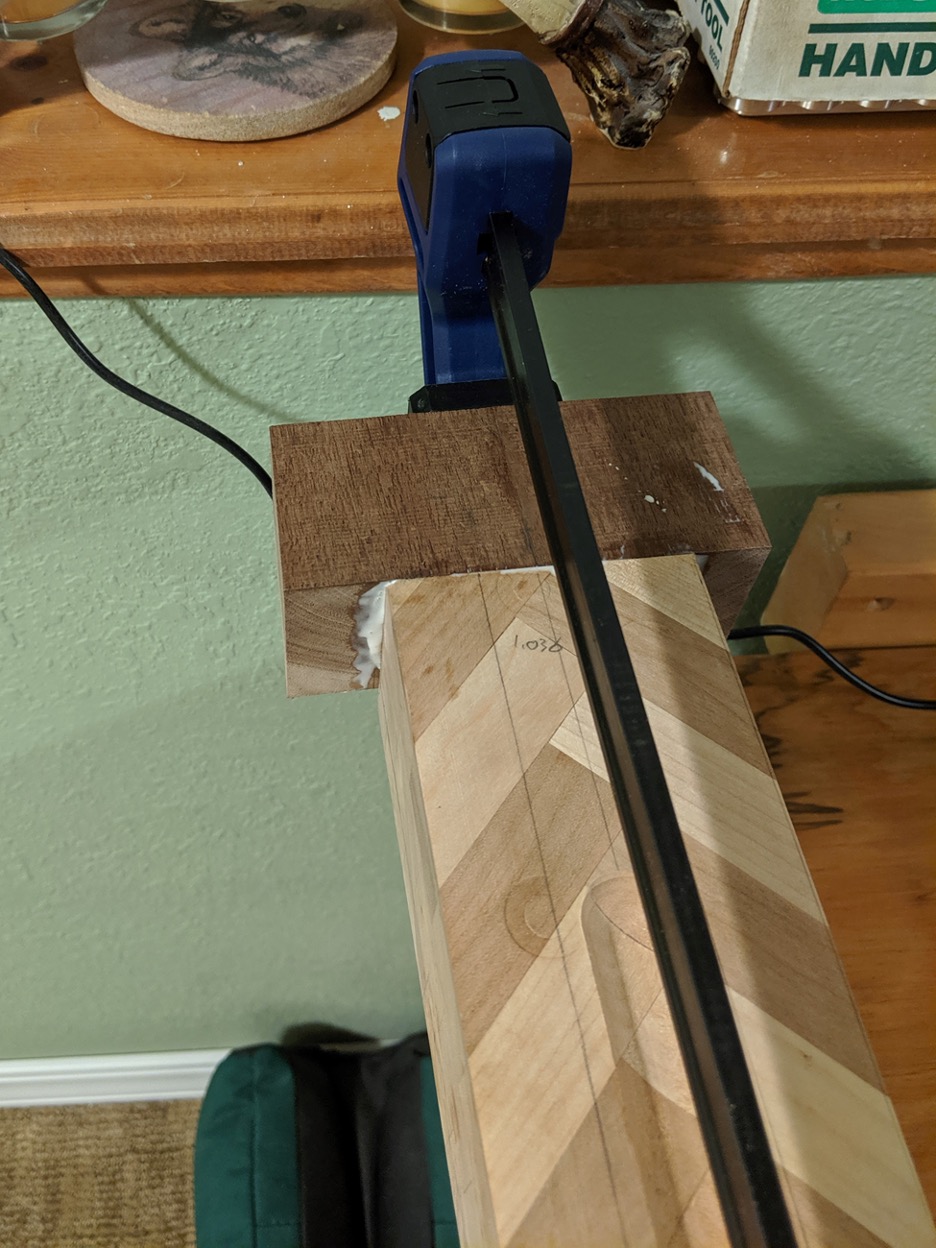
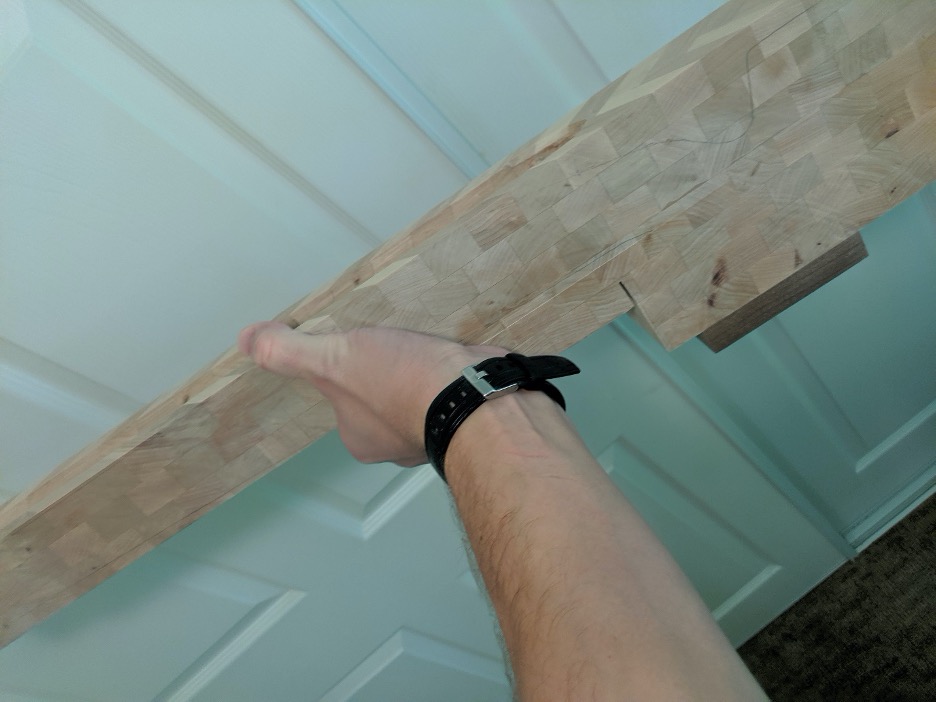
Gluing these pieces together was a challenge! I needed to work up a jig of some sort to make sure that everything stayed square to each other and so every board I glued up was as identical to the other as possible. A small piece of plywood received a square corner cut out of it like a triangle and one of my left-over pieces of Cherry got nailed down to my loading bench to act as a clamping surface along one side. Another small triangular piece of plywood would act as a wedge to push everything together from behind and a plain 1×2 piece of pine was the other clamping surface for the other side. In total, I made 3 boards measuring 36 inches in length with alternating cherry and maple pieces in herringbone pattern. I then glued together four more boards that were 18 inches in length. Before gluing the pieces together, I put a sheet of wax paper down to prevent everything getting glued to my bench. I also put a piece of wax paper at the front and around the triangular wedge at the back. This worked amazingly well as the board didn’t stick to the wax paper once the glue was dried, it all just peeled right off and I could reuse the same pieces of wax paper for the next glue-up. All pieces I let sit for 24 hours before releasing the clamps and pulling the boards out of the jig.
Once I finally had all the necessary pieces glued together, I sanded off excess glue spots then took the boards to the surface planer. Since these boards would be glued together, their surfaces had to be precisely flat and smooth for the glue to make a perfect bond. All boards were passed through one at a time again to ensure all pieces were of the same exact thickness. The surface planer was set to the finishing cuts mode, and very small thickness changes were made to ensure as little material was removed as possible.
When I started doing a mock-up before gluing the boards together, I realized I should alternate the orientation of the starting pieces. I needed to do this because I did not want any of the glue joints to be directly overlapping another glue joint. This also meant that instead of a chess-board pattern, I would have a staggered effect look along the sides. That was not exactly what I wanted, but for the sake of structural soundness, it was the best option. And it would still look pretty sweet!
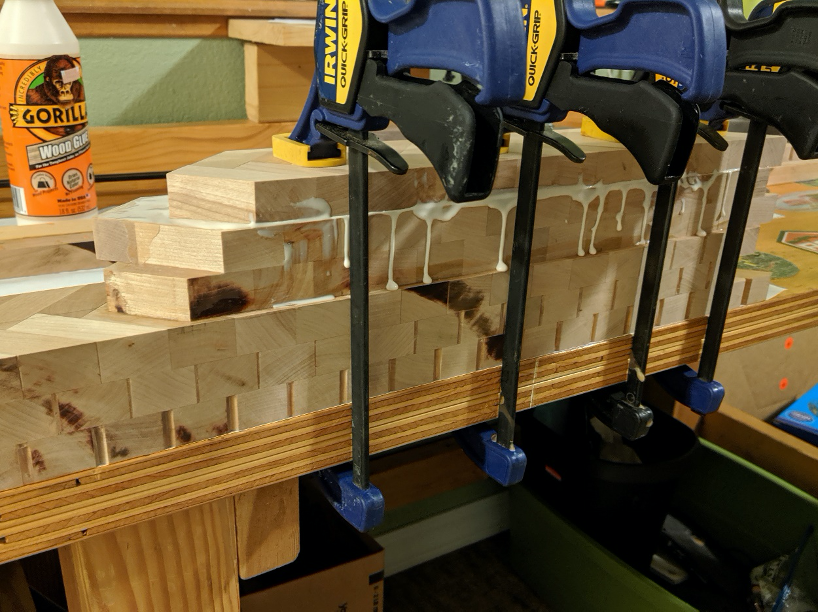
I first glued the three long boards together that would be the forend, action area, and top of the buttstock. I then glued two short boards together, then individually glued one more layer at a time until I had four layers of the shorter length boards. These were glued to the bottom of the back portion of the long boards to complete the depth I would need for the rest of the buttstock and pistol grip. This is also the time when I decided I wanted to use some walnut as a forend tip, grip cap, and buttstock accent pieces. Back to the lumber yard I went and managed to locate a few scrap pieces that I could make work.
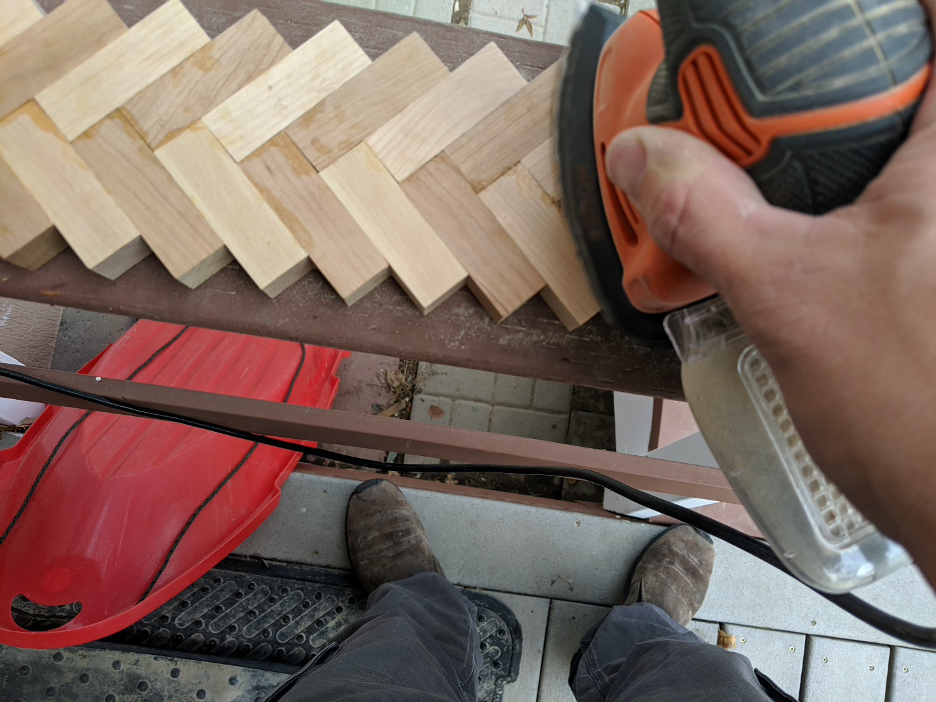
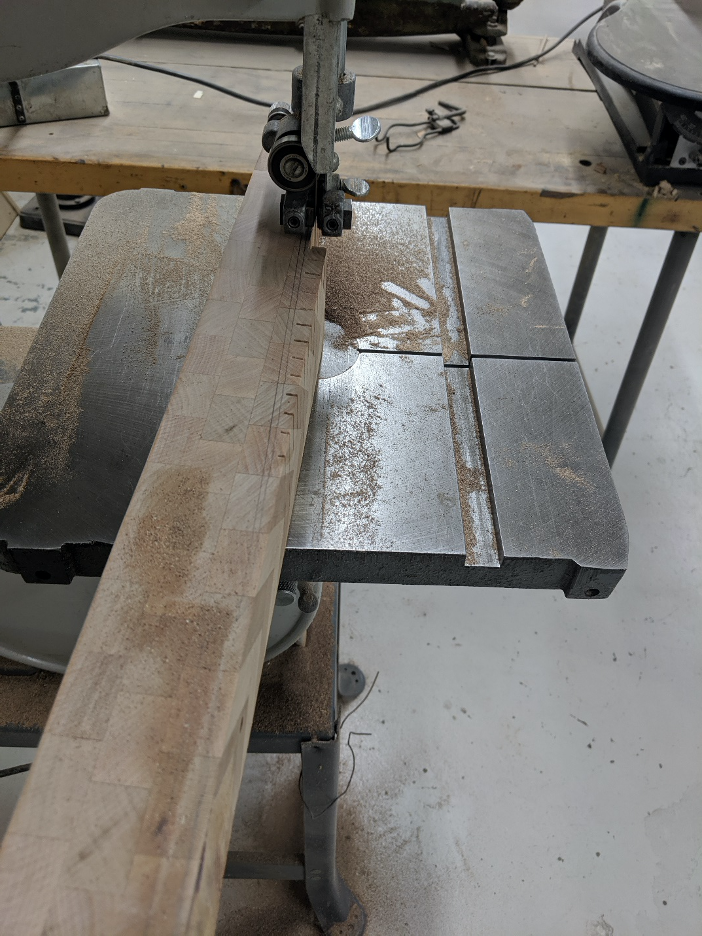
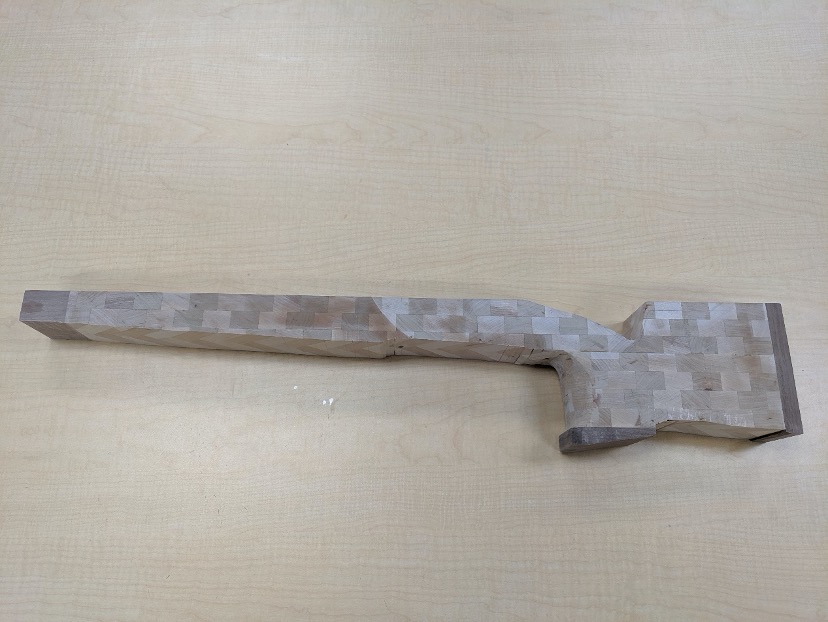
Before gluing the shorter sections onto the longer boards, I cut off the pointed edges along the length in order to make working with it a bit easier, and also to keep the edges flat in preparation for the bandsaw for cutting the stock outline.

This project was already starting to get somewhat tiresome, but my focus was strong and seeing things start to come together as I had envisioned was encouraging. When I was gluing all the boards together, I had to make sure that the centerlines of each successive board stayed true to the rest. This resulted in the four back and bottom boards being slightly offset from the top. I’m not exactly sure what happened, or why, but just dealt with it as I had to. I knew my gluing jig on the work bench probably wasn’t perfectly square, and minor differences in clamping pressure from one glue-up to another could have an effect on the finished board.
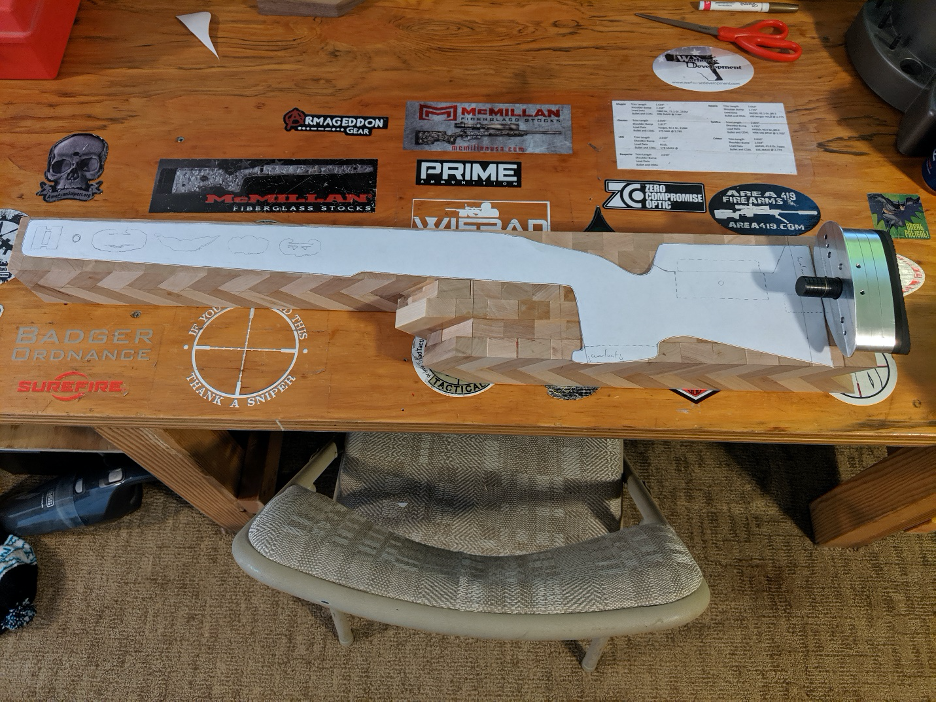
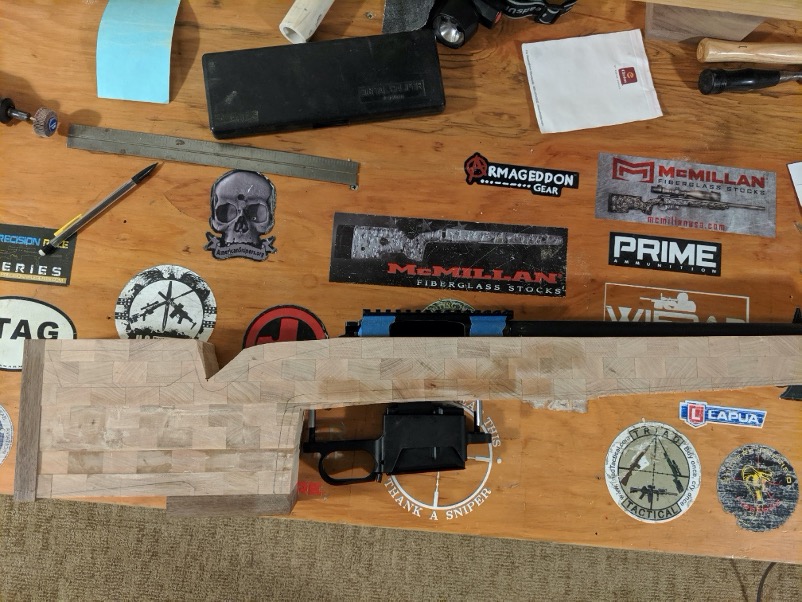
The profile was traced from one of my McMillan A3 stocks as a guideline. I straightened up the grip a little bit and had to shorten the length of the buttstock so I had room for the three-way adjustable system I was going to use. I also planned to make the forend longer as I was going to use an Area 419 Arca rail and did not want the end hanging out in front of the stock. Two other modifications to the basic A3 design is to use a wider forend such as the McMillan A5 and I also wanted a little bit of a palm shelf along with a grip that actually fit my hand, so it had to be thicker. This outline was penciled out on a piece of wax paper and cut out for my template. The outline was traced onto the stock and a new bandsaw blade was ordered so I could start cutting with a nice sharp blade when the time came. I rough cut the shape of the stock on the bandsaw making sure to not get too close to the profile. I would rather sand down that extra bit of material than try to build the wood back up. I also glued on the forend tip, grip cap, and buttstock walnut pieces.
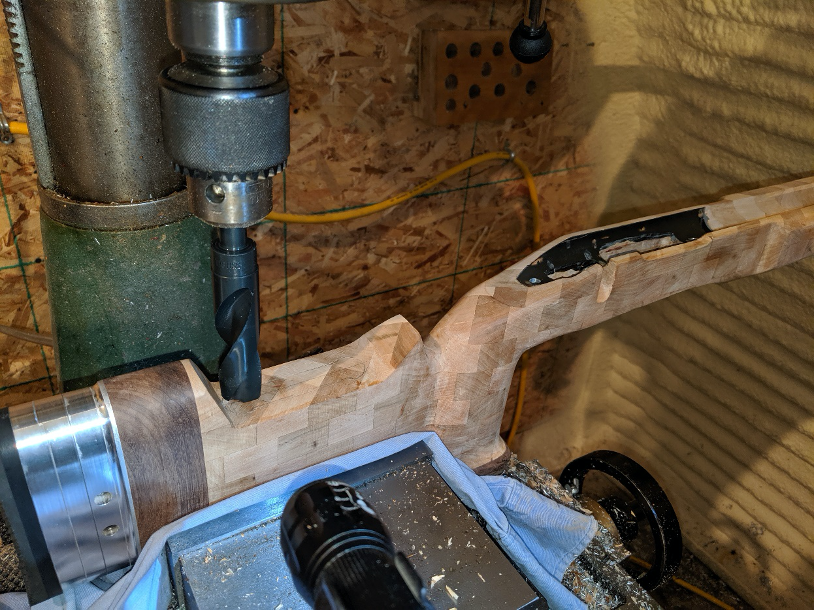
The stock was finally taking shape, and my excitement was growing. It was at least starting to resemble a stock shape, so I was making good progress. From here I had to phone a friend, Chas Bales at Warhorse Development. He lives an hour away and has a mill that would be necessary to drill the action bolt holes. I got the action outline traced on the top of the stock, recoil lug pocket, barrel profile, and measured out the location of the action bolt holes. These holes MUST be absolutely straight down through the stock and perfectly spaced. Over to his place I went on a Sunday morning and we got everything set-up in the mill. We made sure that everything was square and level and found the perfectly sized drill bit. I had some stock-makers bolts from Brownells that thread into the action bolt holes but are smooth along the length of the shaft. These bolts are required so that when test fitting the action multiple times in the stock, the bolt holes do not get widened out from the threads of regular bolts acting as scrapers. Thankfully, we did an excellent job and lowering the action with the stock makers bolts down onto the stock proved that the bolt holes were perfectly located. Now I could start inletting the barreled action into the stock. Time to get the chisels ready and mentally prepare for a lot of patience and test fitting.
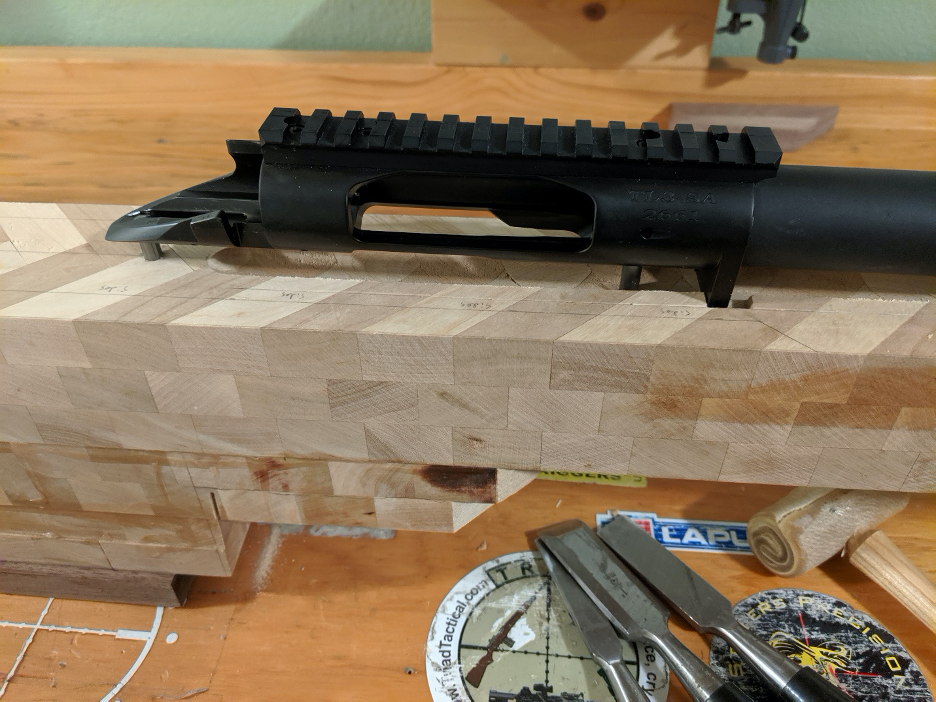
Starting the inletting was a little stressful because this is the very first stock I’ve ever made. Well, not quite. I actually made a thumbhole stock for my Ruger 10/22 back when I was in high school, sometime around 1996. That stock was made from Walnut and oak, with the oak board being sandwiched between two walnut pieces like an Oreo cookie. I still have that stock and rifle today. But this project is on a completely different level than the one I made in high school, my margin for error was much less. First thing to get carved into the stock was the recoil lug pocket. Away I went with my chisels, and Lord help me, a Dremel!
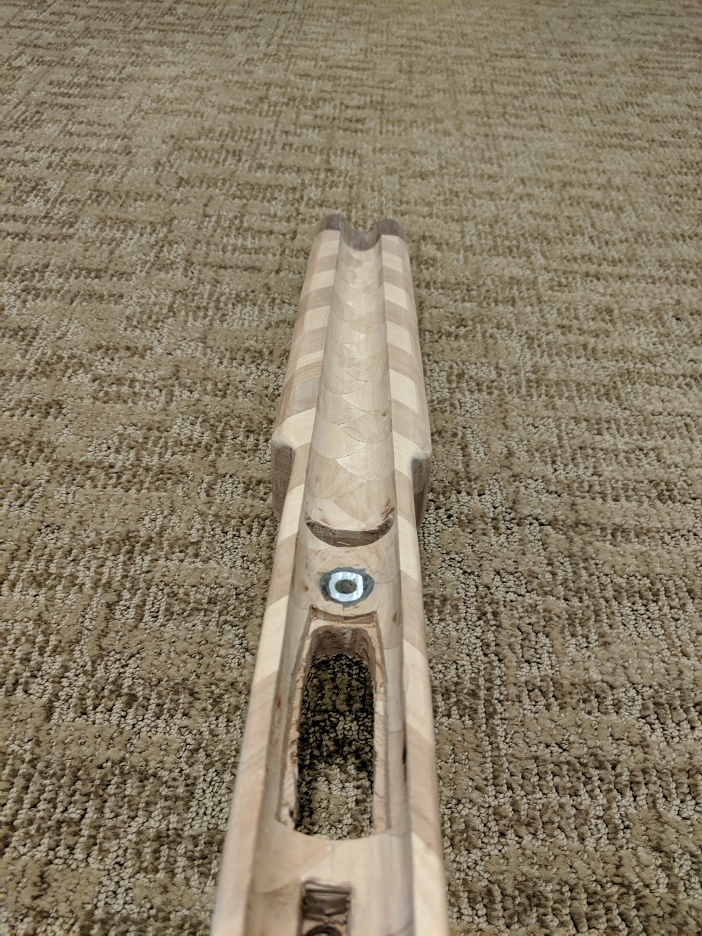
I didn’t take pictures of everything as I had originally intended, my focus was on inletting the stock, not taking pictures. But I used a router attachment for the Dremel to help keep me steady for carving out the barrel channel. I would make several passes, then switch to the barrel bedding scraper and sandpaper wrapped around a wooden dowel. After several hours, and several hours more, I had the barreled action dropping down nicely into the stock. I lost count of how many times I lowered the action down to check for alignment and fitting issues. Everything was staying straight down thanks to the stock makers bolts though, and persistently checking for clearance and only removing wood where it had to come out. Time to go back to the band saw for some more shaping now that I know everything is lining up as I intended.
This next time on the band saw I cut the forend angle and removed excess wood from around the front of the grip. I also cut out the cheekpiece as I would be installing a KMW Loggerhead cheekpiece hardware. This system is the best on the market, so was the logical choice for this project. The removal of the excess wood in front of the grip revealed something I hadn’t expected, the action bolt holes weren’t perfectly straight, they deviated off to the right side by about 1/8th of an inch. Hmmm, head scratching time as I need the bottom metal to all line up exactly down the centerline of the stock. My solution was easy; I was going to pillar bed the action anyway, and the aluminum pillars are quite a bit fatter than the action bolts. So long as the pillars are perfectly straight, all will be fine. So, more time spent laying out the outline of the bottom metal which I made a template for on a piece of paper.
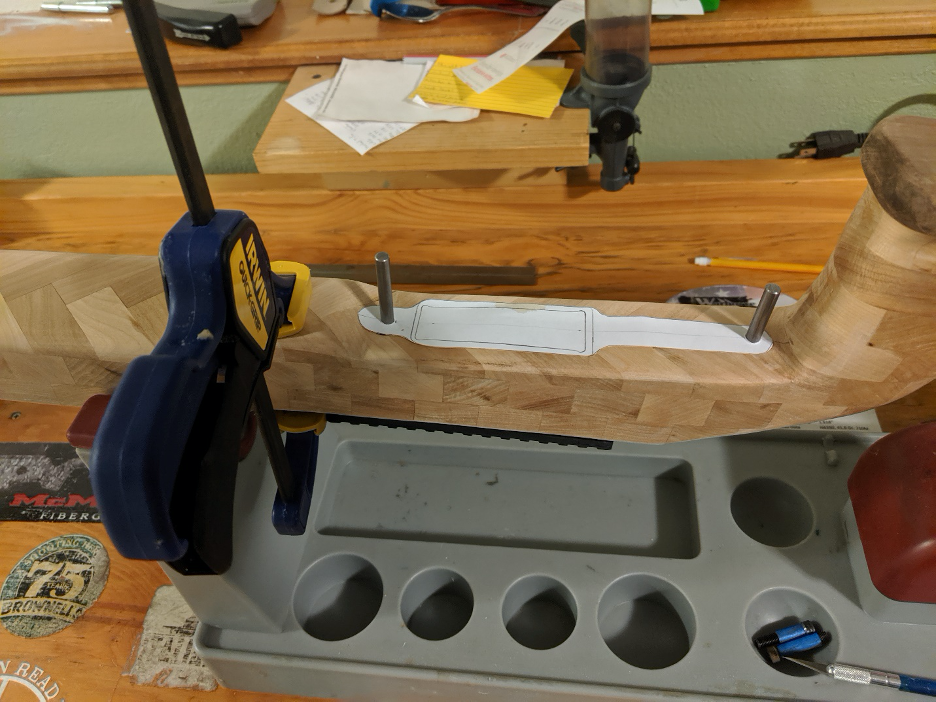
Several measurements, a little bit of tracing, and I had a perfectly sized template to trace the Surgeon bottom metal onto the stock. The centerline of the stock was drawn, center of action bolt holes located, and template traced. Time to get back over to the Warhorse Development shop for more time on the mill.
This time on the mill was more eventful. Securing the stock in the jaws of the mill showed that something wasn’t quite square with the centerline top to bottom. I would have to fix that when I actually did the shaping of the stock. We bored out new holes for the pillars starting at the top, going through the action area. The hole size was just perfect for the pillar to push down into, but not overly snug. We then flipped the stock over and started boring out the pillar holes through the bottom. On each side, we only went about half-way through, just until the holes would come together. I would have to manually blend the difference by hand with my trusty Dremel and some files at home because the top and bottom holes weren’t perfectly aligned with each other. “Oh well, as long as I take my time, it’ll work” I thought to myself. I crossed my fingers and returned home to start making this adjustment.
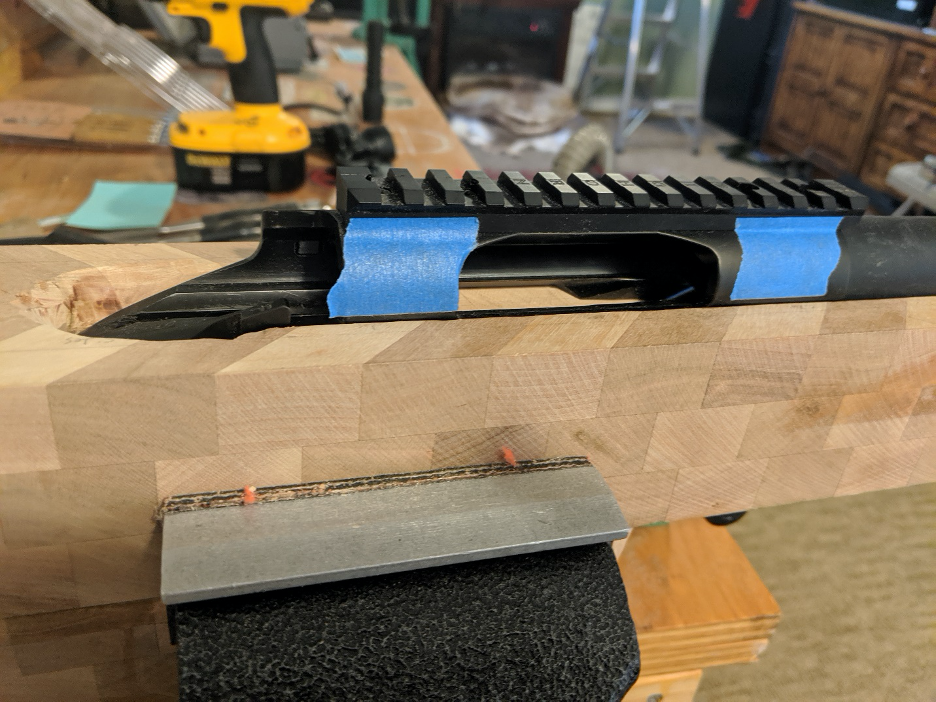
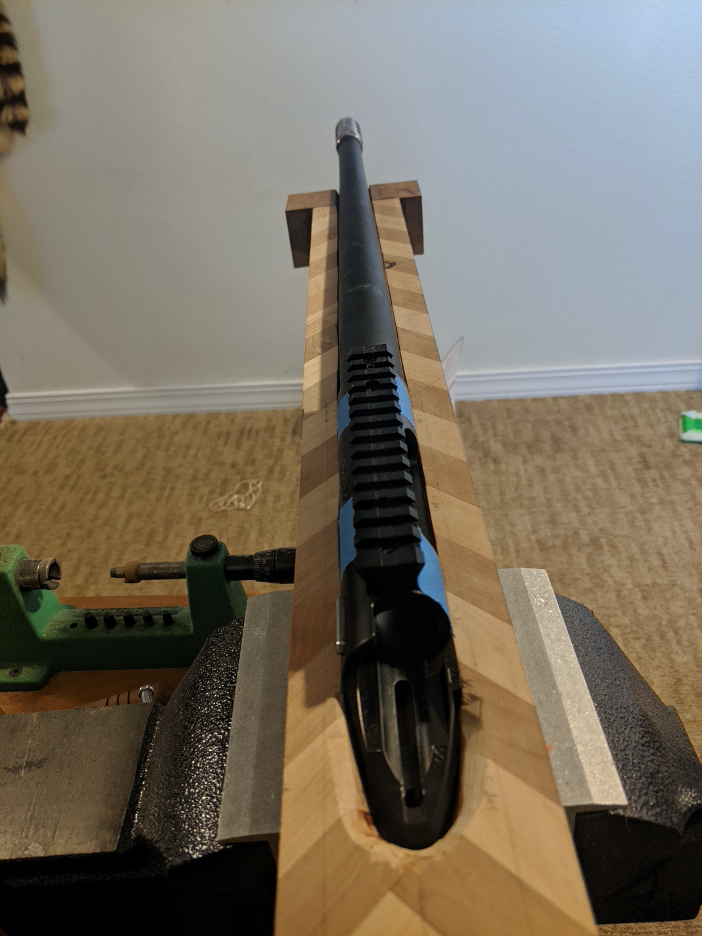
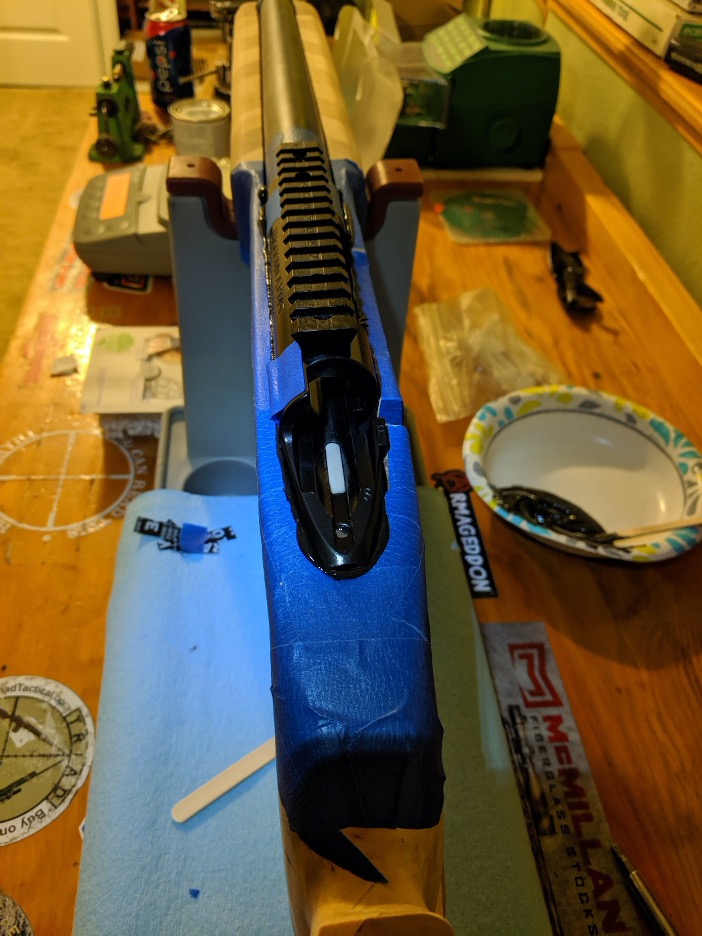
A sanding drum on my Dremel and a little bit of time, and I was set. I took two regular action bolts, wrapped blue painters’ tape around them so that they would just barely slide into the pillars, then trimmed the excess blue off level with the pillar. This ensures that the action holes are perfectly centered in the pillars when the pillars get bedded into the stock. The action bolts with the pillars on them were then threaded onto the action and more test fitting was done until I was happy with the fit and placement of the action and barrel in the stock.
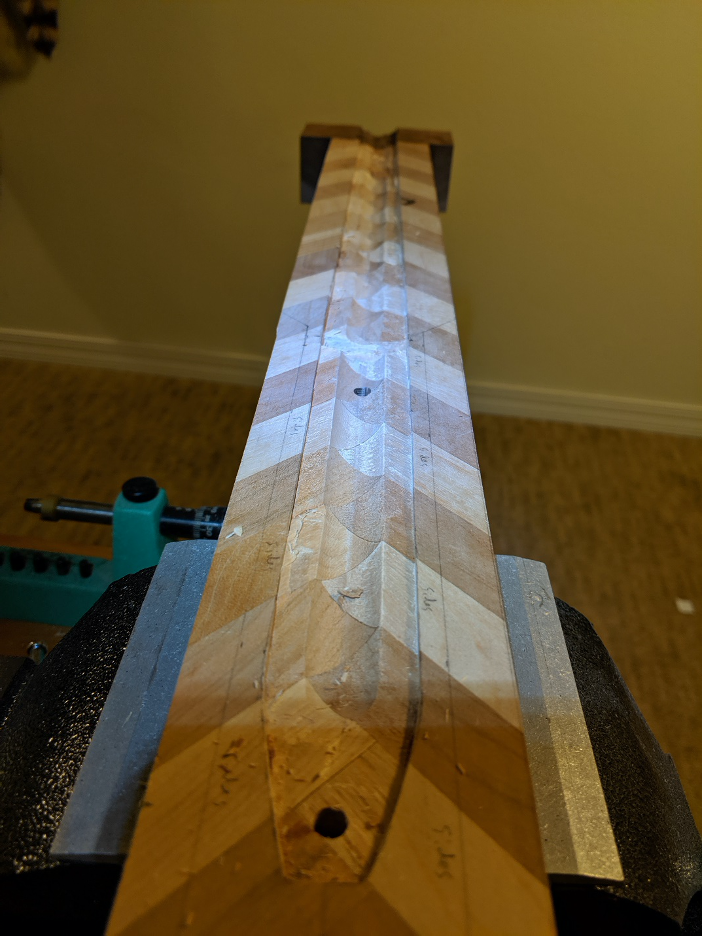
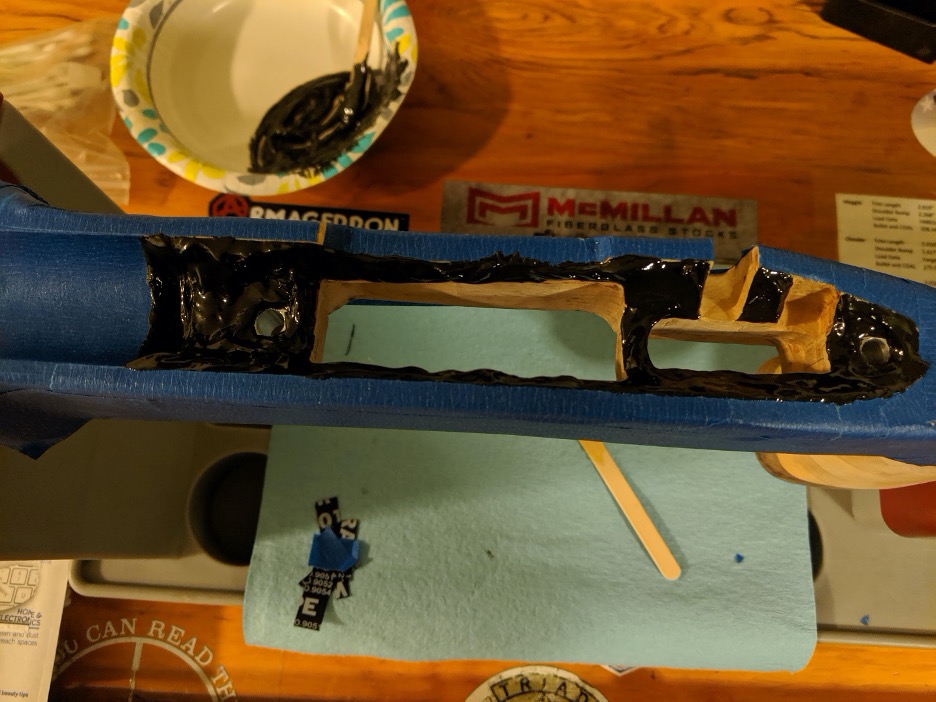
The barrel was deviating off to one side of the barrel channel though, so I had to make excess clearance around the rear action bolt to straighten up the barrel. It wasn’t very much at all, nothing that would be noticed, but was necessary to keep the barrel centered in the channel that was already cut. Once everything dropped down without any stress, I wrapped more blue painters tape around the barrel near the forend tip to keep it centered, and also ensure the center of the bore was aligned with the top of the stock. Everything came apart and was fully degreased in preparation for bedding the pillars into the stock. Release agent was applied to the action, action bolt holes, and the action bolts with the tape. I also applied a bit of sizing die wax inside the pillars to make any excess bedding that creeps into there easy to remove.
The bolts with pillars were reattached to the action and I mixed up some Marine-Tex compound. This was applied first to the inside of the pillar holes in the stock, then spread liberally around the pillars. I should mention that the pillars were roughed up first to help the compound stick to them. I simply dropped the pillars onto a phillips screwdriver shaft then used a course sanding belt on a Worksharp knife sharpener to liberally rough up the exterior surface of the pillars. Now that bedding compound was applied to everything, I carefully lowered the barreled action down into the stock and used some bar clamps to hold the action in place. I did not apply a lot of pressure, just snug enough to hold even pressure down on the action. Wait time for the compound to cure would be 2.5 hours before I could remove the action.
Taking the action bolts out and removing the action was uneventful, as it should be. The pillars were now secured in the stock, they were aligned with the centerline top to bottom, the action sat in the stock perfectly level with the top edge of the stock down the center of the bore, and my excitement grew even more. I let the compound and pillars set for a few days until I could come back and figure out what to do next.
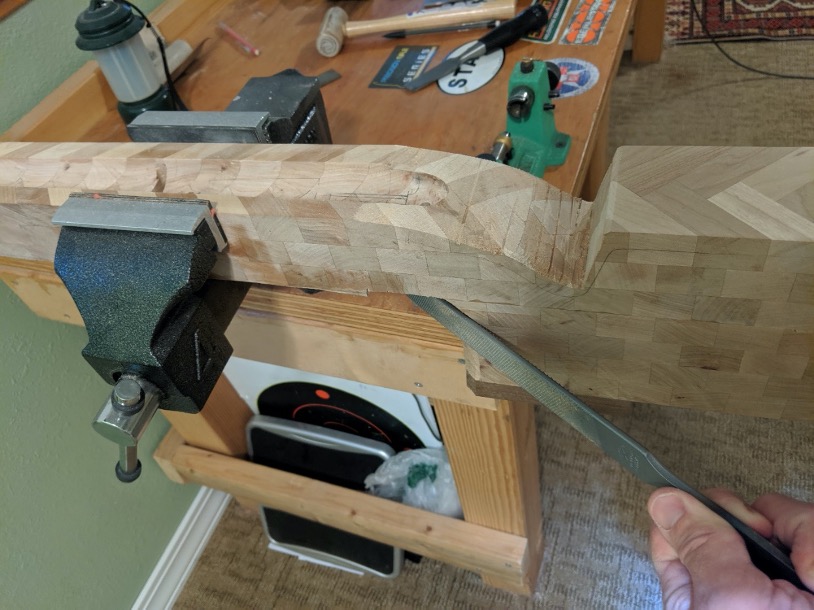
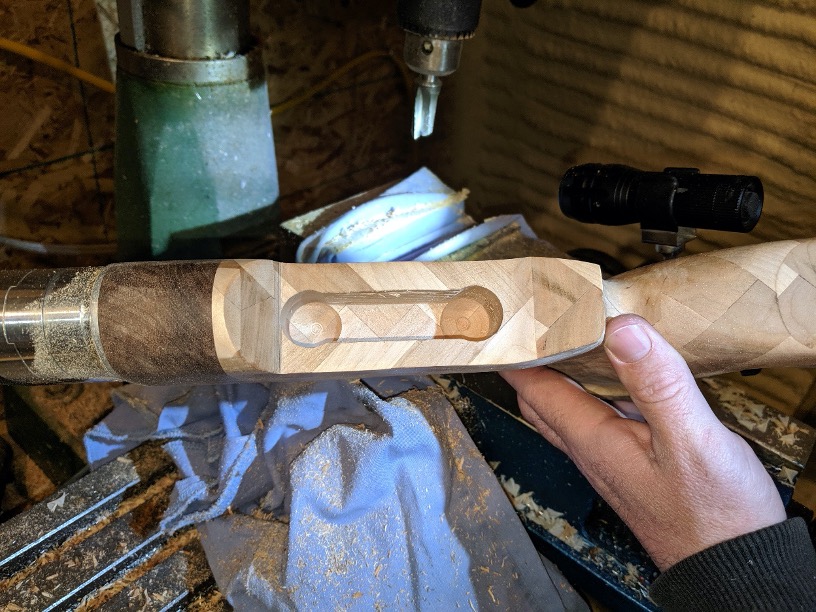
Several things were worked on consecutively: grip shaping and prepping to inlet the bottom metal. The grip is where I really wanted to spend a lot of time to make sure it fit my hand exactly how I wanted it. From the McMillan A3 as a starting point, I lengthened up the grip so that when my hand is in proper firing position, my little finger doesn’t slip off the end. I also wanted a slight palm shelf which helps in proper indexing of the firing hand the same way each time. Wood rasps, sanding drums on the Dremel, lots of sandpaper time, and the grip was shaping up very nicely.
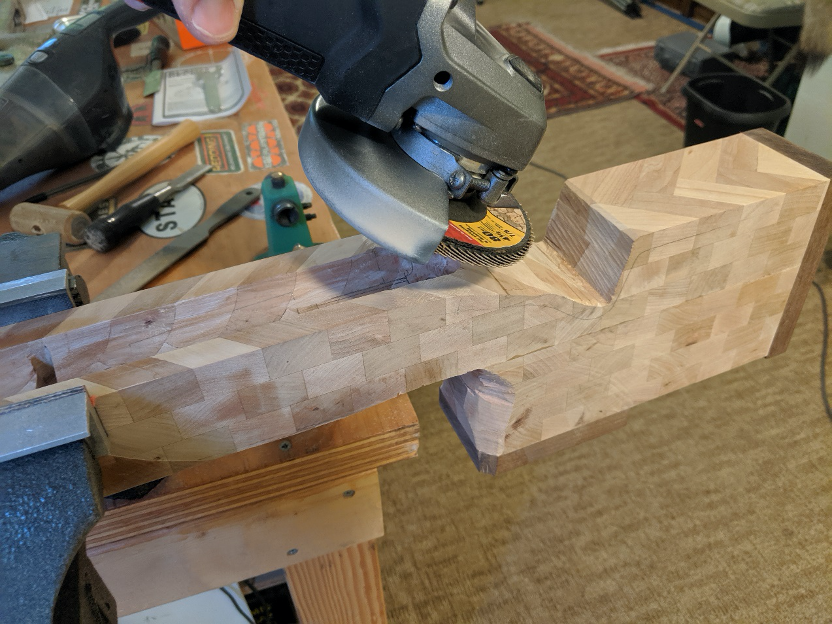
Shaping of the stock had me baffled for a while. I didn’t want to try and chisel off the big chunks and shape the rest with a wood rasp. That just seemed like it would be too much work and take more time than I had. A 4.5” angle grinder with a sanding disk would be the ticket to success.
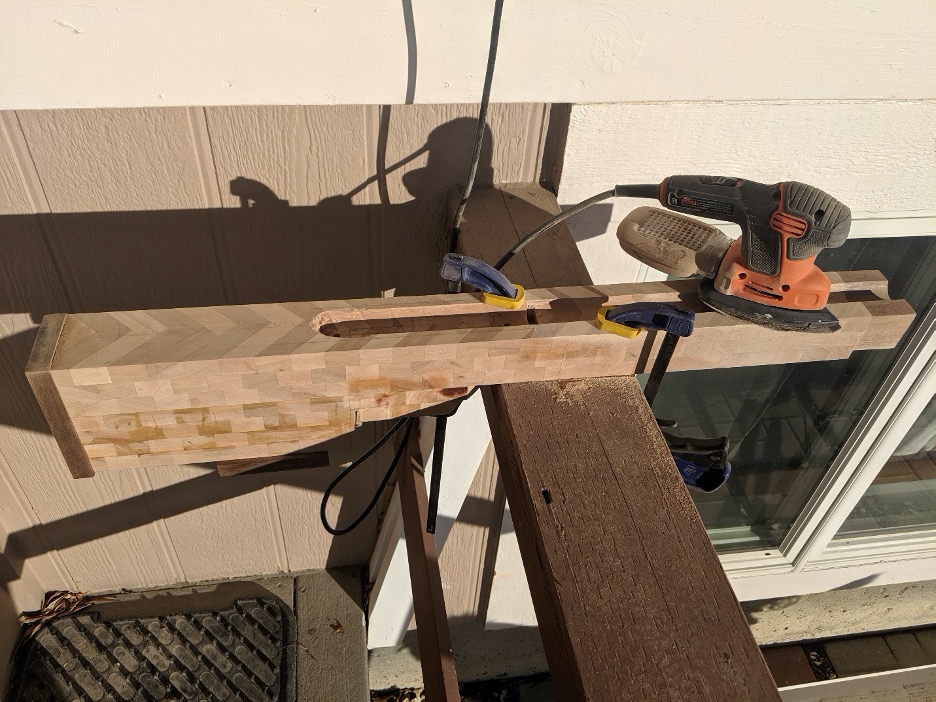
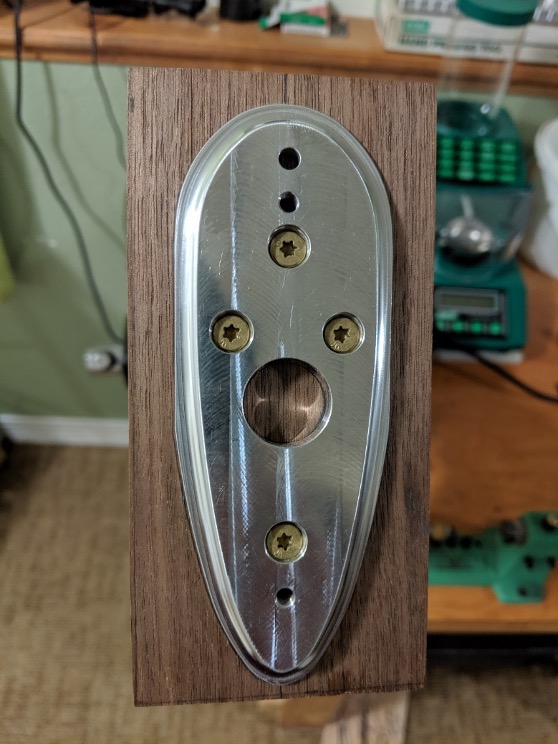
Confidence in my capabilities has always been high but taking an angle grinder to this project had me quite nervous. Only one way to settle those nerves, and that is to get to work doing what you’re nervous about. Very much like running a race when you’re a child, the butterflies in the stomach quickly dissipate once the race starts. So, earmuffs went over my ears, eye protection went on my face, and with the stock clamped onto my front porch railing, I went to work with a cheap angle grinder! I had already centered up the adjustable buttplate piece and attached it to the stock with four screws. It was centered with the action at the top and centerline of the stock at the bottom. I had already drawn a line from the top center of the buttplate along the top center of the buttstock toward the action. Taking the top corners off and blending those down began the process and as I neared the buttplate, I slowed down with how much material I was removing with each pass.
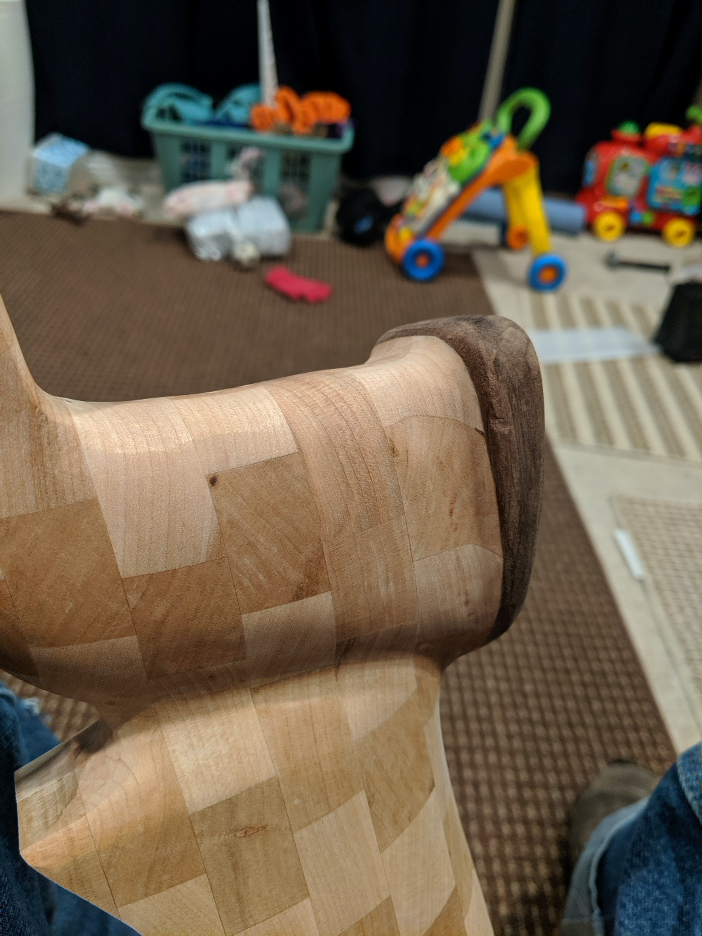
The buttplate had a little bit of a lip remaining around the edge. More than I wanted anyway. As I worked the angle grinder from front to back, I just brought it over the aluminum buttplate as well. This gave a perfectly blended buttplate to stock fitment that would have been extremely difficult for me to achieve if I were shaping them independently. Once the top portion of the buttstock was mostly shaped, I flipped it over and worked the angle down the bottom side. Periodically I would switch over to my little mouse sander to give a better idea of overall look and to also make sure I wasn’t making any unnecessary low spots. The angle leading into the grip was shaped in much the same manner, then down along the forend and the sides of the stock. Due to the tight confines around the grip, I had to use my Dremel with sanding drums. Here I really had to take my time and get a perfect blend from the herringbone pattern down to the walnut grip cap.
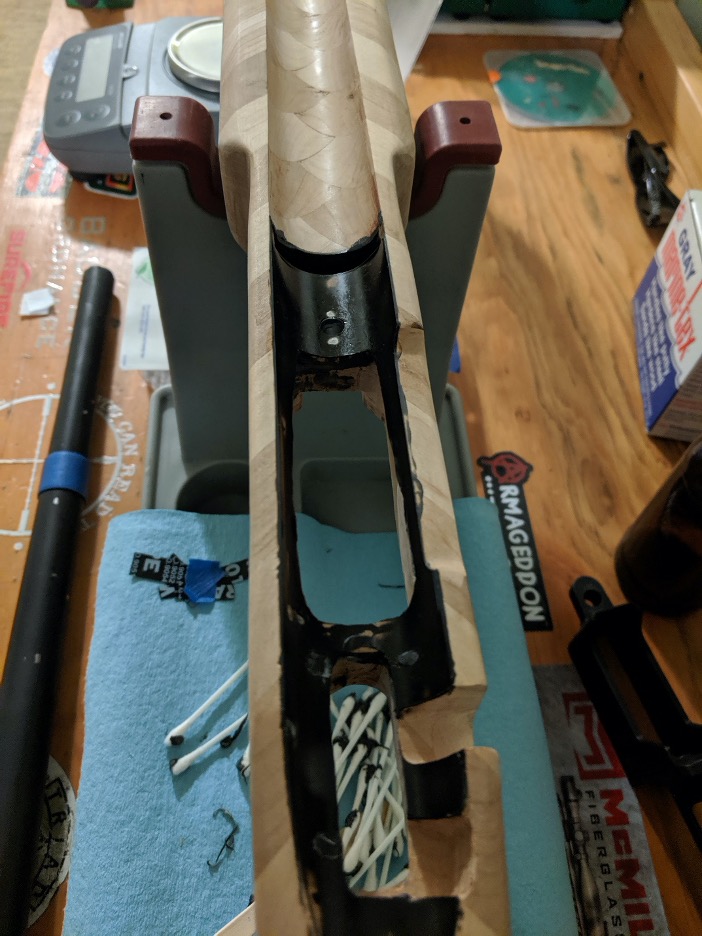
This was about the point where my lovely bride of 15 years was growing tired of this project, and my obsession with it. I tend to be a perfectionist, and when things are not right, it really bugs me to no end. I lose sleep over it, trying to figure out how to fix it. I wake up early to go work on it. Whatever needs to be done to make a project turn out correct, exactly how it should be. And my work on this stock project was starting to consume most of my free time. I was seeing the fruits of my labor though, and I was seriously leaning forward to get this project done. Thankfully, I had a Sunday morning where I stayed home and got to work on the bottom metal inlet without any distraction while the rest of the family did their good Christian duties, went to church, and likely prayed for this project of mine to get completed ASAP! On my front porch, I clamped the stock onto the railing, and I went to work with my chisels and of course, the Dremel. Using a steady hand with a Dremel only goes so far but is what I had at my disposal for this project. This type of work honestly would have been best suited for a mill, but I was impatient and tackled the job anyway. To my own amazement, I didn’t mess anything up! I was able to fit the bottom metal in, seat it on the front and rear pillars, and not have too much of a gap around the edges of the bottom metal. The entire barreled action and bottom metal could now, after countless hours of work, be bolted together in the stock. I actually had a stock taking shape around a rifle! Pride in my project grew even more, this was going to be sweet!

Again, several hours of shaping, sanding, feeling, blending and tedious work went by making this stock really come to life. And yet it was still in its infancy. With the stock nearly completely shaped and approaching finish sanding, I still had to get the action bedded into the stock and install the adjustable cheekpiece hardware.
The bedding job was straight forward enough; ensure proper clearance around the action with the action resting on the pillars. Don’t rush anything. Use plenty of release agent. Marine-Tex is awesome stuff and easy to work with. A few hours later and the action was bedded into the stock.
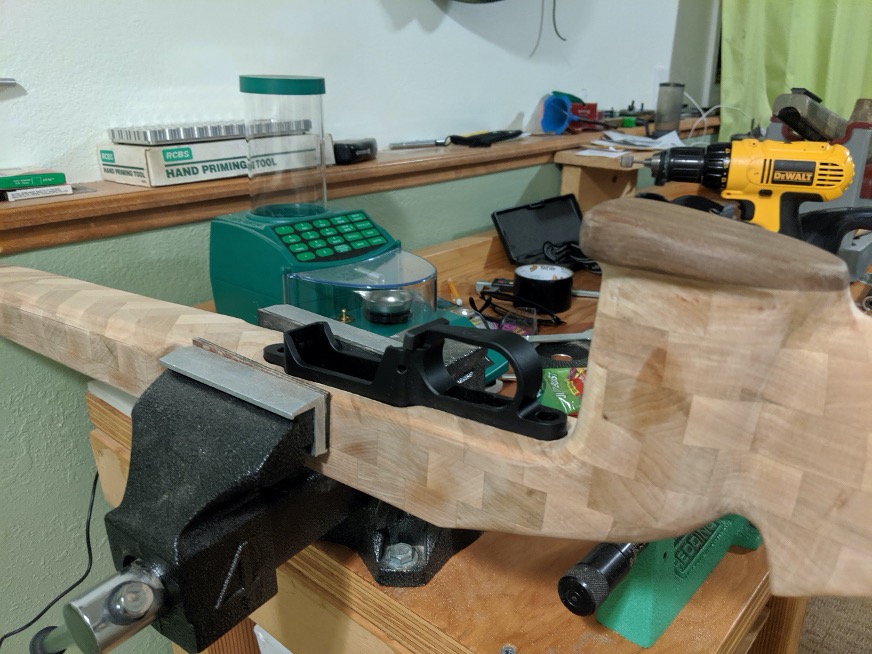
Layout time for the cheekpiece hardware was simple and short, then another journey to Warhorse Development to use the mill. Our first cuts were to the actual cheekpiece and that piece was fit and installed quite easily. Then came the buttstock hardware of the clamping mechanism because we knew that was going to be more involved. We really had to put the squeeze onto the wood of the buttstock with the jaws of the mill because I didn’t leave any straight sides to clamp onto. But we took our time and used a drill bit to bore out the ends of the internal hardware, then an end-mill to remove the rest of the wood through the middle. A couple hours later and I knew everything was going to fit perfectly. The bedding of the hardware would come later after I was mostly done with the finish sanding. That was only a few days later.
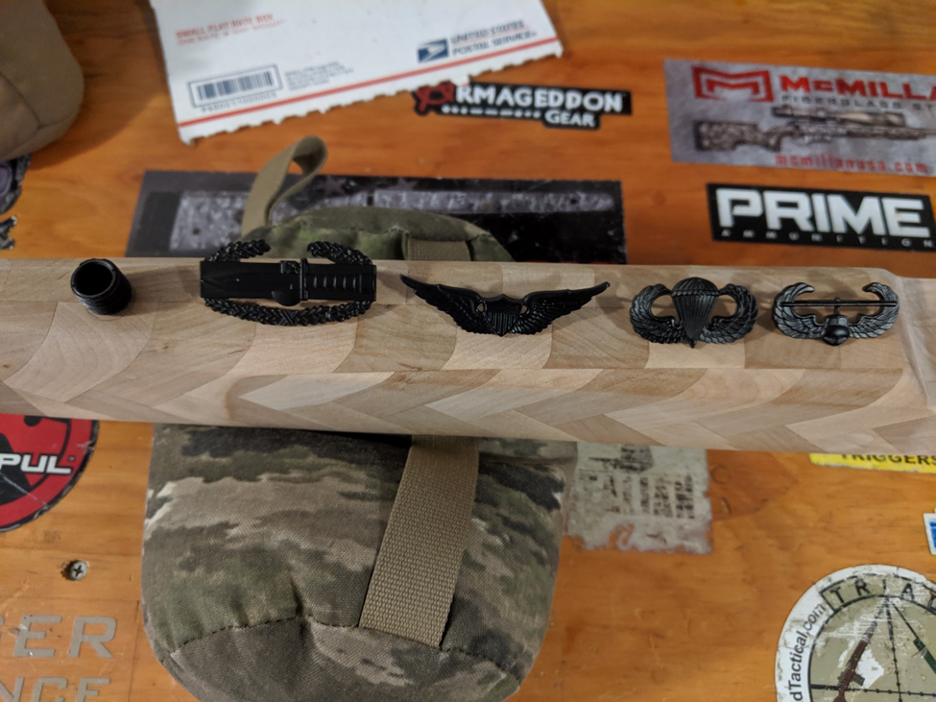
It was after this that I was finally able to coordinate a time to get to the gunsmith’s shop for a new barrel and some Cerakote work. Off I headed to the shop of Nemesis Machine in Butte, MT. This whole stock project is especially important to me as it was going to be a tribute stock for my military service. I have served over 20 years in the Army active duty and Army National Guard with three deployments overseas, and I felt this rifle would be a nice commemorative build for myself. I originally enlisted in the Army for active duty and worked my way up to the rank of E-5, or Sergeant. Some time later, and a deployment to Afghanistan, I decided I would attend college and ROTC to get my commission so that I could finish out my 20 years as an officer. My highest rank held was that of O-3, or Captain, where I was a team leader for an HH-60M MEDEVAC National Guard unit.
I’ve known the owner of Nemesis Machine since I first met him at the 2013 Sniper’s Hide Cup in Wyoming. We were squadded together and became friends quite easily. Since then, he has done multiple smaller gunsmith jobs for me such as bolt knob installs, Cerakote work, rechamber, etc. His work has always been super-fast and most importantly, of the highest quality. So, I asked him about doing the barrel and action work for this project a long time ago, to which he happily agreed. I drove the three hours to his shop with my son along for the ride. Several hours after arriving at Nemesis Machine I had a Proof Research barrel chambered in 6.5X47 installed on a Bighorn Arms TL3 sitting inside this stock, but still no cheekpiece. I also had my military rank and badges Cerakoted black along with the barrel and three-way adjustable buttplate hardware. The next day I took the rifle out to my home range to get my superb Zero Compromise Optic ZC420 rifle scope sighted in. I also wanted to see how well this barrel shot before getting too heavy into load development. The results were outstanding! Considering the rifle didn’t have a cheekpiece, I was very happy. The ease of getting behind the ZC420 scope has always been excellent, so that probably helped me out quite a bit also. If you are ever thinking of having a custom rifle built, I strongly encourage you give Nemesis Machine a call.
Now is when I realized I was nearly complete with this project. The rifle shot excellent, the stock was pretty much complete, I just had the cheekpiece to shape before applying the finish to the stock.
To shape the cheekpiece, I made sure the hardware was tight then dropped it into the stock. I had to do some fitting and sanding but not much. I masked off the stock all around the cheekpiece to help protect the stock if I slipped with the angle grinder. And yet again, I had the stock clamped onto my porch rail to start shaping the cheekpiece. This went fast, comparatively. The only thing that took a bit longer was making sure I could remove my bolt from the action without having to take the CP all the way off. Sanding was done with the mouse sander and 120 grit paper and then finish sanding with 220 grit by hand. Almost complete!
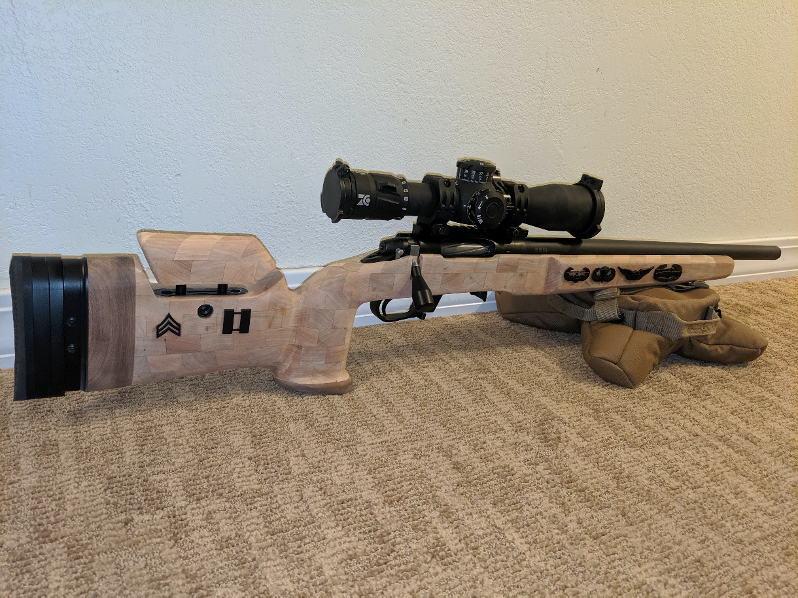
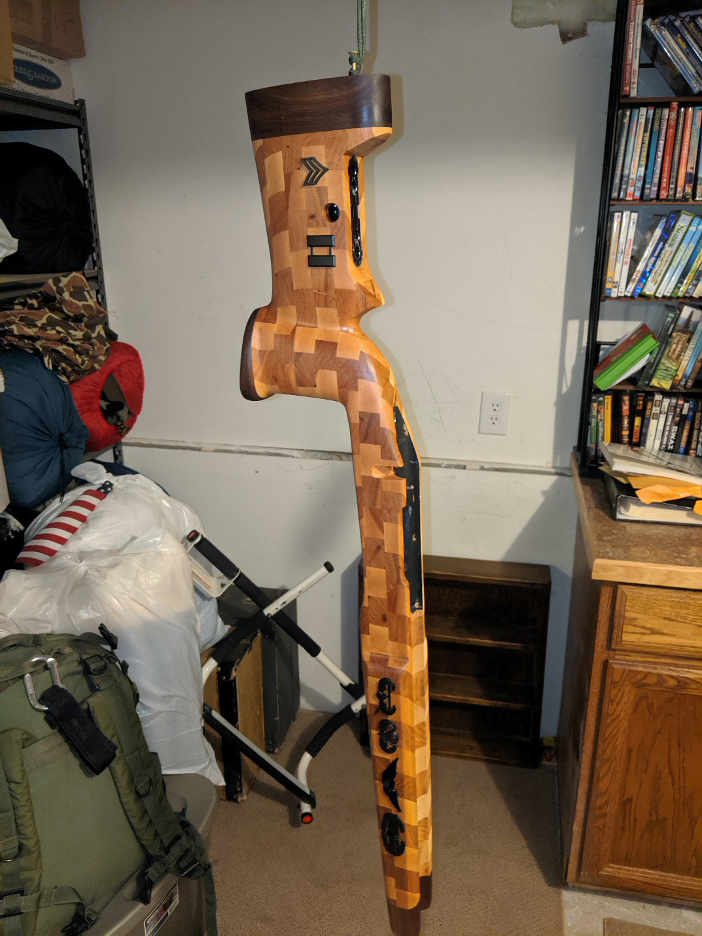
Before I could apply the finish, I had to install the flush cups for my sling and drill out the hole for the securing clamp on the cheekpiece. I also had to mount my rank and badges on the stock before applying an oil finish. More layout time to get everything lined up, light Dremel work to hold bedding compound, and then finish sanding with 220 grit paper over the entire stock. I mixed up more Marine-Tex, and all these pieces were installed and secure after a few more hours. Somewhere along the way I also managed to bed in the bottom metal to the stock so it was a much tighter fit and provided a cleaner look. But having a tight fit between the action, bottom metal, and stock will help with structural integrity.
With everything now finish sanded, Boiled Linseed Oil was my stock finish of choice. The first coat went on pretty heavy and the wood was soaking it up quickly. I applied a generous amount and waited about 15 minutes before wiping off the excess. I let this sit for about 48 hours for the BLO to dry before coming back and applying a second coat. Then a third. I applied a total of six coats of BLO before I called it good enough. There is just the slightest hint of a sheen which I find perfect and the natural feel of the wood provides a great feel in the hand.
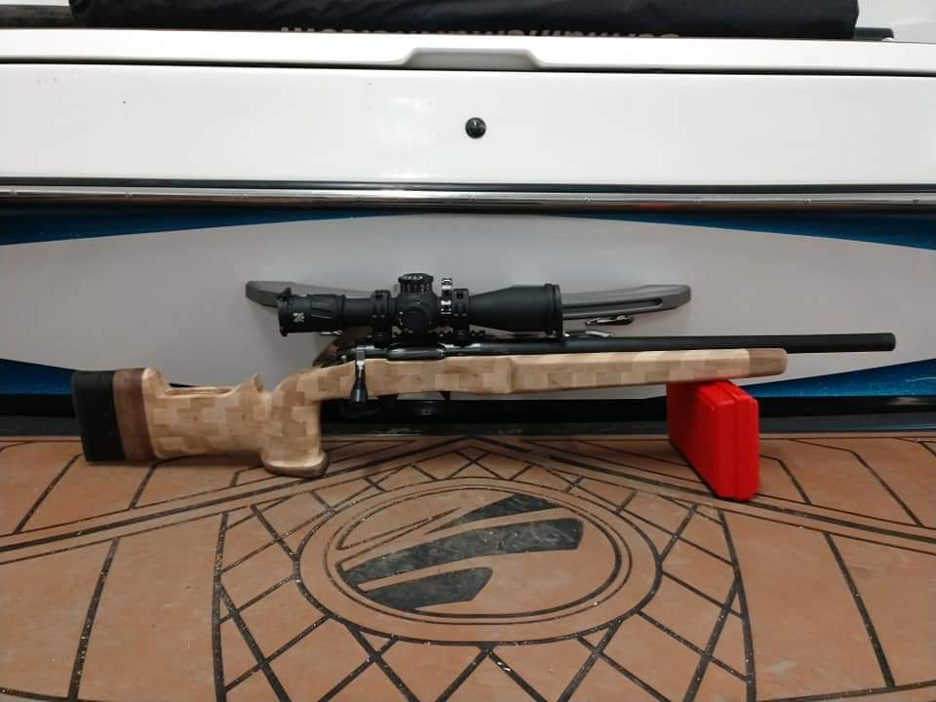
Now that everything was finished, it was time to do actual test firing to see how this whole thing shoots. My selection of components leaves nothing to chance; Bighorn TL3 action, Proof Research steel barrel, Geissele Super 700 two stage trigger, ZCO ZC420 rifle scope, Surgeon bottom metal, KMW cheekpiece hardware, and an excellent gunsmith with Nemesis Machine doing the barreled action work. It’s like a melding of perfection, everything comes together in unison.

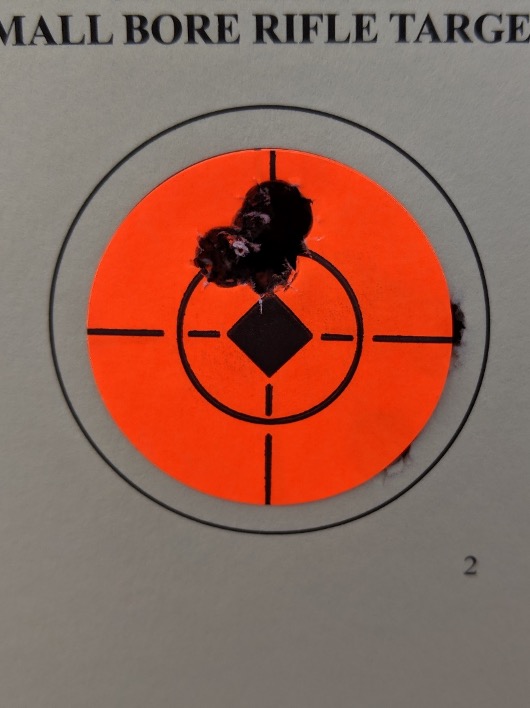
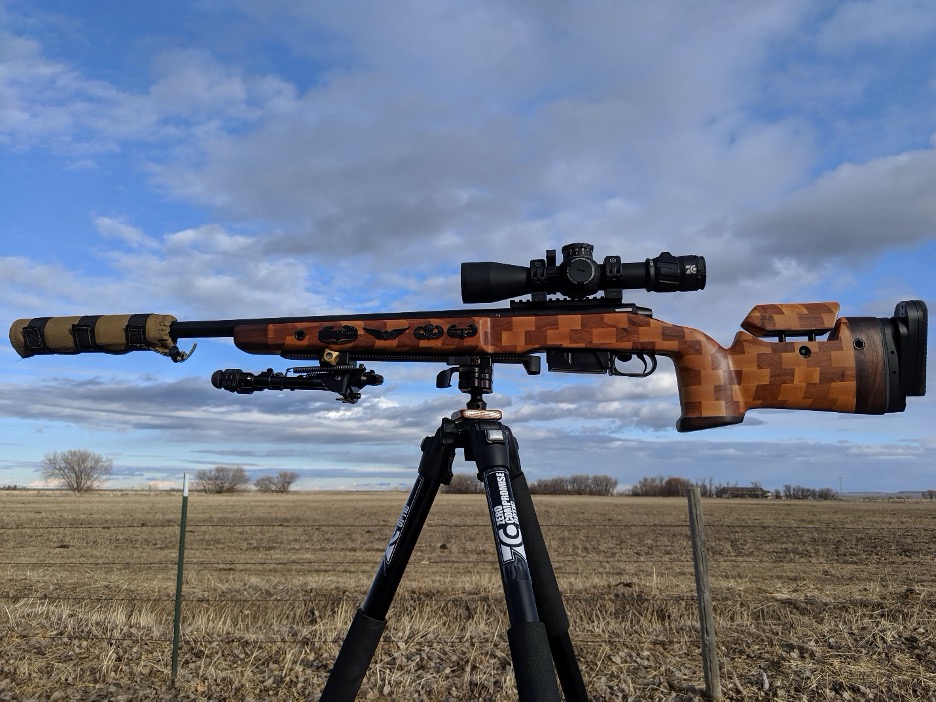
The stock turned out exactly how I envisioned it! The feel of the wood is excellent in the hand as opposed to an aluminum chassis or even fiberglass stocks. The size and shape is precisely as I wanted it to be also and the grip fits my hand how I want it to. Buttplate fit to my shoulder is easily adjusted and perfectly mated to my body build. The look of the stock is amazing and I’ve already used it in a Rifleman’s Team Challenge match this year. Taking on this project was something I knew would be very difficult, and it turned out to be exactly that. But the satisfaction from literally making my own stock from scratch makes me very proud every time I pick that rifle up and head to the range. The fact that it shoots bughole groups just adds to the smile on my face whenever I pull the trigger and see the result through my ZCO rifle scope.
Nicholas Gebhardt – Zero Compromise Optics
