So this has been a project that I started almost a year ago when it became apparent that getting 2 1/2" shells for some of my old shotguns was getting impossible. I started to do some searching about all-brass shotshells, which work fine in 2 1/2" chambers, but also wanted to use smokeless powder. Found a few threads on places like Chuckhawks and CastBoolits that talked about brass shotshells and smokeless. But I had some concerns about the head strength.... something that came up repeatedly in the other forums.
This led to some experimentation (with some input and cheerleading from @buffalowinter) and a process that seems to be working well for making up these shells. My first 'batch' I used on a quail hunt last fall. And they worked great. They performed as well as the factory rounds I brought, anyway. Both knocked down quail, pheasants and chukars! So, that test went great.
I post these here rather than in reloading because some of the folks with old trench guns may want to have an option for reloading the all-brass shells with something other than black powder. Cleaning a Model 97 of BP residue would suck more than cleaning an old SxS. And both have to be cleaned religiously immediately after firing BP cartridges. Red Dot is so much better! This is really a 'vintage' endeavor.
So first step is having MagTech all-brass shell casings. I have a good supply of 12 and 16 gauge available. They are loved by cowboy shooters and black-powder shooters as authentic-looking and reliable as well as simple to load. With Black powder.
The issue with these and smokeless shotshell powder is two-fold. First, they use a small rifle primer to fire. So you really need to get the powder 'around' the primer flash hole. The second issue is that because they are a pure extrusion, they have a 'hollow' base at the case rim, and the primer pocket protrudes inside the case about 0.100". This leaves a lot of powder 'below' the flash hole where I don't think it ignites properly. Not to mention the rim is, as a result, weak, compared to more modern shells. There is a very thin wall at the rim. Smokeless powder shells need a solid base at the case rim.
The solution is to cut brass disks and solder them into the base of these shells, strengthening the bottom and putting all the powder into the flame front area of the primer. Below, you can see the 'protruding' primer pocket. It sticks about 0.100" into the case.

So from a brass bar .750" in diameter, I cut disks that are about .650", which fit into the shell. They are drilled a bit over 1/4 inches and chamfered so they will fit over the primer pocket internally. They are just slightly undersized, allowing room for solder to flow and bond in the bases. Soft Solder has a massive holding power and while it has a low melting point, the firing of the shotshell will not put enough heat into the base to melt it.

Once each 'disk' is sliced off (and chamfered) it is ready to solder into the case. Below you can see the bar, the disks and a case ready to go together.

The disk (and base of the case) have tinning compound brushed on them and a small piece of solder (about 1/4" long) is snipped off a roll and dropped into the case. This will soft solder a reinforcement into the case as well as create a primer pocket that is going to be flush with the powder charge. It's a bit blurry in the picture below, but you can see the tinning compound liquid and the chunk of solder sitting in the bottom of the case on a vice.

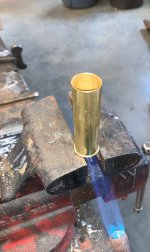
Using a fairly lazy flame and a plumbers torch (I am thinking about doing some kind of hot plate for the next batch) the base of the case is heated until the solder melts and flows between the case and the insert. Clean cases and fresh-machined brass take tin and solder brilliantly. By resting the case on vice jaws as below, the heat goes nicely right into the head.

Here the solder is melting and flowing in and around the case head, creating a solid brass base on the shell. Again, a lazy flame and careful application of heat and the thin walls of the case won't be negatively affected. You don't want to heat the case too hot.... red is bad! A lazy flame will work great. You can see the 'bubbles' of the tinning compound, despite the blurry photo.

After a short application of flame (no more than about 30 seconds) the solder melts, the tinning compound acid remnants 'rise' to the top and the solder flows nicely into the case base. The acid washes out with warm water and soap and a bit of Scotchbrite on a stick.

Next installment, I'll go into loading. The inside of the brass case is bigger than the inside of the plastic case. I considered using modern wads 'one size larger' but experimenting with this, I was concerned that they were too big for the forcing cones and chokes of the old guns. I tried 10 gauge wads in 12 gauge and 12 gauge in 16 ga. And both seemed too big to be safe in an old barrel.
So after much experimenting, I went with modern plastic wads in the 'standard' size (in this case, 16 ga), but used some fiber and card wads to supplement the plastic wads. More on this later. Also light powder charges and reasonable shot loads. No magnums here!
These are just the first 6 I knocked out for testing load in 16 gauge. They are for an old hammer gun that is still in proof (nitro proof) and will handle these loads fine. But has 2 1/2" chamber and there are simply no shells currently available to buy. They are made... but good luck finding any to purchase. So these first shells are to develop a load before I load up a bunch of shells.
FYI, I can convert about 150 cases in a day of turning, soldering and cleaning. And as they can be loaded many times, that's more than enough cases to have on hand for... a long time! It's a time investment that pays off long term.

The cases will have card wads over the shot and a bit of 'white glue' sealing them shut under their crimp. They pattern and shoot great. At least the 12 gauge shells I did last year do! These 16's are a work in progress. But they are perfect for 2 1/2" chambers as they don't have any 'crimp petals' to come out and raise pressures in the short chamber early guns.
For anyone who is cowboy or trench gun shooting.... or a vintage shotgun aficionado, perhaps this helps. It builds on the work of some folks at other forums. And I think the addition of a solid base makes these a much better shell. I'll have some load data, etc. next few weeks when I get enough shells converted to start loading a reasonable number at a sitting.
BTW, for those who are interested, dies for all brass shells are available at C4H... an amazing little company that makes THE most bizarre dies and shellholders. Husband and wife operation that is just fantastic to work with all the time. They make shotshell dies for brass-shells.
More to follow, but in case any of you vintage guys want to get your trench guns or cowboy guns shooting all-brass smokeless loads, this is how it starts.
So that's what I did in the machine shop today, if not the reloading room.
Cheers,
Sirhr
This led to some experimentation (with some input and cheerleading from @buffalowinter) and a process that seems to be working well for making up these shells. My first 'batch' I used on a quail hunt last fall. And they worked great. They performed as well as the factory rounds I brought, anyway. Both knocked down quail, pheasants and chukars! So, that test went great.
I post these here rather than in reloading because some of the folks with old trench guns may want to have an option for reloading the all-brass shells with something other than black powder. Cleaning a Model 97 of BP residue would suck more than cleaning an old SxS. And both have to be cleaned religiously immediately after firing BP cartridges. Red Dot is so much better! This is really a 'vintage' endeavor.
So first step is having MagTech all-brass shell casings. I have a good supply of 12 and 16 gauge available. They are loved by cowboy shooters and black-powder shooters as authentic-looking and reliable as well as simple to load. With Black powder.
The issue with these and smokeless shotshell powder is two-fold. First, they use a small rifle primer to fire. So you really need to get the powder 'around' the primer flash hole. The second issue is that because they are a pure extrusion, they have a 'hollow' base at the case rim, and the primer pocket protrudes inside the case about 0.100". This leaves a lot of powder 'below' the flash hole where I don't think it ignites properly. Not to mention the rim is, as a result, weak, compared to more modern shells. There is a very thin wall at the rim. Smokeless powder shells need a solid base at the case rim.
The solution is to cut brass disks and solder them into the base of these shells, strengthening the bottom and putting all the powder into the flame front area of the primer. Below, you can see the 'protruding' primer pocket. It sticks about 0.100" into the case.
So from a brass bar .750" in diameter, I cut disks that are about .650", which fit into the shell. They are drilled a bit over 1/4 inches and chamfered so they will fit over the primer pocket internally. They are just slightly undersized, allowing room for solder to flow and bond in the bases. Soft Solder has a massive holding power and while it has a low melting point, the firing of the shotshell will not put enough heat into the base to melt it.
Once each 'disk' is sliced off (and chamfered) it is ready to solder into the case. Below you can see the bar, the disks and a case ready to go together.
The disk (and base of the case) have tinning compound brushed on them and a small piece of solder (about 1/4" long) is snipped off a roll and dropped into the case. This will soft solder a reinforcement into the case as well as create a primer pocket that is going to be flush with the powder charge. It's a bit blurry in the picture below, but you can see the tinning compound liquid and the chunk of solder sitting in the bottom of the case on a vice.
Using a fairly lazy flame and a plumbers torch (I am thinking about doing some kind of hot plate for the next batch) the base of the case is heated until the solder melts and flows between the case and the insert. Clean cases and fresh-machined brass take tin and solder brilliantly. By resting the case on vice jaws as below, the heat goes nicely right into the head.
Here the solder is melting and flowing in and around the case head, creating a solid brass base on the shell. Again, a lazy flame and careful application of heat and the thin walls of the case won't be negatively affected. You don't want to heat the case too hot.... red is bad! A lazy flame will work great. You can see the 'bubbles' of the tinning compound, despite the blurry photo.
After a short application of flame (no more than about 30 seconds) the solder melts, the tinning compound acid remnants 'rise' to the top and the solder flows nicely into the case base. The acid washes out with warm water and soap and a bit of Scotchbrite on a stick.
Next installment, I'll go into loading. The inside of the brass case is bigger than the inside of the plastic case. I considered using modern wads 'one size larger' but experimenting with this, I was concerned that they were too big for the forcing cones and chokes of the old guns. I tried 10 gauge wads in 12 gauge and 12 gauge in 16 ga. And both seemed too big to be safe in an old barrel.
So after much experimenting, I went with modern plastic wads in the 'standard' size (in this case, 16 ga), but used some fiber and card wads to supplement the plastic wads. More on this later. Also light powder charges and reasonable shot loads. No magnums here!
These are just the first 6 I knocked out for testing load in 16 gauge. They are for an old hammer gun that is still in proof (nitro proof) and will handle these loads fine. But has 2 1/2" chamber and there are simply no shells currently available to buy. They are made... but good luck finding any to purchase. So these first shells are to develop a load before I load up a bunch of shells.
FYI, I can convert about 150 cases in a day of turning, soldering and cleaning. And as they can be loaded many times, that's more than enough cases to have on hand for... a long time! It's a time investment that pays off long term.
The cases will have card wads over the shot and a bit of 'white glue' sealing them shut under their crimp. They pattern and shoot great. At least the 12 gauge shells I did last year do! These 16's are a work in progress. But they are perfect for 2 1/2" chambers as they don't have any 'crimp petals' to come out and raise pressures in the short chamber early guns.
For anyone who is cowboy or trench gun shooting.... or a vintage shotgun aficionado, perhaps this helps. It builds on the work of some folks at other forums. And I think the addition of a solid base makes these a much better shell. I'll have some load data, etc. next few weeks when I get enough shells converted to start loading a reasonable number at a sitting.
BTW, for those who are interested, dies for all brass shells are available at C4H... an amazing little company that makes THE most bizarre dies and shellholders. Husband and wife operation that is just fantastic to work with all the time. They make shotshell dies for brass-shells.
More to follow, but in case any of you vintage guys want to get your trench guns or cowboy guns shooting all-brass smokeless loads, this is how it starts.
So that's what I did in the machine shop today, if not the reloading room.
Cheers,
Sirhr