• Watch Out for Scammers!

    We've now added a color code for all accounts. Orange accounts are new members, Blue are full members, and Green are Supporters. If you get a message about a sale from an orange account, make sure you pay attention before sending any money!

Gunsmithing Homemade Wood Stock Build

Got Diesel

Senior Member
Full Member
Minuteman
Aug 16, 2010
104
9
38
N. Kansas City, Mo
A little background… Last year I decided to tackle modifying the factory tupperware stocks on my three savages. I did this with the use of bondo and it worked pretty well. They were much more comfortable to shoot and have held up really well. Here is the one that I am replacing with the new stock.
IMG_0531.jpg

Well about two weeks ago I decided I would try my hand at making a stock exactly how I wanted it. I would do this out of cabinet grade birch plywood.

The first thing I did was draw out the template of how I wanted the stock to look. I drew this on three 8 1/2"X11" sheets of card stock taped together.
photo6.jpg

Next, cut that template out. This is what I traced onto my stock blank.
photo8.jpg

I had bought a 2'X4'X1/2" sheet of cabinet grade birch plywood. I new that I was going to need my blank to be 5" tall so I set the fence on the table saw and ripped that down. After that I applied Tightbond III to the four pieces of plywood and clamped them together. This made up my stock blank. I then traced my template onto it.
photo9.jpg

photo7.jpg

After that I cut a portion of the blank off to match the end of the buttstock. This just make the piece easier to work with. After that I used a jigsaw and cut out the thumb rest and hook on the butt stock.
photo10.jpg

I then used the drill press to drill the action bolts. I used these locations and a forstner bit and chisel to inlet the magazine box.
photo11.jpg

photo13.jpg

After that I did the same thing to inlet the recoil lug.
photo14.jpg

Once all that was done I used the table saw again to shape the buttstock.
photo1.jpg

url]

Next I used a 4 ½” grinder to start shaping the grip area, adding in the palm swell. I used a sanding disk for this. You need to be careful here cause it will remove a lot of material in a hurry. It is not final sanded and shaped yet. Just roughed in .
url]

url]

I then used a forstner bit and drill press again to inlet the trigger guard.
url]

That is as far as I have gotten with the project so far. Router bit for inletting the barrel channel and action should be here today. I will post more pics when I get done with more major steps.
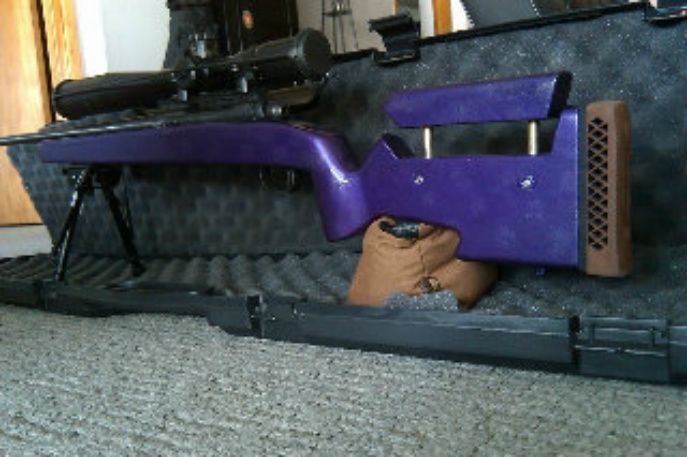
The stock will be painted when done. So if there are any spots that need touched up when all said and done it won't be a problem.

 
Re: Homemade Wood Stock Build

<div class="ubbcode-block"><div class="ubbcode-header">Originally Posted By: Got Diesel</div><div class="ubbcode-body">Thanks.
I don't know why the last four images aren't showing up. </div></div>Pretty sure you can only have 10 pics per post. You can post them right under your thread in a second post though
 
Re: Homemade Wood Stock Build

The router bit finally showed up so I was able to get some more accomplished on it last night.
Cutting the barrel channel and action inlet was easy. I used my router table and fence in order to accomplish this.
photo17.jpg

photo18.jpg

photo21.jpg

Next was inletting for the trigger. This for me with the way I did it was the worst part of the whole project thus far. This is because it’s not square. Using some forstner bits, dremel with sanding drum, and chisels I got it accomplished. Now that I have this one done I have figured out a better way to do it I believe. We will see with the next one.
photo20.jpg

photo19.jpg

I was able to close the bolt enough to ensure that the trigger moves as it’s supposed too and does not hang up.
In case anyone is wondering I left the hunk of wood on the in front of the trigger on so I would have a more stable work piece. It should be cut off tonight.
 
Re: Homemade Wood Stock Build

Great work! The best thing about making your own stocks from a blank is you'll want to do another, and each one gets better from the lessons learned on the last.
 
Re: Homemade Wood Stock Build

keep it coming i want so see more!! you are making me want to do a stock for my savage
 
Re: Homemade Wood Stock Build

I wish I had the time and tools to make my own stocks I would be a happy man
 
Re: Homemade Wood Stock Build

Thanks everyone. I will upload some more photos in the morning. Made some headway tonight. Got the forend cut down to size and the extra width on. I also finished up the magazine box inlet finished up. It's for a Savage centerfeed so I had to inlet for the magazine hold down. Feeds smooth as butter.

I also made my pillars for bedding. I'm hoping to get the action bedded tomorrow night after shaping the forend.

Thanks.
 
Re: Homemade Wood Stock Build

Last night I used a jigsaw to cut the rest of the forearm off. My blade was not cutting at a true 90 degrees to the side, so I cut it off my line and used a belt sander to bring it into the cut line.
photo28.jpg

I also made up my pillars for when I go to bed this. I started out with a 1” long 3/8” diameter with a ¼” hole specialty washer from Lowes. I chucked that up into the drill press and then used a grinder to cut in ridges.
photo27.jpg

I found out the night before I was going to have to router in a notch in the cheek piece in order to remove the bolt when the action was in the stock.
photo29.jpg

photo30.jpg

photo23.jpg

After looking at the photos on the computer I need to clean the lens on my phone off. Sorry about the grainy pictures.

I also did a little more shaping on the stock. I didn’t get pictures of that yet sorry. When I was finished working for the night I went ahead and glued the two side pieces to the forearm. I will get pictures on that tonight.
 
Re: Homemade Wood Stock Build

Last night I was able to shape the forearm a little. I still need to round the bottom a little more but it is getting much closer.
I used the same router bit I cut the inlet for the barrel and action with to shape the side panels on the forearm.
photo36.jpg

I also got some better pictures for you all outside. Let me know what you think.
photo31.jpg

photo32.jpg

photo38.jpg

photo37.jpg

Tonight I am planning on bedding the action.
 
Re: Homemade Wood Stock Build

That is a great lookin project. I would love to be able to do that. Can't wait to see the completed stock.
 
Re: Homemade Wood Stock Build

yea thats cool. where did u get the wood? and can u post a list of tools needed?
 
Re: Homemade Wood Stock Build

Not saying it will be a problem but I would worry about the strength of the stock at the wrist area. Probably not an issue in smaller calibers considering the number of laminations in the plywood you chose but in a larger caliber it might be. Just a random thought but it looks great!
 
Re: Homemade Wood Stock Build

<div class="ubbcode-block"><div class="ubbcode-header">Originally Posted By: Hookturnr</div><div class="ubbcode-body">Not saying it will be a problem but I would worry about the strength of the stock at the wrist area. Probably not an issue in smaller calibers considering the number of laminations in the plywood you chose but in a larger caliber it might be. Just a random thought but it looks great! </div></div>

Good point. OP, you might wanna drill into the bottom of the pistolgrip - say - .530", up into the "wrist", and epoxy in a 1/2" aluminum or steel rod...?

It would suck for the buttstock to break off.

That is really coming out nice. You're making this project look easy. I know, it's NOT!
 
Re: Homemade Wood Stock Build

Thanks for the thought. I did think of that originally that's one of the reasons that I chose to do the first one on my 223 Rem. If it ends up being a problem I was going to drill in from the action inlet through the pistol grip area into the the buttstock. I was then going to epoxy in a piece of all thread.
 
Re: Homemade Wood Stock Build

Last night the only work that I was able to get done on the stock was the start of the butt pad. I wanted to keep it as cheap as possible. I ended up using a cutting board which was purchased for $2.59 and a pair of black flip flops purchased for $2.50. The cutting board material was just so I had something hard essentially plastic so I could take it on and off if needed. I pretty much have a spacer system anytime I want this way.
For the padding itself I needed something that would hold up and that was soft. No so much for the recoil on this rifle but in the future on heavier recoiling calibers. I figured if a flip flop could hold up to 150-300 lbs walking around on it all summer and hold up it should work just fine.
I used my jig saw to cut both of these out. I stuck it in my vice upside down and essentially used it like a scroll saw.
This still needs some more shaping but it proves the point to myself that it will work. I will eventually epoxy the flip flop piece to the cutting board material and then paint it.
photo.jpg

Today I was able to sneak down stairs and bed the rifle. It’s still curing right now, I will pop it loose in the morning.
photo1-1.jpg

The front action bolt will be pillar bedded as you can see in the above picture. I did not pillar bed the rear in the conventional sense because of how the savage sear and centerfeed magazine system work on that rear action screw. So what I did was oversize the hole in the stock for the rear action screw and used the trigger guard to align everything thing using the bolt you can see. If it works out like I’m planning then the epoxy will flow and make its own pillar in the rear.
photo2-1.jpg

photo3-1.jpg

photo5-1.jpg

Thanks
 
Re: Homemade Wood Stock Build

Well Sunday morning first thing I was able to pop the action out of the stock and do some clean up on the bedding. Take in mind I was using a dremel with sanding drum. You will see a couple of scuffs in the bedding surface that from me getting carried away. It didn’t actually remove any material just scuffed a couple of spots.
Before clean up.
photo39.jpg

After clean up with magazine in the stock. There really is a front pillar in there too. They JB Weld I used to bed this is fluid enough that it just covered up the pillar by maybe .0005”.
photo41.jpg

photo40.jpg

I still have a little more clean up to do on it but not much. I will say the action is tight as a drum in the stock now. Before bedding I could feel the wood crush slightly as I would tighten the action bolts. Now not so much, it is solid in the front and rear both.
 
Re: Homemade Wood Stock Build

hey Diesel,
Did you use an off the shelf core box bit to inlett the action and barrel channel or did you get one custom made to size?

Jon
 
Re: Homemade Wood Stock Build

Off the shelf. Frued 18-130. It's an 1.25" Core Box Bit. I did have to open the action inlet just a touch more. I used a 1.25" wooden dowel rop with some 60 grit sandpaper wrapped around it. Thanks
 
Re: Homemade Wood Stock Build

I will take some more pictures and give more of an update later today.

I will say this. The stock is ready for paint. I am planing on shooting it this weekend first, then paint next week.
 
Re: Homemade Wood Stock Build

Excellent. I made a stock with my trainer in the same manner except I would determined to use nothing but hand tools. I did use a press for the initial holes but nothing but a planner and chisels after that. Definetly a labor of love because my pay would have been about $2 an hour.
 
Re: Homemade Wood Stock Build

Over the past few days I haven’t worked on the stock too much. I did finish up the butt bad. You can see how it turned out in this picture.
photo8-1.jpg

If you remember I used the same router bit for the barrel channel as I did for the action. That is a 1.25” diameter bit. All I needed for the barrel channel is around 1” so I added 5 layers of tape to the barrel to give me free float clearance. I used Bondo as my filler and it isn’t for strength or anything like that. You can see that in this picture.
photo10-1.jpg

There was a couple of voids from the plywood that needed filled so I went ahead and filled them with Bondo also. That the pink areas on the stock. It is pretty much sanded down and ready for paint and primer. I’m waiting till after this weekend when I can make it to the range first. Just making just sure there are no unexpected issues that come up.
Ready to go-
photo9-1.jpg

photo7-1.jpg

Let me know what you think. Thanks
 
Re: Homemade Wood Stock Build

That's badass! After seeing this thread and a couple others, I'm inspired to give building my own a couple tries before dropping $700 and waiting on a McMillan or Manners stock. For what I'll use it for the plywood would be just fine. I either have or have access to pretty much any woodworking tool I'd ever need.

On another note, I don't think you'll have any problem at all in the wrist area of the stock. The opposing grain directions of plywood and the multiple layers you use leave it without having a fracture line or a growth ring to give it a weak spot.

What does the stock weigh?
 
Re: Homemade Wood Stock Build

Looks good! Time to get some rounds down range!
 
Re: Homemade Wood Stock Build

I like building my own stuff...yeah, you can hire it done and yes it might look more finished but there is a certain amount of learning and sense of accomplishment when you do it yourself.

Good for you...looks like a great project!
 
Re: Homemade Wood Stock Build

The project has really been fun to work. Not difficult at all really. Just lots of measuring and thinking things thru before doing them. I did most of my inletting when I had square surfaces to work with which I think made it easier.

I'm not sure what the stock weighs, I know the gun as it sits in the picture right above weighs in at 13lbs on the bathroom scale. I will weigh the stock itself next time I pull the action from it.

Thanks for the replies.
 
Re: Homemade Wood Stock Build

I was able to get out and shoot a little today at 100 yds. The rifle shot great. Its usual .25 to .5 moa. That was with a terrible mirage. I will post some pics later today or tomorrow.
 
Re: Homemade Wood Stock Build

hey diesel how about some pictures of it all painted up
 
Re: Homemade Wood Stock Build

I haven't gotten it painted yet. Hoping to get that done tomorrow. Not sure what kind of pattern it will get yet. Any ideas?
 
Re: Homemade Wood Stock Build

Here are some group pictures from yesterday and today. I didn't get to do much shooting yesterday. That is a 5 shot group on one of the Snipershide targets. This was from yesterday.
photo11-2.jpg

Here are three targets from today. This one is the first 3 rounds out of it today.
photo13-1.jpg

This is the last 3
photo12-1.jpg


This one here is another 5 shot group with a different load. It is my reduced blue dot load, shooting a 40 gr V-Max. The others were a 68gr BTHP over 26 Gr of Varget.
photo14-1.jpg


The gun feels excellent to shoot. Extremely comfortable and stable. These were shot with bipod and rear bag.
 
Re: Homemade Wood Stock Build

i really like the gap camo or the vietnam camo. im about to paint mine and i think im going with the gap
 
Re: Homemade Wood Stock Build

Nice job on the stock, nice groups too.

do you have a thread or any photos of how you modified your old plastic stock, if you do id like to see. thanks
 
Re: Homemade Wood Stock Build

Thanks.

I do have some pics of that process somewhere. I will post some photos later today if I can find them. I will also add some photos of a couple of others that I did to the factory synthetic.

I'm planning on starting on two more of these wood stock builds next week. I think I will have a day off next week and am hoping to build two of these in one day. It will take a day of prep first, so I can build a couple more blanks. The next two will be for long actions. One centerfeed, and one staggerfeed.
 
Re: Homemade Wood Stock Build

Update-This weekend I was able to get some paint on this thing. Nothing special just a flat black with clear coat. I was just wanting to get it in something that way I wouldn't have to worry about unwanted moisture getting into the stock. I will post pics later tonight. Thanks
 
Re: Homemade Wood Stock Build

looks nice. i think a satin camo finish might hide the imperfections a little better. not saying it has any but u know what i mean
 
Re: Homemade Wood Stock Build

Very well done and documented! You've saved yourself several hundred dollars verses buying stocks new. Great job!
 
Re: Homemade Wood Stock Build

Thanks for the comments. Yep there are a few spots that would prolly look better with a camo. When it was just flat black before the clear it looked pretty good. The clear was a satin but made it pretty shiny, it shows a couple of spots that I missed with the filler.

Yes much cheaper than a Manners T4 which is what it was modeled after. It didn't turn out to bad for never even holding one just looking at pictures. Not the quality or durability of a Manners but it will work for me.
 
Re: Homemade Wood Stock Build

<div class="ubbcode-block"><div class="ubbcode-header">Originally Posted By: Hookturnr</div><div class="ubbcode-body">Not saying it will be a problem but I would worry about the strength of the stock at the wrist area. Probably not an issue in smaller calibers considering the number of laminations in the plywood you chose but in a larger caliber it might be. Just a random thought but it looks great! </div></div>

Not true.

I just completed this stock, four layers of 1/2" Okoume marine plywood, bonded with West System epoxy. This is the same stuff that multi-million dollar cold- molded yachts are built from (had some left over from a boat project). Just like welds are stronger than the steel they bond, same goes for properly done epoxy bonds. The wood will yield, before the bond.

In fact, plywood is far less likely to stress fracture than solid wood.

IMAG0694.jpg