• Watch Out for Scammers!

    We've now added a color code for all accounts. Orange accounts are new members, Blue are full members, and Green are Supporters. If you get a message about a sale from an orange account, make sure you pay attention before sending any money!

  • The site has been updated!

    If you notice any issues, please let us know below!

    VIEW THREAD

Gunsmithing DIY savage bolt lift kit...

Re: DIY savage bolt lift kit...

The issue with not either shimming the BAS rearward, or trimming the firing pin spring sleeve, is you are tensioning the spring more than you were before. I theorize this could change harmonics and therefore the accuracy of "your load", but have not found that to be the case with mine. Also, you should expect to wear your firing pin spring out sooner.
 
Re: DIY savage bolt lift kit...

Gotcha so I should go get some smaller diameter washers and put them in. Makes sense that the tensioning of the firing pin spring will be greater and I didn't even think about that putting enough stress on it to wear it before it's time. It might also help the lift on the cocked bolt if I back the BAS out a bit to offset the bearing. Thanks man!
 
Re: DIY savage bolt lift kit...

i did the 38/BB mod last night, i did not trim the cocking sleeve, i only noticed a slight improvement, but i already lapped the lugs and nitrided the action when i built it.. so it was already pretty smooth..
 
Re: DIY savage bolt lift kit...

from savage shooters forum...


[quote author=sharpshooter]
I promised myself I would not interfere anymore in these threds that seemed to have everybody worked up, but now I am going to intervene. It doesn't bother me that you want to tinker and make the world better, however your methods are what got me upset. I apologize for coming off unprofessional, but maybe the following will cast some light where I come from.
Your first idea was very questionable from a safety standpoint, and I am glad that you 86'd it. It raised more questions than answers. Your second idea is more favorable, but it is hardly fresh, as I devised the same thing as soon as the new cocking indicator models came out on the American Classics  2 years ago.
thrustbearing.jpg

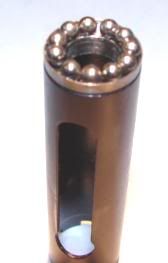
I never bothered posting a picture, frankly because not many were out yet and there was no immediate need. This version uses 11- 3/32" ball bearings in a custom made race.

You have created quite a stir amongst those who want to learn more about this and others who question what your role is. Your "testers" have no established protocol or scope of parameters to lend any credibility to what's going on. It's like the blind leading the blind. Like anything scientific, there are proper and accepted ways to experiment and collect data. I can see where you are lacking in this department and I have decided before this thing gets ugly, I will help you out.
In grade school we had science fairs that were based on experiments of the student's choice, but the format was always the same.This is how is was laid out:

1. OBJECTIVE: decribe what you are attempting to acheive.
2. HYPOTHESIS: decribe what you think will happen with limited observation.
3. METHODS: describe your methods for testing and the equipment you used.
4. RESULTS: report what actually happened supported with data.
5. SUMMARY: summarize the situation explaining why, or why not, the results were different than what was hypothesised.

Over the years I have gathered more than enough data for this, so I will lead by example.

<span style="color: navy">1. OBJECTIVE: to establish a way to reduce the cocking effort required to cycle/cock a Savage rifle by reducing friction.

HYPOTHESIS: by reducing the friction on the bolt assembly screw where it contacts the cocking sleeve on the periphery can reduce the amount of efforts needed to cock and close the bolt.

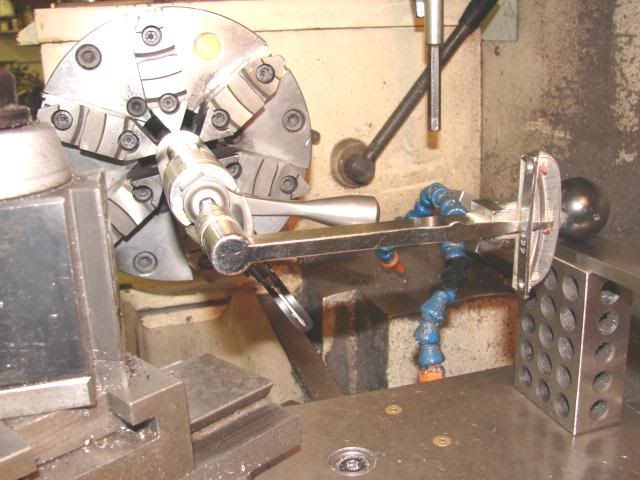
METHODS: I will use ball bearings as a means of friction reduction and will collect data using torque values gathered with a Sturtevant Richmont inch/lb beam style torque wrench, model M 50-1. To eliminate as much human error as possible, I will chuck the action in a lathe chuck and support the torque wrench with a solid support to get consistant reading.All tests will use a bolt assembly screw shortened the same amount of what the bearing will take up.
torktest.jpg

RESULTS: The data collected here was derived from 36 different actions representing a cross section obtained from specimens manufactured from approximately 1997 to 2008. These numbers represent the average of operations.

COCKING EFFORT: 22.30 in/lbs.
CLOSING EFFORT: 13.5 in/lbs.
OPENING EFFORT(already cocked): 17.9 in/lbs.
</span><span style="color: purple">notes: The hardest to cycle measured in @30 in/lbs, the esiest @ 18 in/lbs. I consider these to be the extreme, with most being in the 20 in/lbs range.</span>
The following data was collected from 1 speciman using the 2 types of bearings to reduce friction.

<span style="color: black">             Efforts involved in cycling operation
Observations made on a Savage model 116 serial# G893xxx
1.operation.  2.before mod(stock).  3.w/single centered ball bearing.  4.w/ thrust bearing. 5.Trued&timed w/no mod.  6.Trued&timed w/thrust bearing.  7.Trued &timed w/single centered ball bearing.</span>

<span style="color: red">1.                                   2.             3.            4.           5.          6.        7.</span>
cocking effort                   20 in/lbs.   18            19           14         13        12
closing effort                    16             14           15           10         8          8
re-open effort                   16            14            15           12         10        9

<span style="color: purple">SUMMARY: These tests conclude that a single centered ball bearing reduces more friction that multiple ball thrust bearing. Other factors besides friction affect the efforts of cycling due to the variant geometry of the various components of the fire control system. This test does not address the several other points of friction that also contribute to cycling efforts. The trued & timed action was included in this test to demonstrate the the consistancy of what a single centered ball would reduce in friction only. It appears through this test and many others that I have checked to reduce all the cycling efforts only by 2 in/lbs.</span>
This data was collected long before I publicly shared the idea of the ".38 case and ball bearing tip". Before that, I made the first ones turning a steel "case" and drilled it for a ball bearing. Although it was more precise, it did not work any better than an old .357 case cut down and a ball bearing expoxied in the primer pocket. It was alot less work, not to mention cheap. As far as shortening the bolt assembly screw, it is less work than fabricating a spacer of specific size, although the spacer will work.
These are my findings; like it or not, you don't have to take my word for it, so feel free to do what ever you want. It took quite some time for me to dig out all my notes and compile this, so I hope you appreciate it.

[/quote]
 
Re: DIY savage bolt lift kit...

<div class="ubbcode-block"><div class="ubbcode-header">Originally Posted By: strangedays</div><div class="ubbcode-body">So where can you order one of these setups? This should be a drop in part
smile.gif
</div></div>

Bolt Lift KitSmall disk and ball bearing design which prevents cocking piece from riding on bolt screw. $7.50 each

http://www.stockadegunstocks.com/accessories.html
 
Re: DIY savage bolt lift kit...

geez, do it yourself for under a dollar. even the thrust washer is only a few $$. and dont use a bb, its not as perfect as a bearing. read this thread for the thrust washer source, i think mcmaster/carr or grainger would do.

and just for the record, when i first installed this lift DIY lift kit, i didnt do anything. i just made it and dropped in in, i didnt trim the BAS at all. you will never lessen the felt resistance unless you do one of two things. correct me if i am wrong on this too. softer spring for less resistance or longer bolt handle for more leverage. dont want a weaker spring in there so...
 
Re: DIY savage bolt lift kit...

Not to restart an old thread, but just found this information and want to try my hand at it.

Where can these washers be located online? I ordered the Thrust Bearing online and am awaiting it's delivery, but I don't have a local place I trust to find the washers.

Thanks

<div class="ubbcode-block"><div class="ubbcode-header">Originally Posted By: AtOne</div><div class="ubbcode-body">Feeding the Zombie thread
wink.gif


I did the thrust bearing method and decided to post some pics while I went through it.

Picked up the thrust bearing from the link earlier to Avid and measured the thickness of it all
255t8g0.jpg


Then went down to Coast to Coast Hardware and picked up two 14ga. Machine bushing washers that measure 1/2" I.D x 7/8" O.D
Here's what their total thickness was
11hb628.jpg


Here's the complete package
6tfmfm.jpg


Took about 10 minutes total to use black Krylon Camo paint to put a few coats on the washers and used the hair dryer between and after the coats to speed up the drying time.
aywp37.jpg


Install the thrust washer set with the first plate having the groove facing up, then the bearing and finally the the last plate with the groove facing down towards the bearing.
e704rq.jpg


To put the BAS in I hold the bolt upright on a table while putting downwards pressure on the allen wrench and BAS and give it enough of a turn to catch the threads then its easy to finish up tightening the BAS. Here's what it looks like put together.
106y8wg.jpg


And the finished bolt lift installed
mrqxs5.jpg


Thanks again to everyone who's worked on the different options and to Axe for getting this going !


</div></div>
 
Re: DIY savage bolt lift kit...

<div class="ubbcode-block"><div class="ubbcode-header">Originally Posted By: Glockster35</div><div class="ubbcode-body">Not to restart an old thread, but just found this information and want to try my hand at it.

Where can these washers be located online? I ordered the Thrust Bearing online and am awaiting it's delivery, but I don't have a local place I trust to find the washers.

Thanks </div></div>

I bet you could find them in the bins at the Ace Hardware on US50 across from Gold Dust West. Or, Fastenal up on US50 and Deer Run.

If you want to try one of the 38 Special case head one's, I usually keep a few on hand.
 
Re: DIY savage bolt lift kit...

Had a guy at work mill me a spacer 1/2" I.D x 7/8" O.D x .1590. Am hoping this will get me where I need to be. If not he is willing to have another go at it.

Anyone done this particular mod and what are the results?
 
Re: DIY savage bolt lift kit...

<div class="ubbcode-block"><div class="ubbcode-header">Originally Posted By: jr81452</div><div class="ubbcode-body">oh and the mod that jumped you, that was good old Fred from SSS in all his self important glory. Disregard him, he has essentially turned SSF into his personal marketing tool and is a prick to boot. I have an action tuned by him (when I was new to savages and believed his hype), and several tuned by Kevin rayhill from Stockade. If you want to talk to someone who knows savages like he was born with one in his hand, and builds them like they were his invention, talk to Kevin. If you want to get half ass answers/service and the runaround from a self important, self proclaimed savage guru, go ahead and deal with Fred.

For all the Fred fans
The above post is my opinion based on my experiences, if you don't like it, call someone who cares. </div></div>
I second jr81452's opinion of Fred. I had him accurize and rebarrel a Savage 12 varmit. When I finally got it back after several missed deadlines it grouped much worse that it did with the factory barrel. I am talking 1-2 MOA 5 shot groups under the best of conditions with my best reloads and Federal GM match. This was verified by two other good rifle shooters shooting the gun with Federal GM ammo. I sent it back and not hearing anything for a couple off weeks I called to get an update (After about 20 unanswered calls). Lisa told me that Fred would have gone right out and shot it if I had sent the scope and ammo with the gun. I emailed her back to say that if that is the reason he will not test the rifle then I would send the scope and ammo. Lisa emailed back and acted insulted that I would suggest that the lack of my scope and ammo would be used as an excuse. I sent the scope and ammo to them. They recieved it three weeks and four days ago. Since that time I have emailed Lisa and called about 15 times. I get no answer.
 
Re: DIY savage bolt lift kit...

My part came in today from Avid Racing Concepts, lubed the Thrust bearing up with Slide Glide, dropped it in. Took a bit of tinkering to figure out what I needed to do, but once I figured it out, it was a done deal.

I must say, the difference is amazing. I can't wait to get out and shoot it.

Thanks for posting this Thread!
 
Re: DIY savage bolt lift kit...

Back from the dead thread!!!

I just did this mod. I ordered 2 different thrust bearing to make sure one of them fit. The one that fit was the 5x11x4. It really measures 5x11x4.5mm. I haven't built a washer for my BAS, but it works great so far. This replaced the Stockade kit that really didn't do too much. I also sanded and polished the bolt, handle, cocking ramp and used Tetra-Grease on all contact points as well as the thrust bearing and bearing surface area. This helped even more.

Thrust Bearing

This was on my 10 FCP HS 308.

Polishing Tips
 
Re: DIY savage bolt lift kit...

<div class="ubbcode-block"><div class="ubbcode-header">Originally Posted By: Delfuego</div><div class="ubbcode-body">Back from the dead thread!!!

I just did this mod. I ordered 2 different thrust bearing to make sure one of them fit. The one that fit was the 5x11x4. It really measures 5x11x4.5mm. I haven't built a washer for my BAS, but it works great so far. This replaced the Stockade kit that really didn't do too much. I also sanded and polished the bolt, handle, cocking ramp and used Tetra-Grease on all contact points as well as the thrust bearing and bearing surface area. This helped even more.

Thrust Bearing

This was on my 10 FCP HS 308.

Polishing Tips

Tag

</div></div>
 
Re: DIY savage bolt lift kit...

I have the Savage 110 FCP-k and I installed the RC Thrust Bearing. It was surprisingly simple. All I changed was I turned down the chamber indicator from .245 to .190 and it works great! I didn't have to install any washers or trim down the BAS at all. This was such a cheap and easy upgrade!
 
Re: DIY savage bolt lift kit...

<div class="ubbcode-block"><div class="ubbcode-header">Originally Posted By: skyfox</div><div class="ubbcode-body">I didn't have to install any washers or trim down the BAS at all. </div></div>

By not putting in a washer or trimming you are compressing the firing pin spring. This will lead to problems down the road.
 
Re: DIY savage bolt lift kit...

<div class="ubbcode-block"><div class="ubbcode-header">Originally Posted By: SmokinAce</div><div class="ubbcode-body"><div class="ubbcode-block"><div class="ubbcode-header">Originally Posted By: skyfox</div><div class="ubbcode-body">I didn't have to install any washers or trim down the BAS at all. </div></div>

By not putting in a washer or trimming you are compressing the firing pin spring. This will lead to problems down the road. </div></div>

Isn't the firing pin spring already compressed?
 
Re: DIY savage bolt lift kit...

i never used a spacer. the head of the case wasnt enough for me to worry about compensating for. but you thrust bearing guys may be adding more than that. try the bearing plate and only one washer and have the bearings ride on the BAS if thats possible. you are compressing the firing spring and its already compressed, you are just doing it more. will it be an is is the question


washers and shims come in all sizes at the hardware store. go dig around guys, thats half the fun


and dont worry about digging this up. i wish we could get it pinned or just keep popping it up for the new savage members/owners to see
 
Re: DIY savage bolt lift kit...

i had recently done a similar mod to reduce my bolt lift. i opted away from the thrust bearing idea as it should have increased friction than when compared to single ball bearing. i also did not lock the ball bearing in the primer pocket but allow it to sit free in a pool of moly engine lube with graphite. i did not feel much if any difference. i still have all surfaces to polish minus the bas base. can one use some sort of lapping compound or similar paste and continue to cycle the action? how else do other polish the remaining surfaces that come in contact from cocking?
i also removed material from the cocking ramp on the inside to reduce friction and all my efforts thus far have been questioned. i will try and polish the remaining surfaces and clean up the peak in the cocking slop before it slides into the detent spot. it feels like most the friction comes from the top before it locks the firing pin?
any advice is welcome.
 
Re: DIY savage bolt lift kit...

I just did the thrust bearing mod to my rifle, and ran my first comp. Man what a difference! Just comparing it to my wife's rifle you could feel a bit of difference, but when the clock was ticking it made for a drastic improvement!
 
Re: DIY savage bolt lift kit...

<div class="ubbcode-block"><div class="ubbcode-header">Originally Posted By: billyburl2</div><div class="ubbcode-body">.</div></div>
what method did you use to polish your surfaces that matter when cocking the rifle?

i also think i need to compare mine with another that has few round shot; maybe its not as bad as i think it is. i was expecting to be able to lift with a couple pounds of pressure to cock the firing pin. this is just not the case.
 
Re: DIY savage bolt lift kit...

So who can I buy the single ball bearing mod from? I will actually pay someone to put one together and ship it to me, I would do it except I don't have the time which is bad because I am actually a Diesel Mechanic. If someone has the mod with spacer they would sell shoot me a message. Thanks.
 
Re: DIY savage bolt lift kit...

<div class="ubbcode-block"><div class="ubbcode-header">Originally Posted By: logic factory</div><div class="ubbcode-body"><div class="ubbcode-block"><div class="ubbcode-header">Originally Posted By: billyburl2</div><div class="ubbcode-body">.</div></div>
what method did you use to polish your surfaces that matter when cocking the rifle?

i also think i need to compare mine with another that has few round shot; maybe its not as bad as i think it is. i was expecting to be able to lift with a couple pounds of pressure to cock the firing pin. this is just not the case. </div></div>
I have not polished any of the surfaces, other than running 1200 rounds through this rifle before I tried this mod.
 
Re: DIY savage bolt lift kit...

<div class="ubbcode-block"><div class="ubbcode-header">Originally Posted By: Err</div><div class="ubbcode-body">.</div></div>
i actually bought extra ball bearings for just this purpose.
i will assemble one in the next two days and send a pm asking for your address only when i have finished. do not worry about the cost, i would not sleep at night charging someone for this.
 
Re: DIY savage bolt lift kit...

<div class="ubbcode-block"><div class="ubbcode-header">Originally Posted By: billyburl2</div><div class="ubbcode-body">.</div></div>
understood. i will spend some more time cycling the weapon and also cleaning up some the surfaces i can feel that are rougher.
thank you.
 
Re: DIY savage bolt lift kit...

<div class="ubbcode-block"><div class="ubbcode-header">Originally Posted By: logic factory</div><div class="ubbcode-body"><div class="ubbcode-block"><div class="ubbcode-header">Originally Posted By: Err</div><div class="ubbcode-body">.</div></div>
i actually bought extra ball bearings for just this purpose.
i will assemble one in the next two days and send a pm asking for your address only when i have finished. do not worry about the cost, i would not sleep at night charging someone for this.
</div></div>

I really appreciate this. I would more than happy to throw ya a little at least to cover postage. Thanks.
 
Re: DIY savage bolt lift kit...

i used 600 grit grey wet/dry to polish the bolt area shown on that link. if you go 800 or 1000 even better but the 600 is enough. i emailed the guy that wrote the article and 600 is what he used. i polished the face of the BAS by using the 600 on a piece of glass as a base. i figured the glass was as flat as i could get and it shined up really nice
 
Re: DIY savage bolt lift kit...

Jeezus...
Read all four pages of this thread, and I've never been so fucking confused in my life...

Single ball bearing...
Thrust bearing...
Trim the big ass screw...
Don't trim the big ass screw...
Single ball bearing causes wear of the big ass screw...

Now, after looking at the engineering study done above, it seems that the single, centered ball bearing is the top dog.

But, it did not address whether any other mods- like trimming the BAS- were necessary...

Was there ever a consensus on this that I missed in the aforementioned four pages?
 
Re: DIY savage bolt lift kit...

well when i did this, i didnt trim. look at the small addition to the compression of the firing pin spring due to the rim and bearing thickness and i took a gamble and didnt trim the Big Ass Screw. i did polish the base of the BAS with the same 600 grit i used to polish the contact places on the body of the bolt. i used a piece of glass and set the 600 on it to have a flat surface.

polishing the body of the bolt and the bearing will work just fine. the thrust washer was used due to the cocking indicator being added to the bolt and the center of the BAS being opened up to allow the indicator to protrude thru.

use washers if you want to compensate for the lift kit and dont want to trim the BAS. and if a single bearing causes wear, trimming wont make a difference. the BAS isnt that expensive if it is and once i get to 500 or 1000 rounds on the modification, ill take it apart and see what the wear on the BAS is

make sense?
 
Re: DIY savage bolt lift kit...

<div class="ubbcode-block"><div class="ubbcode-header">Originally Posted By: Wannashootit</div><div class="ubbcode-body">Jeezus...
Read all four pages of this thread, and I've never been so fucking confused in my life...

Single ball bearing...
Thrust bearing...
Trim the big ass screw...
Don't trim the big ass screw...
Single ball bearing causes wear of the big ass screw...

Now, after looking at the engineering study done above, it seems that the single, centered ball bearing is the top dog.

But, it did not address whether any other mods- like trimming the BAS- were necessary...

Was there ever a consensus on this that I missed in the aforementioned four pages?</div></div>

trim or shim the BAS.. both work and should be done to keep it all in spec...
 
Re: DIY savage bolt lift kit...

I thought this was an interesting idea, but after thinking it through, and dusting off some Engineering text books, I am wondering if it makes sense. The friction force is proportional to the perpendicular force between the surfaces and the coefficient of friction. In layman's terms, it doesn't matter what the surface area is, just the force.

So whether you have a circular contact area from the cocking ring or a point contact area from a ball bearing, the force against the Bolt Assembly Screw from the cocking sleeve due to the spring is the same. With a ball bearing the contact area is smaller, but the pressure is higher, but the force is the same. Still, this modification seems to help, which made me wonder why it works, when it seems like it shouldn't matter.

My thought is that it isn't that the ball bearing is smaller than matters, its that it has a smaller coefficient friction than the cocking sleeve (harder material?, smoother?). This would suggest that you could simply place a polished hardened steel disk between the cocking sleeve and the BAS and achieve the same effect, without having to put a thick piece of material between the cocking sleeve and the BAS. I think I will give it a try.
 
Re: DIY savage bolt lift kit...

I used the thrust bearing and spacer system that dolomite took pictures of (thanks for those dolomite). After putting it all back together I test fired a primer and the firing pin indented the primer a lot deeper than when I fired live rounds before the lift kit. Should I be concerned or is that normal?
 
Re: DIY savage bolt lift kit...

Check your firing pin protrusion. Protrusion is adjusted at the front of the firing pin. If u didnt touch it, then it didnt change. So unless it changed or you increased spring pressure everything should be the same. However primer strikes on an empty cartridge could be the issue. Ive never had this problem
 
Re: DIY savage bolt lift kit...

Thanks Rhenerie, I didn't adjust anything with the firing pin so I'm taking it to the range to live fire. I'm thinking the deep primer strike is just because it was with an empty case. With no pressure from powder igniting maybe there is less resistance for the firing pin while impacting the primer. Just a thought. I'll update after live firing.
 
Re: DIY savage bolt lift kit...

I test fired live rounds and the primers are fine. The deep firing pin divot on the empty case wasn't because of the bolt lift. Thanks for the advice and the steps to make this build. I like my savage even more now.
 
Re: DIY savage bolt lift kit...

Has anyone tried one of these instead of the less expensive version (Part# 6655K11) on the same page:

High-Performance Steel Thrust Ball Bearings
http://www.mcmaster.com/#catalog/118/1152/=khwsu2
Part# 7806K55

Th HP version seems to be a little thinner and looks like they are encased so should spin easier.

Thoughts?
 
Re: DIY savage bolt lift kit...

Trim or shim....otherwise, you increase the spring rate a touch.

Instead of a ball bearing, you can also use a 1/8" threaded set screw. But, adds expense if you do not already own the appropriate drill bit and tap to thread the case head. DOES allow you to set the exact amount of protrusion though.
 
Re: DIY savage bolt lift kit...

tried the case and ball bearing today. I noticed zero difference. what else are you guys polishing?
 
Re: DIY savage bolt lift kit...

<div class="ubbcode-block"><div class="ubbcode-header">Originally Posted By: TobyLazur</div><div class="ubbcode-body">tried the case and ball bearing today. I noticed zero difference. what else are you guys polishing? </div></div>

Did you trim or shim the BAS?

Polish the cocking ramp.

Check to make sure the cocking sleeve is round and not dragging inside the bolt body.

Install a longer handle. Gives you more leverage.

The best thing to loosen up a Savage is to fire several hundred rounds.
 
Re: DIY savage bolt lift kit...

<div class="ubbcode-block"><div class="ubbcode-header">Originally Posted By: geargrinder</div><div class="ubbcode-body"><div class="ubbcode-block"><div class="ubbcode-header">Originally Posted By: TobyLazur</div><div class="ubbcode-body">tried the case and ball bearing today. I noticed zero difference. what else are you guys polishing? </div></div>

Did you trim or shim the BAS?

Polish the cocking ramp.

Check to make sure the cocking sleeve is round and not dragging inside the bolt body.

Install a longer handle. Gives you more leverage.

The best thing to loosen up a Savage is to fire several hundred rounds. </div></div>

I left a gap between the screw and the bolt because I haven't had time to turn a shim. I made sure there was plenty of lube on everything, polished the face of the BAS, and only noticed the tiniest of differences.
 
Re: DIY savage bolt lift kit...

You left your BAS loose? It needs to be tight to hold the handle on. If it's tight and you didn't trim it or shim it, you added more preload on the firing pin spring and you won't see much difference.

You've got to do everything, and you have to do it right to see a difference.
 
Re: DIY savage bolt lift kit...

having the BAS loose doesn't effect the bolt handle when lifting and closing the bolt. I also noticed that I have to put significant pressure on the BAS to get the first few threads started. I don't think I saw anyone else mention this.
 
Re: DIY savage bolt lift kit...

<div class="ubbcode-block"><div class="ubbcode-header">Originally Posted By: TobyLazur</div><div class="ubbcode-body">having the BAS loose doesn't effect the bolt handle when lifting and closing the bolt. I also noticed that I have to put significant pressure on the BAS to get the first few threads started. I don't think I saw anyone else mention this. </div></div>

So you're saying it's a good idea to have a loose BAS and handle?

The two ears on the bolt body are not very long. The BAS doesn't have to back off very far for them to loose engagement with the bolt handle. The BAS needs to be tight, against a shim or the bolt handle.

The significant pressure is coming from the firing pin spring. That's the force the bolt lift kit is trying to overcome. You can start the BAS with the firing pin uncocked and then cock the firing pin after you have a couple threads engaged.
 
Re: DIY savage bolt lift kit...

You guys want to change your bolt lift? Open your bolt assembly and back of the spring tension from the cocking sleave end of the firing pin assembly. Just a few turns makes a difference. If you feel froggy back it of untill you get FTF from light primer strikes then crank it back in a smidgen. You just need enough travel for the firing pin to accelerate to the point of impact with the primer. Now go play with your Savages.
 
Re: DIY savage bolt lift kit...

<div class="ubbcode-block"><div class="ubbcode-header">Originally Posted By: geargrinder</div><div class="ubbcode-body"><div class="ubbcode-block"><div class="ubbcode-header">Originally Posted By: TobyLazur</div><div class="ubbcode-body">having the BAS loose doesn't effect the bolt handle when lifting and closing the bolt. I also noticed that I have to put significant pressure on the BAS to get the first few threads started. I don't think I saw anyone else mention this. </div></div>

So you're saying it's a good idea to have a loose BAS and handle?

The two ears on the bolt body are not very long. The BAS doesn't have to back off very far for them to loose engagement with the bolt handle. The BAS needs to be tight, against a shim or the bolt handle.

The significant pressure is coming from the firing pin spring. That's the force the bolt lift kit is trying to overcome. You can start the BAS with the firing pin uncocked and then cock the firing pin after you have a couple threads engaged. </div></div>

no, that's not what I'm saying at all. leaving the BAS loose shouldn't matter when I'm just lifting the bolt on my bench. I'm not runing the bolt like that.
 
Re: DIY savage bolt lift kit...

I just found this forum because of this thread. After looking through the whole thing, I decided that I'm going to try both the 38-single bearing and the thrust bearing and see which works best for me. I've seen people asking where to get the bearings, I found the 5/32s here http://www.vxb.com/page/bearings/PROD/Kit8590 and the thrust bearing here http://www.vxb.com/Merchant2/merchant.mvc? . I realize that the 5/32s are in a pack of 100 but for people that don't have access to anyplace with singles they are pretty cheap. I also ordered an extra BAS from http://www.gunpartscorp.com/ as I plan on trimming it rather than use a spacer. Hope this helps people find the bearings.